


Help and Support
Service Manual
10030881 Rev. B 12-2008
139
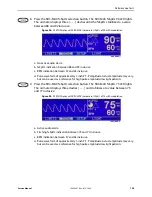
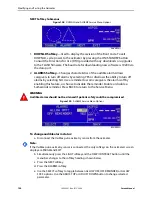
4. From page (2 / 2) of the HELP MAIN window, press ADJUST DOWN to select
PRDELAY and then press SHOW. The HELP PRDELAY window appears.The
SatSeconds help topic contains a total of two (2) consecutive help windows. Press
the NEXT softkey to scroll through each window of the selected help topic for the
following information:
“Pulse Rate Alarm Delay can reduce alarms reported for brief pulse rate limit
violations. The Pulse Rate Alarm Delay can be set to 5 or 10 seconds, or OFF.”
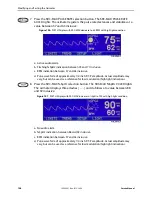
5. From page (2 / 2) of the HELP MAIN window, press ADJUST DOWN to select
SATSECONDS and then press SHOW. The HELP SATSECONDS window appears.The
SatSeconds help topic contains a total of six (6) consecutive help windows. Press
the NEXT softkey to scroll through each window of the selected help topic for the
following information:
“SatSeconds can reduce alarms reported for mild or brief SpO2 limit violations.
Each SpO2 violation can be described as a product of magnitude (number of
percentage points of the SpO2 value falls outside the limit) and time (the number
of seconds the SpO2 the value remains outside the limit). The SatSeconds limit
sets the minimum value the SatSeconds must reach before an alarm is reported.
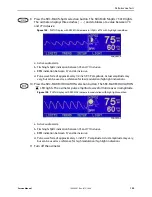
For example: if the SpO2 lower alarm limit is 90 and the measured SpO2 value is
88, the resulting value is 2 after one second, 4 after two seconds, and so on. If the
SatSeconds limit is set to 10, an alarm is reported after five seconds. To adjust the
SatSeconds limit, press LIMITS.”
6. Press the BACK softkey at any juncture to review the previous window(s).
Continue to press BACK to return to the HELP MAIN window.
7. Press EXIT to return to the oximeter’s Main menu.
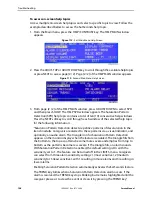
To access a single help topic
Access single on-screen help topics by pressing the HELP/CONTRAST softkey from a
submenu. As an example, this procedure provides direction for accessing help
information on the SatSeconds feature.
1. Press LIMITS on the oximeter Main menu and then SELECT to highlight SAT-S
(SatSeconds).
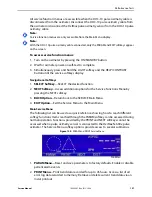
2. Press the HELP/CONTRAST softkey. The HELP LIMITS window appears.
Figure 114.
Limits Help Screen Main Menu
3. Press ADJUST UP or ADJUST DOWN to highlight an available help topic (SELECT,
NEO and ADULT). For this example, highlight SELECT.
To Purchase, Visit
Summary of Contents for OXIMAX N-600X Series
Page 8: ...viii 10030881 Rev B 12 2008 Service Manual...
Page 12: ...Safety Information 12 10030881 Rev B 12 2008 Service Manual...
Page 44: ...Theory of Operations 44 10030881 Rev B 12 2008 Service Manual...
Page 96: ...Managing the Data Port 96 10030881 Rev B 12 2008 Service Manual...
Page 188: ...Oximeter Schematics 188 10030881 Rev B 12 2008 Service Manual Main PCB Schematic Sheet 1 of 13...
Page 189: ...Service Manual 10030881 Rev B 12 2008 189 Main PCB Schematic Sheet 2 of 13...
Page 191: ...Service Manual 10030881 Rev B 12 2008 191 Main PCB Schematic Sheet 4 of 13...
Page 192: ...Oximeter Schematics 192 10030881 Rev B 12 2008 Service Manual Main PCB Schematic Sheet 5 of 13...
Page 194: ...Oximeter Schematics 194 10030881 Rev B 12 2008 Service Manual Main PCB Schematic Sheet 7 of 13...
Page 195: ...Service Manual 10030881 Rev B 12 2008 195 Main PCB Schematic Sheet 8 of 13...
Page 197: ...Service Manual 10030881 Rev B 12 2008 197 Main PCB Schematic Sheet 10 of 13...
Page 200: ...Service Manual 10030881 Rev B 12 2008 200 Main PCB Schematic Sheet 13 of 13...
Page 201: ...Service Manual 10030881 Rev B 12 2008 201 Main PCB Assembly Drawing Front View...
Page 204: ...Oximeter Schematics 204 10030881 Rev B 12 2008 Service Manual...
Page 209: ......