background image


 5-20   Installing Options

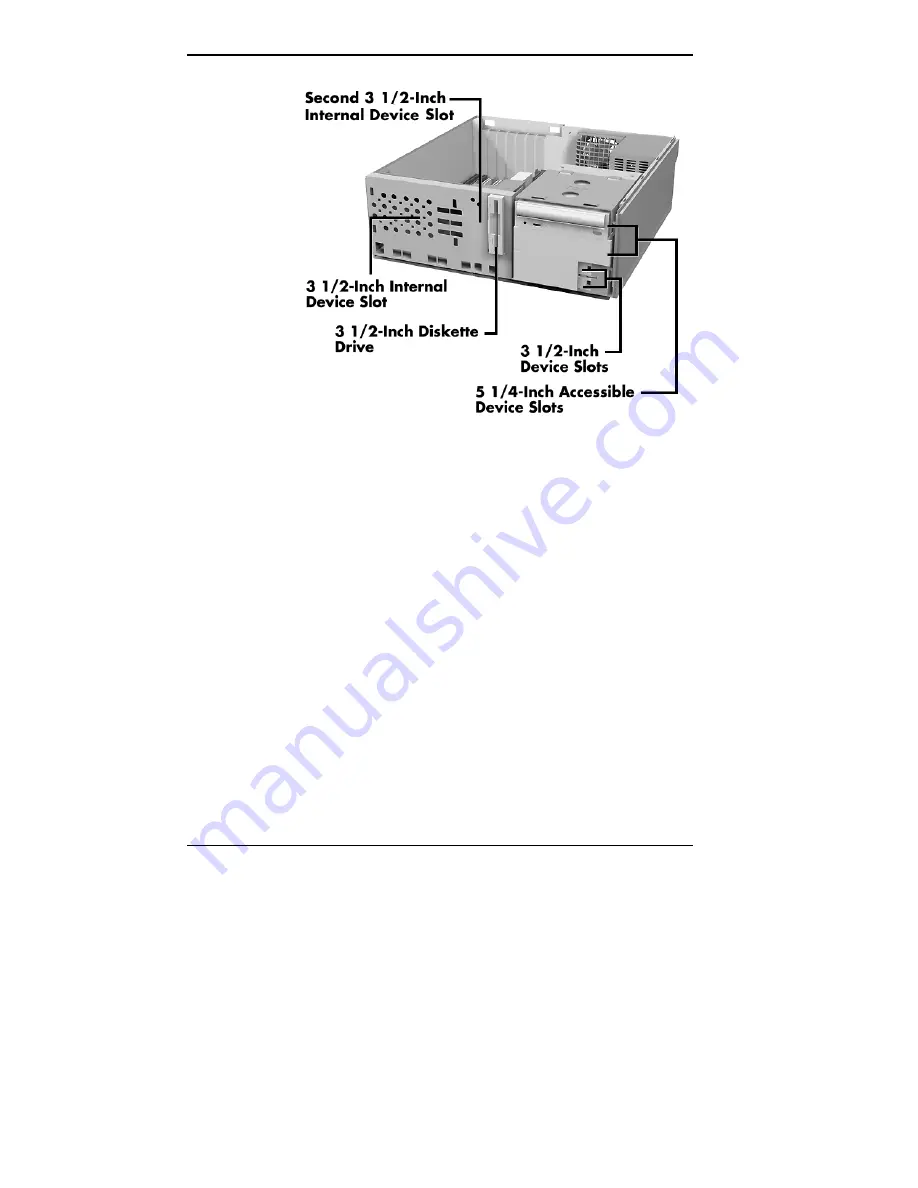
 Locating device slots

Preparing the Device

 Before installing a storage device in the system, follow any
preinstallation instructions that come with the device. For
example, check the following:

„

IDE device

  

check the jumper settings on the device

before installing it. See the documentation that comes
with the device for jumper setting information.

 

An IDE device, such as an IDE hard disk or IDE
CD-ROM reader, must be set correctly as the first
(master) or second (slave) device on the IDE
channel.


Summary of Contents for PowerMate SPB-Boston

Page 1: ...s of the Warranty Statement accompanying each product However actual performance of each such product is dependent upon factors such as system configuration customer data and operator control Since im...

Page 2: ...ectors 1 9 Power Supply Features 1 12 Zip Drive 1 12 Speakers 1 14 Mouse 1 14 2 Using Your Computer System Operation 2 1 Starting Up 2 2 Shutting Down 2 3 Setting the Date and Time 2 4 Using Diskettes...

Page 3: ...res Standard Features 3 1 System Chassis 3 2 System Board Components 3 2 Processor 3 2 Drive Interfaces 3 2 Ports 3 3 System Memory 3 3 Intel Xcelerator Multifunction Controller 3 3 Flash ROM 3 3 Plug...

Page 4: ...on Submenu 4 15 Resource Configuration Submenu 4 15 Security Menu 4 17 How to Set a Password 4 18 How to Disable Password Protection 4 19 Power Menu 4 20 Boot Menu 4 22 Hard Drive Submenu 4 24 Removab...

Page 5: ...age Devices 5 27 Removing the Front Panel 5 28 Installing a 3 1 2 Inch Device 5 29 Installing the 5 1 4 Inch Device 5 34 Accessing the CD ROM Reader DVD Drive 5 36 Replacing the Front Panel 5 36 Exter...

Page 6: ...D Technical Support 8 9 NECCSD Warranty Non Warranty Repair Service 8 10 Battery Replacement 8 10 A Setting Up a Healthy Work Environment Making Your Computer Work for You A 1 Arrange Your Equipment A...

Page 7: ...eyboard and Mouse B 10 Interrupt Requests IRQs B 11 Audio Support B 12 Crystal Audio Subsystem B 12 Wavetable Synthesizer B 12 Audio Connectors B 12 CD ROM Audio Connector B 12 Expansion Slots B 13 BI...

Page 8: ...mory Configurations 5 15 System Board Jumper Settings 6 2 Acceptable DIMM Options B 3 Sample Memory Configurations B 4 Interrupt Assignments B 11 Input Requirements B 13 Output DC Load Requirements B...

Page 9: ...ovides a quick overview of the various features of your system Chapter 4 System BIOS and Utilities describes the system BIOS Setup utility program and other utilities you can use to configure your sys...

Page 10: ...your computer to reduce your risk of developing nerve muscle or tendon disorders WARNING Prolonged or improper use of a computer workstation may pose a risk of serious injury To reduce your risk of in...

Page 11: ...ous personal injury or loss of life CAUTION Cautions indicate situations that can damage the hardware or software NOTE Notes give important information about the material being described Names of keyb...

Page 12: ...k of injury associated with using a computer Your system ships with additional documentation depending on your configuration and any options you selected See the documentation specific to devices such...

Page 13: ...D and its products directly to a fax machine The service is available 24 hours a day 7 days a week With FaxFlash you can obtain product literature and technical information bulletins By using FaxFlash...

Page 14: ...art high performance components for delivering years of service Based on an Intel Pentium II processor with MMX technology your system has the power and speed to tackle all today s computing needs an...

Page 15: ...ing Your Computer FRONT FEATURES Daily contact with your system is through the controls on the front panel The following figures show the control features on the front of the system Front features des...

Page 16: ...tem controls let you select specific system operations the lamps let you know the status of system operation Your computer has the following controls and lamps Power button Turns the system on and off...

Page 17: ...ive reading or writing data CAUTION Do not turn off the system unless absolutely necessary while the disk lamp is lit To do so can damage your hard disk or data Diskette Drive A Your diskette drive ha...

Page 18: ...CD ROM reader or a DVD drive The CD ROM reader DVD drive operates at different speeds depending on whether the CD you are using contains data or music High speed operation lets you get your data fast...

Page 19: ...tray Press this button when the computer power is on to insert or remove a CD CD tray Provides a surface for loading a CD into the reader Press the open close button to open or close the CD tray CD bu...

Page 20: ...RES Setting up your system is mainly done through external connectors on the back of the computer The following figures show these connectors Note that the minitower and desktop models differ only in...

Page 21: ...1 8 Introducing Your Computer Audio connectors desktop models Rear features minitower models...

Page 22: ...might have additional boards not shown in the previous figures Boards and board locations vary depending on the model and options you purchased Keyboard port Connect the keyboard that comes with your...

Page 23: ...5 Mbps for mice and keyboards You can daisy chain up to 127 devices using USB ports Audio connectors The audio connectors include line out line in and microphone in jacks and a MIDI game port The lin...

Page 24: ...rface for graphics intensive applications such as 3D applications SCSI port SCSI models only This port is on the SCSI adapter board that comes installed in an expansion slot on SCSI models The Wide SC...

Page 25: ...our area Most wall outlets in the United States and Canada are 115 volts ZIP DRIVE Some models come with an Iomega Zip drive The Zip drive lets you expand the storage capacity of your hard disk quickl...

Page 26: ...Introducing Your Computer 1 13 CAUTION To prevent damage to your Zip drive and data do not turn off the system or remove a Zip disk while the data lamp is lit Zip drive features on Zip models only...

Page 27: ...comes with your speakers to set them up and to adjust sound See Back Features earlier in this chapter to locate audio connectors and for a description of the connectors MOUSE In addition to the right...

Page 28: ...mentation NOTE Check the additional documentation that comes with your computer for information about using your monitor speakers graphics board and any other devices that you purchased such as a fax...

Page 29: ...ince the last startup One beep indicates that the system has successfully completed the power on test NOTE You can bypass the POST memory test by pressing the space bar If a problem occurs a series of...

Page 30: ...es that the drive is in use CAUTION To protect the integrity of your data shut down all applications before turning off the power Unless absolutely necessary never power off the system without exiting...

Page 31: ...by entering the current hour minutes and seconds in the appropriate fields hh mm ss Move from field to field with the Tab key or Shift tab to move from right to left 3 Set the date by entering the mo...

Page 32: ...lications To remove a diskette from the diskette drive press the release button on the 3 5 inch diskette drive Do not remove a diskette from the drive when the diskette drive lamp is lit To do so can...

Page 33: ...he surfaces of the disc Handle it by the edges and if necessary by putting your finger through the hole Handling a CD Do not write on or apply labels to either side of the disc Keep the disc away from...

Page 34: ...sert a CD into the CD ROM reader DVD drive follow these steps 1 Press the open close button A CD tray slides out from the reader drive 2 Remove the CD from its protective case Hold the CD by its cente...

Page 35: ...all the functionality required for your multimedia applications Setting Power Management Your system provides an energy saving Advanced Power Management feature which reduces power consumption when yo...

Page 36: ...isor password Dual password security provides two levels of password security A Supervisor password allows access to the system s Setup utility for system configuration A User password allows system b...

Page 37: ...press Enter Passwords are not case sensitive Reenter your password and press Enter again 6 Use the arrow keys to select Exit 7 Select Exit Saving Changes Press Enter 8 At the prompt to confirm exiting...

Page 38: ...can save you time in the end By doing so you can avoid losing a whole day s work or more when the unexpected happens such as losing power due to a power outage Some applications provide automatic save...

Page 39: ...pying diskettes Use your Zip drive or Ditto tape backup unit if installed to back up your files Printing a Document Before you can print out a document you must connect a printer to your computer set...

Page 40: ...following procedure describes how to load video drivers to change the properties of your display The display properties that you can set include the screen resolution the number of colors displayed an...

Page 41: ...vary slightly from the one shown Display Properties Window NOTE Both the screen resolution and the color palette were set at the factory for optimum performance Before you change these settings be su...

Page 42: ...omputer built for heavy use With protective measures and proper care you can prevent problems and promote the successful operation and long life span of your computer Protecting Your System from Damag...

Page 43: ...ripherals Use Setup options to limit access to your computer see Security Menu in Chapter 4 Use appropriate virus detection software regularly to protect your system from computer viruses Keep your co...

Page 44: ...o not use any liquid cleaners on the keyboard as they can damage the keyboard If an object such as a paper clip falls into the keyboard turn the keyboard over and gently shake it Clean the monitor scr...

Page 45: ...omponents in the original shipping materials and cartons If these are not available be sure to use adequate packing materials to protect the components ONLINE DOCUMENTATION Most of your application pr...

Page 46: ...nstalling Options Understanding power management Power Saving Feature Chapter 3 and Power Menu Chapter 4 Accessing the World Wide Web Microsoft Internet Explorer under Programs in the Start menu Prote...

Page 47: ...EATURES All models come with the following features 3 5 inch 1 44 MB diskette drive Memory 32 to 384 MB of Synchronized Dynamic Random Access Memory SDRAM using Dual In line Memory Modules DIMMs A har...

Page 48: ...ard power supply three PCI one ISA expansion slot one set of shared PCI ISA slots one specialized slot for the Accelerated Graphics Port AGP and seven storage device slots two for hard drives SYSTEM B...

Page 49: ...a maximum of 384 MB See Appendix B for memory upgrade options Intel Xcelerator Multifunction Controller Your computer uses an Intel PIIX4E which incorporates the PC to ISA bridge a USB controller a d...

Page 50: ...or Plug and Play ISA add in card and power up your computer without complicated setting changes The system automatically configures interrupts I O space and other parameters Any interrupts set to Ava...

Page 51: ...alog mixing functions you need to record and play sound line microphone and monoaural inputs Plug and Play compatibility Sound Blaster and Windows Sound System compatibility The Wavetable Synthesizer...

Page 52: ...the computer the USB determines system resources for each peripheral and assigns them automatically If you attach an external USB hub up to 127 devices can be connected to a single PC Dual IDE Channel...

Page 53: ...where you left off OPTIONS AND UPGRADES Your system supports a variety of options Network Interface Card You can select any of the following cards to add networking functions to your computer 3COM 3C...

Page 54: ...d NEC keyboard Optional Microsoft Natural Keyboard Video Diamond Viper V330 AGP Voodoo2 gaming board Audio Altec Lansing ACS 90 speakers Altec Lansing ACS 45 speakers with subwoofer Altec Lansing ACS...

Page 55: ...wer is turned off This chip is called a complementary metal oxide semiconductor CMOS chip and it is backed up by a battery on the system board The battery supplies continuous power to CMOS memory and...

Page 56: ...m parameters Use the Setup utility program to set the time and date update or check system parameters when you add or remove expansion options change or set power management features correct a hardwar...

Page 57: ...e Setup The bottom of all menus show the specific keys used to navigate around the menus Pressing the F1 key brings up a Help screen The right hand side of the menu is pop up item sensitive help Use t...

Page 58: ...ess the Tab key or the right arrow key to highlight the menu s No field With this choice you remain in the Setup program and you can continue to change settings if necessary Press Enter to confirm Mai...

Page 59: ...rief explanations of each menu entry follow BIOS Version This field displays your system s BIOS version number Processor Type This field displays your computer s processor type Processor Speed This fi...

Page 60: ...uage used by the BIOS English US default Italiano Fran ais Deutsche Espa ol L2 Cache ECC Support This option allows error checking on data accessed from the L2 cache System Time and Date These two fie...

Page 61: ...options Advanced Menu Plug Play O S This option lets you specify whether a Plug and Play compatible operating system is being used in your system Choose Yes or No default Reset Configuration Data Thi...

Page 62: ...tions let you configure your system s Serial Port A or Serial Port B You can choose Auto Enabled default or Disabled The Enabled setting assigns Serial Port A to 2F8h IRQ3 Note that if you set a speci...

Page 63: ...ou to specify the Base I O address and IRQs for the port you re configuring Mode Parallel Port This option sets the mode for the parallel port The options include Output Only AT compatible mode Bidire...

Page 64: ...ices usually hard drives or CD ROM drives Depending on the system you purchased the available options may include User Auto default CD ROM ATAPI Removable or None The standard hard drive drive C shipp...

Page 65: ...ity This field displays the maximum capacity of your hard disk drive a value based on the number of cylinders heads and sectors Multi Sector Transfers This option determines the number of sectors per...

Page 66: ...ed CAUTION Do not change the translation mode setting from the option selected when the hard drive was formatted Changing the option after formatting could result in corrupted data Transfer Mode This...

Page 67: ...he submenu highlight the Floppy Options field then press Enter Select Floppy Disk Controller Diskette A and Floppy Write Protect options Floppy Disk Controller This option configures the system s disk...

Page 68: ...Log Capacity Event Log Validity These fields indicate whether space is available in the Event Log and whether the contents of the log are valid View DMI Event Log If there are no event logs stored you...

Page 69: ...r The choices are 64 MB default and 256 MB To return to the Advanced Menu press the Esc key Resource Configuration Submenu This option allows you to reserve specific resources for use by legacy ISA de...

Page 70: ...rrow cursor keys to highlight the specified IRQ then press Enter Select Available default or Reserved with the arrow keys then press Enter to change the setting CAUTION An asterisk symbol appearing ne...

Page 71: ...r Password feature has been enabled you ll need to enter your User password correctly whenever you boot the system before you ll be able to use it An Administrator Password controls access to the BIOS...

Page 72: ...inistrator Password dialog box appears on your monitor 2 Type a password up to seven alphanumeric characters in the Enter New Password field then press Enter Your password should be easy for you to re...

Page 73: ...rd you disable 2 Type your password in the Enter Current Password field then press Enter 3 Don t type anything in the Enter New Password field just press Enter 4 Again don t type anything in the Confi...

Page 74: ...ff To use the keyboard and mouse you need to enter the User Password first A password is also required to boot from a floppy disk Press the right arrow cursor key to move to the Power Menu Power Menu...

Page 75: ...u can select from 1 5 10 20 30 60 or 120 minutes A setting of 1 minute achieves maximum power savings while a setting of 120 minutes allows maximum performance Hard Drive This option controls whether...

Page 76: ...res The following information describes Boot Menu options CAUTION Setting some items in any menu to incorrect values can cause your system to malfunction Boot Menu QuickBoot Mode This option configure...

Page 77: ...g This option specifies how the system responds when power is off and the modem detects an incoming call The options are Stay Off and Power On default On LAN This option controls how the system respon...

Page 78: ...vable Devices Submenu This submenu lists any available removable devices if included One common option is Legacy Floppy Drives The operating system assigns drive letters to these devices in the order...

Page 79: ...etup program and saves your changes to the BIOS Exit Discarding Changes This option exits the Setup program without saving your changes to the BIOS Load Setup Defaults This option loads the Setup prog...

Page 80: ...LASH UTILITY From time to time changes are made to a computer system s BIOS While not essential it is usually beneficial to upgrade if there is a new BIOS for your system Check the NECCSD Bulletin Boa...

Page 81: ...you made at the beginning of this procedure to set the options NOTE If the flash BIOS process is corrupted for example by a power failure see Chapter 6 for BIOS recovery information See NECCSD Bulleti...

Page 82: ...A drivers are available for a variety of software applications through the NECCSD BBS see NECCSD Bulletin Board Service in Chapter 7 NOTE A multifrequency monitor such as an NEC MultiSync monitor is r...

Page 83: ...tem supports a maximum of 384 MB of memory Video memory your system comes with a 4 MB or 8 MB video board in the Accelerated Graphics Port slot Its video memory may be upgradeable see the documentatio...

Page 84: ...ck or personal injury by observing the following warning WARNING Before removing the system access cover turn off the power and unplug any attached peripherals Disconnect the system power cord from th...

Page 85: ...covers Prevent damage to the connectors by aligning connector pins before you connect the cable When disconnecting a cable always pull on the cable connector or strain relief loop do not pull on the...

Page 86: ...f the computer Label all cables to make reinstallation easier CAUTION Electrostatic discharge can damage computer components Discharge static electricity by touching a metal object before removing the...

Page 87: ...the rear until it stops If it is very tight you can also carefully insert a screwdriver into the slot adjacent to the fans at the back side of the cover and very gently rock the cover loose taking ca...

Page 88: ...aking care not to bend the metal tabs as follows Align the tabs on the access cover with their corresponding slots on the system Insert the tabs on the edge of the access cover into their slots on the...

Page 89: ...which allow you to install a board in an expansion slot without changing the hardware settings There are no system resource conflicts to resolve Plug and Play automatically configures the board for th...

Page 90: ...highest slot on the minitower is not used Slot 1 Not used Slot 2 Accommodates a video board Slot 3 Accommodates an optional PCI board Slot 4 Accommodates an optional PCI board Slots 5 Accommodate an o...

Page 91: ...settings Before installing the new board check its documentation and the Interrupt Request IRQ assignments in Appendix B This information ensures that your new board does not conflict with any instal...

Page 92: ...crew for installing the expansion board Be sure to save the slot cover for future use CAUTION A slot cover can damage the system board or any option board if it falls into the system Take care to keep...

Page 93: ...the expansion slot connector Gently rock the board from side to side to seat it into the connector Installing the board 6 Insert the screw removed in step 3 to secure the expansion board to the suppo...

Page 94: ...ng the Access Cover 2 Label and remove any cables connected to the board 3 Remove the screw that secures the board to the support bracket 4 Pull the board out of the connector Gently rock the board fr...

Page 95: ...ng on product upgrade availability your system memory can be upgraded to a total of 384 MB When upgrading your system memory note the following conditions Be sure to use 168 pin 3 3V DIMMs with gold p...

Page 96: ...access to the DIMM sockets label and disconnect them If any boards block access to the sockets remove them 1 Locate the three DIMM sockets J7J1 Bank 0 J6J2 Bank 1 and J6J1 Bank 2 See Appendix C to id...

Page 97: ...Mx64 32 4 Mx64 32 8 Mx64 64 128 MB 8 Mx64 64 1 Mx64 8 4 Mx64 32 104 MB 2 Mx64 16 4 Mx64 32 1 Mx64 8 56 MB 4 Mx64 32 8 Mx64 64 2 Mx64 16 112 MB Empty 0 16 Mx72 128 16 Mx72 128 256 MB ECC 16 Mx64 128 2...

Page 98: ...Remove the access cover see Removing the Access Cover 2 Locate the DIMM sockets 3 To remove a DIMM from its socket press the plastic clips at the outer edges of the socket away from the DIMM 4 Carefu...

Page 99: ...te the DIMM sockets 3 Remove any currently installed DIMMs that are not needed See the previous section Removing a DIMM CAUTION Before installing a DIMM reduce static discharge by touching the system...

Page 100: ...ing a DIMM 6 Replace any cables or boards that may have been removed 7 Replace the access cover see Replacing the Access Cover Your system automatically detects the memory at bootup VIDEO UPGRADE Your...

Page 101: ...ts Your computer has seven storage device slots a 3 5 inch accessible device slot contains the standard 1 44 MB diskette drive one internal 3 5 inch hard drive slot for the standard hard drive a secon...

Page 102: ...that come with the device For example check the following IDE device check the jumper settings on the device before installing it See the documentation that comes with the device for jumper setting i...

Page 103: ...er installed manually or set automatically if the device is self terminating Most SCSI devices are self terminating Check the manufacturer s documentation Installation hardware check to be certain you...

Page 104: ...tional tape backup unit requires the replacement of the two connector diskette drive signal cable with a three connector cable Connect the optional tape backup unit to the middle connector on the thre...

Page 105: ...secondary IDE connector Each IDE connector on the system board supports two devices The addition of a device to an IDE connector does not require the replacement of the existing signal cable The foll...

Page 106: ...rations Power cable connectors are keyed to fit only in the correct position The following figure shows the power cable connectors Power cable connectors Cabling Storage Devices All storage devices re...

Page 107: ...e connector to the matching pins on the device Take care to prevent bending drive connector pins Align the cable connector to the matching pins on the drive 2 Locate an available power connector comin...

Page 108: ...with the reader Cabling an Accessible 5 1 4 Inch Device 1 Connect the diskette drive signal cable connector to the appropriate connector on the device as shown in the following figure 2 Locate an ava...

Page 109: ...om the rear on either system only needs to be removed when replacing the CD ROM reader DVD drive The installation procedures include removing the front panel installing a 3 1 2 inch device installing...

Page 110: ...o plastic tabs at the front of the chassis They are indicated by two arrows engraved on the chassis 2 Press down on the two tabs and press in a third tab at the end of the panel to release the panel R...

Page 111: ...Follow the preinstallation instructions that came with the device such as setting jumpers and switches 2 Remove the access cover see Removing the Access Cover 3 Remove and label any cables that inter...

Page 112: ...t Remove the two screws securing the 3 1 2 inch hard disk bracket to the front of the system unit Removing the bracket screws Slide the 3 1 2 inch hard disk bracket towards the back of the system unit...

Page 113: ...Options 5 31 Aligning the holes and tabs Lay the hard disk into the bracket and secure with the screw Securing the disk Slide the bracket into the molded plastic and secure to the front panel with the...

Page 114: ...the 3 1 2 inch internal device slot simply insert the drive into the opening until it is secured by the clips Secure the drive with the two screws through the front panel Inserting the device If you a...

Page 115: ...nk panel 7 Remove the metal slot cover by carefully pressing it until it breaks away from the chassis Be careful of sharp edges 8 Slide the device into the slot and secure the device 9 Connect the dev...

Page 116: ...he access cover see Removing the Access Cover 3 Remove and label any cables that interfere with installing the device 4 Remove the front panel see Removing the Front Panel 5 Remove the plastic blank p...

Page 117: ...evice with the screws that came with the device Installing the device NOTE If you removed the side cover on your minitower or the accessible device cage on your desktop replace it Secure the device ca...

Page 118: ...e accessible device cage 1 Locate the screw and tab at the upper left of the device cage and the tab on the lower left Locate the two tabs at the lower rear and two on the right side of the system uni...

Page 119: ...r serial devices Connecting a Parallel Printer NOTE Before connecting a printer to the system be sure the printer is set up correctly Follow the setup instructions that came with the printer Connect a...

Page 120: ...to the system be sure the serial device is set up correctly Follow the setup instructions that came with the option Connect a serial device to the system as follows 1 Turn off power to the system and...

Page 121: ...Installing Options 5 39 5 Turn on the serial device and the computer Locating the serial ports...

Page 122: ...settings or recovering the BIOS When you override the BIOS settings Setup s Maintenance menu appears allowing you to set the processor speed and disable the user and administrator passwords This chapt...

Page 123: ...igure Mode 2 3 Allows system configuration After POST Setup runs automatically The Maintenance menu appears for setting configuration parameters including processor speed and password settings Recover...

Page 124: ...emove the jumper block from pins 1 2 and set it on pins 2 3 We recommend that you use needle nose pliers to move a jumper 6 Replace the access cover see Replacing the Access Cover in Chapter 5 7 Conne...

Page 125: ...recover the BIOS See the NECCSD Bulletin Board Service for system BIOS information 1 Turn off the power and unplug the system and any peripherals WARNING Turn off the system before you change any jump...

Page 126: ...IOS A recovery diskette is needed 9 Power off unplug the system and monitor and remove the access cover 10 Replace the jumper block on pins 1 2 11 If you removed any expansion boards replace them see...

Page 127: ...l online service or the Internet Fax Service to NECCSD Technical Support Services NECCSD Technical Support Services U S customers only If you have access to a modem and or fax machine telephone for Te...

Page 128: ...ort area for the following technical documentation including Frequently Asked Questions reference manuals and warranty information BIOS updates drivers and Setup Disk files to download contact informa...

Page 129: ...self help automated electronic information service for obtaining up to date product application notes installation procedures troubleshooting tips data sheets technical information bulletins illustra...

Page 130: ...sts Frequently Asked Questions FAQs lists and other product support documents Order information from FaxFlash as follows If you would like instructions for using FaxFlash request document number 63233...

Page 131: ...ard Service BBS to get the latest information on hardware and software The BBS allows you to download files for example video drivers printer drivers and BIOS updates for system enhancements and upgra...

Page 132: ...BBS you will be requested to provide information for a new user questionnaire 6 Press Enter twice 7 Enter your first name last name and password Press Enter after each 8 Follow the screen prompts unti...

Page 133: ...mmand for Goodbye Hangup 3 Press Enter E MAIL FAX TECHNICAL SUPPORT SERVICE NECCSD Technical Support offers technical support by E mail over the Internet network if you have a modem The Internet addre...

Page 134: ...ilable 24 hours a day seven days a week Call NECCSD Technical Support toll free at 1 888 632 2678 U S only Free technical support for hardware is limited to the length of the standard warranty Softwar...

Page 135: ...or an error message does not appear use the information in this chapter to determine and solve the problem The problem is often one that you can solve yourself See the following sections in this chap...

Page 136: ...all cables and power cords connected securely Check that all cables and power cords are securely connected Is the monitor screen blank or is the display hard to read Check that the monitor is on Adjus...

Page 137: ...heck the following list to match your problem and see the possible cause and solution No power and power lamp not lit Check that the power cable is plugged into the system power socket Check that the...

Page 138: ...hat the initial boot parameter is set for hard drive C and not for a diskette drive System performance appears sluggish Check that your system is set for optimal operation See your operating system do...

Page 139: ...formatted If not format it See your operating system documentation If the diskette drive busy lamp does not light when you load the diskette try a different diskette If this loads the problem is in t...

Page 140: ...t mode Distorted image appears on your monitor screen Adjust the monitor s video controls If this does not help turn the monitor off for several seconds then back on There is constant movement on the...

Page 141: ...Drive Problems Check the following problems to see the possible cause and solution The system does not see the CD ROM reader DVD drive The drive designation is wrong and should be changed The CD ROM...

Page 142: ...ance the speaker output by adjusting the balance on the Sound Mixer in Windows Microphone Problems Check the following problem to see the possible cause and solution You get no response from the micro...

Page 143: ...vailable to you through NECCSD Technical Support Direct assistance is available 24 hours a day 7 days a week You can call for support toll free at 1 888 632 2678 Free technical support for hardware is...

Page 144: ...ates and Canada call 1 888 632 2678 BATTERY REPLACEMENT All system boards use a battery to maintain system configuration information Your system uses a coin sized battery mounted on the system board s...

Page 145: ...sed to water and causes spontaneous combustion on contact Discard used batteries according to the manufacturer s instructions If you need to replace the battery follow these steps 1 Turn off and unplu...

Page 146: ...od stick however be careful to avoid scratching the system board 5 Remove the battery and discard in accordance with the manufacturer s instructions 6 With the positive side facing up slide the new ba...

Page 147: ...YOU Computers are everywhere More and more people sit at computers for longer periods of time This appendix explains how to set up your computer to fit your physical needs This information is based o...

Page 148: ...susceptible to developing these disorders due to preexisting conditions or psychosocial factors see Preexisting Conditions and Psychosocial Factors later in the appendix To reduce your risk of develop...

Page 149: ...u use frequently within easy reach Adjust your workstation setup to the proper height as described in this appendix by lowering the table or stand that holds your computer equipment or raising the sea...

Page 150: ...ure throughout the day Check the following Keep your body in a relaxed yet upright position The backrest of your chair should support the inward curve of your back Use the entire seat and backrest to...

Page 151: ...otrest when attempts to adjust your chair and workstation fail to keep your feet flat Be sure that you have adequate clearance between the top of your thighs and the underside of your workstation Use...

Page 152: ...r wrists straight and use your entire arm when moving a mouse Do not grasp the mouse tightly Grasp the mouse lightly and loosely Adjust the keyboard height so that your elbows are near your body and y...

Page 153: ...our wrists between typing Avoid resting your wrists on sharp edges Type with your wrists straight Instead of twisting your wrists sideways to press hard to reach keys move your whole arm Keep from ben...

Page 154: ...the following when you position the monitor Adjust the monitor height so that the top of the screen is at or slightly below eye level Your eyes should look slightly downward when viewing the middle of...

Page 155: ...es it hard for you to see your screen use an anti glare filter Clean your monitor regularly Use a lint free non abrasive cloth and a non alcohol neutral non abrasive cleaning solution or glass cleaner...

Page 156: ...longed periods follow these instructions Vary your tasks throughout the day Take frequent short breaks that involve walking standing and stretching During these breaks stretch muscles and joints that...

Page 157: ...iciency endocrine disorders e g diabetes hormonal imbalances connective tissue disorders e g arthritis prior trauma to the hands wrists arms shoulders neck back or legs prior musculoskeletal disorders...

Page 158: ...en you type Is your keyboard directly in front of you Do you avoid resting your wrists on sharp edges Do you press the keys gently and not bang on them Checking Your Mouse Is your mouse at the same he...

Page 159: ...ar eye checkups Do you contact your doctor if you feel any sustained discomfort For more information on workstation setup see the American National Standard for Human Factors Engineering of Visual Dis...

Page 160: ...you purchased Implements the MMX instruction set which optimizes multimedia performance Backward compatible with the 8086 80286 Intel386 Intel486 Pentium and Pentium Pro processors Packaged in a Singl...

Page 161: ...MB NOTE You can use either ECC error checking and correcting DIMMs or non ECC DIMMs but you should not mix them The BIOS automatically detects memory type size and speed All main memory can be cached...

Page 162: ...64 2 Mbit x 72 32 MB 4 Mbit x 64 4 Mbit x 72 64 MB 8 Mbit x 64 8 Mbit x 72 128 MB 16 Mbit x 64 16 Mbit x 72 NOTE Do NOT mix non ECC and ECC DIMMs Use of 8 16 32 64 or 128 MB DIMMs installed in any of...

Page 163: ...2 Mx64 16 4 Mx64 32 1 Mx64 8 56 MB 4 Mx64 32 8 Mx64 64 2 Mx64 16 112 MB Empty 0 16 Mx72 128 16 Mx72 128 256 MB ECC 16 Mx64 128 2 Mx64 16 8 Mx64 64 210 MB 16 Mx64 128 4 Mx64 32 8 Mx64 64 224 MB 16 Mx7...

Page 164: ...AGP and main memory The PAC comes in a 492 pin BGA package and provides the following features Processor interface control Processor host bus speeds of 66 MHz and 100 MHz 32 bit addressing GTL compli...

Page 165: ...o DRAM and PCI1 AGP to DRAM read buffering DRAM write buffer with read around write capability AGP dedicated inbound outbound FIFOs 133 66 MHz System Management Mode SMM support Intel 82371EB PCI ISA...

Page 166: ...A mode transfers up to 33 MB second Supports bus master mode with an 8x32 bit buffer for bus master PCI IDE burst transfers Enhanced DMA controller Two 8237 based DMA controllers Supports PCI DMA with...

Page 167: ...tions that hide memory access latency Demultiplexing of address and data on the bus for near 100 percent bus efficiency Universal Serial Bus USB Support Two external USB ports support USB type periphe...

Page 168: ...modes The IDE device transfer rate and translation mode are automatically detected Super I O Controller SMC FDC37C777 Super I O Controller is an ISA Plug and Play compatible multifunction device that...

Page 169: ...parallel port EPP High speed extended capabilities Port ECP modes Diskette Drive Controller Supports 360 KB 720 KB 1 2 MB 1 25 1 44 MB and 2 88 MB settings Keyboard and Mouse External PS 2 type keyboa...

Page 170: ...M1 5 LPT2 Plug and Play option audio user available 6 Diskette drive controller 7 Parallel Port 1 LPT1 8 Real time clock 9 Reserved 10 User available 11 Windows Sound System user available 12 PS 2 mou...

Page 171: ...ows Sound System standards Wavetable Synthesizer The optional AWE64D synthesizer integrates the Crystal audio subsystem described above general MIDI processor and wavetable This wave synthesis results...

Page 172: ...and Play capability Security features include User and Supervisor passwords Video Support and Monitor Depending on the system you purchased your computer may be equipped with one of several monitors...

Page 173: ...type 5 15 P plug cap at one end and a molded on cord connector body at the other end The cord length must not exceed 15 feet 4 5 meters Outside the U S A and Canada the plug must be rated for 250 VAC...

Page 174: ...lerance 3 3V 4 5V 5 5V 5 12V 5 12V 5 ENVIRONMENTAL SPECIFICATIONS Ambient Temperature Operating 5 to 35 C 41 to 95 F Non Operating 40 to 70 C 4 to 158 F Humidity Operating 85 relative humidity max at...

Page 175: ...you purchased The Pentium II processor has the MMX instruction set built in MMX type components optimize a system s ability to process multimedia components WARNING Should you have occasion to open yo...

Page 176: ...ower to the computer is turned off 3 Touch and maintain continuous contact with an unpainted metal surface of the computer system while handling or touching any internal components chips add on boards...

Page 177: ...nects to your mouse USB Universal Serial Bus Reserved for upgrades and options with USB technology Parallel port Connects to an optional parallel printer data cable Serial port 1 Connects to an option...

Page 178: ...y connector B7C1 CMOS BIOS battery socket J8A1 Configuration Normal mode Configure BIOS recovery 1 2 Normal default 2 3 No jumper resets BIOS J7J1 DIMM slot Bank 0 J6J2 DIMM slot Bank 1 J6J1 DIMM slot...

Page 179: ...m Board Internal Connectors CONNECTOR FUNCTION J4J1 Pentium II CPU socket Slot 1 J7L1 Power supply connector J1C1 Wake on LAN J1A1 Wake on ring The following figures show the system board internal con...

Page 180: ...are those that prevent the system from continuing the boot process If any are detected an error message will appear on the screen The following list of error messages includes causes and possible solu...

Page 181: ...is properly attached Message Failing Bits nnnn Cause The hex number nnnn is a map of the bits at the RAM address that failed the memory test Each 1 one in the memory map indicates a failed bit The fa...

Page 182: ...battery that supports the BIOS is dead Solution Replace the battery and run the Setup Utility program to reconfigure the system Message System CMOS Checksum bad run SETUP Cause System CMOS has been co...

Page 183: ...ram and change any settings Message Parity Check 1 Cause Parity error found in the system bus BIOS attempts to locate the address and display it on the screen If it cannot locate the address it displa...

Page 184: ...nn Cause System RAM failed at offset nnnn of the 64K block at which the error was detected Message System timer error Cause The timer test failed BEEP CODES Beep codes can signify a terminal error If...

Page 185: ...e DRAM 1 3 3 2 29h Initialize POST memory manager 1 3 3 3 2Ah Clear 512 KB base RAM 1 3 4 1 2Ch RAM failure on address line xxxx 1 3 4 3 2Eh RAM failure on data bits xxxx of low byte of memory bus 1 4...

Page 186: ...ulletin board service 7 5 C Cable diskette drive 5 22 IDE 5 23 power 5 24 CD ROM reader DVD drive features 1 5 1 6 CDs 2 5 cleaning 2 6 handling 2 6 loading 2 7 removing 2 8 using 2 5 Chassis 3 2 Chec...

Page 187: ...nal options 5 37 parallel printer 5 37 serial devices 5 38 F Fax support 7 7 FaxFlash service 7 3 Features CD ROM reader DVD drive 1 5 controls 1 3 1 4 diskette drive 1 4 diskettes 2 4 fax modem 1 11...

Page 188: ...7 2 NECCSD FaxFlash 7 3 NECCSD Technical support 7 8 8 9 NECCSD Web site 7 2 Non warranty repair service 8 10 O Online documentation 2 18 Option installation 3 1 2 inch device 5 29 5 1 4 inch device 5...

Page 189: ...2 9 Serial port 1 10 Services 8 8 Setting a password 2 9 Setting the date and time 2 4 Setup utility 4 2 Setup utility uses 4 2 Shipping procedures 2 17 Shutting down the system 2 3 Speakers 1 14 Star...

Page 190: ...Index 5 Video drivers checking 2 13 Video upgrade 5 18 Voltage selector switch 1 12 W Warranty repair service 8 10 Z Zip drive release button data lamp 1 12 using 1 12...

Page 191: ...there is no guarantee that interference will not occur in a particular in stallation If this equipment does cause harmful interference to radio or television reception which can be determined by turn...

Page 192: ...batterie Remplacer uniquement avec une batterie du m me type ou d un type recommand par le constructeur Mettre au r but les batteries usag es conform ment aux instructions du fabricant BATTERY DISPOSA...

Reviews: