background image

7-45

7.6

Send (Public, Personal, or Group User Box)

7

7.6.16

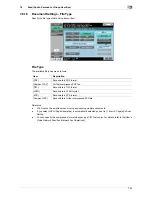
Document Settings - File Type

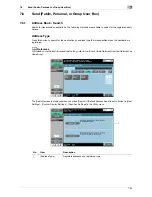
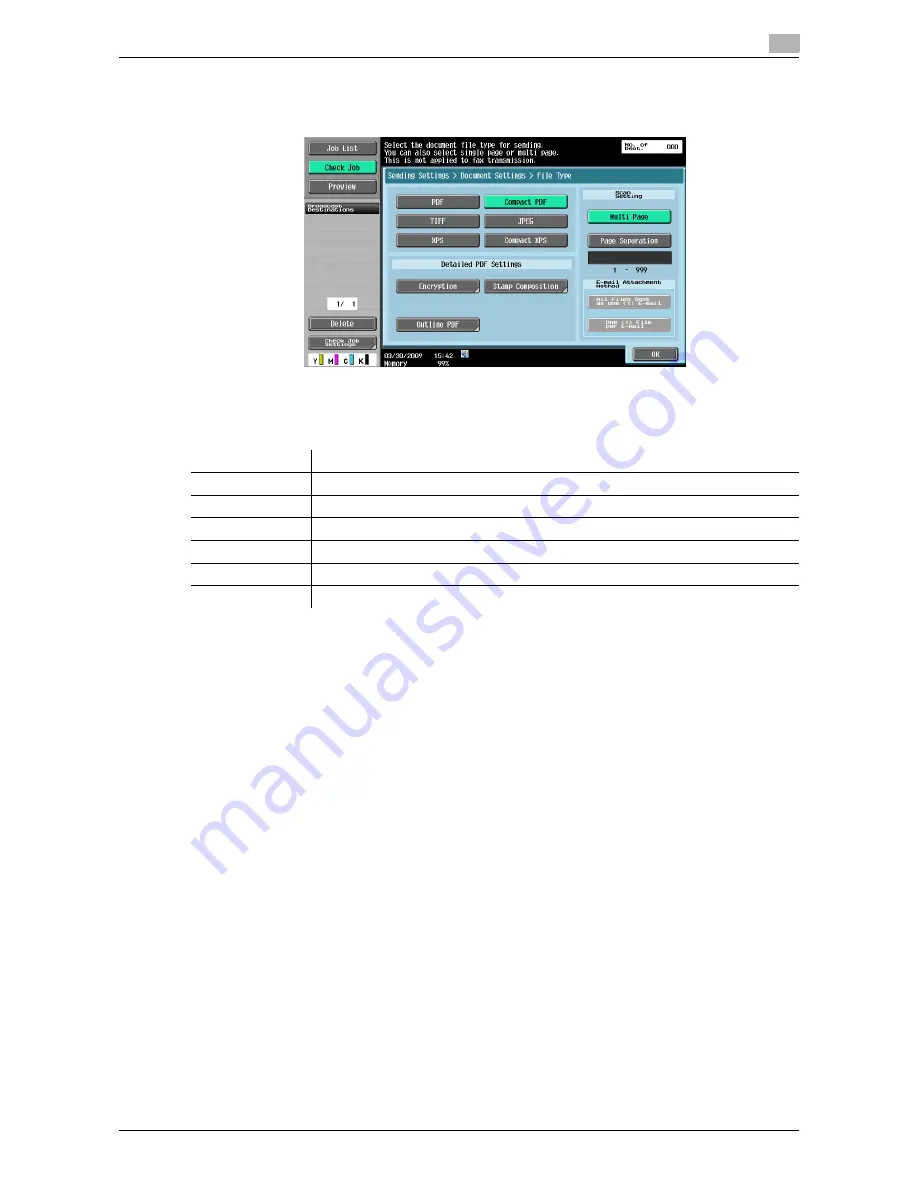
Specify the file type of data being transmitted.

File Type

The available file types are as follows.

Reference

-

JPEG cannot be selected when binding and sending multiple documents.

-

If you select JPEG, [Page Separation] is automatically selected and set to [1 Every X Page(s)] in Scan 
Setting.

-

You can specify the compression format when saving a TIFF file in color. For details, refer to the [User's 
Guide Network Scan/Fax/Network Fax Operations].

Item

Description

[PDF]

Saves data in PDF format.

[Compact PDF]

Further compressed PDF file.

[TIFF]

Saves data in TIFF format.

[JPEG]

Saves data in JPEG format.

[XPS]

Saves data in XPS format.

[Compact XPS]

Saves data in further compressed XPS file.

Summary of Contents for MFC-C2828

Page 1: ......

Page 2: ...h data is saved for memory reception 2 6 2 2 Information 2 7 2 2 1 User authentication 2 7 MFP authentication 2 7 External server authentication 2 7 Account track authentication 2 8 2 2 2 Restriction of box registration 2 8 Public Personal Group User Boxes 2 8 Bulletin Board User Box 2 8 Polling TX User Box 2 8 Memory RX User Box 2 8 Relay User Box 2 9 2 2 3 Restriction of file name 2 9 2 3 Authen...

Page 3: ...lar Phone or PDA 4 18 4 9 Saving a Document Stored in a Cellular Phone or PDA to a User Box 4 20 4 10 Menu tree of the User Box mode 4 22 4 10 1 Save Document 4 22 Public Personal or Group User Box 4 22 System User Box 4 23 4 10 2 Use File 4 25 Print for Public Personal Group User Boxes 4 25 Send for Public Personal Group User Boxes 4 28 Filing Settings for public personal group User Boxes 4 31 Ap...

Page 4: ...Position 6 19 6 3 4 Despeckle 6 19 7 Use File 7 1 Overview of the Use File operations 7 2 7 1 1 Functions of Use File 7 2 Printing a document 7 2 Sending 7 2 Filing 7 2 Application settings 7 2 7 1 2 Detail of the Use Document screen 7 2 7 1 3 If a password is specified for a User Box 7 3 7 2 Print 7 4 7 2 1 Overview of the Print tab 7 4 Description of the Print tab 7 4 Print 7 4 Combine 7 5 7 2 2...

Page 5: ... 24 Stamp Type 7 25 Detail Settings 7 25 7 4 13 Stamp Composition Stamp Repeat 7 25 Stamp Repeat Type 7 26 Detail Settings 7 26 Position 7 26 7 4 14 Stamp Composition Header Footer 7 27 Check Change Temporarily 7 27 7 4 15 Stamp Composition Registered Overlay 7 28 Settings 7 28 Overlay Setting 7 29 7 5 Send 7 30 7 5 1 Overview of the Transmission Settings 7 30 Description of the Send tab 7 30 Send...

Page 6: ...14 Overview of the Document Settings 7 44 7 6 15 Document Settings Resolution 7 44 7 6 16 Document Settings File Type 7 45 File Type 7 45 Encryption 7 46 Encryption Detail Settings 7 46 Stamp Composition 7 48 Outline PDF 7 48 Scan Setting 7 49 7 6 17 Document Settings Color 7 49 7 6 18 Overview of the Communication Settings 7 50 7 6 19 Communication Settings Line Setting 7 50 Description of Line S...

Page 7: ... information 7 64 Preview 7 65 7 8 Application 7 66 7 8 1 Overview of the Application settings 7 66 Description of the Application tab 7 66 7 8 2 Edit Document 7 67 Edit Document Delete Page 7 67 Edit Document Rotate Page 7 68 Edit Document Move Page 7 70 Preview Set Range 7 71 Preview Specify by Input 7 72 7 8 3 Register Overlay 7 73 Register Overlay New 7 74 Register Overlay Overwrite 7 75 Detai...

Page 8: ...mail 7 84 7 13 17 Send Direct Input PC SMB 7 84 7 13 18 Send Direct Input FTP 7 85 7 13 19 Send Direct Input WebDAV 7 85 7 13 20 Send Job History 7 85 7 13 21 Send LDAP Search Search 7 85 7 13 22 Send LDAP Search Advanced Search 7 85 7 13 23 Send Document Settings Resolution 7 85 7 13 24 Send Document Settings File Type 7 85 7 13 25 Send Document Settings Color 7 85 7 13 26 Send Communication Sett...

Page 9: ... Time 7 97 Stamp Composition Page Number 7 97 Stamp Composition Stamp 7 97 Stamp Composition Copy Security Copy Protect 7 97 Stamp Composition Copy Security Copy Guard 7 97 Stamp Composition Copy Security Password Copy 7 97 Stamp Composition Stamp Repeat 7 97 7 17 5 Filing Settings Save to User Box 7 98 7 18 Mobile PDA System User Box 7 99 7 18 1 Operating environment 7 99 7 18 2 Mobile PDA Print ...

Page 10: ...rsonal or Group User Box 8 17 Max No of Use Boxes 8 17 Maximum Number of User Boxes 8 18 8 3 8 User Box Setting 8 18 Delete Unused User Box 8 18 Delete Secure Print Documents 8 19 Auto Delete Secure Document 8 19 Encrypted PDF Delete Time 8 20 ID Print Delete Time 8 20 Document Hold Setting 8 21 External Memory Function Settings 8 21 Allow Restrict User Box 8 22 ID Print Delete after Print Setting...

Page 11: ...ct Print 9 18 9 4 5 Store Address 9 19 9 4 6 Customize 9 19 9 5 Handling a document in a User Box 9 21 9 5 1 Listing the documents saved in a User Box 9 21 Open User Box 9 21 File List 9 22 9 5 2 Printing a document 9 23 9 5 3 Sending a document to another machine 9 26 9 5 4 Downloading document data to your computer 9 29 9 5 5 Moving or copying a document to another User Box 9 32 9 5 6 Deleting a...

Page 12: ...1 Introduction ...

Page 13: ...s of originals and copy paper Copy function Maintaining this machine Troubleshooting User s Guide Enlarge Display Operations This manual describes details on operating procedures of the enlarge display mode Copy function Scanning function G3 fax function Network fax function User s Guide Print Operations This manual describes details on printer functions Printer function Setting the printer driver...

Page 14: ...ork or troubleshooting operations Limit your troubleshooting operations to the areas explained in this man ual Should you experience any problems please contact your service representative User s Guide Advanced Function Operations This manual describes details on functions that become available by registering the optional license kit and by connecting to an application Web browser function Image p...

Page 15: ...at may cause injury or property damage NOTICE This symbol indicates a risk that may result in damage to this machine or originals Follow the instructions to avoid property damage Procedural instruction 0 This check mark indicates an option that is required in order to use conditions or functions that are pre requisite for a procedure 1 This format number 1 represents the first step 2 This format n...

Page 16: ...s product names and option names are indicated in bold text 1 2 2 Original and paper indications Original and paper sizes The following explains the indication for originals and paper described in this manual When indicating the original or paper size the Y side represents the width and the X side the length Original and paper indications w indicates the paper size with the length X being longer t...

Page 17: ...of operations such as saving and printing data Clicking the link in the flow chart takes you to the relevant function setting pages where you can see more detail Using Menu Tree Various functions can be configured for this machine For information on what button to select to find specific setting items and the list of items that can be configured refer to the Menu tree pages In the menu tree pag es...

Page 18: ...2 User Box Function Overview ...

Page 19: ... User Box refer to the User s Guide Print Operations User Box Description Reference Public Personal Group User Boxes 1 Save a document copied or scanned using this machine You can also save a document that was print instructed through a computer connected to a network Some User Authentication or Account Track settings restrict users who can use User Boxes such as the Personal or Group User Box p 6...

Page 20: ... for printing p 7 79 Memory RX User Box 2 This item appears when the optional Fax Kit is installed You can confirm and print the fax document received though the memory RX setting p 7 82 Annotation User Box Print or transmit document data saved in Scan mode with an image of the date time or an annotation number p 7 83 Fax Retransmit User Box 2 This item appears when the optional Fax Kit is install...

Page 21: ... how to save documents to the Secure Document User Box refer to the User s Guide Print Operations 4 For print instruction of an encrypted PDF refer to the Direct Print manual or the direct print in the Web Connection online help 1 Fax 2 Computer 3 E mail etc 4 FTP server etc 5 Cellular phone or PDA 6 External memory 7 Printout Cellular Phone or PDA Print a document saved in a cellular phone or PDA...

Page 22: ...elete Edit Name Move Copy Save in User Box Save in USB mem ory when exter nal mem ory is con nect ed Docu ment De tails Public Personal Group User Boxes o o o o o o Bulletin Board User Box o Polling TX User Box o Secure Document User Box o o o Memory RX User Box o o o Annotation User Box o o o Fax Retransmit User Box o o Password Encrypted PDF User Box o o ID Print User Box o o External Memory Mo ...

Page 23: ...lletin board function p 8 6 Annotation User Box p 8 15 When using this machine as a relay device If the optional Fax Kit is installed and you want to use this machine for relaying fax transmission create a Relay User Box for saving documents temporarily before they are relayed p 8 8 To create a Relay User Box specify in advance the group containing fax numbers of relay destinations The User Box to...

Page 24: ...an account or user name and a password For details on the account or user name available for using the devices contact your administra tor MFP authentication Enter the user name and password and then press either Login in the touch panel or the Access key on the control panel External server authentication Enter the user name and password and then press either Login in the touch panel or the Acces...

Page 25: ...efer to the User s Guide Copy Op erations for the login procedure 2 2 2 Restriction of box registration Public Personal Group User Boxes The User Box functions provide Public User Boxes which can be used by more than one person Personal User Boxes which can be used only by a single person and Group User Boxes which can be used by the users who are logged in as members of the User Box owner account...

Page 26: ... P Print R Received fax 36C 1 This represents the name of the device that scanned the data The factory default is product name You can change this name in Device Name in Administrator Machine Settings in Administrator Settings Use up to 10 characters 11102315230 This indicates the year last two digits month day hour and minute when the data was scanned If a series of documents are scanned at the s...

Page 27: ...Boxes when the Allow Restrict User Box is set to Restrict in Administrator Settings 2 3 2 When only user authentication is enabled Reference Users can access all Public User Boxes and only Personal User Boxes that the user has created The Personal User Boxes are inaccessible by other users Press this button to set up a User Box administrator A User Box administrator can access all Public User Boxe...

Page 28: ...ccount track settings or changing authentication meth ods all Group User Boxes become Public User Boxes 2 3 4 When user authentication and account track are enabled and synchronized As the account for users has been registered in advance users cannot access Group User Boxes of accounts that they do not belong to Account B Public User Box Account A Access allowed Group User Box of account A Group U...

Page 29: ...r authentication settings or changing authentication methods all Personal User Boxes and all group boxes become Public User Boxes 2 3 5 When user authentication and account track are enabled but not synchro nized As the account for a user has not been registered in advance a user must enter an account name and pass word when logging in Each time a user logging in the user can access the Group User...

Page 30: ...ress this button to set up a User Box administrator A User Box administrator can access all Public User Boxes all Personal User Boxes and all Group User Boxes If you delete authentication data by canceling user authentication settings or changing authentication methods all Personal User Boxes and all group boxes become Public User Boxes User 1 Access allowed Access permitted through entry of accou...

Page 31: ...3 Control Panel Liquid Crystal Display ...

Page 32: ...ode the indicator on the Power Save key lights up in green and the touch panel goes off To exit from Power Save mode press the Pow er Save key again 5 Mode Memory Press this key to register store the desired copy scan settings as a pro gram or to recall a registered copy scan program 6 Utility Counter Press this key to display the Utility screen and the Meter Count screen 7 Reset Press this key to...

Page 33: ...pies zoom ratio and various other settings 15 Guidance Press this key to display the Guidance screen From this screen you can view descriptions of the various functions and details of operations 16 Enlarge Display Press this key to enter Enlarge Display mode If you use Authentication Manager for authentication the Enlarge Display screen is not available 17 Accessibility Press this key to display t...

Page 34: ...ortcut keys 4 Left panel Displays various buttons such as Job List to display the jobs that are currently being performed queued waiting to be performed and Check Job to display the result of the specified settings For details on the display and description of the left panel refer to page 3 5 5 Toner supply indicators Show the amount of toner remaining for yellow Y magenta M cyan C and black K 4 5...

Page 35: ...ontroller IC 412 v1 1 is installed pressing this icon displays the setting screen for the Image Controller IC 412 v1 1 Indicates that the enhanced security mode is enabled Indicates that an external memory device is connected to the machine Indicates that a nonstandard external memory has been connected to this machine therefore USB connection is not enabled Indicates that the job is in the waitin...

Page 36: ... a job Select Job List to display the job currently being performed Job List Delete Press this button to delete the job in process to cancel the operation Select the job from the job list and then press Delete Check the message that appears and delete the job No documents in a User Box will be deleted even if the job currently being run is deleted ...

Page 37: ...ber of copies to be printed When there are more than the upper limit of seven jobs to be displayed at one time press these buttons to display other jobs Delete Press this button to delete the selected job Increase Priority Press this button to change the priority of the job If you set Changing Job Priority in Administrator Settings to Restrict you cannot specify the output priority of the jobs If ...

Page 38: ...splay the job type Detail Press this button to check the job result error details registration source user name file name output tray stored time number of original pages and number of copies for the selected job Scanned Image Select the job to display the scanned image Item Description List items No Job identification number assigned when the job is queued Address Type Displays the destination ty...

Page 39: ... E Mail FTP PC SMB WebDAV TWAIN or setting disabled TWAIN appears for the job that is sent via Web service Address Displays the fax number E mail address User Box name etc of the recipient s machine Time Stored Displays the time that the job was queued Org Displays the number of pages in the original Result Displays the result of the operation completed successfully delet ed due to error deleted b...

Page 40: ...the status is set to Waiting To Redial to perform redialing Forward Forwards the fax received and stored in the memory in memory proxy re ception Specify the recipients either by selecting destinations registered in the address book or by entering directly Detail Press this button to check the registration source user name file name output tray stored time transmission time and number of original ...

Page 41: ...registration source user name file name User Box stored time and number of original pages for the selected job To delete a job press Delete The external server information that is available by pressing Detail ap pears only when using external server authentication Item Description List items No Job identification number assigned when the job is queued User Name Displays the user name or user name ...

Page 42: ... Reference When you select multiple documents use to switch pages d Reference For checking preview image refer to page 3 14 Use File Check Job Settings Select Send or Bind TX in the Send tab to display the address entry screen Check Job Settings is dis played on the lower left of the screen Reference Press Check Job Settings to check the following settings Destination Settings Document Setting Con...

Page 43: ...ess Store Ad dress To check the detailed information of the destination select a destination and press Details To delete a destination select one you want to delete and then press Delete d Reference For details on how to register a destination to the address book refer to the User s Guide Network Scan Fax Network Fax Operations Use File Check Job Settings Document Setting Contents View the list of...

Page 44: ...heck Job Settings Check E Mail Settings Check the document name subject From address and message body to send E mail messages Preview Check the preview image of the selected document when using or filing documents Press Preview to select one document The image of the first page is displayed in the left panel Reference For a document with multiple pages only the image of the first page can be viewe...

Page 45: ...o switch the dis play to another page Zoom Enlarge the image of the document to check details The image can be magnified 2 times 4 times or 8 times To view the desired portion of the enlarged image use the scroll bars located in the right and the bottom of the image Rotate Image Rotates the currently displayed page by 180 degrees to show the image Rotate Pages Select if the saved document contains...

Page 46: ...dd numbered pages Even Page Select images in the even numbered pages Select All Select images in all pages Rotation Angle Select Left 90 Right 90 or 180 as the rotation angle When the destination is a fax an image is sent at 180 degrees if Left 90 is selected in Rotation Angle and at 0 degrees if Right 90 is selected If TIFF or JPEG is selected as the file format to read a long original the rotati...

Page 47: ... 17 3 2 Touch panel 3 Reference If you select Bind TX the Delete Page function becomes unavailable If you select Send for multiple documents the rotate page and delete page functions become unavail able ...

Page 48: ...4 User Box Operation Flow ...

Page 49: ...cuments in User Boxes This section describes the steps for saving documents in Public User Boxes Press the User Box key in the control panel Select the desired User Box and then press Save Document Configure the document name p 6 4 scan set tings p 6 5 and original settings p 6 18 ...

Page 50: ...When saving an original with an embedded password the password entry screen appears Enter the password and press OK to start saving You cannot save an original with copy guard embedded Load the original Press Start or the Start key in the control panel ...

Page 51: ...Printing documents from a User Box This section describes the steps for printing documents saved in Public User Boxes Press the User Box key in the control panel Select the desired User Box and then press Use File Select the Print tab Select documents ...

Page 52: ... 4 When selecting multiple documents and printing them using added functions press Combine p 7 5 Configure the printing order bind order p 7 6 Configure basic and application settings p 7 7 p 7 13 Configure basic and application settings p 7 7 p 7 13 To confirm the contents display the preview p 3 15 ...

Page 53: ...4 6 4 2 Printing documents from a User Box 4 Press Start or the Start key in the control panel ...

Page 54: ... Sending documents from a User Box This section describes the steps for sending documents saved in Public User Boxes Press the User Box key in the control panel Select the desired User Box and then press Use File Select the Send tab Select documents ...

Page 55: ...mp press Bind TX p 7 30 Configure the sending order bind order p 7 6 Specify the destination Address Book Direct Input Job History The job history of fax Internet fax or IP address fax is not displayed when Bind TX is selected Address Search Also specify a scan fax program For details on scan fax programs refer to the User s Guide Network Scan Fax Network Fax Operations ...

Page 56: ... Box 4 Configure document communication and appli cation settings p 7 44 Configure document communication and appli cation settings p 7 44 To confirm the contents display the preview p 3 16 Press Start or the Start key in the control panel ...

Page 57: ...for saving scanned images in the external memory Press User Box in the control panel while the exter nal memory is connected to this machine Connect the external memory to this machine and then press Save a document to External Memory Press Save Document Press User Box Select the System User Box tab Press External Memory then OK ...

Page 58: ... in external memory is set to OFF not saved in the factory setting In addition it is set to OFF cannot be saved by the user function settings when user authentication is enabled To save a document in external memory change the setting to enable you to save a document in Administrator Settings For details refer to page 8 21 Configure the document name p 6 4 scan set tings p 6 5 and original setting...

Page 59: ...ored in the external memory to a User Box Press User Box in the control panel while the exter nal memory is connected to this machine Connect the external memory to this machine and then press Save a document from External Mem ory to a User Box Select the System User Box tab Press External Memory then Use File Press the Filing Settings tab Select a document and then press Save to User Box ...

Page 60: ...lt In addition it is set to OFF cannot be saved by the user function settings when user authentication is enabled To save a document from the external memory into a User Box change the setting to enable you to save a document in Administrator Settings For details refer to page 8 21 Specify the User Box and document name p 7 98 Press Start or the Start key in the control panel ...

Page 61: ...g documents saved in the external memory Press User Box in the control panel while the ex ternal memory is connected to this machine Connect the external memory to this machine and then press Print a document from External Memo ry Select the System User Box tab and then press External Memory Press Use File Select a file and then press Print p 7 95 ...

Page 62: ...lt In addition it is set to OFF cannot be saved by the user function settings when user authentication is enabled To save a document from the external memory into a User Box change the setting to enable you to save a document in Administrator Settings For details refer to page 8 21 Configure print settings p 7 96 Press Start or the Start key in the control panel ...

Page 63: ... User Box This section describes the steps for filing documents saved in Public User Boxes Press the User Box key in the control panel Select the desired User Box and then press Use File Select the Filing Settings tab Select documents and then select a function p 7 60 ...

Page 64: ...ename the documents refer to page 7 61 To move the documents to other User Boxes refer to page 7 61 To copy the documents to other User Boxes refer to page 7 62 To save a document in the external memory refer to page 7 62 To check information of the documents or preview the documents refer to page 7 64 ...

Page 65: ... in a Cellular Phone or PDA This section describes the steps to print a document saved in a cellular phone or PDA Press the User Box key in the control panel Select the System User Box tab Press Mo bile PDA then Use File Press Print List To check printing preferences press Check Print Settings ...

Page 66: ...a Document Saved in a Cellular Phone or PDA 4 d Reference To configure print settings from a cellular phone or PDA refer to page 8 11 Enter the PIN code displayed in the control panel to the cellular phone or PDA p 7 99 ...

Page 67: ... Cellular Phone or PDA to a User Box This section describes the steps to save a document stored in a cellular phone or PDA to a User Box Press the User Box key in the control panel Select the System User Box tab Press Mo bile PDA then Use File Press Save in User Box Select the desired User Box and then press OK ...

Page 68: ...4 21 4 9 Saving a Document Stored in a Cellular Phone or PDA to a User Box 4 Enter the PIN code displayed in the control panel to the cellular phone or PDA p 7 100 ...

Page 69: ...l Fourth level User Box p 6 4 Document Name p 6 4 Scan Settings Original Type p 6 5 Simplex Duplex p 6 6 Resolution p 6 6 File Type File Type p 6 7 Encryption p 6 8 Outline PDF p 6 10 Scan Setting p 6 10 Density p 6 11 Color p 6 11 Scan Size p 6 12 Image Adjust ment Background Removal p 6 13 Sharpness p 6 14 Application Frame Erase p 6 14 Book Copy p 6 15 Separate Scan p 6 17 Original Settings Spe...

Page 70: ... Simplex Duplex p 6 6 Resolution p 6 6 File Type File Type p 6 7 Encryption p 6 8 Outline PDF p 6 10 Scan Setting p 6 10 Density p 6 11 Color p 6 11 Scan Size p 6 12 Image Adjust ment Background Re moval p 6 13 Sharpness p 6 14 Application Frame Erase p 6 14 Book Copy p 6 15 Separate Scan p 6 17 Original Settings Special Original p 6 18 Mixed Original Z Folded Origi nal Long Original Direction Set...

Page 71: ... 6 10 Density p 6 11 Color p 6 11 Scan Size p 6 12 Image Adjust ment Background Re moval p 6 13 Sharpness p 6 14 Application Frame Erase p 6 14 Book Copy p 6 15 Separate Scan p 6 17 Original Settings Special Original p 6 18 Mixed Original Z Folded Origi nal Long Original Direction Set tings Original Direc tion p 6 18 Binding Position p 6 19 Despeckle p 6 19 Mobile PDA Save in User Box p 7 99 First...

Page 72: ...el Second level Third level Fourth level Print Copies p 7 7 Print p 7 7 1 Sided 2 Sided Color p 7 8 Full Color Black Use Existing Color Setting Finishing p 7 8 Sort p 7 9 Group p 7 9 Offset p 7 9 Staple p 7 9 Punch p 7 9 Fold Bind p 7 10 Half Fold Center Staple Fold Combine p 7 11 Combine Pages Combine Direction Zoom p 7 11 Existing Setting Manual Full Size Minimal Fixed Zoom User Preset Zoom Page...

Page 73: ...arting Page Number Page Number Type Starting Chapter Number Insert Sheet Set ting p 7 20 Print Position Text Details Stamp p 7 20 Stamp Type Pre set Stamps Pages Text Size Text Color Print Position Copy Security Copy Protect p 7 21 Copy Guard p 7 23 Password Copy p 7 24 Stamp Repeat p 7 25 Stamp Repeat Type p 7 26 Detail Settings p 7 26 Position p 7 26 Header Footer p 7 27 Recall Head er Footer Mo...

Page 74: ...sition Adjust Value Image Shift p 7 13 Vertical Shift Horizontal Shift Change Back Shift Stamp Composi tion Date Time p 7 18 Date Format Time Format Pages Print Position Text Details Page Number p 7 19 Starting Page Number Page Number Type Starting Chapter Number Print Position Text Details Stamp p 7 20 Stamp Type Pre set Stamps Pages Text Size Text Color Print Position Copy Security p 7 21 Copy P...

Page 75: ...on p 7 26 Header Footer p 7 27 Recall Head er Footer Mode Check Registered Over lay p 7 28 Recall Overlay Image Pages Document De tails Preview p 7 65 First level Second level Third level Fourth level First level Second level Third level Fourth level Send Address Book Search p 7 34 Direct Input Fax p 7 37 Fax Number E Mail p 7 37 Internet Fax p 7 38 RX Ability Desti nation p 7 38 IP Address Fax p ...

Page 76: ... 45 File Type p 7 45 Encryption p 7 46 Stamp Composi tion p 7 48 Outline PDF p 7 48 Scan Setting p 7 49 Color p 7 49 Use Existing Color Setting Full Color Gray Scale Black Communication Settings Line Settings p 7 50 Overseas TX p 7 50 ECM OFF p 7 51 V 34 OFF p 7 51 Check Dest Send p 7 51 Select Line p 7 51 E Mail Settings p 7 52 DocumentName p 7 52 Subject p 7 52 From p 7 53 Body p 7 53 URL Notifi...

Page 77: ...19 Stamp p 7 20 Header Footer p 7 27 Send Print p 7 59 Copies Simplex Duplex Staple Bind TX Address Book Search p 7 34 Direct Input E Mail p 7 37 PC SMB p 7 39 Host Name File Path User Name Password Reference FTP p 7 40 Host Name File Path User Name Password Detailed Settings WebDAV p 7 41 Host Name File Path User Name Password Detailed Settings Job History p 7 42 Address Search p 7 42 Search p 7 ...

Page 78: ...7 46 Stamp Composi tion p 7 48 Outline PDF p 7 48 Scan Setting p 7 49 Communication Settings E Mail Settings p 7 52 DocumentName p 7 52 Subject p 7 52 From p 7 53 Body p 7 53 URL Notification Setting p 7 54 Address Book Detail Search Direct Input E Mail Encryption p 7 57 Digital Signature p 7 57 Application Stamp Composi tion Date Time p 7 18 Page Number p 7 19 Stamp p 7 20 Header Footer p 7 27 Se...

Page 79: ...evel Second level Third level Fourth level Delete p 7 61 Edit Name p 7 61 Move p 7 61 Copy p 7 62 Save to External Memory p 7 62 Document De tails Preview p 7 65 First level Second level Third level Fourth level Edit Document Delete Page p 7 67 Rotate Page p 7 68 Move Page p 7 70 Preview p 7 72 Preview Set Range p 7 71 Register Overlay p 7 73 Overlay Image Edit New p 7 74 Overwrite p 7 75 Detail S...

Page 80: ...u ment User Box Print Copies p 7 80 Print p 7 80 1 Sided 2 Sided Color p 7 8 Full Color Black Use Existing Color Setting Finishing p 7 8 Sort Group Offset Staple Punch Fold Bind p 7 10 Combine p 7 11 Combine Pages Combine Direc tion Zoom p 7 11 Existing Setting Manual Full Size Minimal Fixed Zoom User Preset Zoom Page Margin p 7 13 Margin Position Adjust Value Image Shift Sheet Cov er Chapter Inse...

Page 81: ... p 7 82 Delete Edit Name Document De tails Preview p 7 65 Annotation User Box Print Print Copies p 7 7 Print p 7 7 1 Sided 2 Sided Color p 7 8 Full Color Black Use Existing Color Setting Finishing p 7 8 Sort Group Offset Staple Punch Fold Bind p 7 10 Combine p 7 11 Combine Pages Combine Direc tion Zoom p 7 11 Existing Setting Manual Full Size Minimal Fixed Zoom User Preset Zoom Page Margin p 7 13 ...

Page 82: ... 39 FTP p 7 40 WebDAV p 7 41 Job History p 7 42 Address Search p 7 42 Search p 7 43 Advanced Search p 7 43 Document Set tings Resolution p 7 44 File Type p 7 45 Color p 7 49 Communication Settings E mail Settings p 7 52 URL Notification Setting p 7 54 E Mail Encryp tion p 7 57 Digital Signature p 7 57 Application Stamp Composi tion p 7 18 Send Print p 7 59 Stamp Element p 7 86 Filing Settings p 7 ...

Page 83: ...ocument De tails Preview p 7 65 External Memory Print Copies p 7 96 Color p 7 96 Full Color Black Print p 7 96 1 Sided 2 Sided Binding Position p 7 96 Top Left Right Finishing p 7 8 Sort Group Offset Staple Punch Fold Bind Paper p 7 97 Stamp Composi tion Date Time p 7 18 Page Number p 7 19 Stamp p 7 20 Copy Security p 7 21 Stamp Repeat p 7 25 Filing Settings Save to User Box p 7 98 User Box Docume...

Page 84: ...5 Accessing the User Box mode ...

Page 85: ...his procedure turn this machine on When this machine is ready to copy data the basic set tings screen appears To access the User Box mode press the User Box key in the control panel The User Box mode window appears Lightly press the desired button in the window to display menus or functions Then select the target one ...

Page 86: ...ave Document function refer to page 6 3 For details on the Save Document menu structure refer to page 4 22 5 2 2 Use File Print or send a document saved in a User Box When printing a document you can specify the number of sets or page margins When sending a document you can specify the file type If necessary you can rename or move a document saved in a User Box or copy a document to another User B...

Page 87: ...6 Save Document ...

Page 88: ...ser Box tab and then press Annotation User Box External Memory You can directly save a scanned document in the external memory connected to this machine To use this function check that the external memory is connected to the USB connector of this machine select the Sys tem User Box tab and then press External Memory Otherwise on the screen that is displayed when the external memory device has been...

Page 89: ...ersonal or Group tab to display a list of User Boxes you can save a document in Specify the desired User Box System User Box Select the System User Box tab to display a list of User Boxes you can save a document in Specify the desired User Box Reference If Annotation User Box is selected further specify the desired User Box ...

Page 90: ... Group and Annotation User Boxes you can change the desti nation User Box for saving a document To change the User Box press User Box and select a User Box If there is no User Box with the specified number a new Public User Box is au tomatically created Document Name Press this button to display a keyboard to enter a document name Enter the docu ment name in the control panel Scan Settings Configu...

Page 91: ...fy the photo type Item Description Text Original that consists of only text Text Photo Original that consists of both text and photos halftone Photo Original that consists of only photos halftone Dot Matrix Origi nal Original with faint printing in whole Copied Paper Original with even density that was printed using a copier or printer Item Description Photo Paper Select this setting for a photo p...

Page 92: ... depending on the selected resolution and you may not be able to save data in an external memory If you cannot save data reduce the resolution and retry saving it Item Description 1 Sided Scans one side of the original 2 Sided Scans both sides of the original Cover 2 Sided Scans the first page of the original as a cover in the single sided mode and also scans the remaining pages in the double side...

Page 93: ... you have selected the file type when saving a document in a User Box you must specify the file type when downloading the data of the document If you select JPEG Page Separation is automatically selected and set to 1 Every X Page s in Scan Setting Item Description PDF Saves data in PDF format Compact PDF Further compressed PDF file This format is useful when saving a scanned full color data TIFF S...

Page 94: ...the detailed permission settings when the document permission is specified on the Encryption screen When Low level is selected Item Description Encryption Level Select the encryption level Password Enter the password necessary to open encrypted data up to 32 characters For confirmation enter the password twice Document Per missions Enter the password necessary to change document permissions up to ...

Page 95: ...hen Low level is selected When High level is selected Item Description Printing Allowed Select whether to allow or restrict printing data Low Resolution appears when the Encryption Level is set to High level Enable copying of text images and other con tent Select whether to allow or restrict extracting text images ...

Page 96: ... the selection of Page Separation is stored and then the document is saved as a Multi Page file The selection of Page Separation is enabled when sending data to an E Mail PC SMB or FTP desti nation Item Description Changes Al lowed Select the permission level about changes to the document including signing en tering or commenting data Item Description Multi Page Creates all the scanned originals a...

Page 97: ...pe and Color settings Item Description Auto Color Automatically detects the color of the original and scans it to fit the original setting Full Color Scans the original in full color Gray Scale Select this setting for originals with high level halftone such as black and white pho tos Black Select this setting for originals with distinct black and white areas such as line draw ings Auto Color Full ...

Page 98: ...scanning To scan the orig inal with a predetermined paper size select that size Custom Size Enter the dimensions of a custom size other than the standard sizes Reference X direction Enter a value from 2 to 7 inches 30 0 to 432 0 mm Y direction Enter a value from 2 to 11 11 16 inches 30 0 to 297 0 mm Photo Size Select the 3 e 5 or 2 1 4 e 3 1 4 13 e 18 10 e 15 or 9 e 13 size for photographs ...

Page 99: ...he back ground color may be scanned resulting in the entire image becoming dark To avoid this you can adjust the background density Select the background removal method and specify the level To automatically adjust the density press Auto Reference To prevent the dark part in the back side from being scanned as shade select Bleed Removal To scan an original with the colored background such as a map...

Page 100: ...e specified the frame width to be erased in the Frame Erase setting of the Book Copy function the same value is automatically configured for this Frame Erase function To erase all frames with the same width specify a numeric value between 1 16 and 2 inches 0 1 and 50 0 mm under Frame To individually specify the top left right and bottom widths press the desired button and specify a numeric value f...

Page 101: ... auto matically configured for this Frame Erase setting of the Book Copy function To erase all frames with the same width specify a numeric value between 1 16 and 2 inches 0 1 and 50 0 mm under Frame To individually specify the top left right and bottom widths press the desired button and specify a numeric value for that side To not erase frames press None Item Description Book Spread Scans a two ...

Page 102: ...the binding position in the center of the original Reference Use the keypad or press or to enter a numeric value between 1 16 and 1 3 16 inches 0 1 and 30 0 mm Binding Position If you have selected Separation Front Cover or Front Back Covers press Binding Position and then se lect the binding position ...

Page 103: ...d into several sessions by types of originals for example when all pages of originals cannot be loaded into the ADF when the originals are placed on the original glass or when single sided originals and double sided originals are mixed Press Separate Scan to highlight the display ...

Page 104: ...on Select the orientation of the original After the document is scanned the data is processed so that it is cor rectly oriented Item Contents Mixed Original Select this setting when loading originals with different sizes together into the ADF The scanning speed will be lowered because the size of each page is detected be fore it is scanned Z Folded Origi nal Select this setting to detect the size ...

Page 105: ... scanned image when loading an original in the ADF Reference Specifying Despeckle will drop the scanning speed If the slit glass is too dirty clean it For details refer to the User s Guide Copy Operations Item Description Auto Sets the binding position to the long side if the size is 11 11 16 inches 297 mm or smaller or the short side otherwise Top Select this setting if the original is loaded wit...

Page 106: ...7 Use File ...

Page 107: ... fax You can add finishing or transmission settings when distributing the document You can also specify Bind TX to select two or more documents and distribute them at the same time Filing You can perform various document filing operations such as moving or copying documents between User Boxes You can also save a document stored in a User Box in the external memory Application settings You can move...

Page 108: ...Box contains seven or more documents use or to scroll up or down the list 9 Select All Press this button to select all documents in the specified User Box 10 Reset Press this button to reset all documents in the User Box 11 Detail View Thumb nail View Press this button to switch the display format of saved documents Thumbnail View A reduced image of the first page number of pages and document name...

Page 109: ... the Print screen the two categories of the configurable items are provided Basic and Application No Name Description 1 Print Configure settings to print the selected documents If you have selected multiple documents the document print setting function is not available p 7 5 2 Combine Configure the printing order or other setting to print two or more docu ment selected p 7 6 2 1 No Name Descriptio...

Page 110: ...ttings such as the page margin and stamp 2 1 Item Description Copies Specify the number of copies Print Select either 1 Sided Print or 2 Sided Print Color Configure color settings to print documents Finishing Configure settings such as for sorting or grouping stapling punching or Fold Bind Combine Configure settings to print multiple 2 4 or 8 pages on one page when printing a multi page document S...

Page 111: ...ings for the following functions Reference Fold Bind can be configured when the optional Finisher is installed The punch settings can be configured when the Punch Kit is installed on the optional Finisher When combining and printing document you cannot select the Sort or Group function Item Description Copies Specify the number of copies Print Select either 1 Sided Print or 2 Sided Print Color Con...

Page 112: ... Personal or Group User Box 7 3 1 Copies Use the keypad to enter the number of copies The allowable range is 1 to 9999 Reference To reset the setting to 1 press the C key on the control panel 7 3 2 1 Sided 2 Sided Select whether to print one side or both sides of sheets of paper ...

Page 113: ... they are saved in black and white Black Prints a document in black and white Use Existing Color Setting Prints a document with the color settings used when it was saved 7 3 4 Finishing Configure sorting grouping finishing and other settings d Reference When the finisher is installed you can change the ejection method in Administrator Settings For the Offset function refer to the User s Guide Copy...

Page 114: ...ocument is separated When the finisher is installed the printed sheets are fed while shifting them for each separation When the finisher is not installed the printed sheets are fed while alternately sorting them Staple Printed sheets are stapled at a corner or two points Staple Position Setting If you select the type of stapling specify the position The following screen shows an example of 2 Posit...

Page 115: ...positions Fold Bind Configure the following settings when a finisher is installed Select the desired function Item Description Half Fold Folds printed sheets of paper before being fed Center Staple Fold Staples printed sheets of paper at two center points and folds them in two before being fed ...

Page 116: ... images can be enlarged or reduced when they are printed Specify the magnification Item Description 2in1 Combines a 2 page original into one page 4in1 Combines a 4 page original into one page You can select the combining order of original pages 8in1 Combines An 8 page original into one page You can select the combining order of original pages ...

Page 117: ...next document is printed continuously from the back side of the last page of the previous document No The next document is printed from the front side of a new sheet Item Description Existing Setting Prints A document with the magnification that was specified when it was saved Manual Specify the magnification between 25 0 and 400 0 on a 0 1 basis Use the keypad to directly enter the magnification ...

Page 118: ...ge margin width on a 1 16 inch 0 1 mm basis by pressing or To set the margin width to 0 inch 0 mm press No Shift Item Description Margin Position Select the margin position Auto Zoom A page margin position along the long side of the paper is selected if the original length is 11 11 16 inches 297 mm or less A page margin is created along the short side of the paper if the original length exceeds 11...

Page 119: ...on a 1 16 inch 0 1 mm basis by pressing or To set the margin width to 0 inch 0 mm press No Shift 7 4 2 Sheet Cover Chapter Insert You can configure the Cover Sheet Insert Sheet or Chapters function Item Description Cover Sheet Prints documents with front and back covers Insert Sheet Inserts colored sheets or other type of paper before the specified pages when doc uments are printed Chapters Config...

Page 120: ...ack Blank is selected for Back Cover Item Description Front Cov er None A front cover is not attached to a document Front Copy The first page of a document is printed on the front cover sheet The second page is printed on the back side of the front cover sheet when 2 Sided print ing is selected Front Blank A blank sheet is inserted before the first page of a document Back Cov er None A back cover ...

Page 121: ...epending on whether you select 1 Sided or 2 Sided printing Example When page 6 is specified Item Description Page specifica tion Sort Specify a page you want to insert a sheet into Press a page button and use the key pad to enter the desired page number To sort the entered pages in ascending order press Sort Insert Paper Select a tray to load the sheets to be inserted Check that sheets are loaded ...

Page 122: ... are as follows Blank when 1 Sided is selected A specified sheet is inserted after the sixth page Blank when 2 Sided is selected A specified sheet is inserted as the fourth sheet When you specify an odd pages the back side of the inserted sheet is left blank Item Description Item Description Page specifica tion Sort Specify front sided pages Press a page button and use the keypad to enter the de s...

Page 123: ...ence For details on how to register a header or footer refer to the User s Guide Copy Operations or User s Guide Network Scan Fax Net work Fax Operations Registered Overlay A registered image is overlaid on printed pages This item is not displayed when no overlay image is registered d Reference For details on how to register an overlay image refer to page 7 73 Item Description Date Format Select t...

Page 124: ...rint a page number on an inserted sheet For the available set tings refer to page 7 20 Print Position Specify the print position To fine adjust the print position press Adjust Position Specify the shift length of the print position to the left right top or bottom using a value between 1 16 and 1 15 16 inches 0 1 and 50 0 mm Text Details Specify the details of text to be printed Text Color Select t...

Page 125: ...page number is printed on neither the front cover nor the back cover Insert Sheet Copy Print Page A page number is printed on inserted copy sheets Do Not Print A page number is not printed on inserted copy sheets Skip the Page s Inserted copy sheets are not counted Page numbers are not printed Insert Blank Do Not Print Page numbers are not printed on inserted blank sheets Skip the Page s Inserted ...

Page 126: ...ings or stamps is limited to 4 In the Copy Protect screen you can configure the following settings Text Size Select the printing text size from Minimal or Standard Text Color Select the printing color from black red blue green yellow cyan or magenta Print Position Specify the print position To fine adjust the print position press Adjust Position Specify the shift length of the print position to th...

Page 127: ... one area Other Press this button to specify the job number serial number and distribution control number the document was registered with Job Number The job number for the print job is printed A job number requires one area Serial Number The serial number assigned to this machine is printed The serial number requires one area The serial number is assigned at the time of shipment of this machine F...

Page 128: ... D r a f t D r a f t D r a f t D r a f t REPORT Item Description Preset Stamp Press this button to apply a standard string such as Invalid Copy Copy or Private as a preset stamp One stamp requires one area Date Time Press this button to apply the date and time the document was registered Date Format requires one area Time Format requires one area Other Press this button to specify the job number s...

Page 129: ...assword Copy select Yes and press Password to specify the password Reference For confirmation enter the password twice in the control panel If a password is specified you can configure a stamp You can apply up to 6 stamps Item Description Text Back ground Color Select the text and background colors from black magenta or cyan Copy Guard Pat tern Specify the contrast of a copy guard Emboss Backgroun...

Page 130: ...res one area Other Press this button to specify the job number serial number and distribution control number the document was registered with Job Number The job number for the print job is printed A job number requires one area Serial Number The serial number assigned to this machine is printed The serial number requires one area The serial number is assigned at the time of shipment of this machin...

Page 131: ...Copy or Private as a preset stamp One stamp requires one area Date Time Press this button to apply the date and time the document was registered Date Format requires one area Time Format requires one area Other Press this button to specify the job number serial number and distribution control number the document was registered with Job Number The job number for the print job is printed A job numbe...

Page 132: ...ference For details on how to register the header or footer refer to the User s Guide Network Scan Fax Network Fax Operations Check Change Temporarily In the Header Footer setting screen press Check Change Temporarily to change the registered header or footer Item Description Recall Head er Footer Select the desired ones from the registered headers and footers Check Change Temporarily Press this b...

Page 133: ...ime Configure the date and time settings for the header or footer Other Configure setting to add the distribution control number job number or serial number to the header or footer The serial number is assigned at the time of shipment of this machine For details on settings contact your service repre sentative Pages Select whether to print the header and footer on all pages or the first page only ...

Page 134: ...The original is superimposed on the overlay image when they are printed Item Description Thumbnail View Display Name In the thumb nail view you can check overlay images In the Display Name mode you can check overlay images using their file names Select the desired overlay im age Detail Settings Press this button to specify how to compose an overlay image Density Use the keypad to enter the density...

Page 135: ... as an attachment file of an E mail Internet Fax Sends document data as an attachment file of an E mail via an intranet or Internet IP Address Fax Sends document data to the destination specified with the IP address host name or E mail address of the destination PC SMB Sends document data to the shared folder in the specified computer FTP Sends document data to the specified FTP server WebDAV Send...

Page 136: ...function are not displayed since multiple documents are sent No Item Description 1 Configure the desti nations Configure the destinations p 7 34 2 Configure the func tions Configure the functions that can be added when transmitting docu ments p 7 44 1 2 No Item Description 1 Configure the desti nations Configure the destinations p 7 34 2 Configure the func tions Configure the functions that can be...

Page 137: ...ctly enter unregistered destinations 3 Job History Select the recipients from the transmission log 4 Address Search Press this button to search for the registered address when the LDAP server is used 5 Group Press this button to list the registered group addresses 6 Search Press this button to search the address book for destination 7 Document Settings Press this button to specify the resolution f...

Page 138: ...play the binding order selection screen Documents will be sent in the order they are displayed in this screen When this screen appears the documents are displayed in the order they were selected Reference To change the order select a reorder source document then a reorder destination document ...

Page 139: ...search for the destination by address type that was specified when the destination is registered d Reference For details on the Default Address Book setting refer to the User s Guide Network Scan Fax Network Fax Operations The Search screen is displayed when you press Search if Default Address Book is set to Index in User Settings Custom Display Settings Scan Fax Settings in the Utility menu No It...

Page 140: ... when you press Search if Default Address Book is set to Address Type in User Settings Custom Display Settings Scan Fax Settings in the Utility menu Detail Search Enter the address name or a part of the address to search for the destination address Select either Name or Address and enter an index No Item Description 1 Index Displays addresses by registered index 1 ...

Page 141: ...to display the search option screen and options displayed on that screen use Search Option Settings in the setting menu For details refer to the User s Guide Network Scan Fax Network Fax Operations 7 6 2 Direct Input Directly enter an unregistered destination as a recipient Reference When Manual Destination Input is set to Individual Management in Security Settings in Administrator Settings Direct...

Page 142: ...e second input screen d Reference For details on the Confirm Address TX function refer to the User s Guide Network Scan Fax Network Fax Operations 7 6 4 Direct Input E mail Enter the E mail address in the touch panel Reference You can register the frequently used user names or domain names and call them when sending E mail messages Before you use this function you must register the prefix and suff...

Page 143: ...Network Administrator Next Destination Press this button to continuously specify another destination Receiver RX Ability Select settings that are receivable in the Internet Fax destination You can select multiple receivable settings 7 6 6 Direct Input IP Address Fax Enter the IP Address Fax destination Item Description Compression Type Select JPEG Color JPEG Grayscale MMR MR or MH Paper Size Selec...

Page 144: ... in the touch panel Password Enter the login user password in the touch panel Reference Check the folder information on the destination computer Next Destination Press this button to continuously specify another destination Port Number Use the keypad to enter the sending port number using a value from 1 to 65535 Destination Ma chine Type Select Color when the destination machine supports color pri...

Page 145: ...touch panel User Name Enter the login user name in the touch panel Press Anonymous to enter anonymous Password Enter the login user password in the touch panel Detail Settings Press this button to configure the more detailed settings Next Destination Press this button to continuously specify another destination Item Description Port Number Enter a port number PASV Specify whether to use the PASV m...

Page 146: ...ion folder in the touch panel User Name Enter the login user name in the touch panel Password Enter the login user password in the touch panel Detail Settings Press this button to configure the more detailed settings Next Destination Press this button to continuously specify another destination Item Description Port Number Enter a port number Proxy Specify whether to use a proxy server SSL Setting...

Page 147: ...his history 7 6 11 Address Search The Address Search tab is displayed when the LDAP server is configured in Administrator Settings Reference For details on the LDAP server setting refer to the User s Guide Network Administrator Enabling LDAP The display position of Address Search tab varies depending on user settings For details refer to the User s Guide Network Scan Fax Network Fax Operations ...

Page 148: ... 6 13 LDAP Search Advanced Search Specify multiple search conditions to search for the target address Name Enter the name in the touch panel E mail Addr Enter the E mail address in the touch panel Fax Number Enter the fax number in the touch panel Last Name Enter the last name in the touch panel First Name Enter the first name in the touch panel City Enter the city name in the touch panel ...

Page 149: ... WITH ENDS WITH Select the search condition from OR AND STARTS WITH or ENDS WITH When not specifying any condi tions press No 7 6 14 Overview of the Document Settings Configure document settings such as the resolution or file type 7 6 15 Document Settings Resolution Select the resolution for sending faxes Reference This function is not available when performing Bind TX ...

Page 150: ...ct JPEG Page Separation is automatically selected and set to 1 Every X Page s in Scan Setting You can specify the compression format when saving a TIFF file in color For details refer to the User s Guide Network Scan Fax Network Fax Operations Item Description PDF Saves data in PDF format Compact PDF Further compressed PDF file TIFF Saves data in TIFF format JPEG Saves data in JPEG format XPS Save...

Page 151: ... level is selected Item Description Encryption Level Select the encryption level Password Configure this item when you select the password for the encryption type Enter the password necessary to open encrypted data up to 32 characters For confirmation enter the password twice Document Per missions Configure this item when you select the password for the encryption type Enter the password necessary...

Page 152: ...ed settings When Low level is selected When High level is selected Item Description Printing Allowed Select whether to allow or restrict printing data Low Resolution appears when the Encryption Level is set to High level Enable copying of text images and other con tent Select whether to allow or restrict extracting text images ...

Page 153: ...uch as Adobe Illustrator d Reference This function enables you to specify the accuracy of outline processing when creating outline PDF data For details refer to the User s Guide Network Scan Fax Network Fax Operations Item Description Changes Al lowed Select the permission level about changes to the document including signing en tering or commenting data Item Description Image Select this setting ...

Page 154: ...ti Page Creates all the scanned originals as one file This item cannot be specified together with the JPEG file type Page Separation Separates the scanned data to save every specified number of pages to one file Use the keypad to enter the number of pages to be saved in one file Page Separation cannot be selected when binding and sending multiple docu ments E mail Attach ment Method Specify the me...

Page 155: ...er communication settings 7 6 19 Communication Settings Line Setting Description of Line Settings Configure line settings for fax transmission Overseas TX Faxes are sent to locations with poor communication conditions at a lower baud rate Reference This function cannot be used together with the following functions Polling TX Polling RX Bulletin board ...

Page 156: ...elephone line conditions In this case it is recommended that you turn V34 off to send data After sending has been completed this machine automatically returns to the V34 mode Reference This function cannot be used together with the following functions Polling RX Polling TX Bulletin board registration Bulletin board polling reception ECM OFF Check Dest Send The specified fax number is compared with...

Page 157: ...ssages Document Name The name of the file to be saved is displayed This document name can also be specified in the File Docu ment screen The document name whichever is specified later will be applied to this column You can enter up to 30 characters Subject The text specified in the Utility menu is automatically displayed To change the contents press Direct Input You can enter up to 64 characters ...

Page 158: ...tly enter the address when Change the From Address is set to Restrict in Adminis trator Settings System Settings Restrict User Access Restrict Access to Job Settings For de tails on the Change the From Address setting refer to the User s Guide Network Scan Fax Network Fax Operations Body The E mail body specified in the Utility menu is displayed To change the contents press Direct Input You can en...

Page 159: ... If the authentication mode or User Box password is enabled the password input screen corresponding to each respective authentication status appears On completion of all authentication processing the User Box screen appears Detail Search You can search for E mail addresses from the registered destinations Enter the address name or a part of the address to search for the destination address Select ...

Page 160: ... send or receive data Timer transmission Timer TX Specify the sending time Transmitting faxes in discount telephone rate hours such as late at night or early in the morning will reduce the cost Use the keypad to specify the communication starting time Reference It is specified in hours and minutes You cannot specify the date ...

Page 161: ... to a specific User Box of the remote machine by entering the SUB address and the password F Code TX can be used for the confidential transmission and relay transmission functions Reference To use the F Code for transmission the remote machine must support the F Code function Item Description Confidential TX Documents are sent to the Confidential RX User Box of the remote machine Enter the destina...

Page 162: ...ent from this machine Reference You may not be able to add a digital signature or you may be forced to add a digital signature depend ing on the S MIME communication settings d Reference For details on the S MIME Communication Settings refer to the User s Guide Network Administrator 7 6 25 Communication Settings Fax Header Settings Specify whether to attach sender information TTI when sending docu...

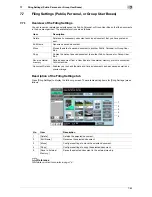
Page 163: ...ing docu ments 7 6 27 Application Stamp Composition Date Time For the setting procedure refer to page 7 18 7 6 28 Application Stamp Composition Page Number For the setting procedure refer to page 7 19 7 6 29 Application Stamp Composition Stamp For the setting procedure refer to page 7 20 7 6 30 Application Stamp Composition Header Footer For the setting procedure refer to page 7 27 ...

Page 164: ...ing sent Also configure print settings Item Description Copies Use the keypad to enter the number of copies A number between 1 and 9999 can be specified Simplex Duplex Select 1 Sided or 2 Sided Staple Select whether to staple the printed sheets Staple Position Setting If you select the type of stapling specify the position ...

Page 165: ...cument such as a document that you have printed or sent Edit Name Renames a saved document Move Moves the data of a saved document to another Public Personal or Group User Box Copy Copies the data of a saved document to another Public Personal or Group User Box Save in external memory Saves a document from a User Box into the external memory which is connected to this machine Document Details Enab...

Page 166: ... you rename the document that you plan to send consider the naming and other conditions forced by the destination server If necessary you can rename the document just before you send it 7 7 4 Moving documents Move a saved document to another User Box For the destination User Box a Public Personal or Group User Box can be selected Select the destination User Box check document data and then press S...

Page 167: ...d in a Personal or Group User Box vary depending on the logged in user You do not need to enter the password even if it is specified in the destination User Box 7 7 6 Save in external memory You can save a document stored in a User Box to the external memory Pressing Document Settings to configure the settings of a document to be saved Reference For information on the external memory refer to page...

Page 168: ...to be saved If you select multiple docu ments settings are reflected in all documents Document Settings Resolution Select the resolution of the document to be saved Document Settings File Type When specifying the file type select Yes The available setting items are as follows Item Description File Type Select the file type for the file to be saved ...

Page 169: ...etails refer to page 7 46 Outline PDF Configure this item when you select Compact PDF for the file type For details refer to page 7 48 Item Description Item Description Registered Time Displays the date and time the document was registered User Name Displays the user name or mode SCAN COPY or PRINT by which the document was registered Document Name Displays the name of the document No of Pages Dis...

Page 170: ...age of the saved document You can view the image at full size or at a size of 2 4 or 8 times the normal size After you have changed the display size use the scroll bars located in the right and the bottom of the image to view to the desired portion Reference For a document with multiple pages only the image of the first page can be viewed ...

Page 171: ... the following screen The available setting items for Application Settings are as follows d Reference For details on other items refer to page 7 2 Item Description Edit Document Deletes rotates or moves the selected page Register Overlay Registers the image of a saved document to be overlaid on the printed data Document Details Enables you to check the date and time a document has been saved as we...

Page 172: ...re deleted If you will need the unchanged version of the document make a backup copy of the document in advance For details on how to copy a document refer to page 7 62 1 Select a page to be deleted and then press Delete Page To select only odd pages press Odd Page To select only even pages press Even Page After selecting Odd Page or Even Page you can use a page key to select the desired page or c...

Page 173: ... this case you can rotate selected pages so that the whole document will be viewed more easily 0 You will be unable to restore the pages because they are overwritten when they are rotated If you will need the unchanged version of the document make a backup copy of the document in advance For details on how to copy a document refer to page 7 62 1 Select a page to be rotated and then press Rotate Pa...

Page 174: ...f you are sure to rotate the selected pages press Start or the Start key on the control panel In the example the specified pages pages 1 and 2 have been rotated At this time the document data is not changed 5 Check the information of the displayed screen To rotate the pages select Save To cancel the rotation press Do Not Save to return to the Edit Document screen The selected pages are rotated and...

Page 175: ... you want the selected page move to This is useful when a doc ument consists of many pages For details refer to page 7 72 1 Select a page to be moved and then press Move Page Only one page can be moved at a time To move two or more pages repeat the above steps for each of the pages you want to move The example demonstrates how to move page 6 to between pages 2 and 3 The destination setting screen ...

Page 176: ...splayed screen To move the page select Save To cancel the movement press Do Not Save to return to the Edit Document screen The selected page is moved and the document is saved Preview Set Range You can specify a range of pages and check preview images when the selected document consists of mul tiple pages You can also change the display size Item Description Prev Page Moves to the previous page ...

Page 177: ... size of 2 4 or 8 times the normal size After you have changed the display size use the scroll bars located in the right and the bottom of the image to view to the desired portion Next Page Press this button to move to the next page Zoom You can view the image at full size or at a size of 2 4 or 8 times the normal size After you have changed the display size use the scroll bars located in the righ...

Page 178: ...ay image You can overlay the selected image to a print ed document using Stamp Composition in the Print tab This function is useful when you want to print the images such as company or product logos that are not provided by this machine stamps and page numbers are those provided by this machine Reference You can register up to 100 overlay images When you select a multi page document the first page...

Page 179: ...w Register a new overlay image 1 Select a document and press Register Overlay 2 Press an unregistered image button and press New 3 Enter the name of the overlay image to be registered and press OK You can enter up to 16 characters 4 Press Start ...

Page 180: ... overwrite the registered overlay image with new one 1 Select a document and press Register Overlay 2 Press the image button to be overwritten and press Overwrite 3 Check the displayed message and press Overwrite 4 Press Start The overlay image is overwritten ...

Page 181: ...f a target overlay image and press Detail Settings After configuring settings press OK Item Description Density Specify the density of the image Use the keypad to enter the density using a value between 20 and 100 Color Specify the color of the overlay image Full Color Prints a document in full color Black Prints a document in black and white ...

Page 182: ... User Boxes Se lect the Bulletin Board User Box that contains the document registered in this machine 7 9 3 Printing a document in a Bulletin Board User Box You can print a document saved in the Bulletin Board User Box Check the preview or information of the doc ument press Start or the Start key on the control panel 7 9 4 Deleting a document in the Bulletin Board User Box You can save only one do...

Page 183: ...e docu ment press Start or the Start key on the control panel Reference You can register a document in the Polling TX User Box as an overlay image For details on how to reg ister an overlay image refer to page 7 74 7 10 3 Deleting a document in the Polling TX User Box You can save only one document in the Polling TX User Box To register a new document in the Polling TX User Box delete the existing...

Page 184: ... When Authentication Error is set to Mode 1 in Se curity Settings Security Details of Administrator Settings 7 11 3 Authentication procedure 2 Follow the procedure below when Prohibited Functions When Authentication Error is set to Mode 2 in Se curity Settings Security Details of Administrator Settings Reference If Mode 2 is selected enter the password for each document even when the ID is the sam...

Page 185: ...nd 9999 can be specified Print Select 1 Sided or 2 Sided Color For the setting procedure refer to page 7 8 Finishing For the setting procedure refer to page 7 8 Combine For the setting procedure refer to page 7 11 Zoom For the setting procedure refer to page 7 11 Page Margin For the setting procedure refer to page 7 13 Sheet Cover Chapter Insert For the setting procedure refer to page 7 14 Stamp C...

Page 186: ... at a time select User Box Settings Delete Secure Print Documents in Administrator Settings For details refer to page 8 19 The available setting items are as follows Item Description Delete Deletes an unnecessary document such as a document that you have printed Edit Name Renames a saved document Document De tails Enables you to check the date and time a document has been saved as well as a previe...

Page 187: ...was specified when memory reception was enabled d Reference For details on how to specify the password for memory reception settings refer to the User s Guide Network Scan Fax Network Fax Operations 7 12 2 Print Select a document to be printed and press Print After the specified document has been printed data is deleted automatically 7 12 3 Filing Settings You can handle a document saved in the Me...

Page 188: ...le The registered Annotation User Boxes are displayed Reference Go to Administrator Settings to register the Annotation User Box For details refer to page 8 15 For the types of numbers that can be printed in Annotation User Boxes refer to page 7 86 To print the numbers specified in the Annotation User Box without saving a document in the User Box set Auto Document Delete Time to Do Not Keep This i...

Page 189: ...g procedure refer to page 7 20 7 13 10 Print Stamp Composition Copy Security Copy Protect For the setting procedure refer to page 7 21 7 13 11 Print Stamp Composition Copy Security Copy Guard For the setting procedure refer to page 7 23 7 13 12 Print Stamp Composition Copy Security Password Copy For the setting procedure refer to page 7 24 7 13 13 Print Stamp Composition Stamp Repeat For the setti...

Page 190: ...Settings File Type For the setting procedure refer to page 7 45 7 13 25 Send Document Settings Color For the setting procedure refer to page 7 49 7 13 26 Send Communication Settings E mail Settings For the setting procedure refer to page 7 52 7 13 27 Send Communication Settings URL Notification Setting For the setting procedure refer to page 7 54 7 13 28 Send Communication Settings E mail Encrypti...

Page 191: ... 58 7 13 33 Send Application Send Print For the setting procedure refer to page 7 59 7 13 34 Send Application Stamp Element Secondary Field Add text to a number to be printed You can enter up to 20 characters Date Time Select the format for the date and time to be printed Density Select the density for the annotation numbers to be printed ...

Page 192: ...7 87 7 13 Annotation User Box System User Box 7 Number Type Select the output format number of digits for the annotation numbers to be printed Print Position Select the printing position ...

Page 193: ...ting items are as follows 7 13 36 Application Register Overlay For the setting procedure refer to page 7 73 Item Description Delete Deletes an unnecessary document such as a document that you have printed Edit Name Renames a saved document Document De tails Enables you to check the date and time a document has been saved as well as a preview image ...

Page 194: ...Retransmit User Box in the Fax Settings of Administrator Settings For details on settings refer to the User s Guide Network Scan Fax Network Fax Operations 7 14 2 Print Proof Print Before retransmitting a saved document you can print the document for conformation Data is not deleted after being printed Select a document to be printed and press Proof Print Check document information and press Start...

Page 195: ...7 90 7 14 Re Transmission User Box System User Box 7 7 14 4 Filing Settings Delete Stop retransmission and delete the target document Select a document select the Filing Settings tab and press Delete ...

Page 196: ...ference Only password encrypted PDF data saved by the user who is logged in is displayed when User Authen tication is enabled in this machine 7 15 2 Print Save Print Save Select a document to be printed or saved and press Print Save When printing or saving a document enter the password assigned to the PDF file After printing or saving has been completed documents in the Pass word Encrypted PDF Use...

Page 197: ...e desired button Begin Printing Press this button to print documents saved in the ID Print User Box without logging in to this machine Print Login Press this button to login to this machine and print the documents saved in the ID Print User Box Login Press this button to log in to this machine but not print the documents After you are logged in you can print or delete documents saved in the ID Pri...

Page 198: ... Box System User Box 7 7 16 2 Print Print 1 Select a document to be printed and press Print 2 Select whether to delete the document after printing 7 16 3 Filing Settings Delete Select a document to be deleted and press Delete ...

Page 199: ... the side that is near the control panel Do not use the USB connector near the rear side because it is used for optional devices 0 Do not disconnect the external memory device while saving a document in the external memory device or printing a document saved in the external memory device 0 Do not use the USB device hard disk or USB hub other than the USB flash memory device 0 Do not connect or dis...

Page 200: ...ed for JPEG and XPS files Printing is not possible when printing is restricted by Security Settings of a PDF file This machine supports printing of PDF Version 1 6 or earlier Only the files of printable file types are displayed in the list File access fails when the total length of the file path and file name exceeds 250 characters Up to 200 printable files are displayed in the folder of the speci...

Page 201: ...can check the modification date file name and other properties of the selected document 7 17 3 Print Basic Press Print to display the following screen Copies Use the keypad to enter the number of copies A number between 1 and 9999 can be specified Color Specify whether to print the document in color or black and white Print Select 1 Sided or 2 Sided Binding Position When you select 2 Sided in Prin...

Page 202: ...e refer to page 7 18 Stamp Composition Page Number For the setting procedure refer to page 7 19 Stamp Composition Stamp For the setting procedure refer to page 7 20 Stamp Composition Copy Security Copy Protect For the setting procedure refer to page 7 21 Stamp Composition Copy Security Copy Guard For the setting procedure refer to page 7 23 Stamp Composition Copy Security Password Copy For the set...

Page 203: ...ternal memory in a User Box Specify the User Box and doc ument name and press Start or the Start key on the control panel Item Description User Box Select the Public Personal or Group User Box to save data in Document Name Specify the name of the document to be saved If you select multiple files you cannot specify the document name ...

Page 204: ... the setting in User Settings Cellular Phone PDA Setting Link File Error Notification To access the link file for printing an XHTML file WebDAV Settings of this machine is required To use a proxy for connection register a proxy server in Administrator Settings Network Settings WebDAV Settings WebDAV Client Settings Host Address and set User Settings Cellular Phone PDA Setting Proxy Server Use to O...

Page 205: ...tered user cannot print a document unless printing from a cellular phone or PDA is allowed in the machine setting For user authentication contact the administrator of this machine Entering the PIN code If you enter the 4 digit PIN code from a cellular phone or PDA a connection is established and data is sent to this machine to be printed Reference Check the PIN code in the instruction manual or in...

Page 206: ...e PIN code If you enter the 4 digit PIN code from a cellular phone or PDA a connection is established and data is sent to this machine to be saved in a User Box Reference Check the PIN code in the instruction manual or in the setting instructions of the cellular phone or PDA ...

Page 207: ...8 User Box Settings ...

Page 208: ...ne Touch Us er Box Registra tion 2 Create User Box p 8 5 1 Public Personal User Box p 8 5 New Edit Delete 2 Bulletin Board User Box p 8 6 New Edit Delete 3 Relay User Box p 8 8 New Edit Delete 2 User Settings 2 Custom Display Settings 3 User Box Set tings p 8 9 Default Tab Shortcut Key 1 Shortcut Key 2 Cellular Phone PDA Set ting Link File Error Notification p 8 10 Proxy Server Use p 8 10 Print p ...

Page 209: ...8 18 2 Delete Secure Print Documents p 8 19 3 Auto Delete Secure Document p 8 19 4 Encrypted PDF Delete Time p 8 20 5 ID Print Delete Time p 8 20 6 Document Hold Setting p 8 21 7 External Memo ry Function Set tings p 8 21 Save Document Print Document External Memory Document Scan 8 Allow Restrict User Box p 8 22 9 ID Print Delete after Print Setting p 8 22 0 Document Delete Time Setting p 8 23 ...

Page 210: ...enti cation Account Track 2 User Authenti cation Settings 1 Administrative Setting ID Print Set tings p 8 23 9 System Con nection 5 Cellular Phone PDA Setting p 8 24 0 Security Set tings 2 User Box Administrator Setting p 8 24 4 Security De tails Secure Print Only p 8 25 6 HDD Settings 1 Check HDD Capacity p 8 25 2 Overwrite HDD Data p 8 26 Overwrite Meth od Encryption Priori ty Overwrite Priori t...

Page 211: ...r press User Box No and use the keypad to enter the User Box number between 1 and 999999999 User Box Name Press User Box Name and enter the User Box name in the control panel up to 20 characters Specifying different User Box numbers enables you to create User Boxes with the same name Password Specify a password to limit access to the User Box Press Password and enter the password in the control pa...

Page 212: ...elect the target User Box and press Delete Item Description Auto Document Delete Time Specify the period from the date time when a document was saved in or last retrieved form a User Box to the date time when it is to be deleted au tomatically In Delete Time you can specify the time in addition to the number of days To specify the time enter the numeric value on a 1 minute basis in the range from ...

Page 213: ... panel up to 8 characters Type Select Public Personal or Group depending on User Authentication or Account Track settings If Personal is selected specify the owner user To select the owner user use the owner user change page If Group is selected specify the owner account To select the owner ac count use the Change Owner page Item Description Auto Document Delete Time Specify the period from the da...

Page 214: ...nassigned number To specify a User Box number press User Box No and use the keypad to enter the User Box number between 1 and 999999999 User Box Name Press User Box Name and enter the User Box name in the control panel up to 20 characters Specifying different User Box numbers enables you to create User Boxes with the same name Relay Destination Select a relay destination to send data from the Rela...

Page 215: ...is enabled System Displays the System User Box page Group Displays the Group User Box page when Account Track is enabled Shortcut key This function enables you to add up to two shortcut keys in the area on the lower right of the page It is avail able when registering the frequently used System User Box as a shortcut key Reference A shortcut key is displayed only in the User Box mode after pressing...

Page 216: ...int a link file part 8 2 4 Cellular Phone PDA Setting Proxy Server Use This function enables you to specify whether to use a proxy server to access a link file when printing an XHTML file from a cellular phone or PDA Default OFF ON Uses a proxy server OFF Does not use a proxy server Reference To use a proxy server for connection register the desired proxy server in Administrator Settings Net work ...

Page 217: ... When using a cellular phone or PDA to print a document through this machine configure print settings Basic Print Select 1 Sided or 2 Sided Basic Color Select Full Color or Black Basic Paper Select the printing paper size if the sent data does not contain paper size information ...

Page 218: ...Page Number For the setting procedure refer to page 7 19 Application Stamp Composition Stamp For the setting procedure refer to page 7 20 Application Stamp Composition Copy Security Copy Protect For the setting procedure refer to page 7 21 Application Stamp Composition Copy Security Copy Guard For the setting procedure refer to page 7 23 Application Stamp Composition Copy Security Password Copy Fo...

Page 219: ...8 13 8 2 User mode settings 8 Application Stamp Composition Stamp Repeat For the setting procedure refer to page 7 25 ...

Page 220: ...g User Authentication or Account Track saves the User Box registered as a Personal or Group User Box as a Public User Box The User Box name however remains unchanged When User Authentication or Account Track is enabled enter the ID and password when logging in to this machine After this be sure to press Login or the Access key in the control panel to complete authentication processing If authentic...

Page 221: ...ox Create an Annotation User Box You can configure the following items when create a User Box Reference To change the setting of a created User Box select the target User Box and press Edit If Edit is selected you cannot change the User Box number To delete a created User Box select the target User Box and press Delete Item Description Public User Box Public User Box that can be accessed by everyo...

Page 222: ...r Box Name Press User Box Name and enter the User Box name in the control panel up to 20 characters Specifying different User Box numbers enables you to create User Boxes with the same name Password Specify a password to limit access to the User Box Press Password and enter the password in the control panel up to 8 characters Item Description Count Up Select whether to count the annotation number ...

Page 223: ...umber of User Boxes select OFF Primary Field Add any text up to 40 characters Item Description Auto Document Delete Time Specify the period from the date time when a document was saved in or last retrieved form a User Box to the date time when it is to be deleted au tomatically In Delete Time you can specify the time in addition to the number of days To specify the time enter the numeric value on ...

Page 224: ...mine it Reference If the maximum number of User Boxes is set to 0 you cannot create new ones When the selected user already sets the number of User Boxes to 3 the allowable range of the maxi mum number of User Boxes changes 3 to 1000 8 3 8 User Box Setting Delete Unused User Box Delete a User Box with no document saved as an unnecessary User Box To delete a User Box confirm the message that appear...

Page 225: ... confirm the message and select Yes Auto Delete Secure Document Specify the period from the date time when a secure document was saved or last retrieved to the date time when it is to be deleted automatically Reference In Delete Time specify 5 minutes to 12 hours on a 1 minute basis 1 day 2 days 3 days 7 days or 30 days When not deleting a document select Save ...

Page 226: ...s to 12 hours on a 1 minute basis 1 day 2 days 3 days 7 days or 30 days When not deleting a document select Save ID Print Delete Time Specify the period from the date time when a document was saved in or last retrieved from the ID Print User Box to the date time when it is to be deleted automatically Reference In Delete Time specify 5 minutes to 12 hours on a 1 minute basis 1 day 2 days 3 days 7 d...

Page 227: ...nction to save a document in external memory is set to OFF not saved in the factory setting It is also set to OFF not saved in the user function setting when User Authentication is enabled To save a document in external memory change the setting to enable you to save a document in Administrator Settings Item Description Save Document Select whether to save ON or not save OFF scanned documents or d...

Page 228: ...er to handle those functions select Prohibit Only the administrator can then create edit or delete a User Box ID Print Delete after Print Setting Select whether to check that the document saved in the ID Print User Box has been deleted after printed Reference To check with the user whether to delete the target document select Confirm with User To delete the target document without checking with th...

Page 229: ...ave ID Print Settings Configure settings for ID Print User Box Reference A public user job is printed or saved when public user printing is enabled A user unauthorized job is printed or saved when Print without Authentication is enabled Item Description ID Print ON Saves all the Normal Print and Authentication Print jobs which were requested from a registered user in the ID Print User Box OFF Save...

Page 230: ... the password is specified Setting User Box administrator To set a User Box administrator select Allow and press Password Setting to register the User Box admin istrator s password Reference For confirmation enter the password twice If Password Rules is enabled you cannot create the password that is less than eight characters When the registered User Box password is less than eight characters chan...

Page 231: ...loading or deleting documents saved in all User Boxes Changing all User Box settings Deleting all User Boxes 8 3 11 Security Details Security Print Only Use this setting to specify to enable only Secure Print when issuing the print command from the printer driver To print a document you must enter the ID and password 8 3 12 HDD Settings Check HDD Capacity You can check the occupied and free spaces...

Page 232: ...ryption Priority or Overwrite Priority setting format the HDD after rebooting this ma chine However be careful that data is erased by formatting the HDD For the data erased by formatting the HDD refer to page 8 29 Item Description Mode 1 Overwritten with 0x00 Mode 2 Overwritten with 0x00 Overwritten with 0xff Overwritten with letter A 0x61 Verified Encryption Priority Performs encryption processin...

Page 233: ... with 1 byte random numbers Overwritten with 1 byte ran dom numbers Overwritten with 0x00 Mode 3 Overwritten with 0x00 Overwritten with 0xff Overwritten with 1 byte random numbers Verified Mode 4 Overwritten with 1 byte random numbers Overwritten with 0x00 Overwritten with 0xff Mode 5 Overwritten with 0x00 Overwritten with 0xff Overwritten with 0x00 Overwritten with 0xff Mode 6 Overwritten with 0x...

Page 234: ...orget it Forgetting the pass word will require a large amount of recovery work Specify the password and reboot this machine The HDD password is specified Reference Enter the HDD password using 20 characters Note that all the characters must not be the same If you have already specified the HDD password Change and Release appears You can change or release the HDD password ...

Page 235: ... Boxes Confidential User Box setting Bulletin Board User Box setting HDD Encryption Setting You can configure HDD encryption setting Specifying a 20 character encryption passphrase for the HDD prevents the user from easily reading the data saved in the HDD 0 Be sure to keep the specified encryption passphrase carefully so that you will never forget it 0 The encryption passphrase setting must be co...

Page 236: ...hen configure settings for the stamp to be added continuously Reference The following shows the types of the stamps that can be applied to the printed data Date Time Page Number Stamp Copy Security Copy Protect Copy Guard Password Copy Stamp Repeat Header Footer Registered Overlay The following shows the types of the stamps that can be applied to the transmitted data Date Time Page Number Stamp He...

Page 237: ...9 Web Connection ...

Page 238: ...168 1 20 When IPv6 is set to ON while a browser other than Internet Explorer 6 is used Enter the IPv6 address enclosed in brackets http IPv6 address of the machine Example When the IPv6 address of this machine is fe80 220 6bff fe10 2f16 http fe80 220 6bff fe10 2f16 If IPv6 is set to ON while Internet Explorer is used add fe80 220 6bff fe10 2f IPv6_MFP_1 to the hosts file in advance and specify the...

Page 239: ...wer off and then turn it on again To avoid this problem disable the cache function For Internet Explorer 1 Select Internet Options in the Tools menu 2 In the General tab select Temporary Internet files Settings 3 Select Every visit to the page and click OK For Netscape Navigator 1 Select Preferences in the Edit menu 2 In Category on the left select Advanced Cache 3 In Document in cache is compared...

Page 240: ...s en abled and displays the login page in the public user mode when User Authentication or Account Track is not enabled When re logging in to this machine as a different user or as an administrator log out once and log in again When User Authentication or Account Track is not enabled You are automatically logged in as a public user To log in as an administrator log out once ...

Page 241: ...9 5 9 2 Login and logout 9 Login as an administrator again ...

Page 242: ... enabled If Authentication Manager is used for authentication ask your server administrator about the login proce dure The User Authentication or Account Track page appears Enter the required items to log in To log in as a different user or as an administrator log out once ...

Page 243: ...ine When logged in as a public user To Login Screen appears When logged in as a registered user or an administrator Logout appears If timeout occurred because no operation was performed for the specified period during login or if au thentication setting was changed using the control panel while logging in to the user mode you will au tomatically log out of the mode For details on how to specify th...

Page 244: ...not available in the administrator In the login page select the desired Data Management Utility For details on Data Management Utility refer to the User s Guide Network Administrator Login options You can select items as required when logging in Reference If Flash is selected in View Mode the following items are displayed using Flash Status icons and messages Status of Paper Tray in Information De...

Page 245: ...9 9 9 2 Login and logout 9 Logging in as a public user If user authentication is not enabled on the machine you will be logging in as a public user In the login page select Public User and click Login ...

Page 246: ...enabled select a server To log in to the user mode as an administrator select Administrator Administrator User Mode and enter the administrator password If Prohibited Functions When Authentication Error in Administrator Settings is set to Mode 2 and a user enters an incorrect password the specified number of times that user will be locked out and will no longer be able to use the machine For detai...

Page 247: ...s of this machine you may not be able to log in to the administrator mode If Prohibited Functions When Authentication Error in the Administrator Settings is set to Mode 2 and an incorrect password is entered the specified number of times it is no longer possible to log in to the administrator mode For details on the Prohibited Functions When Authentication Error pa rameter refer to the User s Guid...

Page 248: ...play This manual shows an example where the List Function Display is set as the display mode In either display mode the available items are the same In the default setting the screen is displayed in Tab Function Display In Tab Function Display click the desired icon to change the menu In List Function Display change the menu from the list box Select the desired menu in the drop down list click Dis...

Page 249: ...o log in to the user mode as an administrator select Administrator Administrator User Mode and enter the administrator password If Prohibited Functions When Authentication Error in the Administrator Settings is set to Mode 2 and an incorrect password is entered the specified number of times it is no longer possible to log in to the administrator mode For details on the Prohibited Functions When Au...

Page 250: ...gistered user or account Click the user name to display the login user name 2 Status display Displays the status of the printer and scanner sections of this ma chine with icons and messages Clicking the desired icon when an error occurs displays the information Consumable Info Paper Tray or user registration page associated with the icon to enable you to check the status 3 Message display Displays...

Page 251: ...ine Assistance in page 9 16 7 Refresh Click this icon to refresh the information displayed in the page 8 Icon Select the category of the item to be displayed The following icons are displayed in the user mode Information Job User Box Direct Print Store Address Customize 9 Menu Displays information and setting for the selected icon The menu that appears in this area varies depending on which icon w...

Page 252: ...ion Enables you to check the components options consumables and meter counts of this machine Online Assistance Enables you to check the online assistance about this product Change User Password Changes the password of the login user Function Permission Infor mation Enables you to check the function permission information about the user or account Network Setting Informa tion Enables you to check t...

Page 253: ...r queued jobs Job History Enables you to check the executed jobs Communication List Enables you to check the completed transmission and reception jobs Item Description Open User Box Opens the currently created User Box Public Personal or Group User Box to enable you to print send or download a document saved in the User Box or to change the User Box setting Create User Box Enables to create a new ...

Page 254: ... Relay User Box to enable you to handle a document saved in the User Box or change the User Box setting Create System User Box Enables you to create a new Bulletin Board or Relay User Box The Bulletin Board and Relay User Boxes are available when the optional Fax Kit is installed Item Description Item Description Direct Print Specify a file saved in the computer to print it using this machine If n...

Page 255: ...s Group Enables you to check the group address book registered in this machine or to register and change an address Program Enables you to check the program address book registered in this machine or to register and change an address Temporary One Touch Enables you to check the temporary program address book registered in this machine or to register and change an address Subject Enables you to reg...

Page 256: ...9 20 9 4 User Mode Overview 9 Item Description Option Enables you to configure the settings displayed in the initial page after log ging in to this machine ...

Page 257: ...eference Selecting a User Box name with a password displays the password entry page Open User Box Public Group or Personal User Box Open User Box is displayed as shown below depending on the User Authentication or Account Track set tings Open User Box Public Displayed when User Authentication is not enabled Open User Box Public Personal Displayed when User Authentication is enabled Open User Box P...

Page 258: ...Box Deleting a User Box erases all the documents saved in the User Box Thumbnail View To view a thumbnail image for each document click ON When you do not view thumbnail images click OFF Specify operation Select the target operation for example printing moving copying or de leting a document sending to another machine or downloading to your computer For details refer to page 9 23 Changes the displ...

Page 259: ...documents are saved Page Display by 10 cases is displayed 9 5 2 Printing a document 1 Select Specify operation Print and click Changes the display The select check box is displayed for printable documents Edit Name Click this button to rename a document Item Description ...

Page 260: ...9 24 9 5 Handling a document in a User Box 9 2 Select the check box of the target document and click Print Setting 3 Configure print settings ...

Page 261: ...ents are selected This function enables you to change the printing order Click the target document and select Top Up Down Bottom or Undo When checking a thumbnail image for each document click Thumbnail View Combine Displayed when multiple documents are selected This function prints the selected documents as one Basic Setting Configure the number of sets 2 sided printing color and finishing set ti...

Page 262: ...ng a document in a User Box 9 9 5 3 Sending a document to another machine 1 Select Specify operation Send to other device and click Changes the display The select check box is displayed for documents that can be sent ...

Page 263: ...9 27 9 5 Handling a document in a User Box 9 2 Select the check box of the target document and click TX Setting ...

Page 264: ... a document in a User Box 9 3 Configure send settings Item Description Specify destination Click Search from List to select the destination in the address book When checking the destination list click Check Destination ...

Page 265: ... multiple documents are selected This function enables you to change the sending order Click the target document and select Top Up Down Bottom or Undo When checking a thumbnail image for each document click Thumbnail View Bind TX Displayed when multiple documents are selected This function sends the selected documents as one File Type Specify the file type and encryption contents for a file to be ...

Page 266: ...9 30 9 5 Handling a document in a User Box 9 2 Select the check box of the target document and click Download Setting 3 Configure settings ...

Page 267: ...ge Item Description Change order Displayed when multiple documents are selected This function collects pages in the order in which they are displayed and prints them as one doc ument If necessary you can change that order Click the target document and select Top Up Down Bottom or Undo When checking a thumbnail image for each document click Thumbnail View File Format Select the file type for the fi...

Page 268: ...a document to another User Box 1 Select Specify operation Move Copy and click Changes the display The check box for selecting an available document is displayed 2 Select the check box of the target document and click Move Copy Setting You cannot select multiple documents ...

Page 269: ...the File List page 9 5 6 Deleting a document 1 Select Specify operation Delete and click Changes the display The check box for selecting an available document is displayed Item Description User Box Number Select the User Box to move or copy a document from the User Box List Copy Select this check box to copy a document to the target User Box ...

Page 270: ...nt and click Delete To select or unselect all documents select the Check Uncheck check box 3 Check the document name to be deleted and click OK When checking a thumbnail image for each document click Thumbnail View 4 Click OK This deletes a document s and returns you to the File List page ...

Page 271: ... the ROM version Import Export Saves exports setting information of this machine as a file or writes im ports it from a file to this machine Status Notification Setting Configure the function to be reported to a registered user when an error has occurred in this machine Specify the destination and items to notify a registered user of an error Total Counter Notification Setting Configure the settin...

Page 272: ...eration lock when scanning excluding push scanning If necessary configure settings to enable saving or read ing a document in or from the external memory User Box Setting Define the User Box functions such as deleting an unnecessary User Box or specifying the document deletion time If necessary configure settings to enable saving or reading a document in or from the external memory Stamp Settings ...

Page 273: ...cates and configure the SSL protocol or external certificate settings Certificate Verification Settings Specify the items to validate a certificate Address Reference Set ting When giving destination access permission specify a reference allowed group name or access allowed level Restrict User Access Specify the function to restrict user operations Copy Security Specify whether to use the copy guar...

Page 274: ... Public User Box Setting Specify the upper limit of the number of User Boxes User Account Common Setting Specify whether to print data in single color or two color mode Scan to Home Settings Configure the setting to send a file to the Home folder Scan to Authorized Folder Settings Configure settings to restrict manual TX destinations Item Description TCP IP Setting Configure the TCP IP setting whe...

Page 275: ...OpenAPI settings TCP Socket Setting Configure the TCP Socket settings to have a data communication between this machine and the application software in your computer IEEE802 1xAuthentication Setting Configure IEEE802 1X authentication settings LLTD Setting Select whether to enable or disable LLTD SSDP Settings Configure the SSDP settings Bluetooth Setting Select whether to enable or disable Blueto...

Page 276: ...able when the op tional Fax Kit is installed Item Description Item Description Basic Setting Specify the default values of the printer PCL Setting Specify the default values in the PCL mode PS Setting Specify the default values in the PS mode TIFF Setting Specify the paper to print TIFF images XPS Settings Configure the XPS print settings Interface Setting Specify the timeout period of the interfa...

Page 277: ...orary program address book registered in this machine or to register and change an address Subject Registers up to 10 subjects when sending E mails Text Registers up to 10 body messages to be used when sending E mails Application Registration Registers application settings and server addresses when using the appli cations such as RightFax Server registered in the external server Register ing appli...

Page 278: ...unction Setting Configure the fax settings for Memory RX or Network Fax PBX Connection Setting Specify the outside line at PBX connection Report Settings Configure the setting for a report for example Activity Report to be output when sending or receiving data Multi Line Settings Specify the parameters and functions of the extended line This item is displayed when a line is extended Network Fax Se...

Page 279: ...e setting items are as follows Configure the settings for sending a scanned document Configure the network print settings Restrict users using this machine Reference As the setting procedure proceeds its progress flow is displayed on the left If setting is cancelled you will return to the Setting for each purpose page after the items that were con figured before cancellation have been applied ...

Page 280: ...10 Appendix ...

Page 281: ...esti nations or send the transmission in multiple batches Document could not be saved in user box due to insufficient HDD capacity Check log The hard disk is full Delete unnecessary data and then try saving the data again The number of registered user boxes has reached the max al lowance The number of registered user boxes has reached the maximum al lowed The number of User Boxes that can be regis...

Page 282: ...formation data quantity handled by a computer or printer A byte consists of eight bits Compact PDF A compression method for minimizing the data size using the PDF format used for digitalizing color documents Compact PDF allows high compression per formance by identifying the text and image regions and applying the resolution and compression method optimized for each region The compact PDF method c...

Page 283: ...ion 6 the next generation protocol adopts 128 bit IP addresses An IP address is as signed to every computer or other device connected to the Internet JPEG The acronym for Joint Photographic Experts Group One of the file formats used to save image data The file extension is jpg The compression ratio is gener ally 1 10 to 1 100 JPEG is an effective method to compress photographs and other natural im...

Page 284: ...n and the direction of image sensors alignment is called the sub scan ning direction Screen frequency The density of dots used to create the image Single page TIFF A TIFF file that contains only a single page SMB The acronym for Server Message Block This is a protocol for sharing files and printers mainly over the Windows network SSL TLS The acronym for Secure Socket Layer Transport Layer Security...

Page 285: ...11 Index ...

Page 286: ... settings 7 50 Company name 7 44 Continuous print 7 12 Control panel 3 2 Copies 7 7 Copy 7 62 Copy guard type 7 23 Copy protect 7 21 Cover sheet 7 15 Creating a user box 8 5 8 14 Custom display settings 8 9 Custom size 6 12 Customize 9 19 D Date time 7 18 Default tab 8 9 Delete empty user box es Administrator settings 8 6 Delete page 7 67 Delete secure print documents 8 19 Delete unused user box 8...

Page 287: ...b details 3 7 L Last name 7 43 LDAP search advanced search 7 43 LDAP search search 7 43 Left panel 3 5 Line setting 7 50 Link file error notification 8 10 M Maintenance 9 35 Maximum number of user boxes 8 17 8 18 Memory RX user box 7 82 Menu tree 1 6 4 22 8 2 Mobile PDA 7 99 Move page 7 70 Move copy 9 32 Moving documents 7 61 N Name 7 43 Network 9 38 New 7 74 Next destination 7 39 7 40 7 41 Number...

Page 288: ... 9 Sort 7 9 Special original 6 18 Stamp 7 20 Stamp composition 7 48 Stamp element 7 86 Stamp repeat 7 25 Stamp settings 8 30 Stamp type 7 25 Stamp composition 7 18 Standard size 6 12 Staple 7 9 Staple position setting 7 9 Store address 9 19 9 41 Subject 7 52 System settings 9 36 System user box 6 3 T Timer transmission 7 55 Touch panel 3 4 U URL notification setting 7 54 Use file 7 2 Use file chec...

Page 289: ... Paper 6 5 Copy 7 16 7 60 7 62 Copy Guard Pattern 7 24 Copy Protect 7 18 7 21 Copy Protect Pattern 7 22 Cover 2 Sided 6 6 Cover Sheet 7 14 Custom Display Settings User Box Setting 8 9 Custom Size 6 12 D Date Time 7 18 7 22 7 23 7 25 7 26 7 86 8 16 Default Tab 8 9 Delete 3 6 3 7 3 8 3 10 3 11 7 60 7 81 7 82 7 88 7 90 7 91 7 93 Delete Page 3 16 Delete Secure Print Documents 8 19 Delete Unused User B...

Page 290: ...4 Insert Sheet Setting 7 19 Insert Type 7 16 Internet Fax 7 38 IP Address Fax 7 38 J Job Details 3 7 Job List 3 5 3 6 JPEG 6 7 7 45 L L1 3 8 L2 3 8 Last Name 7 43 Left 6 19 Line Setting 7 50 Long Original 6 18 M Manual 7 12 Maximum Number of User Boxes 8 17 Minimal 7 12 Mixed Original 6 18 Mode 1 8 26 Mode 2 8 26 Move 7 60 Moving documents 7 61 Multi Page 6 10 7 49 N Name 7 43 New 7 74 Next Destin...

Page 291: ... Secure Document User Box 7 79 Security Print Only 8 25 Select All 7 3 Send Print 7 59 Separate Scan 6 17 Separation 6 15 Sharpness 6 14 Sheet Cover Chapter Insert 7 5 Shortcut key 8 9 Simplex Duplex 6 6 Skip the Page s 7 20 Sort 7 16 7 17 Stamp 7 18 7 20 Stamp Composition 7 48 Stamp Element 7 86 Stamp Repeat 7 18 7 25 Stamp Composition 7 5 7 6 7 58 Subject 7 52 T Text 6 5 7 48 Text Color 7 21 7 2...

Page 292: ......
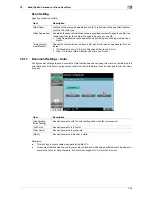
Reviews: