background image

22

3

TV Connections

Auto Input Sensing

The TV’s Auto Input Sensing feature automatically rec-
ognizes most connections and prompts you to identify 
the type of device connected.  See  page 16  for more on 
Auto Input Sensing.

Connection Types

Review the connection types available on your input 
devices and use connections that will give the best 
video quality.  For example, choose HDMI over compo-
nent video, and choose component video over S-video 
or composite video.

Picture Quality

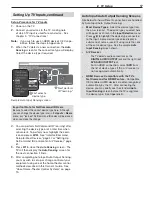
Usually, to receive the best picture quality, connect the 
source device video directly to the TV input without 
routing it through other devices.

Surround Sound

For best surround sound audio quality, route audio-
signal cables or HDMI cables from the source device 
directly to your A/V receiver or sound system.

IMPORTANT

Accessory items such as cables, adapters, 
splitters, or combiners required for TV 
connections are not supplied with the TV.  
These items are available at many electronics 
stores.

Before You Begin

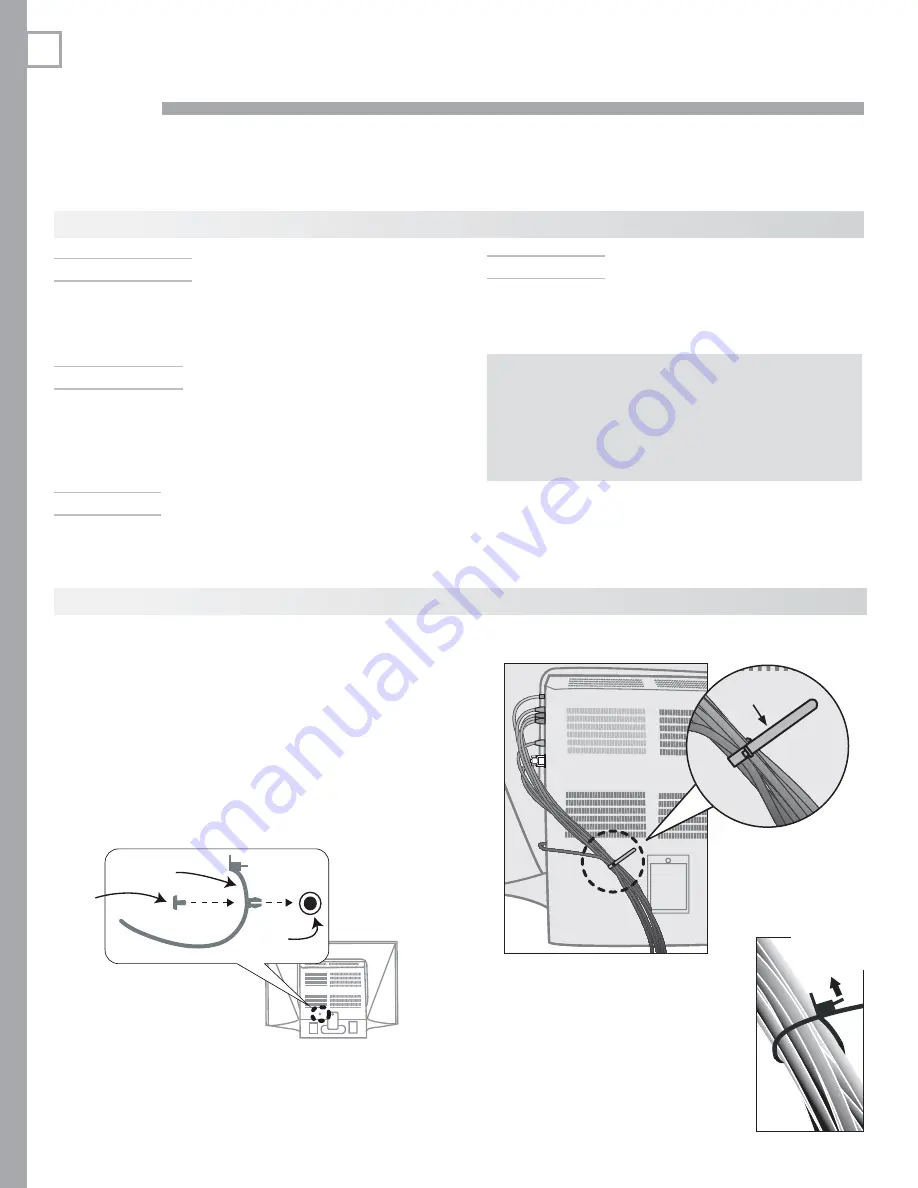
 Cable Management

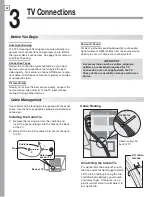
One cable tie with a locking pin is supplied with the acces-
sories.  Use the tie to keep cables properly organized and 
connected.

Back of TV

1.

2.

Hole in 
back of TV

Cable tie

Pin

Installing the Cable Tie

Remove the locking pin from the cable tie and 

1. 

insert the anchor prongs into the hole on the back 
of the TV.

Reinsert the pin in the cable tie to secure the tie to 

2. 

the TV.

Cable Routing

Unlatching the Cable Tie

Pry up the latch tab and push or pull 
the free end of the tie through the latch.

Lift the latch tab by pinching the tab 
and latch body between your thumb 
and index finger.  Otherwise, use a 
plastic wallet card or similar object to 
pry up the tab.

Cable routing on 
back of TV

Lift tab to 
release

Cable tie

Summary of Contents for LaserVue L65-A90

Page 1: ...MODEL L65 A90 Owner s Guide...

Page 2: ......

Page 3: ...roved by Mitsubishi could cause harmful interference and would void the user s authority to operate this equipment CAUTION RISK OF ELECTRIC SHOCK DO NOT OPEN CAUTION TO REDUCE THE RISK OF ELECTRIC SHO...

Page 4: ...aratus 11 Only use attachments accessories specified by the manufacturer 12 Use only with the cart stand tripod bracket or table specified by the manufacturer or sold with the apparatus When a cart is...

Page 5: ...hose specified herein may result in hazardous radiation exposure Use external or remote controls to operate the product Connection to signal sources and power are accomplished through the external con...

Page 6: ...ChannelView Channel Listings 32 Status Display 33 Fav Favorite Channels 34 TV Signals and Display Formats 35 Viewing Camera Files 36 3D Video 38 5 TV Menus Main Menu 39 Remote Control Keys for the TV...

Page 7: ...lity and possibly cause injury Contact your Mitsubishi dealer for information on purchasing a stand or wall mount Mitsubishi recommends you hire a professional installer to mount the TV on the stand o...

Page 8: ...loth before each use by shaking or brushing to remove any residual dirt particles Gently wipe down the glossy surfaces of your TV with the soft cloth Do not apply pressure while wiping If necessary li...

Page 9: ...MI inputs are HDCP copy protection compatible Easy Connect Auto Input Sensing Easy Connect Auto Input Sensing automatically rec ognizes when you plug in an input and prompts you to assign a name to it...

Page 10: ...indicate functions when TV menus are displayed or when a special function has been activated See Remote Control page 31 for more on these functions System Reset Button If the TV fails to respond to th...

Page 11: ...thorized Service Center information POWER Indicator LED Color TV Condition Additional Information None TV is powered off Normal operation Blue TV is powered on Normal operation Blue TV powered off aut...

Page 12: ...jacks for INPUT 3 item 6 if you wish to send audio to the TV 5 Composite Video INPUT 1 INPUT 3 Use one of the jacks labelled VIDEO or Y VIDEO on INPUT 1 to connect composite video from a VCR DVD play...

Page 13: ...nput IR emitters connected to this jack are used by the TV s NetCommand system to send control signals to external IR remote controlled devices such as cable boxes VCRs DVD players satellite receivers...

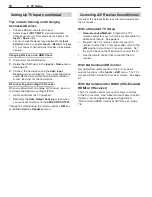
Page 14: ...After the blue LED stops blinking press the POWER key to power on the TV When the 6 Welcome screen appears the first time you power on the TV select a language for TV menus You can later change the la...

Page 15: ...es for 1 TV features including Remote Control For use of the remote control see page 31 Input Selection viewing source Select a connected program source to watch such as a VCR DVD player or antenna Pr...

Page 16: ...TV s Easy Connect Auto Input Sensing feature detects most connections automatically Note For connection and setup of a personal com puter see the information on page 20 Auto Input Sensing for Most Dev...

Page 17: ...next connection it finds After completing Auto Input Auto Output Sensing 6 you may wish to set up or change control of your equipment using one of the home theater control methods described in this Ow...

Page 18: ...Systems on the opposite page and Appendix D NetCommand HDMI Control of CEC Devices page 78 Tips on Auto Sensing and Changing Connected Devices Choose a different name for each input Antenna inputs AN...

Page 19: ...vice functions it can operate TV CEC Enabled A V Device HDMI Cable Source device connected to an A V receiver connected to the TV A V Receiver with HDMI Output no CEC Assign the device to an A V recei...

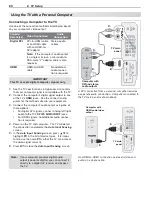
Page 20: ...N S VIDEO INPUT 3 DIGITAL AUDIO OUTPUT INPUT R R R L L DVI PC INPUT VIDEO Y Y VIDEO INPUT 1 Pb Pr Pb YPbPr 480i 480p 720p 1080i Pr INPUT 2 AUDIO L IR NetCommand OUTPUT EXTERNAL CONTROLLER AVR AUDIO OU...

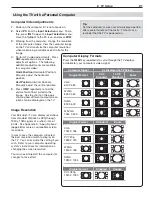
Page 21: ...e format best suited to the image See the chart on this page showing how different computer reso lutions can be displayed on the TV Image Resolution Your Mitsubishi TV can display resolutions from sta...

Page 22: ...receiver or sound system IMPORTANT Accessory items such as cables adapters splitters or combiners required for TV connections are not supplied with the TV These items are available at many electronics...

Page 23: ...L L DVI PC INPUT VIDEO Y Y VIDEO INPUT 1 Pb Pr Pb YPbPr 480i 480p 720p 1080i Pr INPUT 2 AUDIO L IR NetCommand OUTPUT EXTERNAL CONTROLLER AVR AUDIO OUTPUT R L AUDIO R L 3D GLASSES EMITTER VIDEO 480i 48...

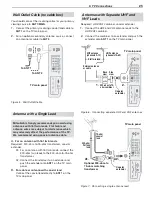
Page 24: ...080i 1080p AUDIO PCM STEREO DVI PC INPUT AUDIO R L DVI PC INPUT AUDIO R L DVI OUT AUDIO R L Digital DVI device TV main panel 1 1 2 2 Figure 3 Connecting a digital DVI device S Video Device Standard Ca...

Page 25: ...PUT EXTERNAL CONTROLLER AVR AUDIO OUTPUT R L AUDIO R L 3D GLASSES EMITTER AUDIO PCM STEREO PC VGA W VGA SVGA W SVGA XGA W XGA SXGA 720p 1080p INPUT 3 ANT 2 AUX ANT 1 MAIN S VIDEO INPUT 3 DIGITAL AUDIO...

Page 26: ...O INPUT 1 Pb Pr Pb YPbPr 480i 480p 720p 1080i Pr INPUT 2 AUDIO L IR NetCommand OUTPUT EXTERNAL CONTROLLER AVR AUDIO OUTPUT AUDIO R L 3D GLASSES EMITTER VIDEO 480i 480p 720p 1080i 1080p AUDIO PCM STERE...

Page 27: ...IDEO 480i 480p 720p 1080i 1080p AUDIO PCM STEREO PC VGA W VGA SVGA W SVGA XGA W XGA SXGA 720p 1080p R L S VIDEO INPUT 3 INPUT 3 ANT 2 AUX ANT 1 MAIN DIGITAL AUDIO OUTPUT INPUT R R R L L DVI PC INPUT V...

Page 28: ...R L AVR AUDIO OUTPUT OPTICAL INPUT COAXIAL INPUT OPTICAL INPUT COAXIAL INPUT COAXIAL INPUT Digital coaxial cable for connecting a digital A V receiver Stereo analog cables for connecting an analog A V...

Page 29: ...nt video cables from 3 VIDEO OUT on the camcorder to the TV s Y Pb Pr component convenience jacks Connect left white and right red audio cables 4 from AUDIO OUT on the camcorder to AUDIO L and R on th...

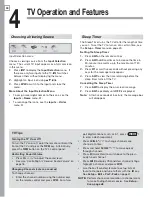
Page 30: ...timer turns off the TV Cancelling the Sleep Timer Press 1 SLEEP to display the on screen message Press 2 SLEEP repeatedly until OFF is displayed Note After five seconds of inactivity the message box w...

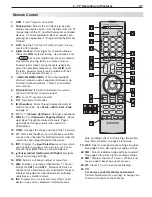
Page 31: ...els Pages up and down through screens when used with ChannelView 12 FORMAT Changes the shape and size of the TV picture 13 LIST Works like the LIST key for a cable box or satellite receiver when learn...

Page 32: ...void dropping on hard surfaces Do not use harsh chemicals to clean Use only a soft lightly moistened cloth Do not mix old and new batteries Resetting the Remote Control If the slide switch is set to T...

Page 33: ...etup menu Edit options antenna sources only 4 Does not apply Program name if broadcast 5 Signal Type Being Received Signal Type Being Received 6 Screen Format in use Screen Format in use 7 Current Fav...

Page 34: ...ress and hold the 2 FAV key for about 2 seconds When FAV and the memory bank number appear under the channel number the channel has been successfully added Remove Fav channels This procedure removes t...

Page 35: ...d bottom bars of non anamorphic DVD images Zoom Enlarges the picture to fill the screen by cropping the sides top and bottom to eliminate black bars 480i 480p and SD 4 3 signals Eliminates top and bot...

Page 36: ...ck or change to a different TV input before disconnecting from the USB photo port Viewing Camera Files JPEG Photos and the USB Photo Port Back up the data on 1 your USB drive before connecting it to t...

Page 37: ...o port You wish to view moving video from the camera The TV s USB Photo menu will be unavailable and you must control the slide show through the camera Display resolution is standard definition 480i R...

Page 38: ...at 60 Hz Press 6 EXIT to close the Auto Input Sensing screen Source of 3D Video Type of 3D Video Signal Name to Assign to Video Input Computer Recommended 1080p 60 Hz 1920 X 1080 The image will fill...

Page 39: ...automatic function Add a separator in a digital channel number 7 INFO Get context sensitive help Main Menu Press MENU on the remote control to open the Main menu Icon Menu Name and Description Page Ma...

Page 40: ...en To Language and Film Mode PerfectColor PerfectColor Sliders Sliders adjust the saturation intensity of six colors for the current image source PerfectTint Sliders Sliders adjust six hues for the cu...

Page 41: ...ture Off No screensaver pattern displays during play of an audio only device Note When playing an audio only device the TV will power off after 12 hours of inactivity Film Mode 480i and 1080i signals...

Page 42: ...rces Natural For most nighttime viewing and x v Color sources Contrast Adjusts the white to black level Settings are stored independently for each Picture Mode Low contrast shows a variety of shades i...

Page 43: ...d uniformly across the entire screen Demo For comparison displays a split picture to show On right side and Off left side Vert Adjustment Stretch Plus Format mode only Press the ENTER key to enter adj...

Page 44: ...he TV speakers default Expand Modifies audio from the TV speakers For monaural non stereo programs creates a simulated stereo effect For stereo programs creates a simulated surround sound effect Liste...

Page 45: ...ons Menu Options Closed Captions Analog Captions On if Mute CC 1 CC 4 Text 1 Text 4 Off On if Mute Displays analog closed captions signal CC 1 when audio from the TV speakers is muted When watching TV...

Page 46: ...automatically at a designated time Set the energy mode for power consumption when the TV is powered off Control 3D mode Notes on Scan and channel memorization Channel memorization may take up to 15 mi...

Page 47: ...your favorite channels For example you can set up a Fav channel bank for each of your favorite program types e g sports news children s programs or set up a bank for each TV user Use to move the highl...

Page 48: ...TV s clock adjusts automatically to daylight savings time The TV s clock will be reset if you tune to a channel sending incorrect time data To prevent unwanted clock resets first use the Auto method t...

Page 49: ...channel number in any of three ways Enter the number using the remote control s number keys Press repeatedly Press and hold to scroll quickly through the available channel numbers Setup menu Timer op...

Page 50: ...ast Power On if you need to Have faster power on Receive updates to ChannelView channel listings Use the External Controller Input Wired IR option see page 13 3D Mode 3D Mode On Off Use the On setting...

Page 51: ...nu to remove an unwanted icon for an HDMI input NetC ommand for HDMI and CEC Enabled Devices If CEC conflicts occur turn off CEC signals in one of these ways a Turn off all NetCommand for HDMI signals...

Page 52: ...ge to a different channel or device If a program or channel is blocked you can still use the TV without entering a pass code The lock allows you to change to a channel airing an allowed program or cha...

Page 53: ...plies in differing degrees to TV PG TV 14 and TV MA Movie Rating G General Audience Designed for the entire family to view PG Parental Guidance Parental Guidance is recommended may not be suitable for...

Page 54: ...future The Other option remains grayed out until the TV receives a signal using an alternate rating system Such alternate rating systems will apply only to digital programming received on the ANT 1 a...

Page 55: ...Command allows the TV to learn the IR control signals for your A V devices You can choose the level of NetCommand control for your home theater Standard Setup Perform a standard setup if you want NetC...

Page 56: ...the device responds again The remote control sensor is somewhere between these two positions This is usually enough accuracy for placement of the IR emit ters In some cases the emitter works better fa...

Page 57: ...NetCommand control press the CANCEL key while the key name is highlighted Press the 6 keys on the TV s remote control to highlight other keys on the list Repeat steps 4 and 5 for each additional funct...

Page 58: ...H PAGE Page Dn Page Down in Guides CH PAGE Menu Setup menu for device MENU Adjust Up Adjust or arrow up Adjust Dn Adjust or arrow down Adjust Lt Adjust or arrow left Adjust Rt Adjust or arrow right En...

Page 59: ...ction menu will auto matically clear from the screen Special Operation Methods Operating NetCommand Controlled Devices Controlling an A V Receiver See page 61 to set up control of an A V receiver Swit...

Page 60: ...use with number keys for direct channel selection NetCommand uses the same ENTER key for both operations When ENTER has a menu or guide function or when the original remote control uses the same key f...

Page 61: ...gnized through Auto Output Auto Input Sensing Press MENU highlight Inputs and highlight AV Receiver to open the AV Receiver screen The first function highlighted in the 2 AV Receiver screen is always...

Page 62: ...e TV s AVR AUDIO OUTPUT jack Audio Switching Setup 1 Audio to the A V receiver from the TV s digital or analog audio output Note This setup is required to hear digital sur round sound A device can sen...

Page 63: ...er however you must connect your DVD player satellite receiver or cable box directly to the A V receiver as surround sound may not be available from the TV s audio output Before You Begin Connect your...

Page 64: ...g The HDMI connection allows you to route video signals from multiple devices over a single cable to the TV See the diagram on the opposite page The connected devices can be analog digital or a mixtur...

Page 65: ...dio input Perform the steps under Audio Switching Setup 1 Automatic A V Receiver Switching to the TV Audio Input page 63 Setup to Control Automatic Audio and Video Switching via HDMI Follow these step...

Page 66: ...tion menu You can assign each device type in the list only once Press 8 EXIT if finished or repeat these steps for addi tional video sources connected to the A V receiver NetCommand IR Control Device...

Page 67: ...endix A Specifications 68 Appendix B Bypassing the Parental Lock 69 Appendix C Programming the Remote Control 71 Appendix D NetCommand HDMI Control of CEC Devices 78 Appendix E Troubleshooting 82 Appe...

Page 68: ...d Power Consumption Model Dimensions inches Weight lbs Power watts Height Width Depth L65 A90 39 8 57 7 10 05 141 5 180 Inputs Type Qty Input Specifications Antenna Cable input 2 RF F connector 75 ohm...

Page 69: ...You can either enter a new pass code to open the Lock menu and make changes or press EXIT to close the menu If any of the locks are turned on and you exit the menus when prompted for a new code the ol...

Page 70: ...70 Appendices This page intentionally left blank...

Page 71: ...you wish to program for or control Appendix C Programming the Remote Control IMPORTANT Some manufacturers may change their products or they may use more than one remote control system The TV s remote...

Page 72: ...digit code listed for your equipment Once you have found the correct code write it in 6 the space below for future reference Switch Position Device Type Code CABLE SAT VCR DVD AUDIO Code Verification...

Page 73: ...73 10259 10020 Regency 10020 Rembrandt 10040 10011 Runco 10000 Samsung 10144 10040 10003 Scientific Atlanta 11877 10877 10477 10237 10012 10008 10003 10000 Cable Boxes Make Code Signal 10040 10011 Sig...

Page 74: ...31313 30097 Onkyo 31805 31320 31298 30842 30135 Optimus 31074 31023 30849 30797 30670 30531 30121 30014 Oritron 31497 31366 Outlaw 31487 Panasonic 32967 31764 31763 31633 31548 31518 31509 31363 31350...

Page 75: ...POWER 21972 ITT Nokia 20240 20041 Janeil 20240 Jensen 20067 20041 JVC 21162 20067 20041 KEC 20278 20037 Kenwood 20067 20046 20041 20038 KLH 20072 Kodak 20037 20035 VCRs Make Code KTV 20000 LG 21037 20...

Page 76: ...21571 Blaupunkt 20717 Blue Parade 20571 Blue Sky 20699 20695 Brandt 20651 Broksonic 20695 DVD Players Make Code California Audio Labs 20490 Celestial 21020 Centrex 20672 Cinea 20831 CineVision 20876 2...

Page 77: ...21117 Sherwood 21077 21043 20770 20633 Shinsonic 20839 20533 Slim Art 20784 SM Electronic 20730 Sonic Blue 21099 20869 20783 20715 20573 DVD Players Make Code Sony 21536 21533 21516 21431 21070 21033...

Page 78: ...DMI Control or NetCommand for HDMI HDMI CEC allows one device such as the TV to control other devices such as an A V receiver or disc player CEC use is optional Each manufacturer chooses which CEC fun...

Page 79: ...e 4 NetCommand HDMI Control is off With the HDMI CEC device powered on switch the 3 TV to the device press the INPUT key highlight the device icon press ENTER Within a few minutes CEC will be establis...

Page 80: ...AUDIO L IR NetCommand OUTPUT EXTERNAL CONTROLLER AVR AUDIO OUTPUT AUDIO R L D GLASSES EMITTER RS 2 VIDEO 480i 480p 720p 1080i 1080p AUDIO PCM STEREO R L S VIDEO S VIDEO INPUT 3 INPUT 3 DIGITAL AUDIO O...

Page 81: ...m the TV s Input Selection menu CEC enabled A V receiver functions that may be available Try the VOL MUTE and menu navigation keys To open the A V receiver menu follow these steps While watching TV pr...

Page 82: ...settings A V Reset for all inputs To reset audio and video adjustments for all inputs to the original factory settings While viewing the TV press the control panel touch keys GUIDE and FORMAT at the...

Page 83: ...ased includ ing NetCommand IR setups While viewing the TV press 1 MENU to display the TV Main menu With the 2 Main menu displayed press number keys 1 2 3 to display the Reset menu READ THE ON SCREEN 3...

Page 84: ...s or Other Ratings setting is On Check the Lock Time Unlock Time to check if rating restric tions are disabled Rating restrictions apply only to content on ANT 1 and ANT 2 and VIDEO composite video ja...

Page 85: ...t four inches of clearance on all sides of the TV 6 TV will not power off Use the System Reset button TV Channels Symptom Remarks 1 The TV takes several seconds to respond to channel changes It is nor...

Page 86: ...g continued Sound see also NetCommand troubleshooting for additional help with A V receiver concerns Symptom Remarks 1 There is no sound even when the volume is turned up Check if the MUTE key is on T...

Page 87: ...wer is turned on With A V receiver power turned on redisplay the Input Selection menu and press ENTER to allow NetCommand to correctly select the A V Receiver input Incorrect setup in the Inputs AV Re...

Page 88: ...on restrictions on the HDMI signal 7 I learned the RECORD key for my VCR DVR but when I pressed the RECORD key the VCR DVR did not record anything Check that the VCR or DVR is receiving a signal direc...

Page 89: ...opyright or other intellectual property laws and treaties This License Agreement grants you no rights to use such content except that you own the media on which the Software is recorded but MDEA and i...

Page 90: ...acceptance of and compliance with the terms of the Software License Agreement applicable to this television and this limited warranty on the Embedded Software shall be null and void if the Embedded S...

Page 91: ...found service calls related to unsatisfactory audio or visual reception or signal unless caused by a defect in the product that is covered under this limited warranty all costs expenses or any other...

Page 92: ...Closed Captions 45 Color Adjustments 40 42 43 Reset Color 40 82 Computer and Display Formats 21 68 Connecting 20 Contrast 42 Controller Output 13 Control Panel 10 Control Panel Lock 54 Customer Servi...

Page 93: ...ogramming Compared to NetCommand Learning 71 Programming Instructions 72 Reset 32 Reset AV Menu Reset by input 40 A V Reset all settings 10 Color 82 Pass Code 69 Remote Control 32 Remote Control Audio...

Page 94: ...te www mitsuparts com or call 800 553 7278 SYSTEM RESET If the TV does not respond to the remote control control panel touch keys or will not power on off press the SYSTEM RESET button on the control...

Page 95: ......

Page 96: ...2008 Mitsubishi Digital Electronics America Inc 853B620A10 For information on System Reset please see inside back cover Guidelines for setting up and using your widescreen TV start on page 14...

Reviews: