DISASSEMBLY PROCEDURE
PHOTOS
96
19.
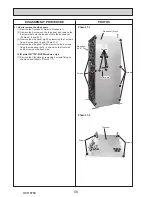
How to remove the scale trap (sanitary circuit)
(1) Remove the front panel (Refer to Procedure 1).
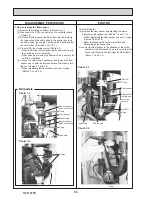
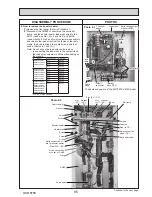
(2) Disconnect the CNP4 connector and the earth cable in
the control box. (Photo 4-1)
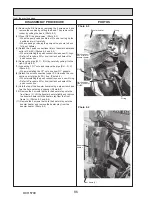
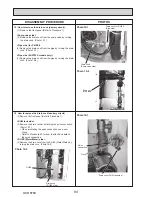
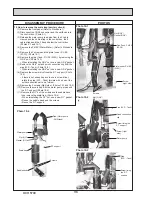
(3) Release the water pump lead wire from the 2 cable
clamps and the cable strap in the control box, the 2
cable straps and the 3 bands below the control box.
(Photos 4-1 and 10-1)
(4) Remove the P-HEX (Water-Water) (Refer to Procedure
17).
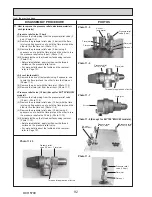
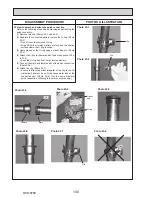
(5) Remove the 3 screws and the plate (under P-HEX
(W-W)). (Photo 19-1)
(6) Remove the pipe (Tank - P-HEX (W-W)) by removing the
G3/4" nut. (Photo 19-1)
• When reinstalling the G3/4" nut, use a new G3/4" gasket.
(7) Remove the G3/4" nut and quick connection clip from the
pipe (W.P. - Tank). (Photo 19-2)
• When reinstalling the G3/4" nut, use a new G3/4" gasket.
(8) Remove the screw which fixes the S.T. support. (Photo
19-3)
• If there is not enough space to use a screw driver,
rotate the pipe (W.P. - Tank) forward with a use of the
quick connection part as a fulcrum.
(9)
Remove the 2 screws (Right side). (Photos 19-1 and 19-2)
(10) Remove the scale trap with the water pump, pipes and
the S.T. support. (Photo 19-4)
(11) Remove the
G1" nut, the screws and the saddle band,
then remove the scale trap. (Photo 19-4)
• When reinstalling the G1" nut, use a new G1" gasket.
• Reuse the saddle band and the screws.
• Reuse the
S.T. support.
Photo 19-1
Photo 19-2
Photo 19-3
Photo 19-4
Scale trap
Water pump
Nut (G1")
S.T. support
Screws
Saddle band
Pipe (Water pump
- DHW tank)
Nut (G3/4"),
Gasket (G3/4")
Pipe (Tank - P-HEX
(W-W))
Screws
Plate (under P-HEX
(W-W))
Screw fixing the
S.T. support
Nut (G3/4")
Pipe (W.P. - Tank)
Quick connection
clip
Water pump
Screw (right
side)
Screw fixing
the S.T.
support
Pipe
(W.P. - Tank)
Gasket (G1")
Screw
(right side)
OCH570C
Summary of Contents for EHPT20X-MHCW
Page 108: ......


