PHOTOS
83
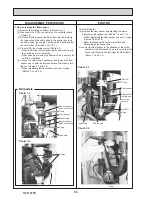
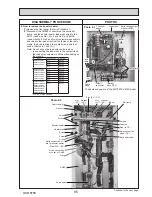
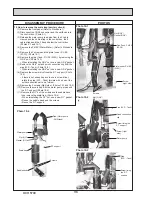
Photo 6-1
6. How to remove the 3-WAY VALVE/3-WAY VALVE MOTOR
(1) Remove the front panel (Refer to Procedure 1).
(2) Disconnect the CNV1 connector on the controller board.
(Photo 4-2)
(3) Release the 3-way valve motor lead wire from the 2
cable clamps, the fastener and the cable strap in the
control box, and the cable strap, the coated clamp and
the band below the control box. (Photos 4-1 and 10-1)
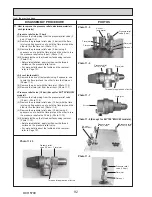
(4) Remove the 3-way valve motor from the 3-way valve by
pressing the button on the 3-way valve motor (viewed
from the front of the cylinder unit). (Photos 6-1 and 6-2)
• Press the button also when reinstalling the 3-way valve
motor.
(5) Remove the 3-way valve by removing the 3 G1" nuts in
the order of the bottom, middle and top using 2
spanners: one to hold the 3-way valve and the other to
turn each nut. (Photos 6-1 and 6-2)
• When reinstalling the G1" nuts, use new G1" gaskets. A
and B shown represent the bottom and the top
directions of the 3-way valve, respectively.
Note:
Before replacing the motor, be sure to power off the
cylinder unit.
Failure to do so may cause electric shock or cause the
3-way valve to malfunction.
Photo 6-2
DISASSEMBLY PROCEDURE
3-way
valve
motor
3-way valve motor
Button
A
B
Nut (G1")
Nut (G1")
Gasket(G1")
Gasket(G1")
Place to hold the 3-way valve
with a spanner
3-way valve
3-way valve
Gasket(G1")
Nut (G1")
<Strainer valve>
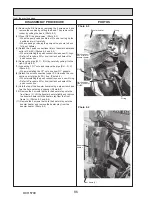
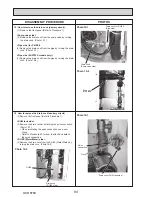
(6)
Remove the 2 screws on the strainer valve stay. (Photo 5-1)
(7) Remove the strainer valve by detaching the quick con
-
nection.
• When reinstalling the quick connection, use a new
O-ring.
• Refer to Procedure 23 for how to attach and detach the
quick connection.
(8) Remove the strainer valve stay by removing the 2
screws. (Photo 5-5)
• Reuse the removed strainer valve stay and the strainer
valve stay fixing screws.
Note: Skip steps (2) and (3) when replacing the strainer
valve only.
<Strainer cover (debris recovery)>
(5) Remove the cover using 2 spanners: one to hold the
strainer valve and the other to turn the cover. (Photo 5-5)
• Be sure to reattach the mesh after washing it.
(Photo 5-6)
• When reinstalling the cover, use a new packing. (Photo
5-6)
Note: Skip Steps (2) and (3) above when washing the strain
-
er mesh only.
Photo 5-6
From the previous page.
Strainer mesh
Packing
Cover
Button
Photo 5-5
Strainer valve stay
Screws
Cover
Strainer mesh (inside)
OCH570C
Summary of Contents for EHPT20X-MHCW
Page 108: ......

