4/8/16Ch H.264 Network DVR Series-MU.Ver2.3
125
Step 4
Double-click on the video you would like to review. While in the
playback screen, you may click on the
icon to access the
Event Search
control window.
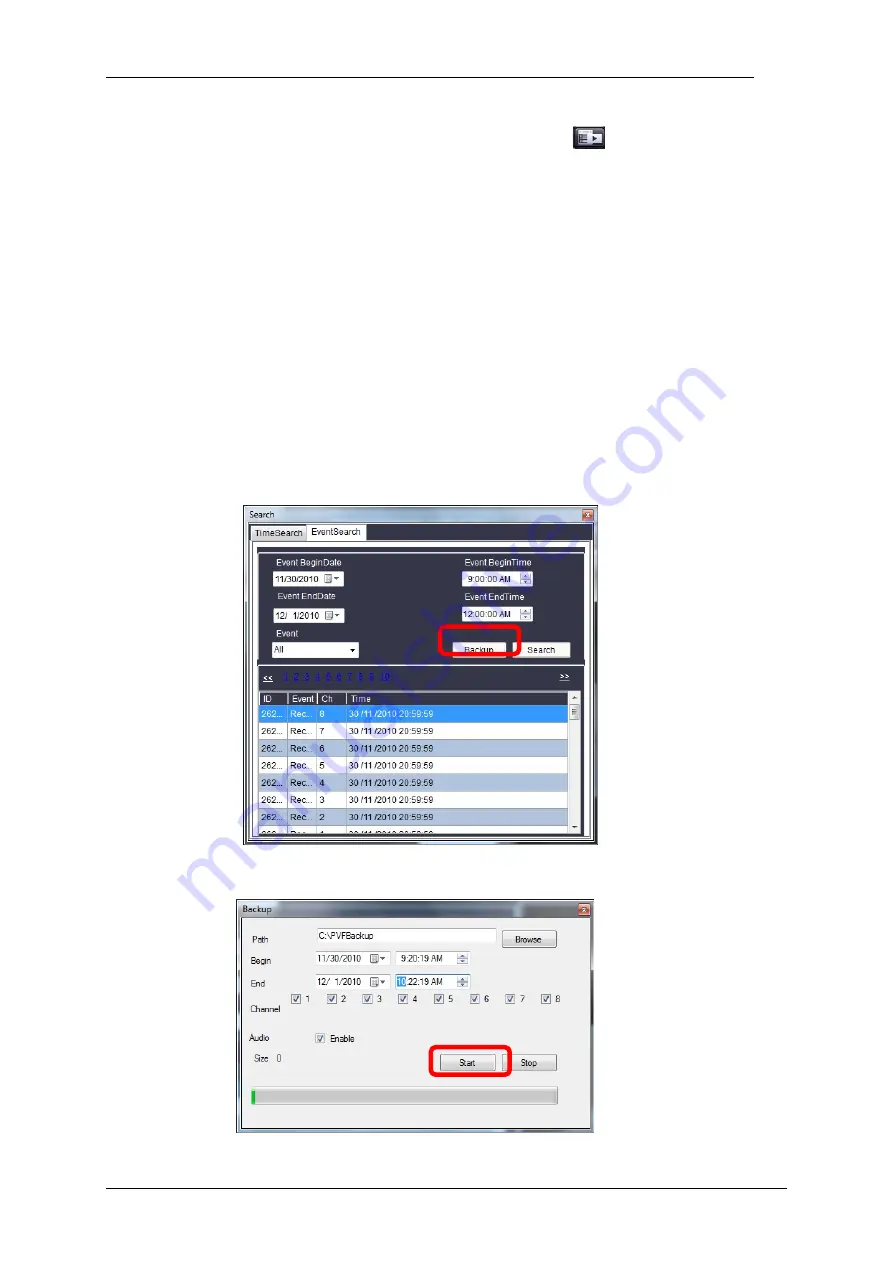
Step 5
Press the
“Backup”
button to create a copy of the video. The
succeeding menu will require you to set the following:
Path
: Click on the
“Browse”
button to specify the location where you
would like to store the file.
Begin
: Select the start date and time for the video you would like to
create a copy of.
End
: Select the end date and time for the video you would like to
create a copy of.
Channel
: Select the channel or channels from which the backup video
or videos will be taken from.
Audio
: Enables the inclusion of audio into the backup
Size
: The file size automatically adjusts according to the duration (start
and end time) set by the user.
Step 6
Press “Start” to begin the backup process.
Summary of Contents for dvr
Page 1: ...4 8 16Ch H 264 Network DVR Series Ver2 2 4 8 16 Channel H 264 Network DVR Series User Guide ...
Page 2: ...4 8 16Ch H 264 Network DVR Series MU Ver2 2 ii ...
Page 8: ...4 8 16Ch H 264 Network DVR Series MU Ver2 2 viii ...
Page 12: ......
Page 13: ...4 8 16Ch H 264 Network DVR Series MU Ver2 3 1 Chapter 1 1 Overview ...
Page 23: ...4 8 16Ch H 264 Network DVR Series MU Ver2 3 11 Chapter 2 2 Installation ...
Page 39: ...27 Chapter 3 3 Getting Started ...
Page 97: ...85 Chapter 4 4 Playback and Data Backup ...
Page 109: ...4 8 16Ch H 264 Network DVR Series MU Ver2 3 97 Chapter 5 5 PTZ Control ...
Page 114: ...102 Chapter 6 6 System Information ...
Page 118: ...106 Chapter 7 7 Network Connectivity ...
Page 125: ...4 8 16Ch H 264 Network DVR Series MU Ver2 3 113 Chapter 8 8 PC Viewer ...
Page 140: ...4 8 16Ch H 264 Network DVR Series Ver2 2 128 Chapter 9 9 Remote Viewers ...


