background image

21 


2-2-3 Windows Vista/Windows 7 IP address setup: 

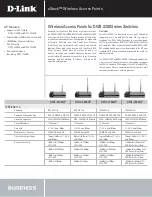
1. Click Start (it should be located at the lower-left corner of your 
desktop), then click control panel. Click 

Network and Sharing 

Center

, and then click 

Change adapter settings. 

Right-click 

Local Area Connection, then select “Properties.”

 The

 Local 

Area Connection Properties

 window will appear. Select “Internet 

Protocol Version 4 (TCP / IPv4),” then click Properties. 
 

Summary of Contents for 525541

Page 1: ...750AC WIRELESS DUAL BAND ROUTER USER MANUAL MODEL 525541 MAN 525541 UM 0314 01 0 manhattan products com...

Page 2: ...n of IC Intracom Any software described in this manual is sold or licensed as is Should the programs prove defective following their purchase the buyer and not IC Intracom its distributor or its deale...

Page 3: ...the instructions may cause harmful interference to radio communications However there is no guarantee that interference will not occur in a particular installation If this equipment does cause harmfu...

Page 4: ...C Radiation Exposure Statement This equipment complies with FCC radiation exposure set forth for an uncontrolled environment In order to avoid the possibility of exceeding the FCC radio frequency expo...

Page 5: ...gers of electric shock and static electricity when working with electrical equipment All guidelines of this and of the computer manufacture must therefore be allowed at all times to ensure the safe us...

Page 6: ...p 29 2 3 1 Setup procedure for Cable Modem 32 2 3 2 Setup procedure for Fixed IP xDSL 33 2 3 3 Setup procedure for PPPoE xDSL 34 2 3 4 Setup procedure for PPTP xDSL 35 2 3 5 Setup procedure for L2TP x...

Page 7: ...ble wireless security 87 2 7 3 2 WEP Wired Equivalent Privacy 87 2 7 3 3 Wi Fi Protected Access WPA 90 2 7 3 4 WPA RADIUS 91 2 7 4 Wireless Access Control 92 2 7 5 Wi Fi Protected Setup WPS 95 2 7 6 S...

Page 8: ...e Status 131 3 4 4 System Log 132 3 4 5 Security Log 133 3 4 6 Active DHCP client list 134 3 4 7 Statistics 134 3 5 System Tools 135 3 5 1 Configuration Backup and Restore 136 3 5 2 Firmware Upgrade 1...

Page 9: ...lities simultaneously All computers and wireless enabled network devices including PDAs smartphones game consoles and tablets can connect to this wireless router without additional cabling New 11ac wi...

Page 10: ...t from the router first 4 If placing the router up high or on a wall make sure it s firmly secured to avoid damage to the router and its accessories 5 Accessories like the antenna and power supply are...

Page 11: ...e card Web browser Microsoft Internet Explorer Google Chrome or Safari An available AC power outlet 100 240V 50 60Hz 1 4 Package Contents Before starting to use this router check if there s anything m...

Page 12: ...ess LAN activity transferring or receiving data On 2 4GHz Wireless WPS function is enabled Off 2 4GHz Wireless network is switched off 2 4G Flashing 2 4GHz Wireless LAN activity transferring or receiv...

Page 13: ...AN Internet port Power Jack Power connector connects to A C power adapter Reset WPS Reset the router to factory default settings clear all settings or start WPS function Press this button and hold for...

Page 14: ...on between your router and your computers and network devices 1 Connect your xDSL cable modem to the WAN port of the router using Ethernet cable 2 Connect all your computers network devices network en...

Page 15: ...15 3 Connect the power adapter to the wall outlet then connect it to the power jack of the router...

Page 16: ...EDs should be on if the computer network device connected to the respective port of the router is powered on and correctly connected If the PWR LED is not on or if any LED you expect to be on is not r...

Page 17: ...s or if you re unsure configure your computer to use a dynamic IP address using these steps If the operating system of your computer is Windows 2000 go to section 2 2 1 Windows XP go to section 2 2 2...

Page 18: ...18 2 Select Obtain an IP address automatically and Obtain DNS server address automatically then click OK...

Page 19: ...t corner of your desktop then click Control Panel Double click the Network and Internet Connections icon click Network Connections and then double click Local Area Connection The Local Area Connection...

Page 20: ...20 2 Select Obtain an IP address automatically and Obtain DNS server address automatically then click OK...

Page 21: ...t corner of your desktop then click control panel Click Network and Sharing Center and then click Change adapter settings Right click Local Area Connection then select Properties The Local Area Connec...

Page 22: ...22 2 Select Obtain an IP address automatically and Obtain DNS server address automatically then click OK...

Page 23: ...e lower left corner of your desktop then click Control Panel Click Network and Sharing Center then click Change adapter settings Right click Ethernet then select Properties The Ethernet Properties win...

Page 24: ...24 2 Select Obtain an IP address automatically and Obtain DNS server address automatically then click OK...

Page 25: ...25 2 2 5 Router IP address lookup After the IP address setup is complete click Start then Run at the bottom left corner of your desktop...

Page 26: ...Input cmd then click OK Input ipconfig then press the Enter key Check the IP address of the Default Gateway In the example below the address of the router is 192 168 2 1 but this value may be differe...

Page 27: ...n Input a user name and password as shown The default user name is admin the default password is 1234 Click OK and you should see the Web management interface of this router NOTE If the IP address of...

Page 28: ...that the user name and password are correct go to section 4 2 Troubleshooting to perform a factory reset and set the password back to the default value TIP This screen shows the four major settings se...

Page 29: ...Setup This router provides a Quick Setup procedure which will help you complete all required settings needed to quickly access the Internet Click Quick Setup The following configuration options will...

Page 30: ...ountry you live uses Daylight Saving Savings 3 check the Enable Function box and choose the duration of Daylight Saving After you finish with all settings click Apply 4 2 Broadband Type 1 2 3 4 NOTE T...

Page 31: ...select contact your Internet service provider A wrong Internet connection type will cause connection problems and you will not be able to connect to the Internet To go back a previous step click Back...

Page 32: ...ut the MAC address of your computer here if your service provider only permits computers with certain MAC addresess to access the Internet If you re using a computer that used to connect to the Intern...

Page 33: ...t the IP address of the gateway Gateway 4 provided by your service provider When you finish with all settings press OK 5 To go back to a previous menu click Back 1 2 3 4 5 NOTE You can choose this Int...

Page 34: ...ed by your Internet service provider Service Name 3 Assign a name to this Internet service optional MTU 4 Input the MTU value of your network connection If you don t know it you can use the default va...

Page 35: ...Cable Modem above or Use the following IP address i e static IP address WAN MTU Use the default value if you don t know what it is or ask your service provider for a proper value Connection Type There...

Page 36: ...y your Internet service provider Password 2 Input the password assigned by your Internet service provider PPTP Input the IP address of the PPTP gateway Gateway 3 assigned by your Internet service prov...

Page 37: ...her Internet connection types and all required setting items are the same with the PPTP connection Like PPTP there are two kinds of required settings First WAN Interface Settings Select the manner in...

Page 38: ...assigned by your Internet service provider MTU 4 Input the MTU value of your network connection If you don t know it you can use the default value Connection Select the connection type of Internet typ...

Page 39: ...by Telstra Password 2 Input the password assigned by Telstra Assign login Check this box to choose a login server server manually by yourself 3 Server IP Input the IP address of the login server Addre...

Page 40: ...k Apply to prepare to restart the router and you ll see this message Wait for about 40 seconds then click OK You ll be back to the router management interface again and the router is ready with new se...

Page 41: ...o change the time zone password and remote management settings Start your Web browser and log on to the router s Web management interface then click General Setup on the left or click the General Setu...

Page 42: ...le the Daylight Saving setting check Enable and set the duration of Daylight Saving When you finish click Apply You ll see the following message Press Continue to save the settings made and go back to...

Page 43: ...nge the password Click System on the left side of the Web management interface then click Password Settings Here are descriptions of every setup item Current Input the current password Password 1 New...

Page 44: ...e content in the Current Password field is wrong Click OK to go back to the previous menu and try to input the current password again If the current and new passwords are correctly entered after you c...

Page 45: ...of the Web management interface then click Remote Management Here are descriptions of every setup item Host Address 1 Input the IP address of the remote host you wish to initiate management access to...

Page 46: ...your service provider assigns you will vary every time you establish an internet connection this will be a problem Either ask your service provider to give you a static IP address or use a dynamic IP...

Page 47: ...terface Select the Internet connection method that corresponds to the type of connection you re using You can either click the connection method on the left 1 or right 2 If you select the connection m...

Page 48: ...f your service provider only permits a computer with a certain MAC address to access the Internet If you re using a computer that used to connect to the Internet via cable modem you can simply press C...

Page 49: ...ut 40 seconds while the router is rebooting 2 5 2 Setup procedure for Static IP Here are descriptions of every setup item IP Address 1 Input the IP address assigned by your service provider Subnet Mas...

Page 50: ...the setup menu or to continue to another setup procedure Click Apply to reboot the router so the settings will take effect wait about 40 seconds while the router is rebooting To reset all settings on...

Page 51: ...t always on If the connection is interrupted the router will reconnect automatically Connect On Demand Only connect when you want to surf the Internet Idle Time Out is set to stop the connection when...

Page 52: ...equires two kinds of settings WAN interface setting setup IP address and PPTP setting PPTP user name and password First the WAN interface settings Select the manner in which you obtain an IP address f...

Page 53: ...ateway assigned by your Internet service provider Connection ID 4 Input the connection ID This is optional You can leave it blank MTU 5 Input the MTU value of your network connection If you don t know...

Page 54: ...back to the setup menu or to continue to other setup procedures or click Apply to reboot the router so the settings will take effect wait about 40 seconds while router is rebooting If you decide to r...

Page 55: ...e type 5 refer to 2 5 3 for details Idle Time Input the idle time out of the Internet connection Out 6 refer to 2 5 3 for details When you finish with all settings click Apply 7 and the following mess...

Page 56: ...me 1 Input the user name assigned by Telstra Password 2 Input the password assigned by Telstra Assign login Check this box to choose a login server by server manually yourself 3 Server IP Input the IP...

Page 57: ...creen back to previously saved values click Cancel 2 5 7 Setup procedure for DNS If you select Dynamic IP or PPPoE as your Internet connection method at least one DNS server s IP address should be ass...

Page 58: ...ds while router is rebooting If you decide to reset all settings on this screen back to previously saved values click Cancel 2 5 8 Setup procedure for DDNS DDNS Dynamic DNS is an IP to Hostname mappin...

Page 59: ...ructions given on their website Here are descriptions of every setup item Dynamic DNS 1 If you want to enable the DDNS function select Enabled otherwise select Disabled Provider 2 Select your DDNS ser...

Page 60: ...ke effect wait about 40 seconds while router is rebooting If you decide to reset all settings on this screen back to previously saved values click Cancel 2 5 9 Setup procedure for WISP If your network...

Page 61: ...ss client and after connecting to WISP network devices WAN access service will be built up through wireless Users are allowed to access the WAN service through wired Ethernet or through another wirele...

Page 62: ...e access point Click to set security settings for this connection go to section 2 7 3 Wireless Security for detailed instructions After you finish with all settings click Apply 7 and the following mes...

Page 63: ...er If you have no idea how to define an IP address plan for your network here are some suggestions 1 A valid IP address has 4 fields a b c d For most home and business users it s suggested to use 192...

Page 64: ...ons of every setup item IP address 1 Input the IP address of this router Subnet Mask 2 Input the subnet mask for this network 802 1d To activate the 802 1d spanning tree Spanning Tree 3 function selec...

Page 65: ...the domain name for your network This is optional Recommended Values Settings if you don t know what to enter Lease Time Two Weeks or Forever if you have fewer than 20 computers Start IP 192 168 2 100...

Page 66: ...ign a certain IP address to a specific computer since IP addresses will be assigned in random order by this method Here are descriptions of every setup item Enable Static Check to enable this function...

Page 67: ...ss mapping 1 then click Delete Selected 2 To delete all mappings click Delete All 3 After you finish all the LAN settings click Apply The following message will be displayed on your Web browser Click...

Page 68: ...hacked by malicious intruders This router supports both 2 4GHz and 5GHz wireless bands simultaneously the wireless settings for both wireless bands are almost the same The following sections will only...

Page 69: ...nu or to continue to other setup procedures or click Apply to reboot the router so the settings will take effect wait about 40 seconds while router is rebooting 2 7 1 Basic Wireless Settings Click 2 4...

Page 70: ...enable the Ethernet device be a wireless station c AP Bridge Point to Point Connect this router with another wireless router to expand the scope of a network d AP Bridge Point to Multi Point Connect t...

Page 71: ...section 2 7 1 4 AP Bridge WDS go to section 2 7 1 5 Universal Repeater go to section 2 7 1 6 2 7 1 1 Setup procedure for Access Point Select the radio band you want to use from the Band drop down menu...

Page 72: ...rk clients to connect to this router maximum transfer rate of 11 Mbps 2 4 GHz N This mode only allows 802 11n wireless network clients to connect to this router maximum transfer rate of 300 Mbps 2 4 G...

Page 73: ...wireless network clients to connect to this router maximum transfer rate of 54 Mbps for 802 11a clients 5GHz N This mode allows 802 11n wireless network clients to connect to this router maximum tran...

Page 74: ...default SSID is default It s recommended that you change the default SSID value to one that is meaningful to you like myhome office_room1 etc Channel Number Select a channel from the drop down list fo...

Page 75: ...u can connect the router to an Ethernet device such as a TV or game console to enable the Ethernet device to act as a wireless station and join to a wireless network through an access point or AP rout...

Page 76: ...t to here Site Survey 4 When you use this wireless router as a wireless station for an Ethernet network device to have wireless capability you have to associate it with a working access point Click Se...

Page 77: ...e on the same physical network This function is very convenient when you need to connect two networks between two buildings To connect two wireless routers together 2 4GHz AP Bridge Point to Point Set...

Page 78: ...Security for details 2 7 1 4 Setup procedure for AP Bridge Point to Multi Point In this mode you can connect your wireless router with at least four wireless routers to expand the scope of a wireless...

Page 79: ...f the other wireless 1 to 4 4 7 routers Security Click to set security settings for this connection Setting 8 go to 2 7 3 Wireless Security for details 2 7 1 5 Setup procedure for AP Bridge WDS In thi...

Page 80: ...you want to use all the wireless routers must use the same setting SSID 3 Input the SSID of your wireless router The setting should be the same with other wireless routers for the convenience of roami...

Page 81: ...Security for details 2 7 1 6 Setup procedure for Universal Repeater In this mode the router can act as a wireless repeater serving as a Station and AP at the same time It can use the Station function...

Page 82: ...nded that you change the default SSID to the one that is meaningful to you like myhome office_room1 etc Channel Select a channel All the wireless clients must Number 4 use the same setting Associated...

Page 83: ...r Web browser Click Continue to go back to the setup menu or to continue to other setup procedures or click Apply to reboot the router so the settings will take effect wait about 40 seconds while rout...

Page 84: ...84 5GHz Advanced Settings Here are descriptions of every setup item Fragment Set the fragment threshold of the wireless radio 1 2 3 4 5 7 8 6 9 10 11 12 13...

Page 85: ...sfer Since most wireless devices will negotiate with each other and pick a proper data transfer rate automatically it s not necessary to change this value unless you know what will happen after modifi...

Page 86: ...s will enhance security distant malicious unknown users will not be able to reach your router WMM 12 Short for Wi Fi MultiMedia it will enhance the data transfer performance of multimedia contents whe...

Page 87: ...nu There are four options 2 7 3 1 Disable wireless security When you select this mode data encryption is disabled and every wireless device in proximity will be able to connect to your wireless router...

Page 88: ...message at the right of Key Format is Hex 10 characters which means the length of the WEP key is 10 characters Default Tx Key 4 You can set up to four sets of WEP keys and you can decide which key is...

Page 89: ...nother sub menu will appear RADIUS Server Input the IP address of the RADIUS server IP address 11 RADIUS Server Input the port number of the RADIUS server Port 12 RADIUS Server Input the password for...

Page 90: ...is rebooting 2 7 3 3 Wi Fi Protected Access WPA When you select this mode the wireless router will use WPA encryption and the following setup menu will be shown on your Web browser Here are descripti...

Page 91: ...lick Continue to go back to the setup menu or to continue to router setup or click Apply to reboot the router so the settings will take effect wait about 40 seconds while router is rebooting 2 7 3 4 W...

Page 92: ...er After you finish with all settings click Apply 6 the following message will be displayed on your Web browser Click Continue to go back to the setup menu or to continue to router setup or click Appl...

Page 93: ...Here are descriptions of every setup item Delete Selected To delete a specific MAC address entry check 2 the Select box of the MAC address you want to delete then click Delete Selected You can select...

Page 94: ...e this field to write a comment for every MAC address as a memory aid Add 7 Click Add to add the MAC address and any associated comment to the MAC address filtering table Clear 8 Click Clear to remove...

Page 95: ...d PIN Code If you want to use PBC you have to push a specific button on the wireless client to start WPS mode and switch this wireless router to WPS mode too You can push the Reset WPS button of this...

Page 96: ...uild a wireless connection by WPS with other WPS enabled wireless devices SSID The SSID of this wireless router will be displayed here Authentication Mode The wireless security authentication mode of...

Page 97: ...ty Tips for the Wireless Network Here are some quick tips to help you improve the security level of your wireless network 1 Never use simple words like school apple and computer for WEP encryption or...

Page 98: ...98 4 Use the Access Control function described in section 2 7 4 so those people who are not on your list will not be able to connect to your network...

Page 99: ...idth and some applications which require guaranteed bandwidth like video streaming and network telephones will be affected resulting for example in the interruption of video audio transfer With this f...

Page 100: ...Add 5 Click Add to add a new QoS rule see section 3 1 2 Add a New QoS Rule Edit 6 To modify the content of a specific rule check the Select box of the rule you want to edit then click Edit Only one ru...

Page 101: ...llowing message will be displayed on your Web browser Click Continue to go back to the setup menu or to continue to other setup procedures or click Apply to reboot the router so the settings will take...

Page 102: ...mum bandwidth for the application allowed by this rule Local IP Specify the local source IP address that will Address c affected by this rule Input the starting IP address in the left field and input...

Page 103: ...blank Traffic Type g Select the traffic type of this rule None SMTP HTTP POP3 and FTP You can select a specific traffic type for this rule If you want to make this rule an IP address based rule apply...

Page 104: ...e NAT technology to share a single Internet IP address among multiple computers on a local network so everyone can get connected to the Internet To set NAT parameters 3 2 1 Basic NAT Settings Enable o...

Page 105: ...nternet IP address to the same port of the IP address on a local network The port number s of an Internet IP address and private IP address the IP address on a local network must be the same If the po...

Page 106: ...oth Port Range 5 Input the starting port number in the left field and input the ending port number in the right field To redirect a single port number just enter the port number in the left field Comm...

Page 107: ...o previously saved values click Cancel 3 2 3 Virtual Server This function allows you to redirect a port of the Internet IP address on WAN port to a specified port of an IP address on the local network...

Page 108: ...elect the computer name without checking the IP address of the computer Private Port 4 Input the port number of the IP address that provides Internet service Type 5 Select the type of connection TCP o...

Page 109: ...lete All 12 Delete all mappings in the Virtual Server table Reset 13 Unselect all mappings After you finish with all the settings click Apply 14 the following message will be displayed on your Web bro...

Page 110: ...uncheck to disable the virtual server IP Address 2 Input the IP address of the computer which you want to open the ports Computer Name Pull down the menu and all the computers 3 connected to the route...

Page 111: ...the Current Trigger Port Table select the Special Application settings you want to remove in the table and click Delete Selected To remove all Special Application settings from the table just click D...

Page 112: ...ion enables network auto configuration for peer to peer communications Network devices will be able to communicate with other devices directly and learn about other devices Many network devices and ap...

Page 113: ...saved values click Cancel 3 2 6 ALG Settings Application Layer Gateway ALG is a special function of this router It includes many preset routing rules for numerous applications that require special su...

Page 114: ...the router is rebooting If you decide to reset all the settings on this screen back to previously saved values click Cancel 3 3 Firewall This router also provides a firewall function to block malicio...

Page 115: ...so the settings will take effect wait about 40 seconds while the router is rebooting 3 3 1 Access Control This function allows or denies computers with specific MAC address from connecting to the net...

Page 116: ...Dashes and colons are not required i e if the MAC address label of your wireless device indicates aa bb cc dd ee ff or aa bb cc dd ee ff just input aabbccddeeff Computer Name Pull down the menu and al...

Page 117: ...nd select Deny or Allow to determine the behavior of the IP filtering table If you select Deny all IP addresses listed in the filtering table will be prevented from connecting to the network if you se...

Page 118: ...ntinue to go back to the previous setup menu or to continue to other setup procedures or click Apply to reboot the router so the settings will take effect wait about 40 seconds while the router is reb...

Page 119: ...ess up to Description a 16 alphanumerical characters Input the Client PC IP starting IP address in the left field and input address b the end IP address in the right field to define a range of IP addr...

Page 120: ...all settings click Add to save the settings You ll be brought back to the previous menu and the rule you just set will appear in the current IP filtering table If you want to remove all settings on t...

Page 121: ...L like pornography cartoon stock or anything Add 3 Click Add to add the URL keyword to the URL Keyword filtering table Reset 4 Click Reset to remove the value you inputted in the URL Keyword field Cur...

Page 122: ...will take effect wait about 40 seconds while the router is rebooting If you decide to reset all the settings on this screen back to previously saved values click Cancel 3 3 3 DoS Attack Prevention Den...

Page 123: ...ion status of a specified remote network device but some malicious intruder could try to fill your network bandwidth with a lot of Ping request data packets to make your Internet connection become ver...

Page 124: ...section 3 3 3 1 DoS Advanced Settings below After you finish with all settings click Apply 6 the following message will be displayed on your Web browser Click Continue to go back to the previous setup...

Page 125: ...Death packets is received in a very short time this DoS prevention mechanism will be activated Discard Ping Check the box to activate this DoS From WAN b prevention mechanism Port Scan c Many kinds o...

Page 126: ...lues click Cancel 3 3 4 Demilitarized Zone DMZ Demilitarized Zone DMZ refers to a special area in your local network This area resides in the local network and all computers in this area use private I...

Page 127: ...ou want to map to a specific private IP address Client PC IP Input the private IP address that the address 3 Internet IP address will be mapped to Computer Name Pull down the menu and all the computer...

Page 128: ...l DMZ entries listed here click Delete All Reset 10 You can also click Reset to unselect all DMZ entries After you finish with all settings click Apply 11 the following message will be displayed on yo...

Page 129: ...of the Web management interface or click Status in the main menu 3 4 1 System information and firmware version You can use this function to learn about the system information and firmware version of t...

Page 130: ...tus of current Internet connections Click Internet Connection on the left side of the Web management interface and the following message will be displayed on your Web browser This information will var...

Page 131: ...this function to see the status of your router Click Device Status on the left side of the Web management interface the following message will be displayed on your Web browser This information will v...

Page 132: ...og on the left of side of the Web management interface the following message will be displayed on your Web browser The system events will be displayed on this screen Here are descriptions of the butto...

Page 133: ...outer Click Security Log on the left side of the Web management interface the following message will be displayed on your Web browser The system events will be displayed on this screen Jere are descri...

Page 134: ...e following message will be displayed on your Web browser All information about active DHCP leases issued by this router will be displayed here You can click Refresh to display the latest information...

Page 135: ...ibed here will provide you system tools for the all the settings backup restore firmware upgrade and resetting the router to default settings To enter system status menu either click the Tools link lo...

Page 136: ...Click Tool located at the upper right corner of the Web management interface then click Configuration Tools on the left side of the Web management interface the following message will be displayed on...

Page 137: ...e made and Factory Default restore the configuration to factory default 3 settings 3 5 2 Firmware Upgrade The system software used by this router is called firmware Just like any applications on your...

Page 138: ...bad or you find the behavior of the router is strange you can perform a router reset Sometimes it will solve the problem Click Tool at the upper right corner of the Web management interface then click...

Page 139: ...139 Click Apply to reset your router It will be available again after a few minutes...

Page 140: ...140 Chapter IV Appendix 4 1 For Specifications refer to the datasheet at manhattan products com...

Page 141: ...orrectly powered c You must use the same IP address section which router uses d Are you using MAC or IP address filter Try to connect the router by another computer and see if it works if not please r...

Page 142: ...service provider too i Try to use IP address instead of hostname If you can use IP address to communicate with a remote server but can t use hostname please check DNS setting I can t locate my router...

Page 143: ...ddress of the router b Password is case sensitive Make sure the Caps Lock light is not illuminated c If you really forget the password do a hard reset Router become hot a This is not a malfunction if...

Page 144: ...ser the user is sent to the proper IP address The DNS server IP address used by the computers on your home network is the location of the DNS server your ISP has assigned to you DSL Modem DSL stands f...

Page 145: ...00 and its host ID is 00000000 00000000 00000000 00000111 This is a convenient and efficient method for routers to route IP packets to their destination ISP Gateway Address see ISP for definition The...

Page 146: ...o Point Protocol is a secure data transmission method originally created for dial up connections PPPoE is for Ethernet connections PPPoE relies on two widely accepted standards Ethernet and the Point...

Page 147: ...ssion over the Internet Both TCP and UDP are transport layer protocol TCP performs proper error detection and error recovery and thus is reliable UDP on the other hand is not reliable They both run on...

Reviews: