


REPAIR INSTRUCTIONS, PART 1
Page 291
18. Recheck the end play to ensure the thrust
washers have been installed correctly and
that end play is within specification. Rotate
the crankshaft to ensure there is no binding.
CHECKING RUNNING CLEARANCE
When using the Plastigage method of checking
running clearance, do not turn the crankshaft.
Doing so will destroy the Plastigage.
If checking the main bearing clearance with the
engine in the upright position (such as in the
chassis), the weight of the crankshaft must be
removed from the lower half of the bearing being
checked. To do this, place cardboard under the
crankshaft journal in the main caps adjacent to
the journal to be checked and tighten the
adjacent caps until the journal to be checked
seats against the upper bearing. Do not fully
torque screws. Capscrews on the bearing being
checked should be torqued to specification after
the Plastigage strip has been positioned on the
bearing shell and the cap reinstalled. Support the
crankshaft at Nos. 1, 4 and 7 main journals, while
checking Nos. 2, 3, 5 and 6 bearings. Support the
crankshaft at the Nos. 3 and 5 journals, while
checking the Nos. 1, 4 and 7 bearings.
Engine Out of Chassis and Inverted
1. Use Plastigage to check the main bearing
clearance. Check each bearing, one at a
time, by placing a piece of Plastigage on the
journal and tightening the cap in place. The
bearing clearance is determined by
measuring the width of the crushed
Plastigage with the supplied gauge.
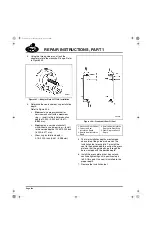
2. Place a section of Plastigage on the journal
to be checked and assemble the main
bearing cap to the cylinder block as shown
in Figure 327.
3. Apply a light coat of oil on the threads of the
bearing cap capscrews and secure the cap.
4. Tighten the capscrews to the specified
torque, 210 lb-ft (285 N
폷
m), using torque
wrench J 24407, or equivalent. The
Plastigage strip will be crushed between the
bearing insert and the crankshaft journal.
327
Figure 327 — Checking Running Clearance with
Plastigage
5. Remove the capscrews and cap, and check
the bearing running clearance.
6. Check the width of the Plastigage using a
Plastigage width chart. After measuring the
width, remove the Plastigage from the
bearing.
1. Main Bearing Cap
2. Plastigage
3. Bearing Insert
4. Crankshaft Journal
5-111.bk Page 291 Monday, July 10, 2006 2:26 PM
Summary of Contents for ASET AC
Page 6: ...TABLE OF CONTENTS Page iii TABLE OF CONTENTS 5 111 bk Page iii Monday July 10 2006 2 26 PM...
Page 14: ...INTRODUCTION Page 1 INTRODUCTION 5 111 bk Page 1 Monday July 10 2006 2 26 PM...
Page 23: ...Page 10 NOTES 5 111 bk Page 10 Monday July 10 2006 2 26 PM...
Page 96: ...COMPONENT LOCATOR Page 83 COMPONENT LOCATOR 5 111 bk Page 83 Monday July 10 2006 2 26 PM...
Page 99: ...Page 86 NOTES 5 111 bk Page 86 Monday July 10 2006 2 26 PM...
Page 100: ...TROUBLESHOOTING Page 87 TROUBLESHOOTING 5 111 bk Page 87 Monday July 10 2006 2 26 PM...
Page 140: ...MAINTENANCE Page 127 MAINTENANCE 5 111 bk Page 127 Monday July 10 2006 2 26 PM...
Page 153: ...Page 140 NOTES 5 111 bk Page 140 Monday July 10 2006 2 26 PM...
Page 383: ...Page 370 NOTES 5 111 bk Page 370 Monday July 10 2006 2 26 PM...
Page 479: ...Page 466 NOTES 5 111 bk Page 466 Monday July 10 2006 2 26 PM...
Page 480: ...SPECIFICATIONS Page 467 SPECIFICATIONS 5 111 bk Page 467 Monday July 10 2006 2 26 PM...
Page 505: ...Page 492 NOTES 5 111 bk Page 492 Monday July 10 2006 2 26 PM...
Page 513: ...Page 500 NOTES 5 111 bk Page 500 Monday July 10 2006 2 26 PM...
Page 519: ...Page 506 NOTES 5 111 bk Page 506 Monday July 10 2006 2 26 PM...
Page 520: ...APPENDIX Page 507 APPENDIX 5 111 bk Page 507 Monday July 10 2006 2 26 PM...
Page 528: ...INDEX Page 515 INDEX Index fm Page 515 Monday July 10 2006 2 48 PM...
Page 535: ...Page 522 NOTES Index fm Page 522 Monday July 10 2006 2 48 PM...