REPAIR INSTRUCTIONS, PART 1
Page 367
3. Install the engine mount capscrews to
secure the engine to the engine mounts.
Tighten the capscrews to specification.
4. Remove the transmission jack from under
the transmission.
5. Install the clutch linkage and
bracket-retaining capscrews.
6. Install the power steering hoses and
reservoir, if applicable.
7. Install the hood rest crossmember(s), if
applicable.
8. Support the exhaust pipe to prevent it from
dropping onto the EGR hot tube bellows.
Then, install the exhaust bracket to the
flywheel housing and install the exhaust
clamp at the turbocharger.
DO NOT let the exhaust pipe drop onto the
bellows of the EGR hot tube as the exhaust pipe
clamp is being installed at the turbocharger. The
bellows could be damaged requiring replacement
of the hot tube.
If the V-band is loosened for angular orientation
of the compressor cover, ensure that the mating
flanges are tightly seated and that the V-band is
snug but will still allow cover orientation.
Complete the orientation of the cover and
housing before making any rigid connections to
the compressor inlet. Tighten the V-band
retaining nut to 105 lb-in (12 N
폷
m), using torque
wrench J 5853-C, or equivalent. Then make
certain that all ducting aligns closely with the
turbocharger. This minimizes external stresses
acting on the unit.
9. Reinstall the boost pressure relief valve
tube. Reconnect the boost pressure relief
outlet tube at the exhaust pipe connection.
Use care when installing the boost pressure relief
valve tube. The tube can be damaged if bent
excessively at the bellows.
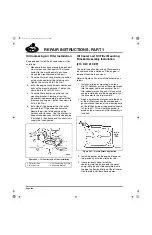
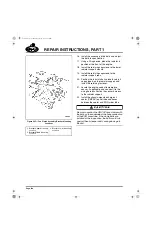
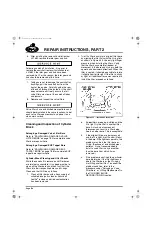
444
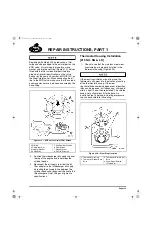
Figure 444 — Boost Pressure Relief Tube
10. Install the starter. Then, connect the wiring
and cables.
11. Install the air cleaner housing, if required.
12. Install all coolant tubes, ground straps, air
lines, fuel lines, hydraulic hoses or tubes,
throttle linkage and electrical wiring
harnesses that were removed from the
engine during removal.
13. Connect the air inlet tube between the
turbocharger and the air cleaner assembly.
14. Connect the heater hoses and A/C
refrigerant lines, if applicable, where
attached at the lower dash panel behind the
engine.
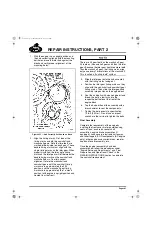
15. Install the fan, fan clutch assembly and
bracket on the water pump housing. There
are three sets of screw holes in the housing
for mounting the fan clutch assembly
bracket (Figure 445). The hole set used is
dependent on the chassis application.
1. Outlet Tube-to-Exhaust
2. Valve-to-Outlet Tube
Coupling
3. Boost Pressure Relief
Valve (Turbo By-Pass)
4. Exhaust Pipe
5. Outlet Tube-to-Exhaust
Pipe Connection
5-111.bk Page 367 Monday, July 10, 2006 2:26 PM
Summary of Contents for ASET AC
Page 6: ...TABLE OF CONTENTS Page iii TABLE OF CONTENTS 5 111 bk Page iii Monday July 10 2006 2 26 PM...
Page 14: ...INTRODUCTION Page 1 INTRODUCTION 5 111 bk Page 1 Monday July 10 2006 2 26 PM...
Page 23: ...Page 10 NOTES 5 111 bk Page 10 Monday July 10 2006 2 26 PM...
Page 96: ...COMPONENT LOCATOR Page 83 COMPONENT LOCATOR 5 111 bk Page 83 Monday July 10 2006 2 26 PM...
Page 99: ...Page 86 NOTES 5 111 bk Page 86 Monday July 10 2006 2 26 PM...
Page 100: ...TROUBLESHOOTING Page 87 TROUBLESHOOTING 5 111 bk Page 87 Monday July 10 2006 2 26 PM...
Page 140: ...MAINTENANCE Page 127 MAINTENANCE 5 111 bk Page 127 Monday July 10 2006 2 26 PM...
Page 153: ...Page 140 NOTES 5 111 bk Page 140 Monday July 10 2006 2 26 PM...
Page 383: ...Page 370 NOTES 5 111 bk Page 370 Monday July 10 2006 2 26 PM...
Page 479: ...Page 466 NOTES 5 111 bk Page 466 Monday July 10 2006 2 26 PM...
Page 480: ...SPECIFICATIONS Page 467 SPECIFICATIONS 5 111 bk Page 467 Monday July 10 2006 2 26 PM...
Page 505: ...Page 492 NOTES 5 111 bk Page 492 Monday July 10 2006 2 26 PM...
Page 513: ...Page 500 NOTES 5 111 bk Page 500 Monday July 10 2006 2 26 PM...
Page 519: ...Page 506 NOTES 5 111 bk Page 506 Monday July 10 2006 2 26 PM...
Page 520: ...APPENDIX Page 507 APPENDIX 5 111 bk Page 507 Monday July 10 2006 2 26 PM...
Page 528: ...INDEX Page 515 INDEX Index fm Page 515 Monday July 10 2006 2 48 PM...
Page 535: ...Page 522 NOTES Index fm Page 522 Monday July 10 2006 2 48 PM...

