Page 264
REPAIR INSTRUCTIONS, PART 1
294
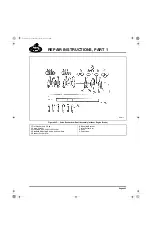
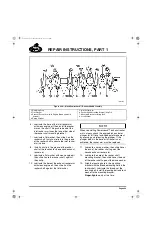
Figure 294 — Checking Cylinder Head for Fretting
Damage
앫
Inspect the push rods, and replace any
that are bent or damaged.
Valve Rocker Arm Shaft
Reassembly (without Engine Brake)
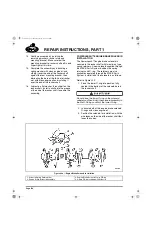
There is a shouldered rocker arm mounting
capscrew at one end of each rocker arm
assembly to ensure proper alignment.
Refer to Figure 295.
The assembly procedure for the rocker arm shaft
is described below. The arrangement includes
valve rocker arms (with lash adjusters) and
mounting brackets mounted on the shaft. The
bracket mounting dimensions are the same for
both non-brake and brake assemblies.
1. Lubricate the six adjusting screws and jam
nuts, and install one in each of the rocker
arms. The adjusting screws are identical for
both inlet and exhaust rocker arms.
2. Position the shaft so that the screw locating
hole is in line with the bracket locating screw
hole. The offset side of the bracket must be
positioned toward the right side of the
engine.
3. Assemble the bracket on a press table.
Press the shaft into the bracket until the oil
hole in the shaft is aligned with the hole in
the bracket. Install the locating screw and
lock washer to secure the bracket on the
shaft. Tighten the locating screw to the
specified torque.
4. Lubricate the spring washers and install the
washers on the shaft, one on each side of
the mounting bracket.
5. Lubricate the exhaust rocker arm and install
it on the shaft.
6. Install a flat washer and C-clip on the shaft
to retain the exhaust rocker arm.
7. Lubricate the inlet rocker arm and install it
on the shaft.
8. Install a flat washer and C-clip on the shaft
to retain the inlet rocker arm.
9. Install a flat washer and C-clip on the shaft
to position and retain the exhaust rocker arm
at the center position of the shaft.
10. Lubricate the exhaust rocker arm and install
the arm on the shaft.
11. Lubricate a spring washer, install it on the
shaft next to the exhaust rocker arm and
press the center mounting bracket onto the
shaft. This bracket does not have a threaded
hole on top or an oil hole at the bottom
surface. Align the mounting surface and
offset of the bracket with the bracket already
installed.
12. Lubricate a spring washer and install it on
the shaft next to the center bracket.
13. Lubricate and install the inlet rocker arm on
the shaft.
14. Install a flat washer and C-clip on the shaft
to retain the center inlet rocker arm.
15. Follow steps 9 through 14 to install the
remaining set of rocker arms and mounting
bracket.
At this point, a used or scrapped cylinder head
can be used as a template for proper bracket
alignment and to ensure that the mounting
surfaces of each bracket are parallel.
16. Check for proper bracket alignment. Ensure
that mounting surfaces of each bracket are
parallel.
5-111.bk Page 264 Monday, July 10, 2006 2:26 PM
Summary of Contents for ASET AC
Page 6: ...TABLE OF CONTENTS Page iii TABLE OF CONTENTS 5 111 bk Page iii Monday July 10 2006 2 26 PM...
Page 14: ...INTRODUCTION Page 1 INTRODUCTION 5 111 bk Page 1 Monday July 10 2006 2 26 PM...
Page 23: ...Page 10 NOTES 5 111 bk Page 10 Monday July 10 2006 2 26 PM...
Page 96: ...COMPONENT LOCATOR Page 83 COMPONENT LOCATOR 5 111 bk Page 83 Monday July 10 2006 2 26 PM...
Page 99: ...Page 86 NOTES 5 111 bk Page 86 Monday July 10 2006 2 26 PM...
Page 100: ...TROUBLESHOOTING Page 87 TROUBLESHOOTING 5 111 bk Page 87 Monday July 10 2006 2 26 PM...
Page 140: ...MAINTENANCE Page 127 MAINTENANCE 5 111 bk Page 127 Monday July 10 2006 2 26 PM...
Page 153: ...Page 140 NOTES 5 111 bk Page 140 Monday July 10 2006 2 26 PM...
Page 383: ...Page 370 NOTES 5 111 bk Page 370 Monday July 10 2006 2 26 PM...
Page 479: ...Page 466 NOTES 5 111 bk Page 466 Monday July 10 2006 2 26 PM...
Page 480: ...SPECIFICATIONS Page 467 SPECIFICATIONS 5 111 bk Page 467 Monday July 10 2006 2 26 PM...
Page 505: ...Page 492 NOTES 5 111 bk Page 492 Monday July 10 2006 2 26 PM...
Page 513: ...Page 500 NOTES 5 111 bk Page 500 Monday July 10 2006 2 26 PM...
Page 519: ...Page 506 NOTES 5 111 bk Page 506 Monday July 10 2006 2 26 PM...
Page 520: ...APPENDIX Page 507 APPENDIX 5 111 bk Page 507 Monday July 10 2006 2 26 PM...
Page 528: ...INDEX Page 515 INDEX Index fm Page 515 Monday July 10 2006 2 48 PM...
Page 535: ...Page 522 NOTES Index fm Page 522 Monday July 10 2006 2 48 PM...


