


REPAIR INSTRUCTIONS, PART 1
Page 191
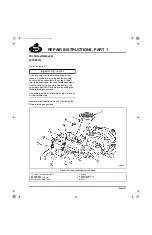
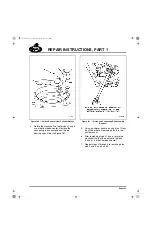
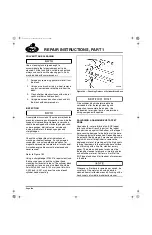
2. Install the cutter plate on the main shaft. Use
the large end of hex key wrench PT2210-14
to hold the cutter plate and tighten securely.
The hole in the side of the cutter plate
accepts the large end of the tool.
Do not allow the cutter bit to touch the cylinder
sleeve bore wall.
3. Position the tool in the cylinder bore by
backing off the depth-set collars and
lowering the cutter plate into the counterbore
to center the tool.
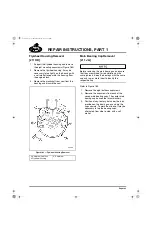
4. Secure the cutter plate to the cylinder block
with four M16 x 2 x 90 hex-head capscrews
and special washers from the counterbore
tool kit PT2210.
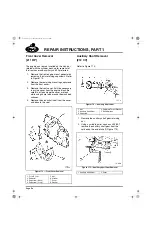
5. Cross-torque the capscrews to 30 lb-ft
(41 N
폷
m) using torque wrench J 24406 or
equivalent.
Lift the T-handle slightly (so cutter plate is not in
contact with the counterbore) and rotate the main
shaft counterclockwise to ensure that the cutter
plate turns freely without binding. If necessary,
loosen the capscrews and relocate the tool.
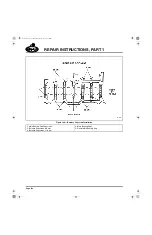
6. Using the counterbore tool T-handle, raise
the cutter plate approximately 1/2 inch
(12.7 mm) from the counterbore ledge.
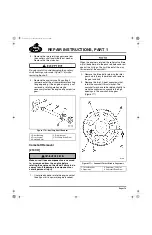
7. Using hex key wrench PT2210-14, turn the
cutter bit adjusting screw clockwise until the
cutter bit contacts the counterbore ledge. Do
not touch the counterbore wall.
8. Back off the lower depth-set collar and lower
the cutter plate until the cutter rests on the
ledge.
9. Rotate the lower depth-set collar down until
the collar contacts the main housing.
10. Rotate the collar an additional five
increments totaling 0.005 inch (0.127 mm).
Each graduation of the collar is 0.001 inch
(0.025 mm). This will lift the cutter bit
0.005 inch (0.127 mm) off the counterbore
ledge, allowing an accurate setting of the
cutter bit.
It may be necessary to use a flashlight to see the
cutter bit adjusting screw.
11. Using hex key wrench PT2210-14, turn the
cutter bit adjusting screw clockwise until the
cutter bit rests on the counterbore ledge.
12. If the cutter bit will not adjust, adjust the
lower depth-set collar 0.005 inch (0.127 mm)
more and recheck the cutter bit hold-down
screws for looseness.
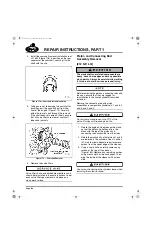
13. Zero the depth-set collars:
a.
Back off the lower depth-set collar and
carefully lower the cutter plate into the
bore and allow the cutter to rest on the
counterbore ledge.
b.
Rotate both the upper and lower
depth-set collars down until the bottom
collar contacts the main housing.
Do not force the collar beyond this point, as it will
lift the cutter plate and prevent an accurate zero
reading.
14. Set the depth of the cut. Determine the final
depth of the cut and back off the upper
depth-set collar accordingly. Each increment
on the depth-set collar increases the depth
of the cut by 0.001 inch (0.025 mm). Tighten
the thumbscrew on the upper collar
securely.
5-111.bk Page 191 Monday, July 10, 2006 2:26 PM
Summary of Contents for ASET AC
Page 6: ...TABLE OF CONTENTS Page iii TABLE OF CONTENTS 5 111 bk Page iii Monday July 10 2006 2 26 PM...
Page 14: ...INTRODUCTION Page 1 INTRODUCTION 5 111 bk Page 1 Monday July 10 2006 2 26 PM...
Page 23: ...Page 10 NOTES 5 111 bk Page 10 Monday July 10 2006 2 26 PM...
Page 96: ...COMPONENT LOCATOR Page 83 COMPONENT LOCATOR 5 111 bk Page 83 Monday July 10 2006 2 26 PM...
Page 99: ...Page 86 NOTES 5 111 bk Page 86 Monday July 10 2006 2 26 PM...
Page 100: ...TROUBLESHOOTING Page 87 TROUBLESHOOTING 5 111 bk Page 87 Monday July 10 2006 2 26 PM...
Page 140: ...MAINTENANCE Page 127 MAINTENANCE 5 111 bk Page 127 Monday July 10 2006 2 26 PM...
Page 153: ...Page 140 NOTES 5 111 bk Page 140 Monday July 10 2006 2 26 PM...
Page 383: ...Page 370 NOTES 5 111 bk Page 370 Monday July 10 2006 2 26 PM...
Page 479: ...Page 466 NOTES 5 111 bk Page 466 Monday July 10 2006 2 26 PM...
Page 480: ...SPECIFICATIONS Page 467 SPECIFICATIONS 5 111 bk Page 467 Monday July 10 2006 2 26 PM...
Page 505: ...Page 492 NOTES 5 111 bk Page 492 Monday July 10 2006 2 26 PM...
Page 513: ...Page 500 NOTES 5 111 bk Page 500 Monday July 10 2006 2 26 PM...
Page 519: ...Page 506 NOTES 5 111 bk Page 506 Monday July 10 2006 2 26 PM...
Page 520: ...APPENDIX Page 507 APPENDIX 5 111 bk Page 507 Monday July 10 2006 2 26 PM...
Page 528: ...INDEX Page 515 INDEX Index fm Page 515 Monday July 10 2006 2 48 PM...
Page 535: ...Page 522 NOTES Index fm Page 522 Monday July 10 2006 2 48 PM...