background image

MidAir 25/37 User Guide     »     9

8  Hardware Connections

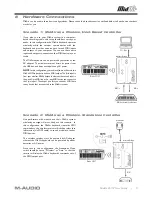
MidAir can be used in three basic configurations.  Please take a look at the scenarios outlined below to find the one that best 
works for you.

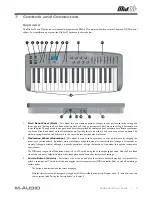
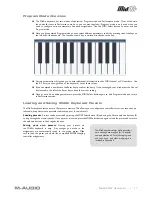
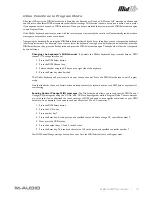
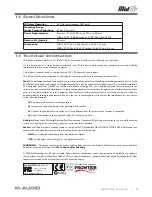
Scenario 1:  MidAir as a Wireless, Host-Based Controller

If  you  plan  to  use  your  MidAir  system  in  a  computer-
based recording studio, this setup should best serve your 
needs.  In this configuration, the MidAir keyboard operates 
wirelessly  while  the  receiver  communicates  with  the 
keyboard and provides an extra set of wired MIDI inputs 
and outputs to your computer.  You can use these extra 
inputs and outputs to connect another MIDI device in your 
studio.

The MidAir keyboard can be powered by batteries or the 
AC adapter.  The wireless receiver draws its power from 
the USB bus and does not require any AC power.

NOTE

: In this configuration, your audio software will detect two 

MidAir MIDI input ports and one MIDI output.  The first input is 
from your wireless MidAir keyboard whereas the second input is 
the wired 5-pin MIDI input (i.e., any MIDI device you connect to 
the 5-pin input).  The output port lets you send out MIDI data 
to any device that is connected to the MidAir receiver.

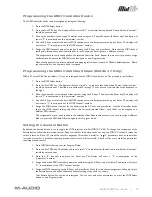
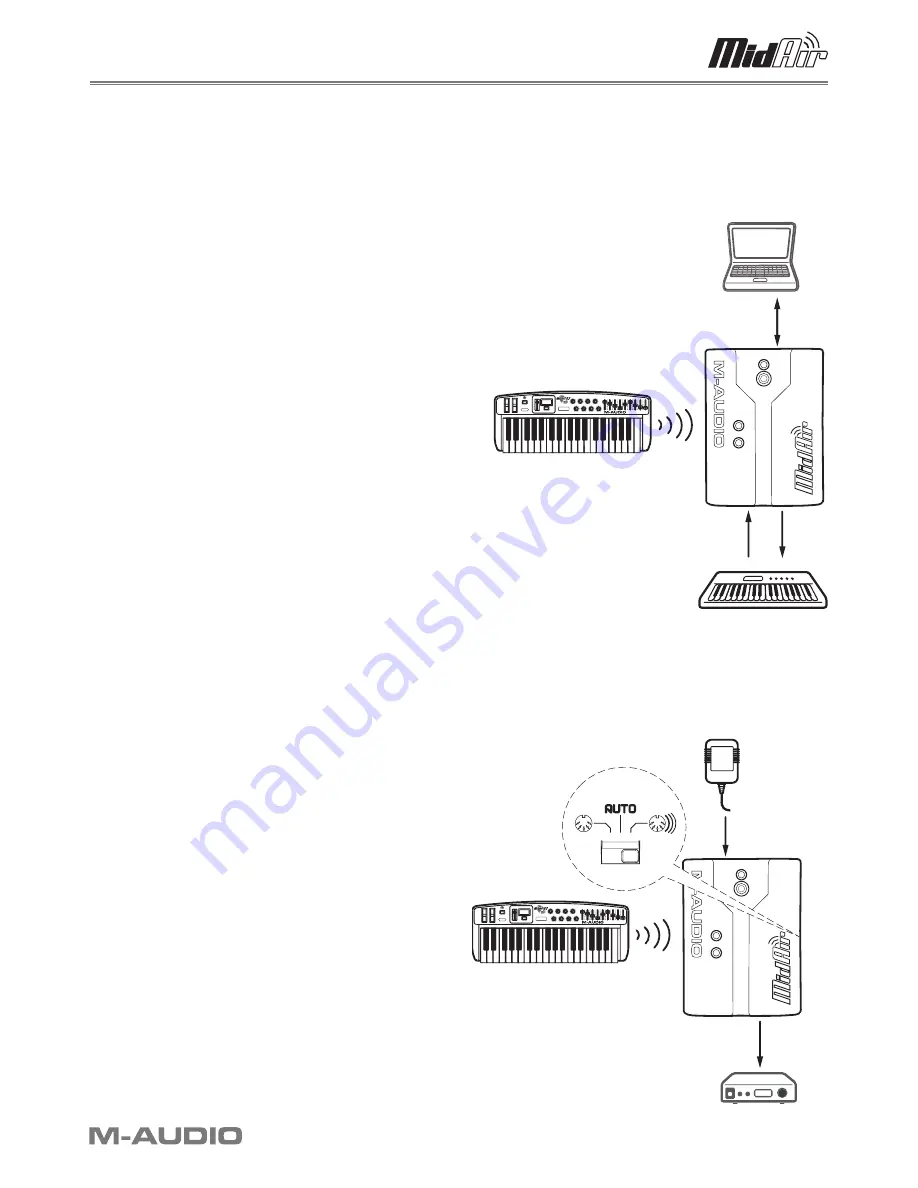
Scenario 2:  MidAir as a Wireless, Standalone Controller

Live  performers  who  want  to  use  their  MidAir  system 
wirelessly on stage will most likely use this scenario.  In 
this  configuration,  the  MidAir  keyboard  transmits  MIDI 
commands to the wireless receiver which then relays that 
information (via MIDI cable) to sound modules or other 
MIDI devices.

The  wireless  receiver  must  be  powered  by AC  adapter 
whereas the MidAir keyboard can be powered by either 
batteries or AC power.

Note  that  in  this  configuration,  the  Standalone  Mode 
switch should be set to “Wireless” or “Auto” so that the 
receiver will relay the MidAir keyboard’s commands out of 
the MIDI output port.

PC


/


Mac

MIDI


In

MIDI


Out

Wireless


Bridge

MIDI


Keyboard/Synthesizer

IN

OUT

MidAir


25/37

AC


Adapter

MIDI

Wireless


Bridge

Sound


Module

IN

OUT

MidAir


25/37

Summary of Contents for MidAir 25

Page 1: ...User Guide 25 37 MIDAIR Wireless USB MIDI Controller D E S I G N G R O U P Wireless Technology by...

Page 2: ...Overview 11 Loading and Saving MidAir Keyboard Presets 11 Programming the MIDI Controller Knobs 12 Programming the MIDI Controller Sliders MidAir 37 Only 12 Setting the Sustain Button 12 Setting the...

Page 3: ...MidAir receiver to your computer s USB port power up the keyboard and you re ready to go There are no complicated setup procedures or software applications your audio software treats the MidAir keyboa...

Page 4: ...liminates the need to open your computer to install hardware Furthermore your MidAir 25 or 37 keyboard can be powered by six AA batteries for use as a portable MIDI controller no strings attached Fina...

Page 5: ...Modulation This wheel is used to add expressivity to your performance by changing the intensity of certain effects By default most synthesizers assign this wheel to control vibrato change in intonati...

Page 6: ...ht MIDI Controller knobs give you real time control over your MIDI hardware and software through MIDI Continuous Controller CC messages Each knob is assignable and can be con gured to send out many ki...

Page 7: ...ver The Standalone Mode switch 8 determines which source is routed When the receiver is used with a computer the computer sees this port as a separate USB MIDI device that is unrelated to the MidAir k...

Page 8: ...s sent to its MIDI Out port Any data received from the wireless input is ignored Wireless Data from the receiver s wireless input is sent to its MIDI Out port Any data received from the wired MIDI In...

Page 9: ...one MIDI output The rst input is from your wireless MidAir keyboard whereas the second input is the wired 5 pin MIDI input i e any MIDI device you connect to the 5 pin input The output port lets you...

Page 10: ...to four octaves each way The display will read d 4 d 3 d 2 d 1 0 U 1 U 2 U 3 or U 4 as you shift from the lowest selection to the highest To quickly re center the keyboard simultaneously press the up...

Page 11: ...t setting Once you are done editing parameters press the MIDI Select button again to exit Program mode and return to Performance mode Loading and Saving MidAir Keyboard Presets The MidAir keyboard let...

Page 12: ...ipation of the parameter number 4 Use the 0 9 keys to select the desired MIDI continuous controller parameter and press Enter The display will now show a C in anticipation of the MIDI channel number 5...

Page 13: ...se the Data Entry slider to quickly scroll through the various presets contained in your MIDI device This method is useful if you need to quickly reach a preset without having to repeatedly press the...

Page 14: ...ta on MIDI channel 1 To change this channel 1 Press the MIDI Select button 2 Press the MIDI Channel key 3 Select a channel using the 0 9 keys on the right side of the keyboard 4 Press the Enter key wh...

Page 15: ...lly cross link the wrong remote and receiver units To resolve this issue simply press the Wireless Connect buttons on the MidAir keyboard 15 and the receiver unit 5 at the same time to allow the two u...

Page 16: ...600 Assignable MIDI Controller Knobs 1 2 3 4 5 6 7 8 82 83 28 29 74 71 2 3 Data Entry Slider Sustain Button 7 64 Preset 6 Drum Bass Rig Key Rig Assignable MIDI Controller Knobs 1 2 3 4 5 6 7 8 71 74 9...

Page 17: ...72 8 Assignable MIDI Controller Knobs 1 2 3 4 5 6 7 8 74 71 24 102 75 76 77 78 Data Entry Slider Sustain Button 7 64 Preset 3 ImpOSCar Fader 1 2 3 4 5 6 7 8 9 71 74 52 47 48 49 50 51 93 Assignable MID...

Page 18: ...4 12 13 14 15 7 Assignable MIDI Controller Knobs 1 2 3 4 5 6 7 8 71 74 91 93 73 72 2 10 Data Entry Slider Sustain Button 7 64 Preset 7 Digidesign Xpand Fader 1 2 3 4 5 6 7 8 9 16 17 18 19 80 81 73 75...

Page 19: ...7 Assignable MIDI Controller Knobs 1 2 3 4 5 6 7 8 23 24 25 26 27 28 29 30 Data Entry Slider Sustain Button 7 64 Preset 10 Ableton Live Set Fader 1 2 3 4 5 6 7 8 9 110 111 112 113 114 115 116 117 118...

Page 20: ...y s X X Touch Channel X X Pitch Bend 0 X Control 0 119 0 X Change 120 127 0 X Program 0 127 X Change True Number 1 128 System Exclusive X X System Song Position Pointer X X Common Song Sel X X Tune Re...

Page 21: ...43 Cello 44 Contrabass 45 Tremolo Strings 46 Pizzicato Strings 47 Orchestral Harp 48 Timpani 73 Piccolo 74 Flute 75 Recorder 76 Pan Flute 77 Bottle Blow 78 Shakuhachi 79 Whistle 80 Ocarina 105 Sitar 1...

Page 22: ...2 2 Chorus 3 3 Chorus 4 4 FB Chorus 5 Flanger C5 General MIDI Drums Note assignments MIDI Note Drum Sound MIDI Note Drum Sound MIDI Note Drum Sound 35 Acoustic Bass Drum 52 Chinese Cymbal 69 Cabasa 36...

Page 23: ...r 115 18 Gen Purpose 3 67 Soft Pedal 116 Controller 116 19 Gen Purpose 4 68 Legato Pedal 117 Controller 117 20 Controller 20 69 Hold 2 118 Controller 118 21 Controller 21 70 SoundVariation 119 Control...

Page 24: ...his equipment does cause harmful interference to radio or television reception which can be determined by turning the equipment off and on the user is encouraged to try to correct the interference by...

Page 25: ...Germany Kuhallmand 34 D 74613 Ohringen Germany Technical Support e mail support m audio de tel 49 0 7941 9870030 fax 49 0 7941 98 70070 Sales e mail info m audio de tel 49 0 7941 98 7000 fax 49 0 794...

Reviews: