MidAir 25/37 User Guide » 6
4.
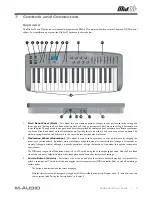
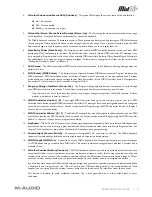
Wireless Connection Status LED (Connect)
– This green LED displays the current state of the wireless link:
<
On – Connected
<
Off – Not connected
<
Blinking – Connection in progress
5.
Octave Up/Down, Preset Select Buttons (Down, Up)
– The Octave up/down buttons select the octave range
of the keyboard. Press both buttons simultaneously to center the keyboard.
The MidAir keyboard can store 10 presets in memory. These presets can be accessed by pressing the MIDI Select button
(8) and using the Octave up/down buttons to step through the memory banks. Once a preset is located, press the MIDI
Select button again to load the preset and to return the up/down buttons to their regular function.
6.
Data Entry Slider (Data Entry)
- The Data Entry slider sends out MIDI controller data and is used to control MIDI
devices and DAW components in real-time. By default, this slider controls volume (MIDI controller #7) although it can
be reassigned in Program mode to affect one of five available MIDI controllers (Velocity Offset, Reverb Depth, Aftertouch,
Pan and Volume) or to send out program change messages. To learn how to reprogram this slider, see the section titled
“Setting the Data Entry Slider” in Chapter 9.
7.
LED Screen
- The LED screen displays MIDI functions and data selections. It also displays a warning message when the
batteries are low.
8.
MIDI Select (MIDI/Select)
– This button lets you alternate between MIDI Performance and Program modes on the
MidAir keyboard. MIDI Performance mode is where you’ll spend most of your time as you play the keyboard. Program
mode allows you to select and change settings such as Data Entry slider (6) and MIDI Controller knob (10) assignments.
See chapter 9 of this manual to learn more about Program Mode.
9.
Program Change Up/Down (Down, Up)
– The Program Change up/down buttons can be used to cycle through
your MIDI instrument’s preset sounds. These buttons step through the instrument’s presets one at a time.
Note that this is one of the three ways that you can send program change messages from the MidAir keyboard. All three
methods are discussed in detail in chapter 9.
10.
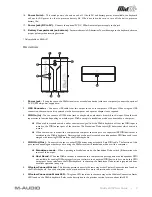
MIDI Controller Knobs (1-8)
– These eight MIDI Controller knobs give you real time control over your MIDI
hardware and software through MIDI Continuous Controller (CC) messages. Each knob is assignable and can be configured
to send out many kinds of control data. See the section entitled “Programming the MIDI Controller Knobs” in chapter 9
to learn how to set these knobs.
11.
MIDI Controller Sliders* (9-17)
– The MidAir 37 keyboard has nine fully assignable sliders that can send out MIDI
control data, just like the MIDI Controller knobs (see above). See the section entitled “Programming the MIDI Controller
Sliders” in chapter 9 to learn how to program these sliders.
12.
Keyboard
– MidAir 25 and 37 have two- and three-octave keyboards, respectively. Both units feature velocity-sensitive
keys that can also be used to enter program numbers and other information when the controller is in Program mode. See
chapter 9 of this manual for more about the function of these keys during programming.
13.
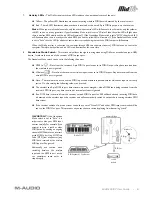
Sustain Input (Sustain Switch)
– Connect your sustain pedal’s 1⁄4” connector to this jack. The MidAir keyboard
supports all sustain pedal polarities by auto-sensing the pedal’s orientation during startup.
14.
MIDI Output (MIDI Out)
– If you wish to use the MidAir keyboard as a wired controller, simply connect this output
to a MIDI device using a standard 5-pin MIDI cable. This output remains active regardless of whether a wireless link is
available or not.
15.
Wireless Connect Button (Connect)
– The MidAir keyboard and receiver will usually establish a wireless connection
automatically. Under some circumstances, excessive interference, distance, or other factors may cause the controller and
receiver units to lose contact. If the wireless connection fails and the keyboard and receiver are within a range of 30 feet,
press the wireless connect buttons on the transmitter (keyboard) and receiver units to re-establish connection.
If you’re using more than one MidAir wireless setup, you might find yourself in a situation where you’ve inadvertently linked
a keyboard to the wrong receiver unit. This will result in your MIDI data being routed to the wrong destination. If this
happens, you can simply press the wireless connect buttons on both devices to “re-introduce” them to each other.
This button is recessed to avoid accidental activation. Use a bent paperclip, pen, or other small object to press
the button.


