MidAir 25/37 User Guide » 12
Programming the MIDI Controller Knobs
The MIDI Controller knobs can be reassigned by doing the following:
1. Press the MIDI Select button.
2. Press the Set CTRL key. The display will show a small “n” to indicate that the desired Controller knob “number”
should be entered next.
3. Choose the number of the desired Controller knob using the 0-9 keys. Then press the Enter key. The display will
show a “P” in anticipation of the “parameter” number.
4. Use the 0-9 keys to select the desired MIDI continuous controller parameter and press Enter. The display will
now show a “C” in anticipation of the MIDI “channel” number.
5. Assign the MIDI channel number for the knob using the 0-9 keys and press Enter. Note that the MIDI channel
setting only affects the currently selected knob—each knob can be assigned to a different channel.
This assignment has now been applied to the selected Controller knob. Repeat this process if you wish to assign
a different knob or press the MIDI Select button again to exit Program mode.
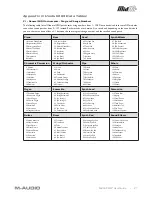
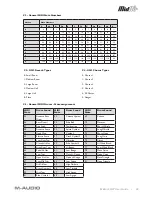
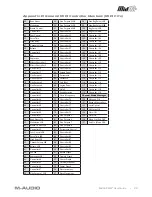
Note that Appendix A contains complete knob mapping information for each of MidAir’s default presets. Please
see that section to see how each knob is assigned.
Programming the MIDI Controller Sliders (MidAir 37 Only)
MidAir 37’s nine MIDI Control sliders (11) can be reassigned like the MIDI Controller knobs. The procedure is as follows:
1. Press the MIDI Select button.
2. Press the Set CTRL key. The display will show a small “n” to indicate that the desired Control slider “number”
should be entered next. The sliders are numbered 9 through 17 as you move from left side of the keyboard to
the right.
3. Choose the number of the desired slider number using the 0-9 keys. Then press the Enter key. The display will
show a “P” in anticipation of the “parameter” number.
4. Use the 0-9 keys to select the desired MIDI continuous controller parameter and press Enter. The display will
now show a “C” in anticipation of the MIDI “channel” number.
5. Assign the MIDI channel number for the knob using the 0-9 keys and press Enter. Like the Controller knobs
above, this MIDI channel setting only affects the currently selected slider—each slider can be assigned to a
different MIDI channel.
This assignment has now been applied to the selected slider. Repeat this process if you wish to assign a different
slider or press the MIDI Select button again to exit Program mode.
Setting the Sustain Button
By default, the Sustain button is set to toggle the MIDI sustain controller (MIDI CC #64). To change the assignment of the
Sustain button, follow the instructions below. Keep in mind that this button sends out only two MIDI CC values: 0 (when the
switch is turned off) and 127 (when the switch is engaged). This makes it useful for “toggle” parameters (such as sustain) but
it may be less useful in situations requiring precise control (such as filter cutoff). A knob will be more useful for parameters
requiring precise control.
1. Press MIDI Select button to enter Program Mode.
2. Press the Set CTRL key. The display will show a small “n” to indicate that the desired controller knob “number”
should be entered next.
3. Press the ”0” key and then press the Enter key. The display will show a “P” in anticipation of the
“parameter” number.
4. Assign the desired MIDI controller parameter number using the 0-9 keys and press Enter. The display will show a
“C” in anticipation of the MIDI “channel” number.
5. Assign the MIDI channel using the 0-9 keys and press Enter. Note that this channel assignment will apply only to
the Sustain button and will not affect the channel setting of any knobs or sliders.
Your Sustain button has now been reassigned. You can now edit other parameters or press the MIDI Select
button to exit Program mode.


