56
4.7 Saving the Image and Generating a Report of the Current Count
4.7.1 To save data and/or generate a report, insert a USB drive into the USB port on the left side of
the instrument.
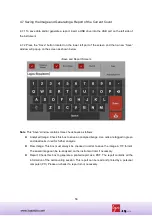
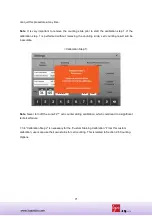
4.7.2 Press the “Save” button located on the lower left part of the screen and then a new “Save”
window will pop up on the screen as shown below.
<Save and Report Screen>
Note
: This “Save” window contains three check boxes as follows:
Analyzed Image: Check this box to save an analyzed image. Live cells are tagged in green
and dead cells in red for further analysis.
Raw Image: This box must always be checked in order to save the image in TIF format.
The saved image can be re-analyzed on the instrument later if necessary.
Report: Check this box to generate a printed report as a PDF. The report contains all the
information of the cell counting session. This report can be read and printed by a personal
computer (PC). Please un-check if a report is not necessary.


