Note
: Use These Instructions for
ULC Installations
Step One: Mount The LNI 2000
Note:
Mounting may be done after the
wiring of the LNI 2000 is complete,
depending on the enclosure configuration.
Refer to CAN/ULC-S559-04
specifications for more information.
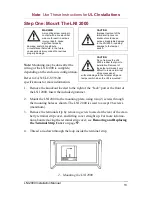
1. Remove the knockout located to the right of the “Jack” port at the front of
the LNI 2000. Insert the included grommet.
2. Mount the LNI 2000 to the mounting plate, using two (2) screws through
the mounting holes as shown. The LNI 2000 is sized to accept #6 screws
(maximum).
3. Remove the terminal strip by removing screw located at the rear of the cran-
berry terminal strip cover, and lifting cover straight up. For more informa-
tion about removing the terminal strip cover, see
Removing and Replacing
the Terminal Strip Cover
on page
57
.
4. Thread a tie-down through the loop inside the terminal strip.
2. Mounting the LNI 2000
LNI 2000 Installation Manual
WARNING
A mounting screw coming in
contact with a live electrical
wire could result in serious
injury or death, cause
significant property
damage, and/or bring about a
circumstance that could, in the future,
cause serious injury or death or serious
property damage.
CAUTION
Improper removal of the
terminal strip cover or
knockout could cause
serious, irreparable damage
to the LNI 2000, including
damage to the tamper
switch.
CAUTION
Do not remove the LNI
2000’s rubber feet prior to
installation. Removal of
these feet will make it very
difficult to remove terminal
strip access panel
without damage to the terminal strip and
tamper switch when the LNI is mounted.
13


