46
Model:
95LI
Tools Required:
Metric Hex Key Set, Side Cutters, T-45 Torx Wrench
1.
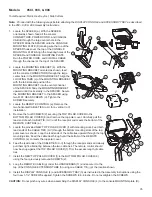
Remove the CONSOLE SUPPORT TOP CAP (A).
2.
Remove the two SCREWS (b) securing the CONSOLE
SUPPORT COVER (c). Remove the console support
cover and set it and the screws aside.
3.
Remove the four SCREWS (d) securing the DISPLAY
CONSOLE (e). Set the screws aside. Tilt the console
forward and disconnect all cables. Set the console aside.
4.
Locate the REMOTE CONTROL (f). Confi gure the
MOUNTING BRACKET for a vertical installation.
Secure the REMOTE CONTROL to the top of the
HANDRAIL (h) and just left of the RIGHT BULLHORN (j)
as shown. Tighten the bracket mounting screws securely.
5.
Route the REMOTE CABLE (k) below the HANDRAIL (h),
around the MONOCOLUMN (m) and up through the
CONSOLE SUPPORT (n) alongside the power cord and
coaxial cable.
6.
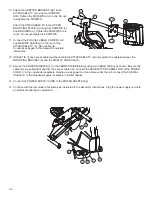
Locate the TV MOUNTING BRACKET (o). With the
mounting holes in the tube facing downward, slide the
tube portion of the mounting bracket into the top of the CONSOLE SUPPORT (n). Align the inserts in the tube with the
mounting holes on the underside of the console support. Secure the mounting bracket using two SCREWS
(p). Tighten the screws securely.
CAUTION:
Do not pinch any cables when inserting the mounting bracket into the console support.
7.
Re-install the DISPLAY CONSOLE (e) using the four previously removed SCREWS (d). Tighten the SCREWS to 6-8
in-lbs. Do not overtighten the SCREWS.
CAUTION:
Do not pinch any wires when assembling the DISPLAY CONSOLE to the console support.
8.
Attach the ADAPTER BRACKET (q) to the ATTACHABLE TV (r) using four SCREWS (s). Tighten the SCREWS
to 6-8 in-lbs. Do not overtighten the SCREWS.
Attach the ATTACHABLE TV to the UPPER MOUNTING PLATE (t) using four SCREWS (u) and washers (v).
Tighten the SCREWS to 6-8 in-lbs. Do not overtighten the SCREWS.
e
r
q
s
u
v
o
x
a
b
m
h
f
k
d
p
c
n
j
t


