1
Type the printer IP address into the address field of your Web browser.
Note:
If you do not know the IP address of the printer, print a network setup page and locate the IP address in
the TCP/IP section.
2
Click
Device Status
. The Device Status page appears, displaying a summary of supply levels.
Ordering supplies
To order parts and supplies in the U.S., contact Lexmark at 1-800-539-6275 for information about Lexmark authorized
supplies dealers in your area. In other countries or regions, visit the Lexmark Web site at
www.lexmark.com
or contact
the place where you purchased the printer.
Note:
All life estimates for printer supplies assume printing on letter
‑
or A4
‑
size plain paper.
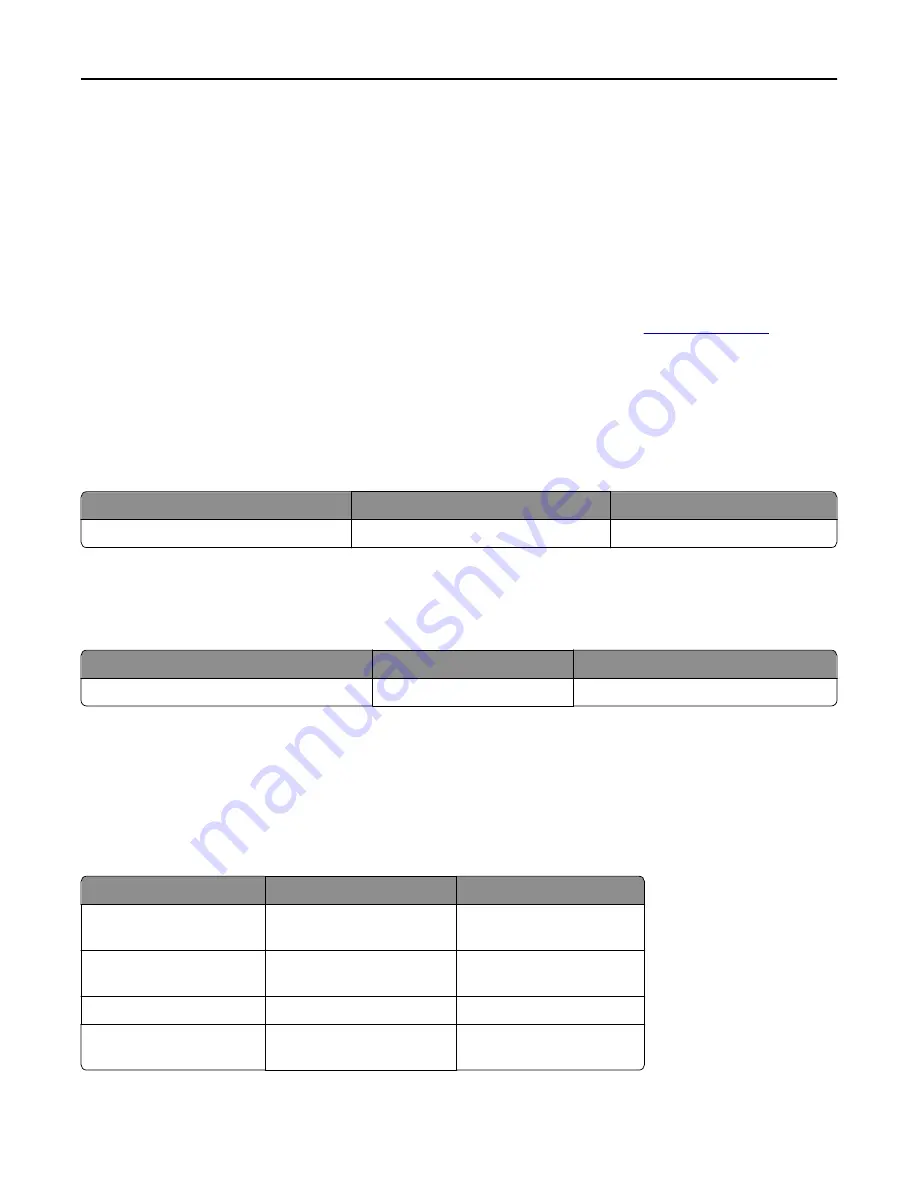
Ordering toner cartridges
Recommended toner cartridge and part number
Part name
Part number
For printer(s)
High Yield Toner Cartridge
X860H21G
X860, X862, X864
Ordering a photoconductor kit
When
Replace Photoconductor
message appears, order a new photoconductor kit.
Part name
Part number
For printer(s)
Photoconductor Kit
X860H22G
X860, X862, X864
Ordering a maintenance kit
When
80 Routine maintenance needed
appears, order a maintenance kit. The maintenance kit contains all
the items necessary to replace the pick rollers, the charge roll, the transfer roller, and the fuser.
Note:
Using certain types of paper may require more frequent replacement of the maintenance kit. The pick rollers,
charge roll, transfer roller, and fuser can also be individually ordered and replaced as necessary.
Part name
Part number
For printer(s)
Maintenance kit (low
voltage)
40X2375
X860, X862, X864
Maintenance kit (high
voltage)
40X2376
X860, X862, X864
Maintenance kit (100 volt)
40X2377
X860, X862, X864
Maintenance kit (for the
ADF)
40X2734.
X860, X862, X864
Maintaining the printer
201
Summary of Contents for X860de
Page 6: ...Edition notice 287 Power consumption 291 Index 304 Contents 6 ...
Page 211: ...3 Place the tray into the printer 4 Remove the cable cover Maintaining the printer 211 ...
Page 242: ...231 paper jam 1 Open Door D 2 Remove the jam D D 3 Close Door D Troubleshooting 242 ...
Page 250: ...282 paper jam 1 Open Door F 2 Remove the jam 3 Close Door F Troubleshooting 250 ...
Page 254: ...28x paper jam 284 paper jam 1 Open Door F 2 Remove the jam 3 Close Door F Troubleshooting 254 ...


