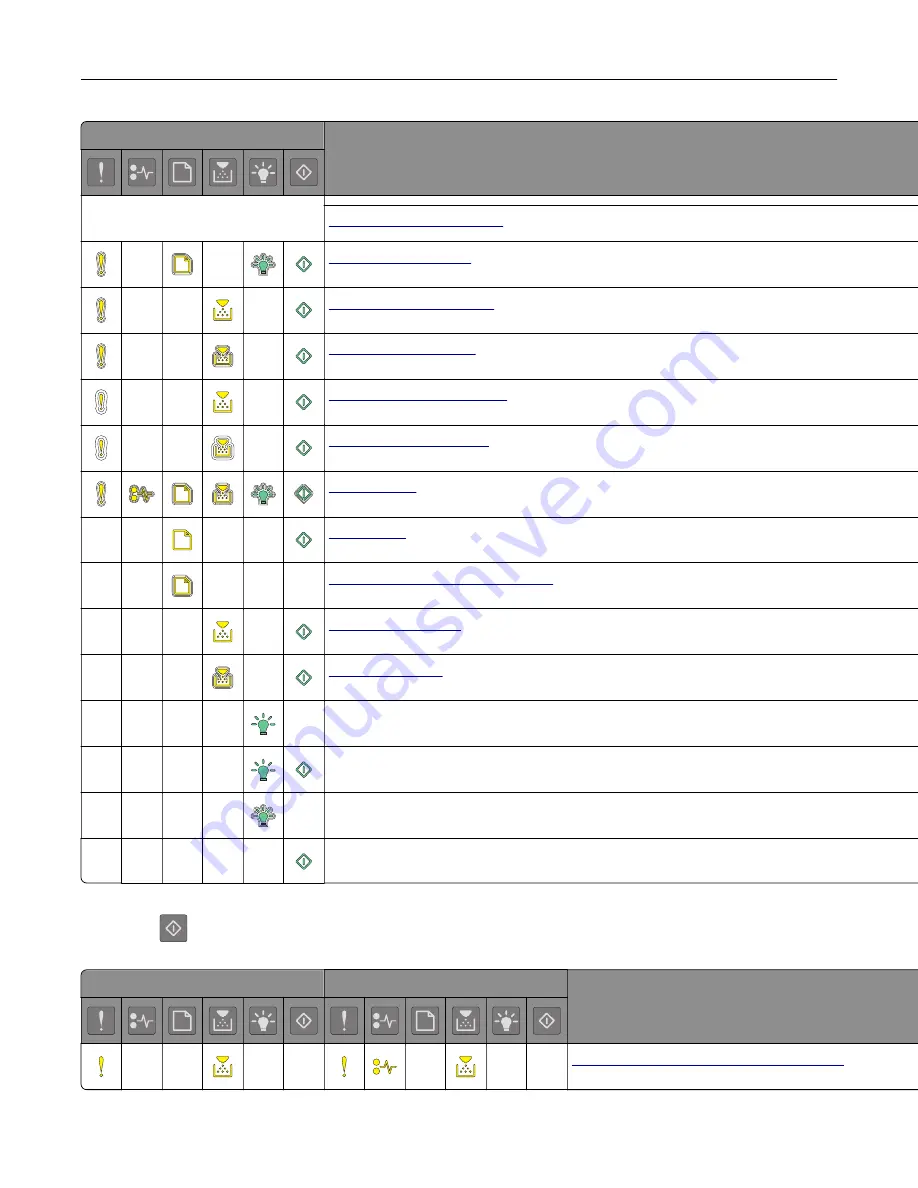
Lexmark MS310 Series User Manual Download Page 13

Light sequence

Error message or printer status

The lights blink one at a time from
left to right repeatedly.

Non-Lexmark supply type

Printer had to restart

Toner cartridge very low

Imaging unit very low

Toner cartridge nearly low

Imaging unit nearly low

Service error

Load paper

Remove paper from standard bin

Toner cartridge low

Imaging unit low

Ready

Waiting

Busy

Not ready

If the light sequence matches a light sequence in the Primary light sequence column of the following table,

then press 

 twice. Search for a matching light sequence in the Supplemental light sequence column, and

then see the corresponding error message or printer status.

Primary light sequence

Supplemental light sequence

Error message or printer status

Missing or unresponsive toner cartridge

Learning about the printer

13

Summary of Contents for MS310 Series

Page 1: ...MS310 Series User s Guide June 2017 www lexmark com Machine type s 4514 Model s 220 230...

Page 2: ...ng hardware options 16 Setting up the printer software 18 Networking 20 Printing a menu settings and network setup page 23 Loading paper and specialty media 24 Setting the paper size and type 24 Con g...

Page 3: ...Erasing non volatile memory 78 Finding printer security information 79 Maintaining the printer 80 Cleaning the printer 80 Checking the status of parts and supplies 80 Estimated number of remaining pag...

Page 4: ...99 Paper jam in trays 101 Paper jam in the multipurpose feeder 104 Troubleshooting 106 Understanding the printer messages 106 Solving printer problems 146 Solving print problems 151 Embedded Web Serv...

Page 5: ...do not place or use this product near water or wet locations CAUTION POTENTIAL INJURY This product uses a laser Use of controls or adjustments or performance of procedures other than those speci ed in...

Page 6: ...s product is designed tested and approved to meet strict global safety standards with the use of speci c manufacturer s components The safety features of some parts may not always be obvious The manuf...

Page 7: ...ork Caring for and maintaining the printer Troubleshooting and solving problems User s Guide and Quick Reference Guide The guides are available at http support lexmark com Note These guides are also a...

Page 8: ...ith this printer or go to http support lexmark com In other countries and regions See the printed warranty that came with this printer Selecting a location for the printer When selecting a location fo...

Page 9: ...ations CAUTION POTENTIAL INJURY To reduce the risk of equipment instability load each tray separately Keep all trays closed until needed You can con gure your printer by adding one optional 250 or 550...

Page 10: ...l 2 Paper stop 3 Standard bin 4 Front door release button 5 Controller board access door 6 Standard 250 sheet tray 7 Optional 250 or 550 sheet tray 8 50 sheet multipurpose feeder 9 Front door Learning...

Page 11: ...aper must be loaded in the tray or removed from the bin 4 Toner low or replace imaging unit light Yellow The toner cartridge is low on toner or the imaging unit needs to be replaced 5 Ready or data li...

Page 12: ...inking slowly Control panel light sequences error messages and printer status Light sequence Error message or printer status Close front door Replace imaging unit Replace unsupported toner cartridge R...

Page 13: ...tandard bin Toner cartridge low Imaging unit low Ready Waiting Busy Not ready If the light sequence matches a light sequence in the Primary light sequence column of the following table then press twic...

Page 14: ...nt memory to collate job PPDS font error Complex page Insufficient memory to support Resource Save feat Standard parallel port disabled Rear USB port disabled Too many trays attached Incorrect paper s...

Page 15: ...page or menu settings page and then nding the TCP IP section For more information see Printing a menu settings and network setup page on page 23 Notes An IP address appears as four sets of numbers se...

Page 16: ...rical outlet before continuing If you have any other devices attached to the printer then turn them off as well and unplug any cables going into the printer 1 Turn off the printer using the power swit...

Page 17: ...options in the printer driver to make them available for print jobs For more information see Adding available options in the print driver on page 19 Attaching cables Connect the printer to the comput...

Page 18: ...power cord socket Connect the printer to an electrical outlet 7 Security slot Attach a lock that will secure the printer in place These ports are available only in select printer models Setting up th...

Page 19: ...rinter software to change these settings for individual print jobs This utility is supported only in select printer models Adding available options in the print driver For Windows users 1 Open the pri...

Page 20: ...choose to use the default printer nickname or assign a name that is easier for you to remember You will need an Ethernet cable to connect the printer to the network and an available port where the pr...

Page 21: ...If you cannot nd the SSID or the security information for your network then see the documentation that came with the access point or contact your system support person To nd the WPA WPA2 preshared key...

Page 22: ...he Wireless Setup Assistant lets you Con gure the printer to join an existing wireless network Add a printer to an existing ad hoc network Change the wireless settings after installation Install the p...

Page 23: ...least ve seconds and then turn the printer back on 6 To verify if your printer is connected to the network print a network setup page Then in the Network Card x section see if the status is Connected...

Page 24: ...operating system access the Paper menu using the Local Printer Settings Utility or Printer Settings Note The paper size and type settings will be saved until you reset factory default settings Con gur...

Page 25: ...he standard bin includes a paper stop that keeps paper from sliding out the front of the bin as it stacks To open the paper stop pull it so that it ips forward Note Close the paper stop when moving th...

Page 26: ...Busy Blinking Loading paper and specialty media 26...

Page 27: ...position for the size of the paper you are loading A6 A5 LG L A 5 B 5 E X E C 2 3 Squeeze and then slide the length guide tab to the correct position for the size of the paper you are loading A6 A5 LG...

Page 28: ...paper in the standard tray then squeeze and slide the length guide tab toward the center of the tray to the A6 size position Make sure the width and length guides are aligned with the paper size indic...

Page 29: ...he bottom edge of the sheet toward the front of the tray 6 Insert the tray 7 From the Embedded Web Server or your computer set the paper size and type in the Paper menu to match the paper loaded in th...

Page 30: ...dia such as card stock transparencies paper labels and envelopes You can also use it for single page print jobs on letterhead 1 Open the multipurpose feeder 1 2 a Pull the multipurpose feeder extender...

Page 31: ...ncies by the edges Flex the stack of transparencies back and forth to loosen them and then fan them Straighten the edges on a level surface Note Avoid touching the printable side of the transparencies...

Page 32: ...ed printable side faceup and the top edge entering the printer rst For more information on loading transparencies see the packaging the transparencies came in Note When loading A6 size paper make sure...

Page 33: ...pose feeder Note Depending on your operating system access the Paper menu using Local Printer Settings Utility or Printer Settings Linking and unlinking trays The printer links trays when the speci ed...

Page 34: ...b browser and then type the printer IP address in the address eld Notes Print a network setup page or menu settings page and then locate the IP address in TCP IP section The IP address appears as four...

Page 35: ...he Tray Con guration section select a paper source and then select a custom paper type under the paper type column 4 Click Submit Using the printer settings on the computer Depending on your operating...

Page 36: ...or paper to curl at its edges Excessive curl can cause paper feeding problems Curl can occur after the paper passes through the printer where it is exposed to high temperatures Storing paper unwrapped...

Page 37: ...l character recognition OCR forms In some cases registration can be adjusted with a software application to successfully print on these forms Coated papers erasable bond synthetic papers thermal paper...

Page 38: ...pacts print clarity and how well toner fuses to the paper Surface friction determines how easily sheets can be separated Grain and formation impacts curling which also in uences the mechanics of how t...

Page 39: ...ion the precise location on the page greater than 2 3 mm 0 9 in such as optical character recognition OCR forms In some cases registration can be adjusted with a software application to successfully p...

Page 40: ...or closed position Have bent corners Have rough cockle or laid nishes Adjust the width guides to t the width of the envelopes Note A combination of high humidity over 60 and high printing temperature...

Page 41: ...g large quantities Feed transparencies from the standard tray or the multipurpose feeder Use transparencies designed speci cally for laser printers Transparencies must be able to withstand temperature...

Page 42: ...m 8 5 x 14 in 7 3 4 Envelope Monarch 98 x 191 mm 3 9 x 7 5 in X X X 9 Envelope 98 x 225 mm 3 9 x 8 9 in X X X 10 Envelope 105 x 241 mm 4 1 x 9 5 in X X X 1 This size setting formats the page for 216 x...

Page 43: ...y if the paper size is at least 148 x 210 mm 5 8 x 8 3 in Universal is supported in duplex mode only if the width is at least 210 mm 8 3 in and the length is at least 279 mm 11 in The smallest support...

Page 44: ...sided paper labels designed for laser printers are supported for occasional use It is recommended to print 20 or fewer pages of paper labels per month Vinyl pharmacy and two sided labels are not suppo...

Page 45: ...ness Using the Embedded Web Server 1 Open a Web browser and then type the printer IP address in the address eld Notes Print a network setup page or menu settings page and then locate the IP address in...

Page 46: ...o any Google Cloud Print ready printer 1 From the home screen of your mobile device launch an enabled application 2 Tap Print and then select the printer 3 Send the print job Printing from a mobile de...

Page 47: ...folder and then select your printer 2 From the print queue select the print job you want to cancel and then delete it For Macintosh users 1 From System Preferences in the Apple menu navigate to your p...

Page 48: ...aper Weight Paper Loading Custom Types General Settings Print Settings Network Ports Security Standard USB Set Date and Time Paper menu Default Source menu Use To Default Source Tray x MP Feeder Manua...

Page 49: ...es using the linked tray The A6 paper size is supported only in Tray 1 and the multipurpose feeder Tray x Type Plain Paper Transparency Recycled Labels Bond Letterhead Preprinted Colored Paper Light P...

Page 50: ...Size to appear as a menu The multipurpose feeder does not automatically detect paper size Make sure to set the paper size value MP Feeder Type Plain Paper Card Stock Transparency Recycled Labels Bond...

Page 51: ...otes Plain Paper is the factory default setting From the Paper menu set Con gure MP to Manual for Manual Paper Type to appear as a menu Manual Envelope Size 7 3 4 Envelope 9 Envelope 10 Envelope DL En...

Page 52: ...of the card stock loaded Notes Normal is the factory default setting The options appear only if card stock is supported Transparency Texture Smooth Normal Rough Specify the relative texture of the tra...

Page 53: ...paper loaded Note Normal is the factory default setting Heavy Texture Smooth Normal Rough Specify the relative texture of the paper loaded Note Normal is the factory default setting Rough Cotton Textu...

Page 54: ...ht of the envelope loaded Note Normal is the factory default setting Rough Envelope Weight Light Normal Heavy Specify the relative weight of the rough envelope loaded Note Normal is the factory defaul...

Page 55: ...r all print jobs that specify Letterhead as the paper type Preprinted Loading Duplex Off Determine and set two sided printing for all print jobs that specify Preprinted as the paper type Colored Loadi...

Page 56: ...r all the menus Custom Types menu Use To Custom Type x Paper Card Stock Transparency Rough Cotton Labels Envelope Associate a paper or specialty media type with a Custom Type x name Notes Paper is the...

Page 57: ...ctory default setting If PS SmartSwitch is enabled then the printer uses PostScript emulation If PS SmartSwitch is disabled then the printer does not examine incoming data and it uses the default prin...

Page 58: ...ot show estimates View supplies estimates on the control panel Embedded Web Server menu settings and device statistics reports Eco Mode Off Energy Energy Paper Paper Minimize the use of energy paper o...

Page 59: ...Chinese Japanese Custom Key x Specify a language and custom key information for the keyboard on the display Paper Sizes US Metric Specify the unit of measurement for paper sizes Notes US is the factor...

Page 60: ...ecify the text to display in the upper corners of the home screen Note You can type up to 32 characters Displayed Information continued 1 Black Toner Specify the display information for Black Toner Se...

Page 61: ...ptions Display Do not display Date Format1 MM DD YYYY DD MM YYYY YYYY MM DD Format the printer date Note MM DD YYYY is the U S factory default setting DD MM YYYY is the international factory default s...

Page 62: ...g for Alarm Control Off is the factory default setting for Cartridge Alarm Timeouts Standby Mode1 Disabled 1 240 Set the duration of idle time before the printer enters a lower power state Note 15 min...

Page 63: ...cation and reset the Screen Timeout timer instead of returning to the home screen Note Off is the factory default setting Timeouts Print Timeout Disabled 1 sec 255 sec Set the printer to end a print j...

Page 64: ...ved within the speci ed time period Note Disabled is the factory default setting Print Recovery Jam Recovery On Off Auto Specify whether the printer reprints jammed pages Note Auto is the factory defa...

Page 65: ...nonymous device function and error information to Lexmark Note The default value depends on what you selected during the initial setup Information Sent to Lexmark Start Send Stop Send Set the time for...

Page 66: ...display of the printer status Note Off is the factory default setting Export Con guration File1 Export Export con guration les to a ash drive 1 This menu item appears only in touch screen printer mod...

Page 67: ...he RAM is temporary Storing downloads in a ash memory places them in permanent storage Downloads remain in the ash memory even when the printer is turned off This menu item appears only when an option...

Page 68: ...Print Print Specify whether to insert blank pages in a print job Note Do Not Print is the factory default setting Collate 1 1 1 2 2 2 1 2 3 1 2 3 Stack the pages of a print job in sequence when print...

Page 69: ...page document Note Auto is the factory default setting The printer chooses between portrait and landscape Paper Saver Border None Solid Print a border when using Paper Saver Note None is the factory...

Page 70: ...htening the output Note 0 is the factory default setting Contrast 0 5 Adjust the contrast of printed objects Note 0 is the factory default setting PostScript menu Use To Print PS Error On Off Print a...

Page 71: ...e Off is the factory default setting Tray Renumber Assign MP Feeder Off None 0 199 Assign Tray x Off None 0 199 Assign Manual Paper Off None 0 199 Assign Manual Env Off None 0 199 Con gure the printer...

Page 72: ...rt and end times associated with the printer Time Zone setting Note On is the factory default setting UTC GMT Offset input time in minutes Set the time offset from Coordinated Universal Time or Greenw...

Page 73: ...vironmentally conscious company Lexmark supports the use of recycled office paper produced speci cally for use in laser LED printers For more information on recycled papers that work well with your pr...

Page 74: ...address in the TCP IP section If you are using a proxy server then temporarily disable it to load the Web page correctly 2 Click Settings General Settings Sleep Button Settings 3 From the Press Sleep...

Page 75: ...ding on your operating system access the Hibernate Timeout menu using the Local Printer Settings Utility or Print Settings Using Schedule Power Modes Schedule Power Modes lets the user schedule when t...

Page 76: ...o offers recycling of packaging components in some countries or regions For more information go to www lexmark com recycle and then choose your country or region Information on available packaging rec...

Page 77: ...RAM to temporarily buffer user data during simple print jobs Non volatile memory Your printer may use two forms of non volatile memory EEPROM and NAND ash memory Both types are used to store operatin...

Page 78: ...the buffered data simply turn off the printer Erasing non volatile memory 1 Turn off the printer 2 Open the front door of the printer and hold down while turning the printer on Release only when the p...

Page 79: ...tings jobs and passwords from the printer memory 4 Close the front door Finding printer security information In high security environments it may be necessary to take additional steps to make sure tha...

Page 80: ...s Do not use household cleaners or detergents as they may damage the nish of the printer Make sure that all areas of the printer are dry after cleaning 5 Connect the power cord to the electrical outle...

Page 81: ...the U S contact Lexmark at 1 800 539 6275 for information about Lexmark authorized supplies dealers in your area In other countries or regions go to www lexmark com or contact the place where you purc...

Page 82: ...H Extra High Yield Toner Cartridge 504X1 Ultra High Yield Toner Cartridge 504U2 For Africa Middle East Central Eastern Europe and Commonwealth of Independent States Toner Cartridge 505 High Yield Tone...

Page 83: ...d periods of time may cause imaging unit parts to fail prior to exhaustion of toner from toner cartridge For more information on replacing the imaging unit see the instruction sheet that came with the...

Page 84: ...then remove all packing materials 4 Shake the new cartridge to redistribute the toner 5 Insert the toner cartridge into the printer by aligning the side rails of the cartridge with the arrows on the...

Page 85: ...se the front door Replacing the imaging unit 1 Press the button on the right side of the printer and then open the front door 2 1 2 Pull the toner cartridge out using the handle Maintaining the printe...

Page 86: ...ng materials from the imaging unit Warning Potential Damage Do not expose the imaging unit to direct light for more than 10 minutes Extended exposure to light may cause print quality problems Warning...

Page 87: ...tridge with the arrows on the side rails inside the printer 8 Close the front door Moving the printer Before moving the printer CAUTION POTENTIAL INJURY Before moving the printer follow these guidelin...

Page 88: ...s authorized replacement Warning Potential Damage Damage to the printer caused by improper moving is not covered by the printer warranty Moving the printer to another location The printer and its har...

Page 89: ...TCP IP section The IP address appears as four sets of numbers separated by periods such as 123 123 123 123 If you are using a proxy server then temporarily disable it to load the Web page correctly 2...

Page 90: ...e Stop1 2 The printer stops when the supply condition is reached The supply must be replaced to continue printing 1The printer generates an e mail about the status of the supply when supply noti catio...

Page 91: ...printer is printing Do not load too much paper Make sure that the stack height is below the maximum paper ll indicator Do not slide paper into the tray Load paper as shown in the illustration Make su...

Page 92: ...e and type are set correctly on the computer or printer control panel Store paper according to manufacturer recommendations Identifying jam locations Notes When Jam Assist is set to On the printer aut...

Page 93: ...Paper jam in the front door On On If the sequence matches the light sequence in the preceding illustration then press twice to see the supplemental light sequence On On On Clearing jams 93...

Page 94: ...er cartridge 3 Remove the imaging unit Warning Potential Damage Do not expose the imaging unit to direct light for more than 10 minutes Extended exposure to light may cause print quality problems Warn...

Page 95: ...4 Insert the imaging unit Note Use the arrow guides inside the printer 5 Insert the toner cartridge 6 Close the front door 7 From the control panel press Clearing jams 95...

Page 96: ...Paper jam in the rear door On On If the light sequence matches the light sequence in the preceding illustration then press twice to see the supplemental light sequence On On On Clearing jams 96...

Page 97: ...s the light sequence in the preceding illustration then do the following 1 Open the rear door 2 Remove the jammed paper Note Make sure that all paper fragments are removed 3 Close the rear door 4 From...

Page 98: ...Paper jam in the standard bin On On If the light sequence matches the light sequence in the preceding illustration then press twice to see the supplemental light sequence On On On Clearing jams 98...

Page 99: ...ollowing 1 Remove the jammed paper Note Make sure that all paper fragments are removed 2 From the control panel press Paper jam in the duplex unit On On If the light sequence matches the light sequenc...

Page 100: ...n If the supplemental light sequence matches any of the light sequences in the preceding illustrations then do the following 1 Remove the tray 2 Remove the jammed paper Note Make sure that all paper f...

Page 101: ...tray 4 From the control panel press Paper jam in trays On On If the light sequence matches the light sequence in the preceding illustration then press twice to see the supplemental light sequence Clea...

Page 102: ...Light sequences On On On On On On On On If the supplemental light sequence matches any of the light sequences in the preceding illustrations then do the following Clearing jams 102...

Page 103: ...1 Remove the tray 2 Remove the jammed paper Note Make sure that all paper fragments are removed 3 Insert the tray 4 From the control panel press Clearing jams 103...

Page 104: ...per jam in the multipurpose feeder On On If the light sequence matches the light sequence in the preceding illustration then press twice to see the supplemental light sequence On On On Clearing jams 1...

Page 105: ...he light sequence in the preceding illustration then do the following 1 Remove the jammed paper Note Make sure that all paper fragments are removed 2 Flex fan and align the paper edges before loading...

Page 106: ...wing 1 Check if both the toner cartridge and imaging unit are Lexmark authorized MICR magnetic ink character recognition or non MICR supplies 2 Change the toner cartridge or imaging unit so that both...

Page 107: ...el light sequence matches the light sequence in the preceding illustration then you may need to order a toner cartridge If necessary press on the printer control panel to continue printing Cartridge n...

Page 108: ...printing Cartridge very low 88 xy Blinking On On If the printer control panel light sequence matches the light sequence in the preceding illustration then you may need to replace the toner cartridge v...

Page 109: ...ed pages remain 88 xy On On If the printer control panel light sequence matches the light sequence in the preceding illustration then press twice quickly to see the supplemental light sequence On Blin...

Page 110: ...information see the instruction sheet that came with the supply or see the Replacing supplies section of the User s Guide Note If you do not have a replacement toner cartridge then see the Ordering su...

Page 111: ...the printer x indicates the value of the printer region y indicates the value of the cartridge region x and y can have the following values Printer and toner cartridge regions Region number x Region y...

Page 112: ...missing or unresponsive cartridge 31 xy On On If the light sequence matches the light sequence in the preceding illustration then press twice to see the supplemental light sequence On On On Troublesho...

Page 113: ...dge may be defective or a non genuine Lexmark supply For more information see Using genuine Lexmark parts and supplies on page 81 Replace unsupported cartridge 32 xy On On On On If the light sequence...

Page 114: ...the printer control panel light sequence matches the light sequence in the preceding illustration then you may need to order an imaging unit If necessary press on the printer control panel to continue...

Page 115: ...ontinue printing Imaging unit very low 84 xy Blinking Blinking On If the printer control panel light sequence matches the light sequence in the preceding illustration then you may need to replace the...

Page 116: ...n the preceding illustration then replace the imaging unit For more information see the instruction sheet that came with the supply Note If you do not have a replacement imaging unit then see the Orde...

Page 117: ...Check if the imaging unit is missing If missing then install the imaging unit For more information see the instruction sheet that came with the supply If the imaging unit is installed then remove and...

Page 118: ...ly type see User s Guide 33 xy Note The supply type can be toner cartridge or imaging unit The printer has detected a non Lexmark supply or part installed in the printer Your Lexmark printer is design...

Page 119: ...on the control panel simultaneously for 15 seconds For non touch screen printer models press and on the control panel simultaneously for 15 seconds to clear the message and continue printing If you d...

Page 120: ...size and type are speci ed in Print Properties or the Print dialog settings Make sure the correct paper size and type are speci ed in the Paper menu on the printer control panel If the printer is on a...

Page 121: ...e light sequence in the preceding illustration then try one or more of the following Load the tray or feeder with the correct size and type of paper From the printer control panel press to continue pr...

Page 122: ...or feeder with the correct size and type of paper From the printer control panel press to continue printing Note If the printer nds a tray that has the correct size and type of paper then it feeds fro...

Page 123: ...the tray or feeder with the correct size of paper From the printer control panel press to continue printing Note If the printer nds a tray that has the correct size of paper then it feeds from that tr...

Page 124: ...or feeder with the correct size and type of paper From the printer control panel press to continue printing Note If the printer nds a tray that has the correct size and type of paper then it feeds fr...

Page 125: ...then try one or more of the following Load the multipurpose feeder with the correct size and type of paper From the control panel press to continue printing Note If no paper is loaded in the feeder t...

Page 126: ...n then try one or more of the following Load the multipurpose feeder with the correct size and type of paper From the control panel press to continue printing Note If no paper is loaded in the feeder...

Page 127: ...ustration then try one or more of the following Load the feeder with the correct paper size From the control panel press to continue printing Note If no paper is loaded in the feeder then the printer...

Page 128: ...tion then try one or more of the following Load the multipurpose feeder with the correct paper size and type From the control panel press to continue printing Note If no paper is loaded in the feeder...

Page 129: ...quence matches the light sequence in the preceding illustration then do the following 1 Remove the paper stack from the standard output bin 2 From the printer control panel press to continue printing...

Page 130: ...ence in the preceding illustration then try one or more of the following From the printer control panel press to continue printing Unplug the router then wait for 30 seconds and then plug the router b...

Page 131: ...d 56 On On If the printer control panel light sequence matches the light sequence in the preceding illustration then press twice quickly to see the supplemental light sequence On Slowly blinking Slowl...

Page 132: ...pe the printer IP address in the address eld Notes Print a network setup page or menu settings page and then locate the IP address in the TCP IP section If you are using a proxy server then temporaril...

Page 133: ...plemental light sequence matches the light sequence in the preceding illustration then try one or more of the following From the printer control panel press to continue printing Turn off the printer a...

Page 134: ...led 56 On On If the printer control panel light sequence matches the light sequence in the preceding illustration then press twice quickly to see the supplemental light sequence On Blinking Blinking T...

Page 135: ...pe the printer IP address in the address eld Notes Print a network setup page or menu settings page and then locate the IP address in the TCP IP section If you are using a proxy server then temporaril...

Page 136: ...equence On On On If the supplemental light sequence matches the light sequence in the preceding illustration then try one or more of the following From the printer control panel press to print the por...

Page 137: ...Resource Save feature 35 On On If the printer control panel light sequence matches the light sequence in the preceding illustration then press twice quickly to see the supplemental light sequence On B...

Page 138: ...printer control panel to clear the light sequence The job will be printed without using Resource Save Memory full 38 On On If the printer control panel light sequence matches the light sequence in th...

Page 139: ...ress to continue printing A data loss will occur From the printer control panel press to cancel the print job Install additional printer memory Decrease the resolution setting Miscellaneous messages C...

Page 140: ...may not have printed 39 On On If the printer control panel light sequence matches the light sequence in the preceding illustration then press twice quickly to see the supplemental light sequence On On...

Page 141: ...rom the printer control panel press to continue printing A data loss may occur From the printer control panel press to cancel the print job Install additional printer memory Reduce the number and size...

Page 142: ...o see the supplemental light sequence On Blinking On If the supplemental light sequence matches the light sequence in the preceding illustration then try one or more of the following From the printer...

Page 143: ...nking On If the printer control panel light sequence matches the light sequence in the preceding illustration then press on the printer control panel to continue printing For more information visit ht...

Page 144: ...ht sequence matches the light sequence in the preceding illustration then turn off the printer and then turn it back on If the lights are still blinking after 10 seconds then the printer may need to b...

Page 145: ...s attached 58 On On If the printer control panel light sequence matches the light sequence in the preceding illustration then press twice quickly to see the supplemental light sequence On On On Troubl...

Page 146: ...er Step 2 Check if the printer is in Sleep mode or Hibernate mode Is the printer in Sleep mode or Hibernate mode Press the Sleep button to wake the printer from Sleep mode or Hibernate mode Go to step...

Page 147: ...step 8 Step 8 Check if one end of the printer cable is plugged into a port on the printer and the other to the computer print server option or other network device Is the printer cable securely attac...

Page 148: ...n the controller board c Connect the power cord to the printer then to a properly grounded electrical outlet and then turn on the printer Is the internal option properly installed in the controller bo...

Page 149: ...Step 3 Check if the tray is installed Print a menu settings page and then check if the tray is listed in the Installed Options list Is the tray listed in the menu settings page Go to step 4 Reinstall...

Page 150: ...e problem is solved Step 2 a Load paper from a fresh package Note Paper absorbs moisture due to high humidity Store paper in its original wrapper until you use it b Resend the print job Do paper jams...

Page 151: ...is connected to a computer by a USB or parallel cable then open the Local Printer Settings Utility for Windows or the Printer Settings for Macintosh b Resend the pages that did not print Were the jam...

Page 152: ...g the printer messages on page 106 Note The printer continues to print after clearing the message Do the jobs print The problem is solved Go to step 4 Step 4 a Check if the ports USB serial or Etherne...

Page 153: ...Print job takes longer than expected Action Yes No Step 1 Reduce the number and size of fonts the number and complexity of images and the number of pages in the print job and then resend the print job...

Page 154: ...em is solved Job prints from the wrong tray or on the wrong paper Actions Yes No Step 1 a Check if you are printing on paper that is supported by the tray b Resend the print job Does the job print fro...

Page 155: ...wly blinking Do both light sequences match Turn off the printer and then turn it back on to deactivate Hex Trace mode Go to step 2 Step 2 a Open a Web browser and then type the printer IP address in t...

Page 156: ...t Large jobs do not collate Action Yes No Step 1 a From the Finishing menu set Collate to On To access the Finishing menu do either of the following If the printer is on a network then open a Web brow...

Page 157: ...s in the address eld Note If you do not know the IP address of the printer then print a network setup page and locate the IP address in the TCP IP section b Navigate to Settings General Settings Timeo...

Page 158: ...roblem is solved Step 2 a Redistribute the toner in the imaging unit 1 Remove the toner cartridge and then the imaging unit 2 Firmly shake the imaging unit Warning Potential Damage Do not expose the i...

Page 159: ...ttings for Macintosh Do the paper size and type settings match the paper loaded in the tray Go to step 3 Do one or more of the following Specify the correct paper size and type from the tray settings...

Page 160: ...w the IP address of the printer then print a network setup page and locate the IP address in the TCP IP section If the printer is connected to a computer by a USB or parallel cable then open the Local...

Page 161: ...to a computer by a USB or parallel cable then open the Local Printer Settings Utility for Windows or Printer Settings for Macintosh Note 8 is the factory default setting b Resend the print job Does th...

Page 162: ...know the IP address of the printer then print a network setup page and locate the IP address in the TCP IP section If the printer is connected to a computer by a USB or parallel cable then open the Lo...

Page 163: ...by a USB or parallel cable then open the Local Printer Settings Utility for Windows or the Printer Settings for Macintosh Do the paper type and weight match the type and weight of the paper in the tr...

Page 164: ...ld Then navigate to Settings Paper Menu Note If you do not know the IP address of the printer then print a network setup page and locate the IP address in the TCP IP section If the printer is connecte...

Page 165: ...ge and locate the IP address in the TCP IP section If the printer is connected to a computer by a USB or parallel cable then open the Local Printer Settings Utility for Windows or Printer Settings for...

Page 166: ...Go to step 2 1 Check if the distance between the defects equal to 80 mm 3 15 in 2 Take note of the distance and then contact customer support at http support l exmark com or your service representativ...

Page 167: ...e texture and weight match the paper loaded in the tray To access the Paper Menu do either of the following If the printer is on a network then open a Web browser and type the printer IP address in th...

Page 168: ...vigate to Settings Paper Menu Paper Texture Note If you do not know the IP address of the printer then print a network setup page and locate the IP address in the TCP IP section If the printer is conn...

Page 169: ...rowser and type the printer IP address in the address eld Then navigate to Settings Printer Settings Quality Menu Note If you do not know the IP address of the printer then print a network setup page...

Page 170: ...e the IP address in the TCP IP section If the printer is connected to a computer by a USB or parallel cable then open the Local Printer Settings Utility for Windows or Printer Settings for Macintosh b...

Page 171: ...to Settings Paper Menu Paper Texture Note If you do not know the IP address of the printer then print a network setup page and locate the IP address in the TCP IP section If the printer is connected...

Page 172: ...light Go to step 7 The problem is solved Step 7 Replace the imaging unit and then resend the print job Is the print still too light Contact customer support The problem is solved Skewed print ABCDE A...

Page 173: ...support The problem is solved Transparency print quality is poor Action Yes No Step 1 From the Paper Menu set the paper type to match the paper loaded in the tray To access the Paper Menu do either of...

Page 174: ...is on a network then open a Web browser and type the printer IP address in the address eld Then navigate to Settings Paper Menu Note If you do not know the IP address of the printer then print a netw...

Page 175: ...ppear on prints Go to step 5 The problem is solved Step 5 Replace the imaging unit and then resend the print job Do streaked horizontal lines still appear on prints Contact customer support The proble...

Page 176: ...o match the paper in the tray Step 3 a Load paper from a fresh package Note Paper absorbs moisture due to high humidity Store paper in its original wrapper until you use it b Resend the print job Do s...

Page 177: ...Step 3 a Redistribute the toner in the imaging unit 1 Remove the toner cartridge and then the imaging unit 2 Firmly shake the imaging unit Warning Potential Damage Do not expose the imaging unit to d...

Page 178: ...address eld Then navigate to Settings Paper Menu Note If you do not know the IP address of the printer then print a network setup page and locate the IP address in the TCP IP section If the printer is...

Page 179: ...problem is solved Toner rubs off Leading edge Trailing edge ABC DEF Action Yes No Step 1 From the Paper menu on the printer control panel check the paper type texture and weight To access the Paper Me...

Page 180: ...o Replace the imaging unit and then resend the print job Is the print density uneven Contact customer support The problem is solved Embedded Web Server does not open Action Yes No Step 1 a Turn on the...

Page 181: ...is Connected Note If the status is Not Connected then the connection may be intermittent or the network cable may be defective Contact your system support person for a solution and then print another...

Page 182: ...type and serial number Go to http support lexmark com to receive e mail or chat support or browse through the library of manuals support documentation drivers and other downloads Technical support via...

Page 183: ...ce to a product program or service is not intended to state or imply that only that product program or service may be used Any functionally equivalent product program or service that does not infringe...

Page 184: ...ay not cause harmful interference and 2 this device must accept any interference received including interference that may cause undesired operation The FCC Class B limits are designed to provide reaso...

Page 185: ...A Values are subject to change See www lexmark com for current values Waste from Electrical and Electronic Equipment WEEE directive The WEEE logo signi es speci c recycling programs and procedures fo...

Page 186: ...erature 16 C to 32 C 60 F to 90 F Shipping temperature 40 to 43 3 C 40 to 110 F Storage temperature and relative humidity 2 to 35 C 34 to 95 F 8 to 80 RH Laser notice The printer is certi ed in the U...

Page 187: ...ione delle cartucce e del blocco Evitare l esposizione al raggio laser FARE Usynlig laserstr ling n r kassettene tas ut og sperren er satt ut av spill Unng eksponering for laserstr len NIEBEZPIECZE ST...

Page 188: ...edule Power modes Using the Sleep Hibernate button Factory default Hibernate Timeout for this product in all countries or regions 3 days The amount of time the printer waits after a job is printed bef...

Page 189: ...irectives is available upon request from the Authorized Representative or may be obtained at www lexmark com en_us about regulatory compliance european union declaration of conformity html This produc...

Page 190: ...y service involves the exchange of a product or part the item replaced becomes the property of the Remarketer or Lexmark The replacement may be a new or repaired item The replacement item assumes the...

Page 191: ...This limitation of liability will not apply to claims by you for bodily injury or damage to real property or tangible personal property for which Lexmark is legally liable IN NO EVENT WILL LEXMARK BE...

Page 192: ...Corp at the IETF for AES CCM ECC Cipher Suites for TLS implemented in the product or service The use of this product or service is subject to the reasonable non discriminatory terms in the Intellectua...

Page 193: ...on guring Sleep mode 74 con guring supply noti cations 89 connecting printer to wireless network using Personal Identi cation Number method 21 connecting to a wireless network using the Embedded Web S...

Page 194: ...ith paper size orientation 127 Load multipurpose feeder with custom type name orientation 125 Load multipurpose feeder with custom type string orientation 126 Load multipurpose feeder with paper type...

Page 195: ...repeating print defects appear on prints 166 shadow images appear on prints 160 skewed print 172 streaked horizontal lines appear on prints 174 streaked vertical lines 175 toner rubs off 179 toner spe...

Page 196: ...er using 38 73 recycling Lexmark packaging 76 Lexmark products 76 toner cartridges 76 Reinstall missing or unresponsive cartridge 31 xy 112 Reinstall missing or unresponsive imaging unit 31 xy 116 Rem...

Page 197: ...ges or images 158 gray background on prints 161 horizontal voids appear on prints 177 print irregularities 164 print is too dark 166 print is too light 169 printer is printing solid black pages 173 re...

Reviews: