2-30
Service Manual
5062
Go Back
Previous
Next
Print quality
Note:
These symptoms may require replacement of one or more CRUs (Customer Replaceable Units)
designated as supplies or maintenance items, which are the responsibility of the customer. With the customer's
permission, you may need to install a developer (toner) cartridge.
Service tip: Before troubleshooting any print quality problems, do the following:
1.
Print a menu settings page, and then check the life status of all supplies. Any supplies that are low should
be replaced.
Note:
Be sure and keep the original menu page to restore the customer's custom settings if needed.
2.
On the menu page, make sure the following is set to the default level:
–
Color Correction: Set to Auto.
–
Print Resolution: Set to 4800 dpi (print quality problems should be checked at different resolution
settings).
–
Toner Darkness: Set to 4 (default).
–
Color Saver: Set to OFF.
–
RGB Brightness, RGB Contrast, RGB Saturation: Set to 0.
–
Color Balance: Select
Reset Defaults
to zero out all colors.
–
Check the paper type, texture and weight settings against what is loaded in the printer.
Once the printer has been restored to its default levels, do the following:
3.
Inspect the transfer module for damage. Replace if damaged.
4.
Inspect the print cartridges for damage. Replace if damaged.
5.
If paper other than 20 lb plain letter/A4 paper is being used, load 20 lb plain letter/A4 and print the Print
Quality pages to see if the problem remains. Use Tray 1 to test print quality problems.
6.
Print the Print Quality Pages, and then look for variations in the print from what is expected.
An incorrect printer driver for the installed software can cause problems. Incorrect characters could print, and
the copy may not fit the page correctly.
Measure all voltages from the connector to the printer ground.
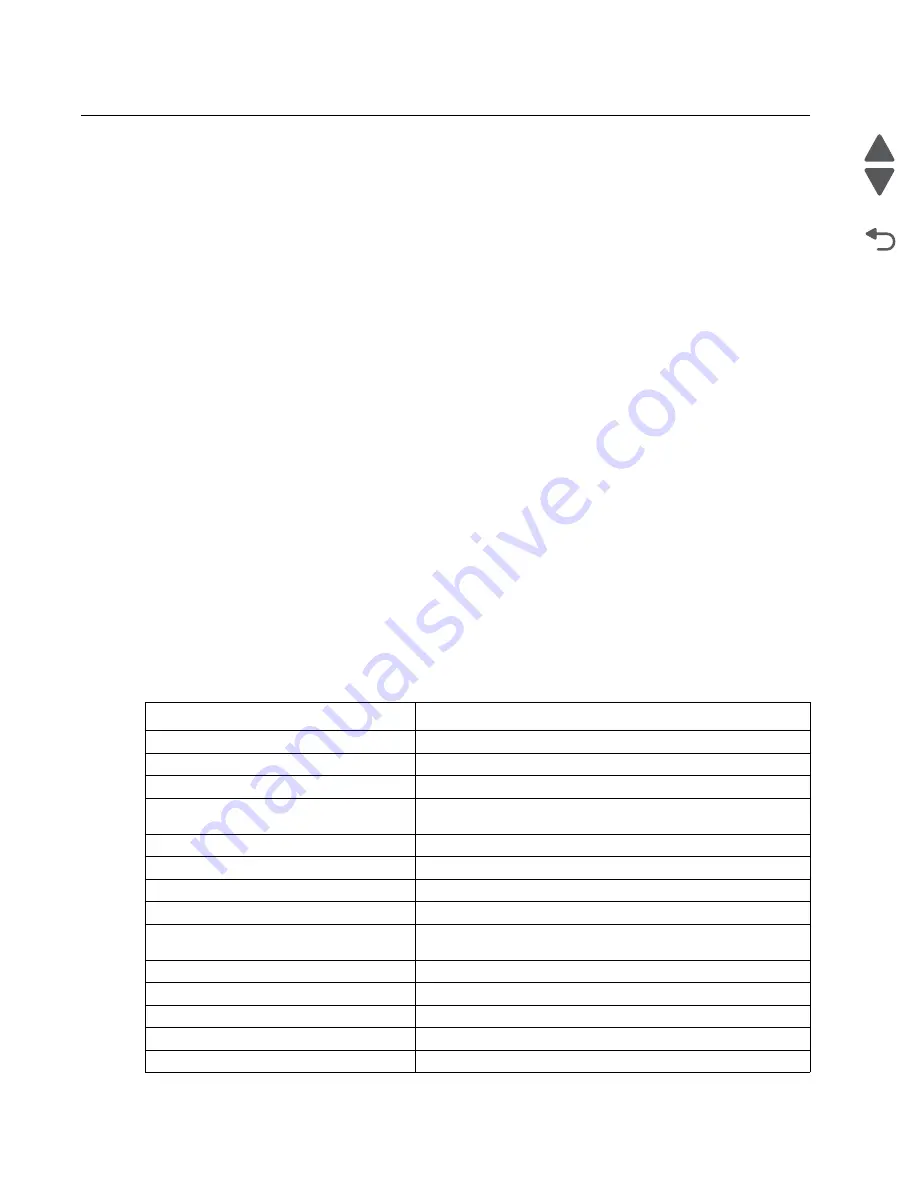
Symptom table—print quality
Symptom
Action
Background (fog)
Go to
“Background (fog)” on page 2-31
.
Blank page
Go to
“Blank page” on page 2-33
.
Blurred or fuzzy print
Go to
“Blurred or fuzzy print” on page 2-34
.
Characters have jagged or uneven edges
Go to
“Characters have jagged or uneven edges” on
page 2-34
Clipped images
Go to
“Clipped images” on page 2-34
Colors not properly aligned
Go to
“Colors not properly aligned” on page 2-35
Horizontal banding
Go to
“Horizontal banding” on page 2-36
.
Horizontal lines
Go to
“Horizontal lines” on page 2-36
.
Light colored line, white line, or incorrectly
colored line
Go to
“Light colored line, white line, or incorrectly colored
line” on page 2-37
.
Media damage
Go to
“Media damage” on page 2-38
Mottle (2–5mm speckles)
Go to
“Mottle (2–5mm speckles)” on page 2-39
.
Paper curl
Go to
“Paper curl” on page 2-39
Print irregularities
Go to
“Print irregularities” on page 2-40
.
Print is too dark
Go to
“Print is too dark” on page 2-41
Summary of Contents for C792 Family
Page 14: ...xiv Service Manual 5062 Go Back Previous Next ...
Page 19: ...Notices and safety information xix 5062 Go Back Previous Next ...
Page 20: ...xx Service Manual 5062 Go Back Previous Next ...
Page 40: ...1 14 Service Manual 5062 Go Back Previous Next ...
Page 212: ...2 172 Service Manual 5062 Go Back Previous Next ...
Page 468: ...4 214 Service Manual 5062 Go Back Previous Next 7 Remove the motor from the bracket ...
Page 490: ...4 236 Service Manual 5062 Go Back Previous Next 4 Flex the sides to remove the roller frame ...
Page 592: ...4 338 Service Manual 5062 Go Back Previous Next ...
Page 594: ...5 2 Service Manual 5062 Go Back Previous Next Connectors System board ...
Page 610: ...5 18 Service Manual 5062 Go Back Previous Next 5 bin mailbox system card ...
Page 612: ...5 20 Service Manual 5062 Go Back Previous Next Finisher Stacker system card HTU system card ...
Page 616: ...6 4 Service Manual 5062 Go Back Previous Next ...
Page 622: ...7 6 Service Manual 5062 Go Back Previous Next Assembly 3 Front 1 2 4 5 6 7 8 3 3 3 3 ...
Page 624: ...7 8 Service Manual 5062 Go Back Previous Next Assembly 3 1 Front continued 1 2 4 5 1 1 1 3 ...
Page 626: ...7 10 Service Manual 5062 Go Back Previous Next Assembly 4 Left 1 2 4 5 6 8 7 3 ...
Page 628: ...7 12 Service Manual 5062 Go Back Previous Next Assembly 4 1 Left continued 1 2 3 4 ...
Page 630: ...7 14 Service Manual 5062 Go Back Previous Next Assembly 5 Rear 1 2 3 6 11 8 9 12 4 7 5 13 10 ...
Page 632: ...7 16 Service Manual 5062 Go Back Previous Next Assembly 6 Optional 550 sheet tray 2 3 1 ...
Page 644: ...7 28 Service Manual 5062 Go Back Previous Next Assembly 11 Finisher stapler assembly 1 2 ...
Page 648: ...7 32 Service Manual 5062 Go Back Previous Next Assembly 13 5 bin mailbox assembly complete 1 ...
Page 654: ...7 38 Service Manual 5062 Go Back Previous Next Assembly 16 HTU complete 1 ...
Page 662: ...7 46 Service Manual 5062 Go Back Previous Next Assembly 20 HTU with hole punch complete 1 ...
Page 682: ...A 2 Service Manual 5062 Go Back Previous Next Print Quality Pages Page 1 total of five ...
Page 684: ...A 4 Service Manual 5062 Go Back Previous Next Print Quality Pages Page 3 total of five ...
Page 704: ...I 14 Service Manual 5062 Go Back Previous Next ...


