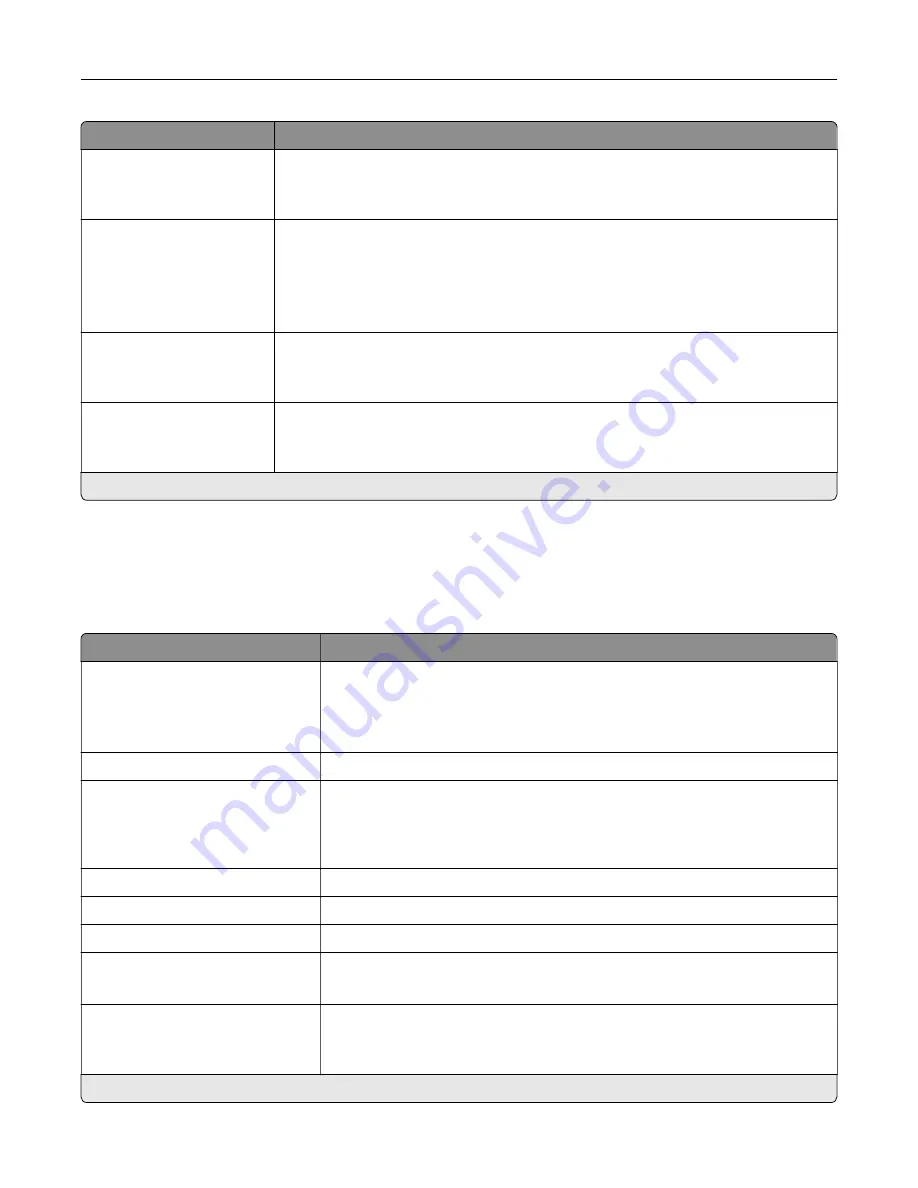
Menu item
Description
Pages per Side Border
None*
Solid
Print a border around each page image when using Pages per Side menu.
Separator Sheets
Off*
Between Copies
Between Jobs
Between Pages
Insert blank separator sheets when printing.
Separator Sheet Source
Tray [x] (1*)
Multipurpose Feeder
Specify the paper source for the separator sheet.
Blank Pages
Do Not Print*
Print blank pages in a print job.
Note:
An asterisk (*) next to a value indicates the factory default setting.
Network/Ports
Network Overview
Menu item
Description
Active Adapter
Auto*
Standard Network
Wireless
Specify the type of the network connection.
Note:
Wireless is available only in printers connected to a wireless network.
Network Status
Show the connectivity status of the printer network.
Display Network Status on
Printer
Off
On*
Show the network status on the display.
Speed, Duplex
Show the speed of the currently active network card.
IPv4
Show the IPv4 address.
All IPv6 Addresses
Show all IPv6 addresses.
Reset Print Server
Reset all active network connections to the printer.
Note:
This setting removes all network configuration settings.
Network Job Timeout
Off
On* (90 seconds)
Set the time before the printer cancels a network print job.
Note:
An asterisk (*) next to a value indicates the factory default setting.
Use printer menus
96
Summary of Contents for C4342
Page 46: ...4 Install the ISP into its housing Set up install and configure 46 ...
Page 47: ...5 Attach the housing to the controller board shield Set up install and configure 47 ...
Page 52: ...Set up install and configure 52 ...
Page 55: ...Set up install and configure 55 ...
Page 56: ...3 Install the wireless module into its housing Set up install and configure 56 ...
Page 57: ...4 Attach the wireless module to the controller board shield Set up install and configure 57 ...
Page 123: ...2 Remove the used toner cartridge 3 Unpack the new toner cartridge Maintain the printer 123 ...
Page 124: ...4 Insert the new toner cartridge 5 Close door B Maintain the printer 124 ...
Page 125: ...Replacing the black imaging unit 1 Open door B Maintain the printer 125 ...
Page 127: ...3 Remove the toner cartridges Maintain the printer 127 ...
Page 128: ...4 Disconnect the imaging kit cable Maintain the printer 128 ...
Page 132: ...9 Insert the imaging kit Maintain the printer 132 ...
Page 134: ...Replacing the color imaging kit 1 Open door B Maintain the printer 134 ...
Page 136: ...3 Remove the toner cartridges Maintain the printer 136 ...
Page 137: ...4 Disconnect the imaging kit cable Maintain the printer 137 ...
Page 138: ...5 Remove the used imaging kit Maintain the printer 138 ...
Page 141: ...8 Insert the black imaging unit into the new imaging kit Maintain the printer 141 ...
Page 142: ...9 Insert the new imaging kit Maintain the printer 142 ...
Page 144: ...Replacing the waste toner bottle 1 Open door B Maintain the printer 144 ...


