background image

Action

Yes

No

Step 8

a

Make sure that the printer is not overheating.

Notes:

Allow the printer to cool down after a long print job.

Observe the recommended ambient temperature for the
printer. For more information, see 

“Selecting a location

for the printer” on page 19

.

b

Print the document.

Is the printer printing slow?

Contact 

customer

support

.

The problem is
solved.

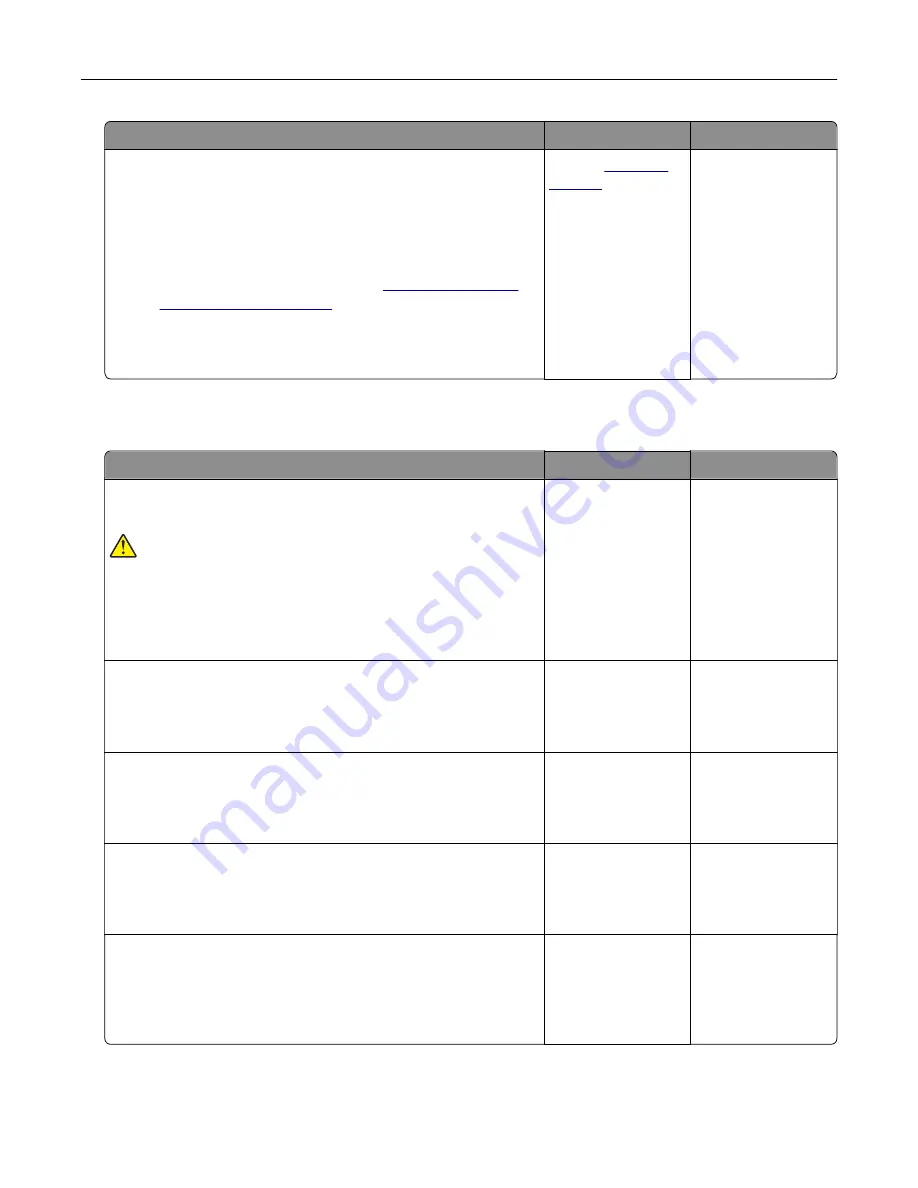
The printer is not responding

Action

Yes

No

Step 1

Check if the power cord is connected to the electrical outlet.


CAUTION—POTENTIAL INJURY: 

To avoid the risk of fire or

electrical shock, connect the power cord to an appropriately
rated and properly grounded electrical outlet that is near the
product and easily accessible.

Is the printer responding?

The problem is
solved.

Go to step 2.

Step 2

Check if the electrical outlet is turned off by a switch or breaker.

Is the electrical outlet turned off by a switch or breaker?

Turn on the switch or
reset the breaker.

Go to step 3.

Step 3

Check if the printer is on.

Is the printer on?

Go to step 4.

Turn on the printer.

Step 4

Check if the printer is in Sleep or Hibernate mode.

Is the printer in Sleep or Hibernate mode?

Press the power
button to wake the
printer.

Go to step 5.

Step 5

Check if the cables connecting the printer and the computer are
inserted to the correct ports.

Are the cables inserted to the correct ports?

Go to step 6.

Insert the cables to
the correct ports.

Troubleshoot a problem

196

Summary of Contents for C4342

Page 1: ...C4342 C4352 CS730 CS735 Printers User s Guide February 2022 www lexmark com Machine type 5030 Models 235 239 635 695 ...

Page 2: ...g up and using the home screen applications 20 Managing contacts 24 Setting up and using the accessibility features 25 Loading paper and specialty media 27 Installing and updating software drivers and firmware 32 Installing hardware options 35 Networking 61 Setting up serial printing Windows only 64 Secure the printer 66 Locating the security slot 66 Erasing printer memory 66 Erasing printer storag...

Page 3: ...etwork Ports 96 Cloud Services 109 Security 109 Reports 116 Troubleshooting 117 Printing the Menu Settings Page 117 Maintain the printer 118 Checking the status of parts and supplies 118 Configuring supply notifications 118 Setting up e mail alerts 118 Viewing reports 119 Ordering parts and supplies 119 Replacing parts and supplies 122 Cleaning printer parts 155 Saving energy and paper 160 Moving th...

Page 4: ...98 Clearing jams 198 Network connection problems 208 Hardware options problems 210 Issues with supplies 212 Paper feed problems 213 Color quality problems 216 Contacting customer support 218 Recycle and dispose 219 Recycling Lexmark products 219 Recycling Lexmark packaging 219 Notices 220 Index 231 Contents 4 ...

Page 5: ...s multioutlet extenders or UPS devices The power capacity of these types of accessories can be easily overloaded by a laser printer and may result in a risk of fire property damage or poor printer performance CAUTION POTENTIAL INJURY Only a Lexmark Inline Surge Protector that is properly connected between the printer and the power cord provided with the printer may be used with this product The use...

Page 6: ...e printer has a caster base then carefully roll it to the new location Use caution when passing over thresholds and breaks in flooring If the printer does not have a caster base but is configured with optional trays or output options then remove the output options and lift the printer off the trays Do not try to lift the printer and any options at the same time Always use the handholds on the printe...

Page 7: ...m battery Discard used lithium batteries according to the manufacturer s instructions and local regulations This equipment is not suitable for use in locations where children are likely to be present This product is designed tested and approved to meet strict global safety standards with the use of specific manufacturer s components The safety features of some parts may not always be obvious The ma...

Page 8: ...d maintaining the printer Troubleshooting and solving problems Information Center Go to https infoserve lexmark com How to videos Go to https infoserve lexmark com idv Touch Screen Guide Go to http support lexmark com Setting up and configuring the accessibility features of your printer Lexmark Accessibility Guide Go to http support lexmark com Help information for using the printer software Help f...

Page 9: ...he U S See the Statement of Limited Warranty included with the printer or go to http support lexmark com In other countries and regions See the printed warranty that came with the printer Product Information Guide See the documentation that came with the printer or go to http support lexmark com Information on Lexmark digital passport Go to https csr lexmark com digital passport php Finding the pr...

Page 10: ...four optional 550 sheet trays 1 Standard bin 2 650 sheet duo tray Note The tray is composed of a 550 sheet tray and a 100 sheet multipurpose feeder 3 Optional 550 sheet trays 4 Control panel Using the control panel Learn about the printer 10 ...

Page 11: ...he printer is in Sleep mode Blinking amber The printer is in Deep Sleep or Hibernate mode Selecting paper Paper guidelines Use the appropriate paper to prevent jams and help ensure trouble free printing Always use new undamaged paper Before loading paper know the recommended printable side of the paper This information is usually indicated on the paper package Do not use paper that has been cut or...

Page 12: ...nment is very different from the printer environment Thick paper may also require a longer conditioning period Grain direction Grain refers to the alignment of the paper fibers in a sheet of paper Grain is either grain long which runs the length of the paper or grain short which runs the width of the paper For recommended grain direction see the Supported paper weights topic Fiber content Most high...

Page 13: ...elf rather than on the floor Store individual packages on a flat surface Do not store anything on top of individual paper packages Take paper out of the carton or wrapper only when you are ready to load it in the printer The carton and wrapper help keep the paper clean dry and flat Selecting preprinted forms and letterhead Use grain long paper Use only forms and letterhead printed using an offset lit...

Page 14: ...148 mm 3 94 x 5 83 in X X X JIS B5 182 x 257 mm 7 17 x 10 1 in Legal 215 9 x 355 6 mm 8 5 x 14 in 1 Supported in both the portrait and landscape orientations When fed in portrait orientation A5 is treated as narrow paper When fed in landscape orientation it is treated as a regular width paper 2 When Universal is selected the page is formatted for 215 9 x 355 6 mm 8 5 x 14 in unless the size is spe...

Page 15: ...25 4 mm 3 875 x 8 875 in X X X 10 Envelope 104 8 x 241 3 mm 4 125 x 9 5 in X 11 Envelope 114 3 x 263 525 mm 4 5 x 10 375 in X 1 Supported in both the portrait and landscape orientations When fed in portrait orientation A5 is treated as narrow paper When fed in landscape orientation it is treated as a regular width paper 2 When Universal is selected the page is formatted for 215 9 x 355 6 mm 8 5 x ...

Page 16: ...Other Envelope4 98 4 x 162 mm to 176 x 250 mm 3 87 x 6 38 in to 6 93 x 9 84 in X X X 1 Supported in both the portrait and landscape orientations When fed in portrait orientation A5 is treated as narrow paper When fed in landscape orientation it is treated as a regular width paper 2 When Universal is selected the page is formatted for 215 9 x 355 6 mm 8 5 x 14 in unless the size is specified by the ...

Page 17: ...ard stock is supported in two sided printing only up to 163 g m2 90 lb bond Anything heavier is supported only in one sided printing Vinyl labels are supported for occasional use only and must be tested for acceptability Some vinyl labels may feed more reliably from the multipurpose feeder Supported paper weights 650 sheet duo tray Optional 550 sheet tray Two sided printing 550 sheet tray 100 shee...

Page 18: ...e printed with Paper Type set to Light Paper Failure to do so may cause excessive curl which can lead to feeding errors especially in more humid environments Two sided printing supports paper weight from 60 162 g m2 16 43 lb bond paper 100 cotton content maximum weight is 90 g m2 24 lb bond Learn about the printer 18 ...

Page 19: ...e sure that airflow in the room meets the latest revision of the ASHRAE 62 standard or the CEN Technical Committee 156 standard Provide a flat sturdy and stable surface Keep the printer Clean dry and free of dust Away from stray staples and paper clips Away from the direct airflow of air conditioners heaters or ventilators Free from direct sunlight and humidity extremes Observe the recommended temper...

Page 20: ... provided with this product or the manufacturer s authorized replacement Warning Potential Damage Do not touch the USB cable any wireless network adapter or the printer in the area shown while actively printing Loss of data or a malfunction can occur Printer port Function 1 USB printer port Connect the printer to a network 2 USB port Attach a keyboard or any compatible option 3 Ethernet port Conne...

Page 21: ...d in the printer memory 8 Address Book Manage a contact list that other applications on the printer can access 9 On screen keypad Enter numbers or symbols in an input field Customizing the home screen 1 Open a web browser and then type the printer IP address in the address field Notes View the printer IP address on the printer home screen The IP address appears as four sets of numbers separated by p...

Page 22: ...ure the screen saver slideshow and wallpaper settings Managing screen saver and slide show images 1 From the Screen Saver and Slideshow Images section add edit or delete an image Notes You can add up to 10 images When enabled the status icons appear on the screen saver only when there are errors warnings or cloud based notifications 2 Apply the changes Changing the wallpaper image 1 From the home s...

Page 23: ...ress on the printer home screen The IP address appears as four sets of numbers separated by periods such as 123 123 123 123 If you are using a proxy server then temporarily disable it to load the web page correctly 2 Click Apps Device Quotas Configure 3 In the User Accounts section add or edit a user and then set the user quota 4 Apply the changes Managing bookmarks Creating bookmarks Use bookmarks...

Page 24: ...pe the printer IP address in the address field Notes View the printer IP address on the printer home screen The IP address appears as four sets of numbers separated by periods such as 123 123 123 123 If you are using a proxy server then temporarily disable it to load the web page correctly 2 Click Bookmarks Add Folder and then type a folder name Note To limit access to the folder enter a PIN 3 Clic...

Page 25: ...lect any item on the display Voice Guidance has limited language support Deactivating Voice Guidance 1 In one motion and using one finger slowly swipe left then up on the display until you hear a voice message Note For printer models without built in speakers use headphones to hear the message 2 Using two fingers do either of the following Touch Voice Guidance then touch OK Touch Cancel Note If the ...

Page 26: ...the printer is in normal mode Swipe down then right using one finger Decrease the volume Note This gesture is also applicable when the printer is in normal mode Swipe up then left using one finger Exit an application and return to the home screen Swipe down then left using one finger Go back to the previous setting Using the on screen keyboard When the on screen keyboard appears do one or more of the...

Page 27: ...nfiguration Paper Size Type select a paper source 2 Set the size and type of the specialty media Configuring Universal paper settings 1 From the home screen touch Settings Paper Media Configuration Universal Setup 2 Configure the settings Loading trays CAUTION TIPPING HAZARD To reduce the risk of equipment instability load each tray separately Keep all other trays closed until needed 1 Remove the tray...

Page 28: ...fore loading 4 Load the paper stack with the printable side faceup For one sided printing load letterhead faceup with the header toward the front of the tray For two sided printing load letterhead facedown with the header toward the back of the tray Do not slide paper into the tray Set up install and configure 28 ...

Page 29: ...r Overfilling may cause paper jams For envelopes and other specialty media make sure that the stack height is below the dashed line Overfilling may cause paper jams 5 Insert the tray If necessary set the paper size and type to match the paper loaded in the tray Set up install and configure 29 ...

Page 30: ... the multipurpose feeder 1 Open the multipurpose feeder 2 Adjust the guide to match the size of the paper that you are loading 3 Flex fan and align the paper edges before loading Set up install and configure 30 ...

Page 31: ... side of the paper guide Load European envelopes with the flap entering the printer first Warning Potential Damage Do not use envelopes with stamps clasps snaps windows coated linings or self stick adhesives Note To avoid paper pick problems make sure that the leading edge of the paper or specialty media is properly aligned with the separator dam Set up install and configure 31 ...

Page 32: ...f the fuser varies according to the specified paper type To avoid printing issues match the paper type setting in the printer with the paper loaded in the tray Installing and updating software drivers and firmware Installing the printer software Notes The print driver is included in the software installer package For Macintosh computers with macOS version 10 7 or later you do not need to install the...

Page 33: ...n t listed and then from the Add Printer window do the following a Select Add a printer using a TCP IP address or hostname and then click Next b In the Hostname or IP address field type the printer IP address and then click Next Notes View the printer IP address on the printer home screen The IP address appears as four sets of numbers separated by periods such as 123 123 123 123 If you are using a ...

Page 34: ...ate Upload the flash file a Browse to the flash file Note Make sure that you have extracted the firmware zip file b Click Upload Start Exporting or importing a configuration file You can export the configuration settings of your printer into a text file and then import the file to apply the settings to other printers 1 Open a web browser and then type the printer IP address in the address field Notes View the...

Page 35: ...ystem Preferences in the Apple menu navigate to your printer and then select Options Supplies 2 Navigate to the list of hardware options and then add any installed options 3 Apply the changes Installing hardware options Available internal options Intelligent storage drive ISD Fonts Simplified Chinese Traditional Chinese Japanese Korean Arabic Mass storage Printer hard disk Licensed features IPDS Ba...

Page 36: ...ces attached to the printer then turn them off as well and unplug any cables going into the printer 1 Turn off the printer 2 Unplug the power cord from the electrical outlet and then from the printer 3 Unpack the optional tray and then remove all the packing material Note If optional trays are already installed then unlock them from the printer before lifting the printer Do not try to lift the pri...

Page 37: ...ock connect the power cord to an appropriately rated and properly grounded electrical outlet that is near the product and easily accessible 6 Turn on the printer Add the tray in the print driver to make it available for print jobs For more information see Adding available options in the print driver on page 35 Set up install and configure 37 ...

Page 38: ...continuing If you have any other devices attached to the printer then turn them off as well and unplug any cables going into the printer 1 Turn off the printer and then unplug the power cord from the electrical outlet 2 Using a flat head screwdriver remove the controller board shield Warning Potential Damage Controller board electronic components are easily damaged by static electricity Touch a met...

Page 39: ...intelligent storage drive ISD Warning Potential Damage Avoid touching the connection points along the edge of the card 4 Locate the ISD connector 5 Insert the card to the ISD connector Set up install and configure 39 ...

Page 40: ...ical outlet and then turn on the printer CAUTION POTENTIAL INJURY To avoid the risk of fire or electrical shock connect the power cord to an appropriately rated and properly grounded electrical outlet that is near the product and easily accessible Set up install and configure 40 ...

Page 41: ...ontinuing If you have any other devices attached to the printer then turn them off as well and unplug any cables going into the printer 1 Turn off the printer and then unplug the power cord from the electrical outlet 2 Using a flat head screwdriver remove the controller board shield Warning Potential Damage Controller board electronic components are easily damaged by static electricity Touch a meta...

Page 42: ...e Trusted Platform Module Warning Potential Damage Avoid touching the connection points along the edge of the card 4 Locate the TPM connector 5 Attach the module to the TPM connector Set up install and configure 42 ...

Page 43: ...ical outlet and then turn on the printer CAUTION POTENTIAL INJURY To avoid the risk of fire or electrical shock connect the power cord to an appropriately rated and properly grounded electrical outlet that is near the product and easily accessible Set up install and configure 43 ...

Page 44: ...ing If you have any other devices attached to the printer then turn them off as well and unplug any cables going into the printer 1 Turn off the printer and then unplug the power cord from the electrical outlet 2 Using a flat head screwdriver remove the controller board shield Warning Potential Damage Controller board electronic components are easily damaged by static electricity Touch a metal surf...

Page 45: ...3 Unpack the internal solutions port ISP kit 1 ISP 2 Mounting bracket 3 Thumbscrews 4 Housing 5 ISP extended cable Set up install and configure 45 ...

Page 46: ...4 Install the ISP into its housing Set up install and configure 46 ...

Page 47: ...5 Attach the housing to the controller board shield Set up install and configure 47 ...

Page 48: ...6 Connect the ISP extended cable to the ISP connector in the controller board Set up install and configure 48 ...

Page 49: ...tes If the printer has a static IP address then do not change the configuration If the computers are configured to use the network name instead of an IP address then do not change the configuration If you are adding a wireless internal solutions port ISP to a printer previously configured for an Ethernet connection then disconnect the printer from the Ethernet network For Windows users 1 Open the prin...

Page 50: ...n the printer off and unplug the power cord from the electrical outlet before continuing If you have any other devices attached to the printer then turn them off as well and unplug any cables going into the printer 1 Turn off the printer and then unplug the power cord from the electrical outlet 2 Using a flat head screwdriver remove the controller board shield Warning Potential Damage Controller bo...

Page 51: ...3 Unpack the hard disk 4 Attach the hard disk to the controller board Warning Potential Damage Do not touch or press the center of the hard disk Set up install and configure 51 ...

Page 52: ...Set up install and configure 52 ...

Page 53: ...ical outlet and then turn on the printer CAUTION POTENTIAL INJURY To avoid the risk of fire or electrical shock connect the power cord to an appropriately rated and properly grounded electrical outlet that is near the product and easily accessible Set up install and configure 53 ...

Page 54: ...let before continuing If you have any other devices attached to the printer then turn them off as well and unplug any cables going into the printer 1 Turn off the printer and then unplug the power cord from the electrical outlet 2 Using a flat head screwdriver remove the controller board shield Warning Potential Damage Controller board electronic components are easily damaged by static electricity ...

Page 55: ...Set up install and configure 55 ...

Page 56: ...3 Install the wireless module into its housing Set up install and configure 56 ...

Page 57: ...4 Attach the wireless module to the controller board shield Set up install and configure 57 ...

Page 58: ...5 Connect the wireless assembly to the ISP connector in the controller board Set up install and configure 58 ...

Page 59: ... the electrical outlet and then turn on the printer CAUTION POTENTIAL INJURY To avoid the risk of fire or electrical shock connect the power cord to an appropriately rated and properly grounded electrical outlet that is near the product and easily accessible Set up install and configure 59 ...

Page 60: ...3 Install the wireless module Notes Apply firm pressure to make sure that the tape sticks to the surface of the printer Make sure that the printer surface is dry and free of condensed moisture The module is best bonded to the printer after 72 hours 4 Check for a gap between the module and the printer then attach the spacer module if necessary Set up install and configure 60 ...

Page 61: ...l panel 1 From the home screen touch Settings Network Ports Wireless Setup On Printer Panel Choose Network 2 Select a Wi Fi network and then type the network password Note For printers that are Wi Fi network ready a prompt to set up the Wi Fi network appears during initial setup Using Lexmark Mobile Assistant 1 Depending on your mobile device download the Lexmark Mobile Assistant application from ...

Page 62: ... Active Adapter is set to Auto From the home screen touch Settings Network Ports Network Overview Active Adapter Using the Push Button method 1 From the home screen touch Settings Network Ports Wireless Wi Fi Protected Setup Start Push Button Method 2 Follow the instructions on the display Using the personal identification number PIN method 1 From the home screen touch Settings Network Ports Wirele...

Page 63: ...ect network password is not visible on the printer display To show the password enable the password peek icon From the home screen touch Settings Security Miscellaneous Enable Password PIN Reveal You can see the password of the Wi Fi Direct network without showing it on the printer display From the home screen touch Settings Reports Network Network Setup Page Connecting a mobile device to the prin...

Page 64: ...rk after disconnecting from the Wi Fi Direct network Deactivating the Wi Fi network 1 From the home screen touch Settings Network Ports Network Overview Active Adapter Standard Network 2 Follow the instructions on the display Checking the printer connectivity 1 From the home screen touch Settings Reports Network Network Setup Page 2 Check the first section of the network setup page and confirm that ...

Page 65: ...n select the COM port from the list 4 Set the COM port parameters in Device Manager Notes Serial printing reduces printing speed Make sure that the serial cable is connected to the serial port on your printer Set up install and configure 65 ...

Page 66: ...up wizard or Leave printer offline and then touch Next 4 Start the operation Note This process also destroys the encryption key that is used to protect user data Destroying the encryption key makes the data irrecoverable Erasing printer storage drive 1 From the home screen touch Settings Device Maintenance Out of Service Erase 2 Touch the Sanitize all information on hard disk check box and then to...

Page 67: ...nters may have a hard disk drive installed The printer hard disk is designed for printer specific functionality The hard disk lets the printer retain buffered user data from complex print jobs form data and font data Intelligent storage drive ISD Some printers may have an ISD installed ISD uses non volatile flash memory to store user data from complex print jobs form data and font data Erase the con...

Page 68: ...th the application 2 Select a printer 3 Print the document Printing from a mobile device using Lexmark Print Lexmark Print is a mobile printing solution for mobile devices running on AndroidTM version 6 0 or later It lets you send documents and images to network connected printers and print management servers Notes Make sure that you download the Lexmark Print application from the Google Play stor...

Page 69: ...the printer are connected to the same network If the network has multiple wireless hubs then make sure that both devices are connected to the same subnet This application is supported only in some Apple devices 1 From your mobile device select a document from your file manager or launch a compatible application 2 Tap Print 3 Select a printer and then adjust the settings if necessary 4 Print the doc...

Page 70: ...ther print jobs then Busy appears on the display 2 From the display touch the document that you want to print If necessary configure the print settings 3 Print the document To print another document touch USB Drive Warning Potential Damage To avoid loss of data or printer malfunction do not touch the flash drive or the printer in the area shown while actively printing reading or writing from the mem...

Page 71: ...d flash drives with full speed standard Flash drives must support the File Allocation Table FAT system File types Documents Images PDF version 1 7 or earlier Microsoft file formats DOC DOCX XLS XLSX PPT PPTX JPEG or JPG TIFF or TIF GIF BMP PNG PCX DCX Configuring confidential jobs 1 From the home screen touch Settings Security Confidential Print Setup 2 Configure the settings Print 71 ...

Page 72: ...the printer to keep all documents with the same file name Printing confidential and other held jobs For Windows users 1 With a document open click File Print 2 Select a printer and then click Properties Preferences Options or Setup 3 Click Print and Hold 4 Select Use Print and Hold and then assign a user name 5 Select the print job type Confidential Repeat Reserve or Verify If you select Confidential ...

Page 73: ...mputer name Confidential select the print job enter the PIN Print Printing a font sample list 1 From the home screen touch Settings Reports Print Print Fonts 2 Touch PCL Fonts or PS Fonts Printing a directory list From the home screen touch Settings Reports Print Print Directory Placing separator sheets between copies 1 From the home screen touch Settings Print Layout Separator Sheets Between Copie...

Page 74: ...tion Media Configuration USB Drive Flash Drive Print Network Ports Network Overview Wireless Ethernet TCP IP SNMP IPSec 802 1x LPD Configuration HTTP FTP Settings ThinPrint USB Restrict external network access Wi Fi Direct Security Login Methods Schedule USB Devices Security Audit Log Login Restrictions Confidential Print Setup Disk Encryption Erase Temporary Data Files Solutions LDAP Settings Miscel...

Page 75: ...Date and Time Date Format Time Format 12 hour A M P M Time Zone UTC GMT Offset DST Start DST End DST Offset Network Time Protocol Enable NTP On NTP Server Enable Authentication None Key ID Password Configure the printer date and time and network time protocol Notes MM DD YYYY is the U S factory default setting DD MM YYYY is the international factory default setting UTC GMT Offset DST Start DST End ...

Page 76: ...erator Panel Menu item Description External VNC Connection Don t Allow Allow Connect an external Virtual Network Computing VNC client to the remote control panel Authentication Type None Standard Authentication Set the authentication type when accessing the VNC client server VNC Password Specify the password to connect to the VNC client server Note This menu item appears only if Authentication Typ...

Page 77: ...ror Off Configure the e mail settings of the printer Error Prevention Jam Assist Off On Set the printer to check for jammed paper automatically Error Prevention Auto Continue Off On 5 seconds Let the printer continue processing or printing a job automatically after clearing certain attendance conditions Error Prevention Auto Reboot Auto Reboot Reboot always Set the printer to restart when an error ...

Page 78: ... printing it Jam Content Recovery Jam Recovery Off On Auto Set the printer to reprint jammed pages Note An asterisk next to a value indicates the factory default setting Power Management Menu item Description Sleep Mode Profile Print from Sleep Mode Stay awake after printing Enter Sleep Mode after printing Set the printer to stay awake or enter Sleep mode after printing Sleep Mode Profile Touch to W...

Page 79: ...vice Usage and Performance Information None Send printer usage and performance information to Lexmark Note Anonymous Data Send Time appears only when you set Anonymous Data Collection to Device Usage and Performance Information Anonymous Data Send Time Start Time Stop Time Note An asterisk next to a value indicates the factory default setting Accessibility Menu item Description Duplicate Key Strik...

Page 80: ...e network settings Restore app settings Restore the printer factory default settings Maintenance Configuration Menu Menu item Description USB Configuration USB PnP 1 2 Change the USB driver mode of the printer to improve its compatibility with a personal computer USB Configuration USB Speed Full Auto Set the USB port to run at full speed and disable its high speed capabilities Tray Configuration Size ...

Page 81: ...r in the Paper menu set Configure MP to Cassette Tray Configuration Action for Prompts Prompt user Continue Use current Set the printer to resolve paper or envelope related change prompts Reports Menu Settings Page Event Log Event Log Summary HealthCheck Statistics Print reports about printer menu settings status and event logs Supply Usage And Counters Clear Supply Usage History Reset the supply us...

Page 82: ...mulations Enable Prescribe Off On Enable Prescribe emulation Printer Emulations Emulator Security Page Timeout 60 minutes Reset Emulator After Job Off Disable Printer Message Access On Configure the security settings of the printer during emulation mode Print Configuration Black Only Mode Off On Set the printer to print always color content in grayscale Print Configuration Color Trapping Off 1 2 3 4 ...

Page 83: ...ons Clear Custom Status Erase user defined strings for the Default or Alternate custom messages Device Operations Clear all remotely installed messages Erase messages that were remotely installed Device Operations Automatically Display Error Screens Off On Show existing error messages on the display after the printer remains inactive on the home screen for a length of time App Configuration LES Appl...

Page 84: ...upplies Job Queue Settings Address Book USB Drive Held Jobs Specify which icons to show on the home screen About this Printer Menu item Description Asset Tag Specify the identity of the printer The maximum length is 32 characters Printer s Location Specify the printer location The maximum length is 63 characters Contact Specify the contact information for the printer The maximum length is 63 chara...

Page 85: ...parator Sheets None Between Copies Between Jobs Between Pages Insert blank separator sheets when printing Separator Sheet Source Tray x 1 Multipurpose Feeder Specify the paper source for the separator sheet Pages per Side Off 2 pages per side 3 pages per side 4 pages per side 6 pages per side 9 pages per side 12 pages per side 16 pages per side Print multiple page images on one side of a sheet of ...

Page 86: ...at use another printer language Job Waiting Off On Preserve print jobs requiring supplies so that jobs not requiring the missing supplies can print Note This menu item appears only when a hard disk or an intelligent storage drive ISD is installed Job Hold Timeout 0 255 30 Set the time in seconds that the printer waits for user intervention before it holds jobs that require unavailable resources No...

Page 87: ...an the available memory Notes When set to Off the printer retains downloaded resources only until memory is needed Resources associated with the inactive printer language are deleted When set to On the printer preserves all the permanent downloaded resources across all language switches When necessary the printer shows memory full messages instead of deleting permanent resources Print All Order Al...

Page 88: ...to a value indicates the factory default setting Advanced Imaging Menu item Description Color Balance Cyan 0 Magenta 0 Yellow 0 Black 0 Adjust the amount of toner that is used for each color Color Balance Reset Defaults Reset all color settings to their default values Color Correction Off Auto Manual Modify the color settings used to print documents Notes Off sets the printer to receive the color ...

Page 89: ... Log Post Current Log Post Delete Current Log Post Delete Oldest Log Delete Current Log Delete Oldest Log Delete All But Current Delete All Logs Specify how the printer responds when the hard disk or ISD is nearly full Log Action at Full None E mail Delete Current Log E mail Delete Oldest Log Post Delete Current Log Post Delete Oldest Log Delete Current Log Delete Oldest Log Delete All But Current...

Page 90: ... use the value directly Lock PS Startup Mode Off On Disable the SysStart file Image Smoothing Off On Enhance the contrast and sharpness of low resolution images Note This setting has no effect on images with a resolution of 300 dpi or higher Font Priority Resident Flash Disk Establish the font search order Notes Resident sets the printer to search its memory for the requested font before searching ...

Page 91: ...ific text Pitch 0 08 100 00 10 00 Specify the pitch for fixed or monospaced fonts Note Pitch refers to the number of fixed space characters in a horizontal inch of type Orientation Portrait Landscape Reverse Portrait Reverse Landscape Specify the orientation of text and graphics on the page Lines per Page 1 255 Specify the number of lines of text for each page printed through the PCL data stream Note...

Page 92: ...ay Renumber Restore Defaults Restore the tray renumber values to their factory defaults Print Timeout Off On 90 seconds Set the printer to end a print job after it has been idle for the specified amount of time Note An asterisk next to a value indicates the factory default setting Image Menu item Description Auto Fit On Off Select the best available paper size and orientation setting for an image N...

Page 93: ...r type loaded in each paper source Substitute Size Off Letter A4 All Listed Set the printer to substitute a specified paper size if the requested size is not loaded in any paper source Notes Off prompts the user to load the required paper size All Listed allows all available substitutions Configure MP Cassette Manual First Determine the behavior of the multipurpose feeder Notes Cassette configures th...

Page 94: ...321 mm 356 Set the portrait height of the universal paper Feed Direction Short Edge Long Edge Set the printer to pick paper from the short edge or long edge direction Note Long Edge appears only when the longest edge is shorter than the maximum width supported Note An asterisk next to a value indicates the factory default setting Media Types Menu item Description Plain Card Stock Recycled Glossy L...

Page 95: ...Style Long Edge Short Edge Determine which side of the paper is bound when performing two sided printing Pages per Side Off 2 pages per side 3 pages per side 4 pages per side 6 pages per side 9 pages per side 12 pages per side 16 pages per side Print multiple page images on one side of a sheet of paper Pages per Side Ordering Horizontal Reverse Horizontal Reverse Vertical Vertical Specify the posi...

Page 96: ...ndard Network Wireless Specify the type of the network connection Note Wireless is available only in printers connected to a wireless network Network Status Show the connectivity status of the printer network Display Network Status on Printer Off On Show the network status on the display Speed Duplex Show the speed of the currently active network card IPv4 Show the IPv4 address All IPv6 Addresses ...

Page 97: ...rk Network Name Network Mode Infrastructure Wireless Security Mode Disabled WEP WPA2 WPA Personal WPA2 Personal Configure the Wi Fi connection using the control panel Wi Fi Protected Setup WPS Auto Detect Off On Start Push Button Method Start PIN Method Establish a Wi Fi network and enable network security Notes WPS Auto Detect appears only when the Wireless Security Mode is set to WEP Start Push B...

Page 98: ... is set to WEP Set WEP Key Specify a WEP password for secure Wi Fi connection WPA2 WPA Personal AES Enable Wi Fi security through Wi Fi Protected Access WPA Note This menu item appears only when the Wireless Security Mode is set to WPA2 WPA Personal Set Pre Shared Key Set the password for secure Wi Fi connection WPA2 Personal AES Enable Wi Fi security through WPA2 Note This menu item appears only ...

Page 99: ...ming data and uses the default printer language specified in the Setup menu PS SmartSwitch Off On Set the printer to switch automatically to PS emulation when a print job requires it regardless of the default printer language Note If PS SmartSwitch is off then the printer does not examine incoming data and uses the default printer language specified in the Setup menu Job Buffering On Off Temporarily...

Page 100: ...quests Off On Accept requests to connect to the network automatically Note Accepting clients automatically is not secured Note An asterisk next to a value indicates the factory default setting Ethernet Menu item Description Network Speed Show the speed of the active network adapter IPv4 Enable DHCP On Set Static IP Address Configure the IPv4 settings IPv6 Enable IPv6 On Enable DHCPv6 Off Stateless ...

Page 101: ...stalled Mac Binary PS Auto On Off Set the printer to process Macintosh binary PostScript print jobs Notes Auto processes print jobs from computers using either Windows or Macintosh operating systems Off filters PostScript print jobs using the standard protocol Energy Efficient Ethernet On Off Auto Reduce power consumption when the printer does not receive data from the Ethernet network Note An aste...

Page 102: ...OOTP to assign a printer IP address Restricted Server List Specify the IP addresses that are allowed to communicate with the printer over TCP IP Notes Use a comma to separate each IP address You can add up to 50 IP addresses Restricted Server List Options Block All Ports Block Printing Only Block Printing and HTTP Only Specify the access option for IP addresses that are not in the list MTU 256 150...

Page 103: ...indicates the factory default setting SNMP Note This menu appears only in network printers or printers that are attached to print servers Menu item Description SNMP Versions 1 and 2c Enabled Off On Allow SNMP Set Off On Enable PPM MIB Off On SNMP Community Configure Simple Network Management Protocol SNMP versions 1 and 2c to install print drivers and applications Note An asterisk next to a value i...

Page 104: ...sk next to a value indicates the factory default setting IPSec Note This menu appears only in network printers or printers that are attached to print servers Menu item Description Enable IPSec Off On Enable Internet Protocol Security IPSec Base Configuration Default Compatibility Secure Set the IPSec base configuration Note This menu item appears only when Enable IPSec is set to On DH Diffie Hellman...

Page 105: ...y when Base Configuration is set to Secure IPSec Device Certificate Specify an IPSec certificate Note This menu item appears only when Enable IPSec is set to On Pre Shared Key Authenticated Connections Host x Configure the authenticated connections of the printer Note These menu items appear only when Enable IPSec is set to On Certificate Authenticated Connections Host x Address subnet Note An asterisk...

Page 106: ...t servers Menu item Description LPD Timeout 0 65535 seconds 90 Set the time out value to stop the Line Printer Daemon LPD server from waiting indefinitely for hung or invalid print jobs LPD Banner Page Off On Print a banner page for all LPD print jobs Note A banner page is the first page of a print job used as a separator of print jobs and to identify the originator of the print job request LPD Trai...

Page 107: ...P TFTP Other Settings HTTPS Device Certificate default View the HTTP device certificate used on the printer Other Settings Timeout for HTTP FTP Requests 30 Specify the amount of time before the server connection stops Other Settings Retries for HTTP FTP Requests 3 Set the number of retries to connect to the HTTP FTP server Note An asterisk next to a value indicates the factory default setting ThinPr...

Page 108: ...enu item appears only when a hard disk or an ISD is installed Mac Binary PS Auto On Off Set the printer to process Macintosh binary PostScript print jobs Notes Auto processes print jobs from computers using either Windows or Macintosh operating systems Off filters PostScript print jobs using the standard protocol Enable USB Port Off On Enable the front USB drive port Note An asterisk next to a valu...

Page 109: ...ion status between the printer and Lexmark Cloud Services Note An asterisk next to a value indicates the factory default setting Security Login Methods Manage Permissions Menu item Description Function Access Modify Address Book Manage Shortcuts Create Profiles Manage Bookmarks Flash Drive Print Flash Drive Color Printing Held Jobs Access Use Profiles Cancel Jobs at the Device Change Language Intern...

Page 110: ...ollment Control access to the printer management options Apps New Apps Slideshow Change Wallpaper Screen Saver Control access to the printer applications Local Accounts Menu item Description Manage Groups Permissions Show a list of all saved groups in the printer Add User User Name Password User Name Password PIN Create local accounts and specify their access to the printer functions administrativ...

Page 111: ...Messages 2 Mail System 3 System Daemons 4 Security Authorization Messages 5 Messages Generated Internally by Syslogs 6 Line Printer Subsystem 7 Network News Subsystem 8 UUCP Subsystem 9 Clock Daemon 10 Security Authorization Messages 11 FTP Daemon 12 NTP Subsystem 13 Log Audit 14 Log Alert 15 Clock Daemon 16 Local Use 0 local0 17 Local Use 1 local1 18 Local Use 2 local2 19 Local Use 3 local3 20 Lo...

Page 112: ...administrator when the log becomes full and begins to overwrite the oldest entries Log Full Behavior Wrap Over Oldest Entries E mail Log Then Delete All Entries Resolve log storage issues when the log fills its allotted memory E mail Full Alert Off On Send e mail notification to the administrator when the log fills its allotted memory Full Alert Level 1 99 90 E mail Log Exported Alert Off On Send e m...

Page 113: ... minutes 5 Specify the lockout duration Web Login Timeout 1 120 minutes 10 Specify the delay for a remote login before the user is logged off automatically Note An asterisk next to a value indicates the factory default setting Confidential Print Setup Menu item Description Max Invalid PIN 2 10 Set the limit for entering an invalid PIN Note When the limit is reached the print jobs for that user name...

Page 114: ... Off On Set the printer to hold all print jobs Keep duplicate documents Off On Set the printer to keep all documents with the same file name Note An asterisk next to a value indicates the factory default setting Disk Encryption Note This menu appears only when a hard disk or an intelligent storage drive is installed Menu item Description Status Enabled Encryption happens automatically when a storag...

Page 115: ...es that Function Access Control FAC protects regardless of the security permission that the user has Note Hide displays only FAC protected features that the user has access Print Permission Off On Let the user log in before printing Default Print Permission Login User Name Password User Name Set the default login for Print Permission Security Reset Jumper Enable Guest access No Effect Specify user...

Page 116: ...us Profiles List Print a list of profiles that are stored in the printer Asset Report Print a diagnostic tool for print problems Note To avoid clipping the content print the report on letter or A4 size paper Print Menu item Description Print Fonts PCL Fonts PS Fonts Print samples and information about the fonts that are available in each printer language Print Demo Demo Page Print a page that shows ...

Page 117: ...ect Connected Clients Print a page that shows the list of devices that are connected to the printer using Wi Fi Direct Note This menu item appears only when Enable Wi Fi Direct is set to On Troubleshooting Menu item Description Print Quality Test Pages Print sample pages to identify and correct print quality defects Printing the Menu Settings Page From the home screen touch Settings Reports Menu S...

Page 118: ...lick Custom Supply Notifications 4 Select a notification for each supply item 5 Apply the changes Setting up e mail alerts Configure the printer to send e mail alerts when supplies are low when paper must be changed or added or when there is a paper jam 1 Open a web browser and then type the printer IP address in the address field Notes View the printer IP address on the printer home screen The IP add...

Page 119: ...s and may deliver unpredictable results if third party parts and supplies are used Imaging component usage beyond the intended life may damage your Lexmark printer or its associated components Warning Potential Damage Supplies and parts without Return Program agreement terms may be reset and remanufactured However the manufacturer s warranty does not cover any damage caused by non genuine supplies...

Page 120: ...C1XM0 71C2XSM0 71C8XM0 Yellow 71C1XY0 71C2XY0 71C8XY0 1 Supported only in the Lexmark CS730 printer model 2 Supported only in the Lexmark CS735 printer model For more information on countries in each region go to www lexmark com regions Lexmark CS730 High yield toner cartridges Item Worldwide Black 71C0H10 Cyan 71C0H20 Magenta 71C0H30 Yellow 71C0H40 Lexmark CS735 Extra high yield toner cartridges ...

Page 121: ...es of paper requires more frequent replacement of the maintenance kit The separator assembly fuser and pick roller assembly are included in the maintenance kit and can be ordered individually and replaced if necessary For more information on replacing the maintenance kit see the documentation that came with the kit Item Part number Fuser maintenance kit 110 120 V 41X3882 Fuser maintenance kit 220 ...

Page 122: ...Replacing parts and supplies Replacing a toner cartridge 1 Open door B Maintain the printer 122 ...

Page 123: ...2 Remove the used toner cartridge 3 Unpack the new toner cartridge Maintain the printer 123 ...

Page 124: ...4 Insert the new toner cartridge 5 Close door B Maintain the printer 124 ...

Page 125: ...Replacing the black imaging unit 1 Open door B Maintain the printer 125 ...

Page 126: ...2 Remove the waste toner bottle Note To avoid spilling the toner place the bottle in an upright position Maintain the printer 126 ...

Page 127: ...3 Remove the toner cartridges Maintain the printer 127 ...

Page 128: ...4 Disconnect the imaging kit cable Maintain the printer 128 ...

Page 129: ...5 Remove the imaging kit Note To avoid scratching the imaging kit or damaging the photoconductor drum place the imaging kit in an uplifted position Maintain the printer 129 ...

Page 130: ... used black imaging unit Warning Potential Damage Do not expose the photoconductor unit to direct light for more than 10 minutes Extended exposure to light may cause print quality problems Maintain the printer 130 ...

Page 131: ...ot touch the shiny photoconductor drum under the imaging kit Doing so may affect the quality of future print jobs 7 Unpack the new black imaging unit 8 Insert the new black imaging unit into the imaging kit Maintain the printer 131 ...

Page 132: ...9 Insert the imaging kit Maintain the printer 132 ...

Page 133: ...10 Connect the imaging kit cable 11 Insert the waste toner bottle 12 Insert the toner cartridges 13 Close door B Maintain the printer 133 ...

Page 134: ...Replacing the color imaging kit 1 Open door B Maintain the printer 134 ...

Page 135: ...2 Remove the waste toner bottle Note To avoid spilling the toner place the bottle in an upright position Maintain the printer 135 ...

Page 136: ...3 Remove the toner cartridges Maintain the printer 136 ...

Page 137: ...4 Disconnect the imaging kit cable Maintain the printer 137 ...

Page 138: ...5 Remove the used imaging kit Maintain the printer 138 ...

Page 139: ...onductor unit to direct light for more than 10 minutes Extended exposure to light may cause print quality problems Warning Potential Damage Do not touch the shiny photoconductor drum under the imaging unit Doing so may affect the quality of future print jobs Maintain the printer 139 ...

Page 140: ...7 Unpack the new imaging kit Note The imaging kit includes the imaging kit and the cyan magenta and yellow developer units Maintain the printer 140 ...

Page 141: ...8 Insert the black imaging unit into the new imaging kit Maintain the printer 141 ...

Page 142: ...9 Insert the new imaging kit Maintain the printer 142 ...

Page 143: ...10 Connect the imaging kit cable 11 Insert the waste toner bottle 12 Insert the toner cartridges 13 Close door B Maintain the printer 143 ...

Page 144: ...Replacing the waste toner bottle 1 Open door B Maintain the printer 144 ...

Page 145: ...tle Note To avoid spilling the toner place the bottle in an upright position 3 Unpack the new waste toner bottle 4 Insert the new waste toner bottle 5 Close door B 6 Dispose the used waste toner bottle properly Maintain the printer 145 ...

Page 146: ...g the power cord from the electrical outlet 2 Open door A and then open door A1 CAUTION HOT SURFACE The inside of the printer might be hot To reduce the risk of injury from a hot component allow the surface to cool before touching it Maintain the printer 146 ...

Page 147: ...3 Remove the used fuser 4 Unpack the new fuser 5 Insert the new fuser 6 Close door A1 and then close door A Maintain the printer 147 ...

Page 148: ...ed and properly grounded electrical outlet that is near the product and easily accessible 8 Reset the fuser maintenance counter For more information see Resetting the maintenance counter on page 154 Replacing the pick roller Replacing the pick roller in the 550 sheet tray 1 Turn off the printer and then unplug the power cord from the electrical outlet 2 Remove the tray Maintain the printer 148 ...

Page 149: ...ve the used pick roller 4 Unpack the new pick roller Warning Potential Damage To avoid damage and poor printer performance make sure that your hands are clean when handling the parts Maintain the printer 149 ...

Page 150: ...the risk of fire or electrical shock connect the power cord to an appropriately rated and properly grounded electrical outlet that is near the product and easily accessible Replacing the pick roller in the multipurpose feeder 1 Turn off the printer and then unplug the power cord from the electrical outlet 2 Open the multipurpose feeder Maintain the printer 150 ...

Page 151: ...ve the used pick roller 4 Unpack the new pick roller Warning Potential Damage To avoid damage and poor printer performance make sure that your hands are clean when handling the parts Maintain the printer 151 ...

Page 152: ... and then turn on the printer CAUTION POTENTIAL INJURY To avoid the risk of fire or electrical shock connect the power cord to an appropriately rated and properly grounded electrical outlet that is near the product and easily accessible Replacing the separator bracket 1 Pull out the tray Maintain the printer 152 ...

Page 153: ...2 Remove the used separator bracket 3 Unpack the new separator bracket Maintain the printer 153 ...

Page 154: ...Supply Usage And Counters 2 Select the counter that you want to reset Warning Potential Damage Supplies and parts without Return Program agreement terms may be reset and remanufactured However the manufacturer s warranty does not cover any damage caused by non genuine supplies or parts Resetting counters on the supply or part without proper remanufacturing can cause damage to your printer After re...

Page 155: ...he electrical outlet and then turn on the printer CAUTION POTENTIAL INJURY To avoid the risk of fire or electrical shock connect the power cord to an appropriately rated and properly grounded electrical outlet that is near the product and easily accessible Cleaning the touch screen CAUTION SHOCK HAZARD To avoid the risk of electric shock when cleaning the exterior of the printer unplug the power co...

Page 156: ...Cleaning the pick tires 1 Turn off the printer and then unplug the power cord from the electrical outlet 2 Remove the tray Maintain the printer 156 ...

Page 157: ...3 Remove the pick roller 4 Apply isopropyl alcohol to a soft lint free cloth and then wipe the pick tires Maintain the printer 157 ...

Page 158: ...he risk of fire or electrical shock connect the power cord to an appropriately rated and properly grounded electrical outlet that is near the product and easily accessible Cleaning the pick roller in the multipurpose feeder 1 Turn off the printer and then unplug the power cord from the electrical outlet 2 Open the multipurpose feeder Maintain the printer 158 ...

Page 159: ...3 Remove the pick roller 4 Apply isopropyl alcohol to a soft lint free cloth and then wipe the pick roller Maintain the printer 159 ...

Page 160: ... is near the product and easily accessible Saving energy and paper Configuring the power save mode settings Sleep mode 1 From the home screen touch Settings Device Power Management Timeouts Sleep Mode 2 Specify the amount of time that the printer stays idle before it enters Sleep Mode Hibernate mode 1 From the home screen touch Settings Device Power Management Timeouts Hibernate Timeout 2 Select th...

Page 161: ...cement CAUTION POTENTIAL INJURY When moving the printer follow these guidelines to avoid personal injury or printer damage Make sure that all doors and trays are closed Turn off the printer and then unplug the power cord from the electrical outlet Disconnect all cords and cables from the printer If the printer has separate floor standing optional trays or output options attached to it then disconne...

Page 162: ... sure that there is adequate clearance around the printer Note Damage to the printer caused by improper moving is not covered by the printer warranty Shipping the printer For shipping instructions go to http support lexmark com or contact customer support Maintain the printer 162 ...

Page 163: ...r white pages on page 171 Dark print on page 172 Ghost images on page 173 Gray or colored background on page 174 Incorrect margins on page 175 Light print on page 176 Missing colors on page 178 Mottled print and dots on page 179 Paper curl on page 180 Print crooked or skewed on page 181 Solid color or black images on page 182 Text or images cut off on page 182 Troubleshoot a problem 163 ...

Page 164: ...nter had to restart Last job may be incomplete Touch Continue to clear the message and continue printing 11 11 11 21 11 31 11 41 11 51 Load source with type size Open the indicated tray and then load paper For more information see Loading trays on page 27 11 12 11 22 11 32 11 42 11 52 Load source with type size orientation 11 91 Load multipurpose feeder with type size Open the multipurpose feeder ...

Page 165: ...h of the three red clips starting with the upper left lower left and ending on the right side 3 Close door A 4 Open door B 5 Pull out the red loop on the right side 6 Close door B 31 30 Transfer module problem Restart printer 1 Turn off the printer and then unplug the power cord from the electrical outlet 2 Connect the power cord to the electrical outlet and then turn on the printer CAUTION POTENT...

Page 166: ...aging the photoconductor drum place the imaging kit in an uplifted position 6 Remove the black imaging unit 7 Insert the black imaging unit Insert the imaging kit 8 Connect the imaging kit cable 9 Insert the toner cartridges 10 Insert the waste toner bottle 11 Close door B 31 64 Reinstall missing unplugged or unresponsive color imaging kit 1 Open door B 2 Remove the waste toner bottle Note To avoi...

Page 167: ...ee Replacing the black imaging unit on page 125 32 64 Replace unsupported color imaging kit See Replacing the color imaging kit on page 134 33 40 33 41 33 42 33 43 Non Lexmark color cartridge see User s Guide See Non Lexmark supply on page 212 33 60 Non Lexmark black imaging unit see User s Guide 33 64 Non Lexmark color imaging kit see User s Guide 37 1 Insufficient memory to collate job Try one o...

Page 168: ... 43 43 Replace defective color cartridge See Replacing a toner cartridge on page 122 43 40 43 41 43 42 43 43 Color cartridge problem 1 Open door B 2 Remove the cartridge 3 Insert the cartridge 4 Close door B If the problem persists then replace the cartridge 55 1 Error reading USB drive Remove USB Remove the flash drive to continue 55 2 Error reading USB hub Remove hub Remove the USB hub to continu...

Page 169: ...nstall a printer hard disk 63 Format the disk Formatting now wipes all information from the storage drive To format the storage drive later do the following 1 From the home screen touch Settings Device Maintenance Out of Service Erase 2 Touch Sanitize all information on hard disk and then touch ERASE 80 01 80 09 Maintenance kit nearly low Touch Continue to clear the message 80 11 80 19 Maintenance...

Page 170: ... 88 40 88 47 88 48 Replace the color cartridge See Replacing a toner cartridge on page 122 200 23 200 33 200 43 200 53 232 23 232 33 232 43 232 53 240 23 240 33 240 43 240 53 242 33 242 35 242 43 242 45 242 53 242 55 243 43 243 45 243 53 243 55 244 53 244 54 244 55 245 56 662 23 663 33 664 43 665 53 Paper jam jam header xxx yy See Paper jam in trays on page 201 200 03 240 05 240 06 240 82 240 83 2...

Page 171: ...e problem is solved Step 2 a Remove the color imaging kit and then remove the black imaging unit Warning Potential Damage Do not expose the color imaging kit and black imaging unit to direct light for more than 10 minutes Extended exposure to light may cause print quality problems Warning Potential Damage Do not touch the photoconductor drum under the color imaging kit and black imaging unit Doing...

Page 172: ...settings on the printer control panel From the home screen touch Settings Print Quality Toner Darkness b Print the document Is the print too dark Go to step 3 The problem is solved Step 3 a Depending on your operating system specify the paper type from the Printing Preferences or Print dialog Notes Make sure that the settings match the paper loaded in the tray You can also change the settings on t...

Page 173: ...From the home screen touch Settings Troubleshooting Print Quality Test Pages Action Yes No Step 1 a Load the tray with the correct paper type and weight b Print the document Do ghost images appear on prints Go to step 2 The problem is solved Step 2 a Depending on your operating system specify the paper type from the Printing Preferences or Print dialog Notes Make sure that the setting matches the ...

Page 174: ...on Yes No Step 1 a Depending on your operating system increase toner darkness from the Printing Preferences or Print dialog Note You can also change the setting on the printer control panel From the home screen touch Settings Print Quality Toner Darkness b Print the document Does gray or colored background appear on prints Go to step 2 The problem is solved Step 2 a Perform Color Adjust From the h...

Page 175: ...ctor drum under the color imaging kit and black imaging unit Doing so may affect the quality of future print jobs b Insert the black imaging unit and then insert the color imaging kit c Print the document Does gray or colored background appear on prints Contact customer support The problem is solved Incorrect margins Action Yes No Step 1 a Adjust the paper guides in the tray to the correct positio...

Page 176: ...lem print the Print Quality Test Pages From the home screen touch Settings Troubleshooting Print Quality Test Pages Action Yes No Step 1 a Perform Color Adjust From the home screen touch Settings Print Quality Advanced Imaging Color Adjust b Print the document Is the print light Go to step 2 The problem is solved Step 2 a Depending on your operating system increase toner darkness from the Printing...

Page 177: ...ch Settings Paper Tray Configuration Paper Size Type b Print the document Is the print light Go to step 5 The problem is solved Step 5 Check if paper has texture or rough finishes Are you printing on textured or rough paper Go to step 6 Go to step 7 Step 6 a Replace textured or rough paper with plain paper b Print the document Is the print light Go to step 7 The problem is solved Step 7 a Load paper...

Page 178: ... Note Before solving the problem print the Print Quality Test Pages From the home screen touch Settings Troubleshooting Print Quality Test Pages Action Yes No a Remove the color imaging kit Warning Potential Damage Do not expose the color imaging kit to direct light for more than 10 minutes Extended exposure to light may cause print quality problems Warning Potential Damage Do not touch the photoc...

Page 179: ...h finishes Do the settings match Go to step 4 Go to step 3 Step 3 a Depending on your operating system specify the paper size and paper type from the Printing Preferences or Print dialog Notes Make sure that the settings match the paper loaded in the tray You can also change the settings on the printer control panel From the home screen touch Settings Paper Tray Configuration Paper Size Type b Print...

Page 180: ...or imaging kit c Print the document Is the print mottled Contact customer support The problem is solved Paper curl Action Yes No Step 1 a Adjust the guides in the tray to the correct position for the paper loaded b Print the document Is the paper curled Go to step 2 The problem is solved Step 2 a Depending on your operating system specify the paper type from the Printing Preferences or Print dialo...

Page 181: ... Print Quality Test Pages From the home screen touch Settings Troubleshooting Print Quality Test Pages Action Yes No Step 1 a Pull out the tray b Remove the paper and then load paper from a fresh package Note Paper absorbs moisture due to high humidity Store paper in its original wrapper until you are ready to use it c Adjust the paper guides in the tray to the correct position for the paper loade...

Page 182: ...sure to light may cause print quality problems Warning Potential Damage Do not touch the photoconductor drum under the color imaging kit and black imaging unit Doing so may affect the quality of future print jobs b Insert the black imaging unit and then insert the color imaging kit c Print the document Is the printer printing solid color or black images Contact customer support The problem is solv...

Page 183: ...he document Is the text or image clipped Go to step 3 The problem is solved Step 3 a Remove the color imaging kit and then remove the black imaging unit Warning Potential Damage Do not expose the color imaging kit and black imaging unit to direct light for more than 10 minutes Extended exposure to light may cause print quality problems Warning Potential Damage Do not touch the photoconductor drum ...

Page 184: ... Note Before solving the problem print the Print Quality Test Pages From the home screen touch Settings Troubleshooting Print Quality Test Pages Action Yes No a Remove the color imaging kit and then remove the black imaging unit Warning Potential Damage Do not expose the color imaging kit and black imaging unit to direct light for more than 10 minutes Extended exposure to light may cause print qua...

Page 185: ...Print dialog Notes Make sure that the setting matches the paper loaded You can also change the setting on the printer control panel From the home screen touch Settings Paper Tray Configuration Paper Size Type b Print the document Do horizontal dark lines appear on prints Go to step 2 The problem is solved Step 2 a Load paper from a fresh package Note Paper absorbs moisture due to high humidity Stor...

Page 186: ... document Do horizontal dark lines appear on prints Contact customer support The problem is solved Vertical dark lines Note Before solving the problem print the Print Quality Test Pages From the home screen touch Settings Troubleshooting Print Quality Test Pages Action Yes No Step 1 a Depending on your operating system specify the paper type from the Printing Preferences or Print dialog Notes Make...

Page 187: ... to light may cause print quality problems Warning Potential Damage Do not touch the photoconductor drum under the color imaging kit and black imaging unit Doing so may affect the quality of future print jobs b Insert the black imaging unit and then insert the color imaging kit c Print the document Do vertical dark lines appear on prints Contact customer support The problem is solved Horizontal wh...

Page 188: ...horizontal white lines appear on prints Go to step 3 The problem is solved Step 3 a Remove the color imaging kit and then remove the black imaging unit Warning Potential Damage Do not expose the color imaging kit and black imaging unit to direct light for more than 10 minutes Extended exposure to light may cause print quality problems Warning Potential Damage Do not touch the photoconductor drum u...

Page 189: ...mmended paper type a Load the specified paper source with the recommended paper type b Print the document Do vertical white lines appear on prints Go to step 3 The problem is solved Step 3 a Remove the color imaging kit and then remove the black imaging unit Warning Potential Damage Do not expose the color imaging kit and black imaging unit to direct light for more than 10 minutes Extended exposure...

Page 190: ...ing the Maintenance Defect Ruler measure the distance between the repeating defects on the affected color page b Replace the supply item that matches the measurement on the affected color page Color imaging kit or black imaging unit 94 5 mm 3 72 in 29 9 mm 1 18 in 23 2 mm 0 91 in Developer unit 43 6 mm 1 72 in 45 0 mm 1 77 in c Print the Print Quality Test Pages Do the defects still appear Take no...

Page 191: ...s do not print Action Yes No Step 1 a From the document you are trying to print open the Print dialog and then check if you have selected the correct printer b Print the document Is the document printed The problem is solved Go to step 2 Step 2 a Check if the printer is on b Resolve any error messages that appear on the display c Print the document Is the document printed The problem is solved Go ...

Page 192: ...ments do not print Action Yes No Step 1 a From the control panel check if the documents appear in the Held Jobs list Note If the documents are not listed then print the documents using the Print and Hold options b Print the documents Are the documents printed The problem is solved Go to step 2 Step 2 The print job may contain a formatting error or invalid data Delete the print job and then send it...

Page 193: ...job individually Are the documents printed The problem is solved Go to step 4 Step 4 a Delete some held jobs to free up printer memory b Print the documents Are the documents printed The problem is solved Go to step 5 Step 5 a Add printer memory b Print the documents Are the documents printed The problem is solved Contact customer support Job prints from the wrong tray or on the wrong paper Action...

Page 194: ...tray The problem is solved Contact customer support Slow printing Action Yes No Step 1 Make sure that the printer cable is securely connected to the printer and to the computer print server option or other network device Is the printer printing slow Go to step 2 The problem is solved Step 2 a Make sure that the printer is not in Quiet Mode From the home screen touch Settings Device Maintenance Con...

Page 195: ...Settings Paper Tray Configuration Paper Size Type Heavier paper prints more slowly Paper narrower than letter A4 and legal may print more slowly b Print the document Is the printer printing slow Go to step 6 The problem is solved Step 6 a Make sure that the printer settings for texture and weight match the paper being loaded From the home screen touch Settings Paper Media Configuration Media Types N...

Page 196: ...properly grounded electrical outlet that is near the product and easily accessible Is the printer responding The problem is solved Go to step 2 Step 2 Check if the electrical outlet is turned off by a switch or breaker Is the electrical outlet turned off by a switch or breaker Turn on the switch or reset the breaker Go to step 3 Step 3 Check if the printer is on Is the printer on Go to step 4 Turn...

Page 197: ...sh drive Action Yes No Step 1 Check if the printer is not busy processing another print copy scan or fax job Is the printer ready Go to step 3 Go to step 2 Step 2 Wait for the printer to finish processing the other job Remove and then insert the flash drive Does the printer recognize the flash drive The problem is solved Go to step 3 Step 3 Check if the flash drive is inserted into the front USB port ...

Page 198: ... the flash drive Does the printer recognize the flash drive The problem is solved Contact customer support Enabling the USB port From the home screen touch Settings Network Ports USB Enable USB Port Clearing jams Avoiding jams Load paper properly Make sure that the paper lies flat in the tray Correct loading of paper Incorrect loading of paper Do not load or remove a tray while the printer is printin...

Page 199: ...ign the paper edges before loading Do not use paper that has been cut or trimmed by hand Do not mix paper sizes weights or types in the same tray Make sure that the paper size and type are set correctly on the computer or printer control panel Store paper according to manufacturer recommendations Identifying jam locations Notes When Jam Assist is set to On the printer flushes blank pages or pages w...

Page 200: ...Jam locations 1 Standard bin 2 Door A 3 Trays 4 Multipurpose feeder Troubleshoot a problem 200 ...

Page 201: ...A sensor inside the optional tray is easily damaged by static electricity Touch a metal surface before removing the jammed paper in the tray 2 Remove the jammed paper Note Make sure that all paper fragments are removed 3 Insert the tray Troubleshoot a problem 201 ...

Page 202: ...emoved 4 Insert the tray Paper jam in the standard bin Remove the jammed paper Note Make sure that all paper fragments are removed Paper jam in door A Paper jam in the fuser area 1 Open door A CAUTION HOT SURFACE The inside of the printer might be hot To reduce the risk of injury from a hot component allow the surface to cool before touching it Troubleshoot a problem 202 ...

Page 203: ...2 Remove the jammed paper Note Make sure that all paper fragments are removed 3 Open door A1 Troubleshoot a problem 203 ...

Page 204: ...moved 6 Close and latch the fuser access door 7 Close door A1 and then close door A Paper jam behind door A 1 Open door A CAUTION HOT SURFACE The inside of the printer might be hot To reduce the risk of injury from a hot component allow the surface to cool before touching it Troubleshoot a problem 204 ...

Page 205: ...2 Open the isolation unit door 3 Remove the jammed paper Note Make sure that all paper fragments are removed Troubleshoot a problem 205 ...

Page 206: ...or 5 Close door A Paper jam in the duplex area 1 Open door A CAUTION HOT SURFACE The inside of the printer might be hot To reduce the risk of injury from a hot component allow the surface to cool before touching it Troubleshoot a problem 206 ...

Page 207: ...2 Open the duplex cover 3 Remove the jammed paper Note Make sure that all paper fragments are removed 4 Close the duplex cover and then close door A Troubleshoot a problem 207 ...

Page 208: ...stalled a supported browser Internet Explorer version 11 or later Microsoft Edge Safari version 6 or later Google ChromeTM version 32 or later Mozilla Firefox version 24 or later b Access the EWS Can you open the EWS The problem is solved Go to step 4 Step 4 a Check if the network connection is working Note If the connection is not working then contact your administrator b Access the EWS Can you o...

Page 209: ...orrect Wi Fi network Go to step 4 Go to step 3 Step 3 Connect to the correct Wi Fi network For more information see Connecting the printer to a Wi Fi network on page 61 Can the printer connect to the Wi Fi network The problem is solved Go to step 4 Step 4 Check the wireless security mode From the home screen touch Settings Network Ports Wireless Wireless Security Mode Is the correct wireless secur...

Page 210: ... into the appropriate connector on the controller board c Connect the power cord to the electrical outlet and then turn on the printer CAUTION POTENTIAL INJURY To avoid the risk of fire or electrical shock connect the power cord to an appropriately rated and properly grounded electrical outlet that is near the product and easily accessible Does the printer detect the internal option The problem is ...

Page 211: ...tacle of the controller board Does the ISP operate correctly The problem is solved Contact customer support Parallel or serial interface card does not operate correctly Action Yes No Step 1 Print a menu settings page and then check if the parallel or serial interface card appears in the Installed Features list Is the parallel or serial interface card listed in the Installed Features list Go to ste...

Page 212: ... the correct region that matches the printer region or purchase a worldwide cartridge The first number in the message after 42 indicates the region of the printer The second number in the message after 42 indicates the region of the cartridge Printer and toner cartridge regions Region Numeric code Worldwide or Undefined region 0 North America United States Canada 1 European Economic Area Western Eur...

Page 213: ... your printer and install a genuine Lexmark supply or part For more information see Using genuine Lexmark parts and supplies on page 119 If the printer does not print after clearing the error message then reset the supply usage counter 1 From the home screen touch Settings Device Maintenance Configuration Menu Supply Usage And Counters 2 Select the part or supply that you want to reset and then tou...

Page 214: ...act customer support Tray linking does not work Action Yes No Step 1 a Check if the trays contain the same paper size and paper type b Check if the paper guides are positioned correctly c Print the document Do the trays link correctly The problem is solved Go to step 2 Step 2 a From the home screen touch Settings Paper Tray Configuration Paper Size Type b Set the paper size and paper type to match ...

Page 215: ...pe b Set the correct paper size and type c Print the document Do paper jams occur frequently Go to step 3 The problem is solved Step 3 a Load paper from a fresh package Note Paper absorbs moisture due to high humidity Store paper in its original wrapper until you are ready to use it b Print the document Do paper jams occur frequently Contact customer support The problem is solved Jammed pages are ...

Page 216: ...ecifications for Web Offset Publishing SWOP color output Euro CMYK Applies color correction to approximate Euroscale color output Vivid CMYK Increases the color saturation of the US CMYK color correction setting Off FAQ about color printing What is RGB color RGB color is a method of describing colors by indicating the amount of red green or blue used to produce a certain color Red green and blue li...

Page 217: ...ailable These sets are also available from the Color Samples page of the Embedded Web Server Selecting any sample set generates multiple page prints consisting of hundreds of colored boxes Each box contains a CMYK or RGB combination depending on the table selected The observed color of each box is obtained by passing the CMYK or RGB combination labeled on the box through the selected color convers...

Page 218: ...ore contacting customer support make sure to have the following information Printer problem Error message Printer model type and serial number Go to http support lexmark com to receive e mail or chat support or browse through the library of manuals support documentation drivers and other downloads Technical support via telephone is also available In the U S or Canada call 1 800 539 6275 For other ...

Page 219: ... These efficiencies result in fewer greenhouse emissions energy savings and natural resource savings Lexmark also offers recycling of packaging components in some countries or regions For more information go to www lexmark com recycle and then choose your country or region Information on available packaging recycling programs is included with the information on product recycling Lexmark cartons ar...

Page 220: ... to make these available in all countries in which it operates Any reference to a product program or service is not intended to state or imply that only that product program or service may be used Any functionally equivalent product program or service that does not infringe any existing intellectual property right may be used instead Evaluation and verification of operation in conjunction with othe...

Page 221: ...L is a registered trademark of the Hewlett Packard Company PCL is Hewlett Packard Company s designation of a set of printer commands language and functions included in its printer products This printer is intended to be compatible with the PCL language This means the printer recognizes PCL commands used in various application programs and that the printer emulates the functions corresponding to th...

Page 222: ...ominated biphenyls or polybrominated diphenyl ethers in concentrations exceeding 0 1 by weight and 0 01 by weight for cadmium except for the exemption set in the Rule Lithium ion rechargeable battery This product may contain a coin cell lithium ion rechargeable battery which should only be removed by a trained technician Crossed out wheelie bin means the product should not be discarded as unsorted...

Page 223: ...turn the cartridges are also recycled To return Lexmark cartridges for reuse or recycling do the following 1 Go to www lexmark com recycle 2 Select the product that you want to recycle Static sensitivity notice This symbol identifies static sensitive parts Do not touch the areas near these symbols without first touching a metal surface in an area away from the symbol To prevent damage from electrost...

Page 224: ...certified as a Class I laser product conforming to the requirements of IEC 60825 1 2014 Class I laser products are not considered to be hazardous The laser system and printer are designed so there is never any human access to laser radiation above a Class I level during normal operation user maintenance or prescribed service conditions The printer has a non serviceable printhead assembly that conta...

Page 225: ...inutes depending on the printer model If the printer speed is less than or equal to 30 pages per minute then you can set the timeout only up to 60 minutes or 54 minutes depending on the printer model Setting the Sleep Mode Timeout to a low value reduces energy consumption but may increase the response time of the product Setting the Sleep Mode Timeout to a high value maintains a fast response but ...

Page 226: ...use undesired operation The FCC Class A limits are designed to provide reasonable protection against harmful interference when the equipment is operated in a commercial environment This equipment generates uses and can radiate radio frequency energy and if not installed and used in accordance with the instruction manual may cause harmful interference to radio communications Operation of this equip...

Page 227: ...5 EU as amended by EU 2015 863 on the approximation and harmonization of the laws of the Member States relating to electromagnetic compatibility safety of electrical equipment designed for use within certain voltage limits and on the restrictions of use of certain hazardous substances in electrical and electronic equipment The manufacturer of this product is Lexmark International Inc 740 West New ...

Page 228: ...lass A product In a domestic environment this product may cause radio interference in which case the user may be required to take adequate measures STATEMENT OF LIMITED WARRANTY FOR LEXMARK LASER PRINTERS LEXMARK LED PRINTERS AND LEXMARK MULTIFUNCTION LASER PRINTERS Lexmark International Inc Lexington KY This limited warranty applies to the United States and Canada For customers outside the U S re...

Page 229: ...for exchange is defaced altered in need of a repair not included in warranty service damaged beyond repair or if the product is not free of all legal obligations restrictions liens and encumbrances As part of your warranty service and or replacement Lexmark may update the firmware in your printer to the latest version Firmware updates may modify printer settings and cause counterfeit and or unautho...

Page 230: ...e limit set forth in the following paragraph Lexmark s liability for actual damages from any cause whatsoever will be limited to the amount you paid for the product that caused the damages This limitation of liability will not apply to claims by you for bodily injury or damage to real property or tangible personal property for which Lexmark is legally liable IN NO EVENT WILL LEXMARK BE LIABLE FOR ...

Page 231: ...troubleshooting print appears tinted 217 colored background on print 174 computer connecting to the printer 64 confidential documents do not print 192 confidential print jobs configuring 71 printing 72 configuring supply notifications 118 configuring Wi Fi Direct 63 connecting a computer to the printer 64 connecting mobile device to printer 63 connecting the printer to a wireless network 61 connecting t...

Page 232: ...d Platform Module 41 installing options internal solutions port 44 printer hard disk 50 installing the print driver 32 installing the printer software 32 installing wireless print server 54 60 intelligent storage drive 67 erasing 66 installing 38 internal option is not detected 210 internal options 35 internal options adding print driver 35 internal solutions port installing 44 troubleshooting 211...

Page 233: ...aging unit 121 color imaging kit 121 fuser maintenance kit 121 toner cartridge 119 waste toner bottle 121 P paper letterhead 13 preprinted forms 13 selecting 11 unacceptable 12 Universal size setting 27 paper characteristics 11 paper frequently jams 215 paper guidelines 11 paper jam behind door A 202 in the duplex area 202 in the fuser area 202 in the multipurpose feeder 202 in the standard bin 20...

Page 234: ... Service 69 using Wi Fi Direct 69 printing a directory list 73 printing a font sample list 73 printing a network setup page 64 printing from a computer 68 R recycling Lexmark packaging 219 Lexmark products 219 removing jam behind door A 202 in the duplex area 202 in the fuser area 202 removing paper jam in trays 201 repeat print jobs 71 repeating print defects 190 Replace cartridge printer region ...

Page 235: ... horizontal white lines 187 light print 176 missing colors 178 mottled print and dots 179 paper curl 180 repeating print defects 190 skewed print 181 solid color or black images 182 text or images cut off 182 toner easily rubs off 183 uneven print density 184 vertical dark lines appear on prints 186 vertical white lines 188 white pages 171 troubleshooting printer options cannot detect internal opt...

Reviews: