of the
ThinkStation Safety and Warranty Guide
, go to:
http://www.lenovo.com/support
This section provides instructions on how to replace the front fan assembly.
Note:
Not all computers have the front fan assembly.
To replace the front fan assembly, do the following:
1. Remove all media from the drives and turn off all attached devices and the computer. Then, disconnect
all power cords from electrical outlets and disconnect all cables that are connected to the computer.
2. Remove the computer cover. See “Removing the computer cover” on page 74.
3. Remove the front bezel. See “Removing and reinstalling the front bezel” on page 75.
4. Remove the PCI card holder. See “Removing and reinstalling the PCI card holder” on page 76.
5. Disconnect the front fan assembly cable from the front fan connector on the system board. See
“Locating parts and connectors on the system board” on page 71.
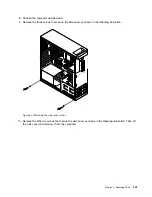
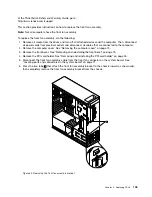
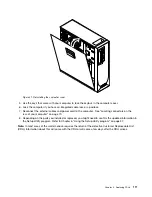
6. Press the two tabs
1
that attach the front fan assembly bracket to the chassis inward as shown and
then completely remove the front fan assembly bracket from the chassis.
Figure 35. Removing the front fan assembly bracket
Chapter 9
.
Replacing FRUs
105
Summary of Contents for ThinkStation C20
Page 2: ......
Page 15: ...Chapter 2 Safety information 9 ...
Page 19: ...Chapter 2 Safety information 13 ...
Page 20: ...1 2 14 ThinkStation Hardware Maintenance Manual ...
Page 21: ...Chapter 2 Safety information 15 ...
Page 27: ...Chapter 2 Safety information 21 ...
Page 31: ...Chapter 2 Safety information 25 ...
Page 74: ...68 ThinkStation Hardware Maintenance Manual ...
Page 118: ...112 ThinkStation Hardware Maintenance Manual ...
Page 240: ...234 ThinkStation Hardware Maintenance Manual ...
Page 245: ......
Page 246: ...Part Number 89Y7336 Printed in USA 1P P N 89Y7336 89Y7336 ...

