


6. Slide the computer cover to the front of the computer a small amount. Then, lift the computer cover to
remove it from the computer.
Figure 39. Removing the computer cover
Installing or removing the hard disk drive assembly
Attention:
Do not open your computer or attempt any repair before reading and understanding the “Important safety information”
on page v.
This section provides instructions on how to install or remove the hard disk drive assembly.
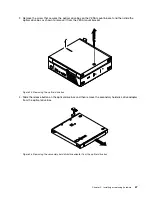
To remove the hard disk drive assembly, do the following:
1. Turn off the computer and disconnect all power cords from electrical outlets.
2. Remove the computer cover. See “Removing the computer cover” on page 55.
3. Locate the hard disk drive. See “Locating components” on page 11.
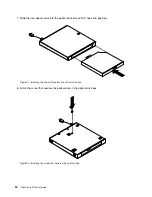
4. Disconnect the signal cable and the power cable from the hard disk drive.
Chapter 5
.
Installing or replacing hardware
57
Summary of Contents for ThinkCentre M73
Page 1: ...ThinkCentre M73 User Guide Machine Types 10AX 10AY 10DK 10DL 10DM and 10DN ...
Page 6: ...iv ThinkCentre M73 User Guide ...
Page 26: ...14 ThinkCentre M73 User Guide ...
Page 34: ...22 ThinkCentre M73 User Guide ...
Page 40: ...28 ThinkCentre M73 User Guide ...
Page 44: ...32 ThinkCentre M73 User Guide ...
Page 104: ...92 ThinkCentre M73 User Guide ...
Page 118: ...106 ThinkCentre M73 User Guide ...
Page 140: ...128 ThinkCentre M73 User Guide ...
Page 146: ...134 ThinkCentre M73 User Guide ...
Page 150: ...138 ThinkCentre M73 User Guide ...
Page 153: ...Appendix E China Energy Label Copyright Lenovo 2013 2015 141 ...
Page 154: ...142 ThinkCentre M73 User Guide ...
Page 156: ...3 Follow the instructions on the screen 144 ThinkCentre M73 User Guide ...
Page 160: ...148 ThinkCentre M73 User Guide ...
Page 161: ......
Page 162: ......


