background image


18 

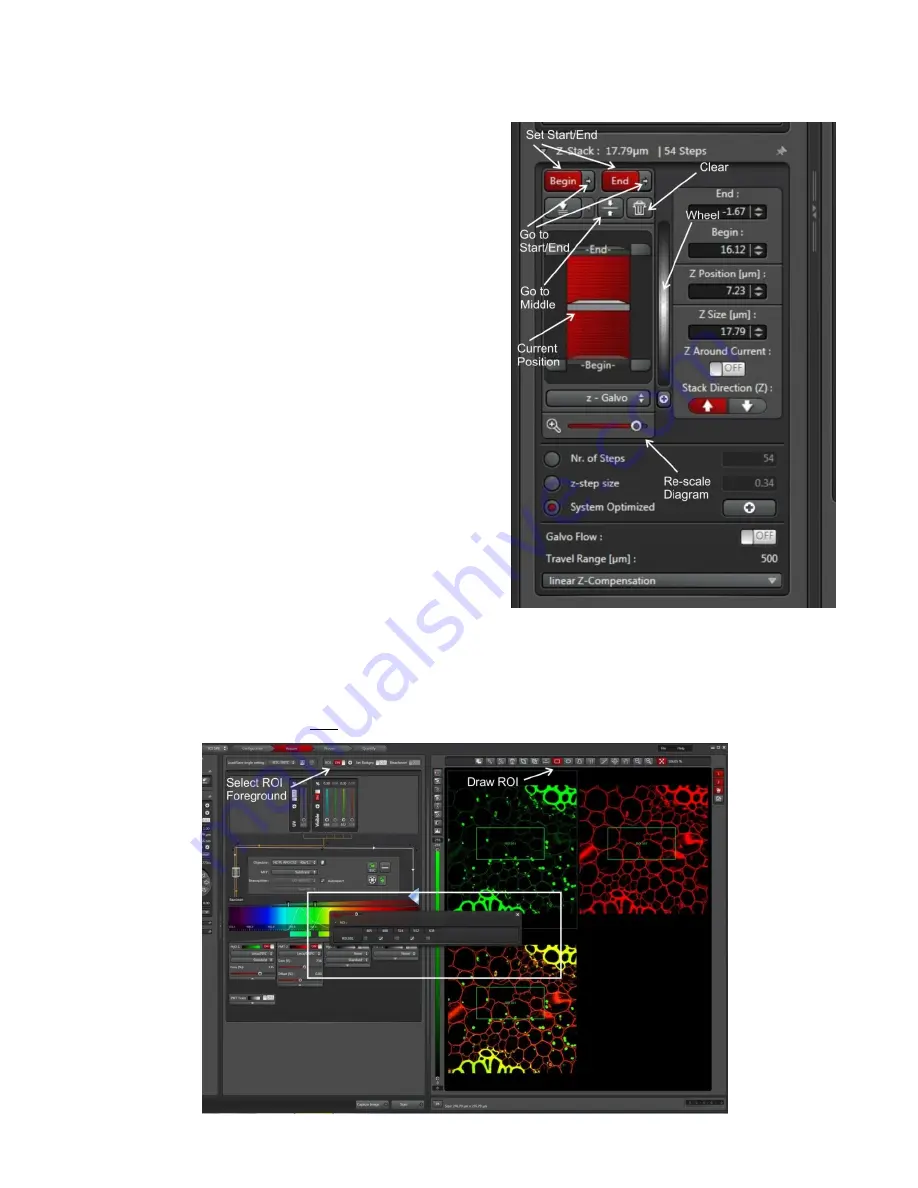
Programming a Stack 

Programming a stack works similarly to the Mark 

First/Last mechanism used in Zeiss LSM. It requires the 

following steps: 

1.


With Live acquisition going, adjust the focus to 

the top of the stack. Use the Confocal Controller, 
or the microscope controller fine focusing knob. 

Fine adjustments may be made using the 

clickable wheel.  

2.


Click on 

Set Start

.  

3.


Re-adjust the focus to the bottom of the stack. 

4.


Click on 

Set End

The number of steps and the step size will be 

automatically computed based on the longest 

wavelength emission band. It can be modified by clicking 

on 

Nr. of Steps

 or 

z-step size

The diagram indicates the size and spacing of the 

stack and the current stage position. It may be re-scaled 

for better viewing using the slider provided. 

Clicking on 

the double-vertical arrow

 button at the 

top moves the stage to the middle of the stack. 

Clicking on the 

garbage can

 icon will delete the 

stack. This should be performed before creating a new 

stack. 

Use of the z-Galvo stage or the nosepiece for vertical 

movement is controlled by the pull-down menu. The z-

Galvo stage is more precise.  

Leave 

Galvo Flow

 off. 

Acquiring from a Region of Interest 

Unlike in Zeiss LSM, images can be acquired from a region of interest (ROI) alone, or from an ROI with 

different conditions for an ROI and the background.  


Summary of Contents for TCS SP8 MP

Page 1: ...ch as stage translation condenser height and objective rotation Thank you and we wish you every success in your imaging We are here to help The Confocal Microscope and Accessories The instrument is a...

Page 2: ...confocal microscopy These detectors are electrically and liquid cooled for decreased background They should only be used in a darkened room and with the microscope covered by a dark room cloth availab...

Page 3: ...wn focusing drive controlled from the microscope controller or the confocal controller or from the software The smaller Super Z Galvo stage rides on top of the large stage and includes the slide holde...

Page 4: ...rcent excitation is required in most circumstances Optics The available objectives illustrated above from left to right are as follows Position Objective Magnification n a Working distance mm Medium 1...

Page 5: ...via two screws as in the Zeiss system The condenser focus knob is to the left side The condenser cannot normally be brought into focus but as long as it is properly centered it will function satisfact...

Page 6: ...cope controller are as follows Screen 1 Status and Illumination Use to adjust illumination intensity and the aperture and field stops in transmitted light TL These are in the microscope body not the o...

Page 7: ...button to move the nosepiece to any position Note that this button will allow the nose piece to travel below the focus position Careless use of it may drive the objectives into the specimen The Home a...

Page 8: ...roscope controller raise the nosepiece all the way to the top or to a level that allows you to change your sample without interference from the objectives Note the Set Clear Limits button bottom left...

Page 9: ...til the specimen is in focus through the eyepieces with the 10X lens Raise it a small amount On the Set Clear Limits button push the Up Down button it will turn red The button will now be labelled Set...

Page 10: ...e clips are positioned at the edges of the slide recess If the clips are hard to move use the hi tech tool provided Place the slide in the slide recess Usually placing the right side first is the most...

Page 11: ...start LAS AF if the confocal power strip is not on There are two questions to be answered during startup Optional selection of multi photon laser Select MP_LASER_OFF Initialization of the large X Y st...

Page 12: ...tor combination The knobs and buttons can be operated while acquiring in Live mode Modifications to them will be reflected in the Acquire pane From left to right they are Left button move the current...

Page 13: ...s The lasers may also be set to Standby mode if not required for a period The Hardware dialog is useful to select the acquisition bit depth The default is 8 bit which is adequate for image acquisition...

Page 14: ...s are available to all users from the pull down menu above Please don t modify them You can also create your own configurations and store them Acquisition Mode The acquisition mode defaults to xyz wit...

Page 15: ...der The image area may also be translated in the directions indicated by the rosette arrows Large lateral translations at low zoom will move the scan range off axis and are therefore not recommended M...

Page 16: ...set of 0 3 Modifiying the Detector Bandwidth The detector bandwidth may be modified in either direction by simply clicking on and dragging its edges The minimum bandwith is 5 nm Adjacent detector band...

Page 17: ...ed to display the results may be changed using the button at the top left of the display window The first click selects a range finding LUT for the active window that can be used to set gains and offs...

Page 18: ...be modified by clicking on Nr of Steps or z step size The diagram indicates the size and spacing of the stack and the current stage position It may be re scaled for better viewing using the slider pr...

Page 19: ...ditions Acquisition conditions within the ROI will be as specified in the Detectors panel Draw the ROI using the tools above the image window In this example a square ROI has been selected To set the...

Page 20: ...hem Up to six sequential acquisition events are possible Events may be any of the available modes e g xy xyz xyt xy Events may be acquired line by line indicated by arrow This is the preferred method...

Page 21: ...21 Alternate Acquisition Modes Line Scan...

Page 22: ...nge Properties window The maximum spectral range is 380 nm to 785 nm The shortest wavelength laser is 405 nm so the shortest practical wavelength is 420 nm unless multi photon excitation is used The m...

Page 23: ...23 Alternate Acquisition Modes Time Series Select xyt or similar acquisition mode...

Page 24: ...rent position for storage Multiple positions can be stored The current position number is reflected below the map The second button deletes the current stored position as reflected by the position num...

Page 25: ...e scanned In this example a 2 x 1 tile map is to be acquired Stage 3 To expand the tiled area move the stage to a new position at an orthogonal extreme as before Click on the Select Position button to...

Page 26: ...window will increment You may delete the current position using Delete Current Position or delete all currently defined positions using the trash can You may also re define the current position A fami...

Page 27: ...xperiments Double click on an experiment to inspect the result or analyze it Right click on an experiment or sub experiment to change its name Use the Save button below in the Experiments window to sa...

Page 28: ...the experiment if it is not already loaded Click on the sub experiment Select the Apply button at the base of the Experiments window to apply the parameters If you wish to check the parameters first S...

Page 29: ...ton laser is on Multiphoton gain and offset All detector settings including acquisition type for HyDs Standard vs Photon Counting Pinhole diameter These parameters are NOT applied Bit depth important...

Page 30: ...30 Process Pane...

Page 31: ...31 Quantify Plane...

Page 32: ...ary to power down the computer or the microscope when switching from MP_LASER_OFF to MP_LASER_ON operation However certain steps must be followed for the correct sequence Switch on the Electro Optical...

Page 33: ...ing the MP Laser Unlike the semiconductor lasers the MP laser must be turned on in the Configuration pane Setting up the MP Laser In the Acquire pane first click MP on Then click on the button to open...

Page 34: ...SER_ON mode will enable the NDD Super HyD detectors These are controlled using a single gain slider The NDD detectors are very sensitive Use low gain and low laser power initially Operate only in a da...

Page 35: ...aser intensity at the specimen The number at the base of the left slider is the excitation wavelength in nm Best practice is initially to set the coarse slider to zero and the fine slider to a low val...

Page 36: ...f the computer Switch off the confocal at the power strip Don t forget to restore the Home and Focus levels if you have changed them Replace the condenser and any non standard objectives in the drawer...

Reviews: