


2-25
Installing and Setting up the Machine > Default Settings of the Machine
Network Setup (LAN Cable Connection)
The machine is equipped with network interface, which is compatible with network protocols such as TCP/IP (IPv4),
TCP/IP (IPv6), IPX/SPX, NetBEUI, and IPSec. It enables network printing on the Windows, Macintosh, UNIX, NetWare
and other platforms.
This section explains the procedure of IPv4 and Bonjour settings for TCP/IP settings. For other network settings, refer to
the
Network on page 8-43
.
TCP/IP Settings
IPv4 setting
Set up TCP/IP (IPv4) to connect to the Windows network.
The default settings are "TCP/IP Protocol: On, DHCP: On, Auto-IP: On".
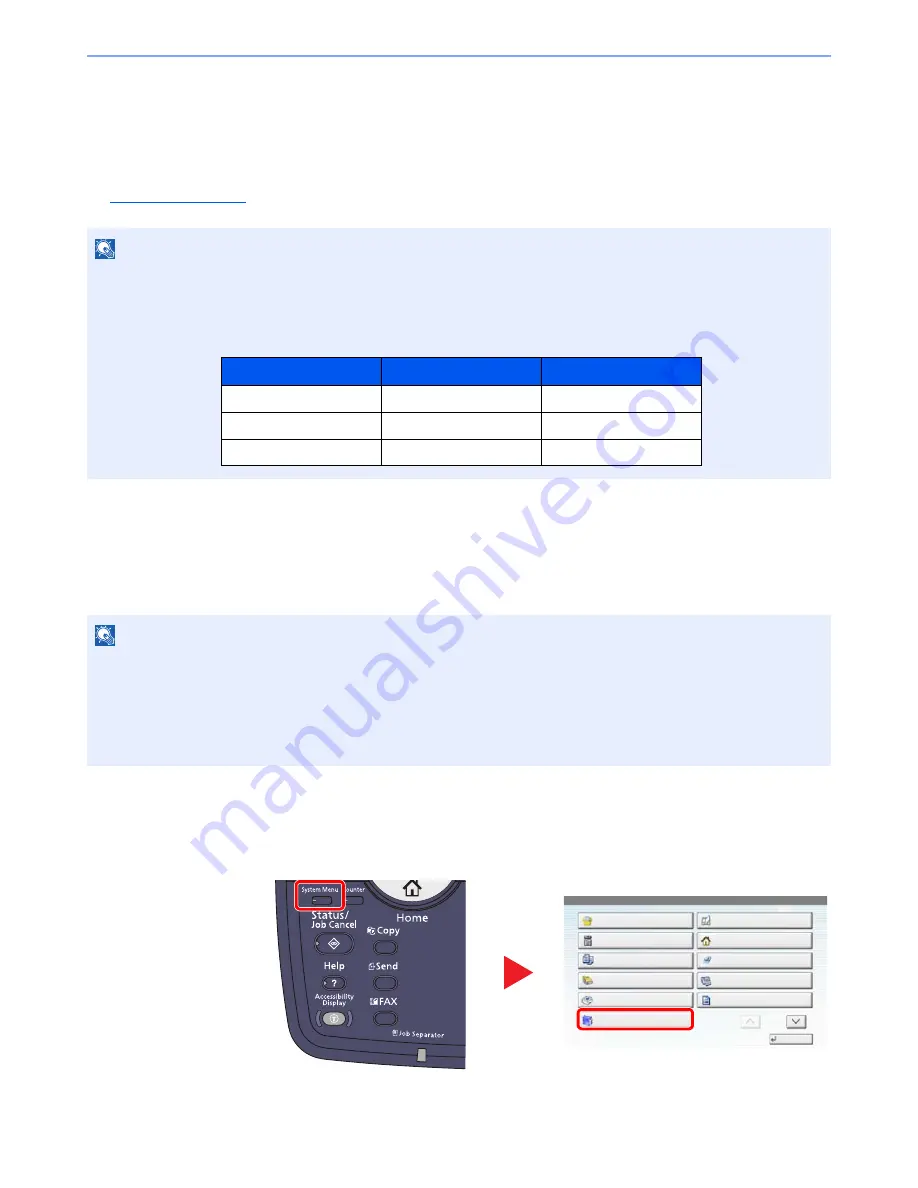
1
Display the screen.
1
Press the [
System Menu
] key and select [System/Network].
NOTE
If user login administration is enabled, you can only change the settings by logging in with administrator privileges.
If user login administration is disabled, the user authentication screen appears. Enter a login user name and
password, and press [Login].
The factory default login user name and login password are set as shown below.
NOTE
• Ask your network administrator for the IP address in advance, and have it ready when you configure this setting.
In the following cases, set the IP address of DNS server on the Command Center RX.
• When using the host name with "DHCP" setting set to "Off"
• When using the DSN server with IP address that is not assigned by DHCP automatically.
Refer to the
Command Center RX User Guide
.
Model Name
Login User Name
Login Password
3501i
3500
3500
4501i
4500
4500
5501i
5500
5500
1
System Menu
Quick Setup Wizard
Close
Common Settings
Copy
Document Box/Removable
Memory
Printer
System/Network
Cassette/MP Tray Settings
Home
Send
FAX
Report
1/2
2
Summary of Contents for TASKalfa 3501i
Page 1: ...OPERATION GUIDE 3501i 4501i 5501i ...
Page 42: ...xli Menu Map ...
Page 60: ...1 18 Legal and Safety Information Notice ...
Page 106: ...2 46 Installing and Setting up the Machine Transferring data from our other products ...
Page 162: ...3 56 Preparation before Use Registering Destinations in the Address Book ...
Page 180: ...4 18 Printing from PC Printing Data Saved on the Printer ...
Page 440: ...9 42 User Authentication and Accounting User Login Job Accounting Unknown ID Job ...
Page 447: ...10 7 Troubleshooting Regular Maintenance 3 4 5 6 CLICK ...
Page 450: ...10 10 Troubleshooting Regular Maintenance 4 5 6 7 1 2 CLICK CLICK ...
Page 485: ...10 45 Troubleshooting Troubleshooting Large Capacity Feeder 1 500 sheet x 2 1 2 3 4 2 1 B1 B2 ...
Page 486: ...10 46 Troubleshooting Troubleshooting Multi Purpose Tray 1 2 3 4 ...
Page 488: ...10 48 Troubleshooting Troubleshooting Duplex unit 1 2 ...
Page 489: ...10 49 Troubleshooting Troubleshooting Duplex Unit and Cassette 1 1 2 3 CLICK ...
Page 491: ...10 51 Troubleshooting Troubleshooting Fixing unit 1 2 3 A1 ...
Page 493: ...10 53 Troubleshooting Troubleshooting Optional Job Separator Inner Job Separator 1 2 3 A1 ...
Page 494: ...10 54 Troubleshooting Troubleshooting Right Job Separator 1 2 3 Bridge Unit Option A1 1 2 ...
Page 495: ...10 55 Troubleshooting Troubleshooting 1 000 Sheet Finisher Option 1 2 3 D1 D2 2 1 D3 ...
Page 498: ...10 58 Troubleshooting Troubleshooting Tray B 1 2 3 Tray C 1 D2 D3 ...
Page 499: ...10 59 Troubleshooting Troubleshooting Conveyor 1 2 Mailbox Option 1 D2 D3 1 2 ...
Page 502: ...10 62 Troubleshooting Troubleshooting 5 Cassette 5 Option 1 2 2 1 ...
Page 505: ...10 65 Troubleshooting Troubleshooting Staple cartridge holder B C 1 2 3 4 2 1 CLICK ...
Page 506: ...10 66 Troubleshooting Troubleshooting ...
Page 551: ......
Page 554: ...Rev 1 2013 6 2N9KDEN101 ...


