background image

P R O D U C T   I N F O R M A T I O N

Printer identification labeling

1-2

FS-6700

1.1

Printer identification labeling

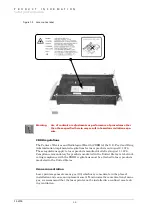
The printer bears its model and serial numbers on a label at its back. The label also 

contains other safety precautions. Figures below show the printer labels in two dif-

ferent destinations (versions).

Figure 1.1 Printer labels

Europe/Asia version

US/Canada version

Summary of Contents for Ecosys FS-6700

Page 1: ...Service Manual L A S E R P R I N T E R Ecosys FS 6700 ...

Page 2: ...oduct of Xerox Corporation IBM Proprinter X 24E is a product of International Business Machine Corporation Epson LQ 850 is a product of Seiko Epson Corporation HP LaserJet 5Si and HP 7475A are product of Hewlett Packard Company Hewlett Packard PCL and HP GL are registered trademarks of Hewlett Packard Company Centronics is a trade name of Centronics Data Computer Corp This Kyocera printer uses Pee...

Page 3: ...ted chapters or sections or documentations Bold letters are also used for emphasis wherever italics may cause a confuse This symbol followed by Warning denotes that the following paragraph s includes precautions which if ignored could result in personal injury and or irrevocable damage to the printer When followed by Caution this symbol denotes that the following paragraph s include the precaution...

Page 4: ...e to be conducted periodically on the printer Four Operation overview Explains basic functions of the printer mechanism including engine and logic controller systems Five Disassembly Instructs removal of parts for both the printer and the option paper feeder Six Troubleshooting Provides countermeasure to follow for troubleshooting Appendix Contents A Printer interface Information regarding the pri...

Page 5: ...onventions Preface v REVISION HISTORY Version Date Replaced pages Remarks 1 00 19 July 98 KE distribution only 1 10 1 Sep 98 Inclusion of the PF 25 VISIT US AT OUR INTERNET HOME PAGE http www kyocera com ...

Page 6: ...Conventions Preface vi This page left intentionally blank ...

Page 7: ...Contents Appendix B S T A T U S P A G E B 1 Status page page B 2 Service information on the status page page B 2 Example of the service status page page B 3 ...

Page 8: ... 1 Ensure that the message display is indicating Ready 2 Press MODE SELECT 3 Press until the message display indicates Others 4 Press 5 Press repeatedly until the message display indicates Service 6 Press until the message display indicates Print status page 7 Press ENTER The question mark appears at the end Print status page 8 Press ENTER again The service status page is printed Service informati...

Page 9: ...igh speed mode 07 ECP mode S00 Serial interface status 00 normal bit0 framing error bit1 overrun error bit2 parity error D00 NVRAM download status 00 none bit4 front panel mes sage data name bit7 error Total page Total print count Second line of the bottom of the page 0064 Top margin inches 1 100 inches FRPO L1 L2 ex 64 100 inches 0126 Left margin inches 1 100 inches FRPO L3 L4 ex 1 and 26 100 inc...

Page 10: ...tal page count for A4 letter size paper Same as above 0 Left margin offset for MP tray cassette EF 1 DU 25 in 1 600 inch Third line of the bottom of the page DN BDE8502337 Serial number for drum unit DK 25 Drum kit name If stored in the drum EPROM AAAFEAI Drum life counter in pages A 0 B 1 C 2 J 9 RS2 Serial interface mode RS2 RS 232C RS4 RS 422A SN SPL8500011 Machine serial number Table B 1 Statu...

Page 11: ...B 5 FS 6700 ...

Page 12: ...terface connection page A 2 A 2 Serial interface page A 4 Serial interface specifications page A 4 Data error information Snn page A 5 Changing the serial interface configuration page A 5 Serial port pin assignment page A 6 RS 232C interface voltage levels page A 7 Connector configurations page A 7 RS 232C protocol page A 8 ...

Page 13: ... Ground GND 5 Data4 PAD3 23 Ground GND 6 Data5 PAD4 24 Ground GND 7 Data6 PAD5 25 Ground GND 8 Data7 PAD6 26 Ground GND 9 Data8 PAD7 27 Ground GND 10 nAck ACKOUT 28 Ground GND 11 Busy BUSYOUT 29 Ground GND 12 PError PERROR 30 Ground GND 13 Select SELECT 31 nInit INIT 14 nAutoFd AUTOFD 32 nFault FAULT 15 Not defined NC 33 Not defined Pull up 1kΩ 16 Logic ground GND 34 Not defined NC 17 Grounded thr...

Page 14: ...he FRPO com mand O2 parameter Auto Feed nAutoFd 14 This signal is used in the Epson version of the Centronics interface to receive a carriage return In high speed mode it is used as an interrupt 5V DC 18 This line is connected to the printer s 5V DC line 5V 0 5V 250 mA maximum fused Prime nInit 31 This signal is used in the standard Centronics interface to enable the computer to reset the printer ...

Page 15: ... to the IBM pin assignment scheme Serial interface specifications The table below summarizes the specifications for the serial interface used in the printer The parameter options can be selected using either the printer s front panel or Prescribe FRPO command Table A 3 Serial interface specifications Item Option parameters Selection Default Interface mode The serial interface mode currently engage...

Page 16: ...an antistatic wrist strap Caution Touch the main circuit board only by the edge Caution Be sure to remove the memory card first if inserted in the printer s memory card slot Refer to chapter 3 and remove the main circuit board out of the printer Locate the jumper connector To change the serial protocol from RS 232C to RS 422A for example carefully remove the jumper connector from the main circuit ...

Page 17: ...er Data set ready 7 SG Signal ground 9 SDA Printer to host Transmit data Reversed RS 422A 10 SDB Printer to host Transmit data RS 422A 18 RDB Host to printer Receive data RS 422A 20 DTR Printer to host Data terminal ready Other Not con nected Undefined Table A 6 Meaning of signals 1 2 Signal Pin Meaning FG 1 This pin is connected directly to the printer frame TXD 2 RS 232C only This output carries...

Page 18: ...for the RS 422A configuration by referring to the diagram last below RS 232C for computers with a DB 9 connector RS 232C for computers with a DB 25 connector SG 7 All signals can transmit between the printer and the host computer to send each signals with a signal ground SDA 8 This output transmits asynchronous inversed form of dif ferential data from the printer to the computer SDB 8 This output ...

Page 19: ...erial interface supports the full baud rates of 300 600 1 200 2 400 4 800 9 600 and 19 200 38 400 57 600 and 115 2k bps For adjusting serial interface parameters including baud rate parity etc refer to chapter 7 in the printer s user s Manual Computer serial port DB 25 Printer serial port DB 25 GND 1 TXD 2 RXD 3 RTS 4 CTS 5 DSR 6 GND 7 DTR 20 1 FG 2 TXD 3 RXD 4 RTS 5 CTS 6 DSR 7 SG 20 DTR Computer...

Page 20: ... 16 E2 Laser scanner motor error page 6 21 E3 Laser beam detection error page 6 25 E4 Fuser heater error page 6 28 E5 Eraser error page 6 30 ED Flash ROM error page 6 31 E9 Toner motor error page 6 31 F0 Front control panel error page 6 32 F1 System ROM error page 6 32 F2 Main memory error page 6 32 F3 General failure page 6 32 False error Feed unit cover open page 6 32 6 7 Print quality problems ...

Page 21: ... boards is on 6 2 Overall wiring diagram page 5 Liaison board KP 620 Table 6 1 KP 620 connectors Loc above Connector Connected to Check points 1 CN8 Fan large 2 CN3 Main motor E1 pin 3 MOTOR pin 1 24V 3 CN4 Registration clutch 4 CN1 Engine board KP616 CN14 5 CN5 Feed clutch 6 CN7 Manual feed clutch 7 CN9 Cassette detect switch 8 CN2 Front panel 9 CN6 Manual feed solenoid ...

Page 22: ...ectors at the right side of the printer are mounted on the connect board These connectors derive engine signals For pin assignments refer to 6 2 Overall wiring diagram page 5 Table 6 2 CN13 Scanner CN1 pin assignment Pin No Signal 1 5V 2 GND 3 LONB 4 LASER 5 VDOUT 6 VDOUT 7 PD 8 SCCLK 9 SCRDY 10 SCANNER 11 GND 12 12V ...

Page 23: ...g Board layouts 6 4 FS 6700 Fuser board KP 505 YC 721 Table 6 3 YC 721 Pin No Signal 1 FUPSD 2 24V 3 FDNSD 4 PFULL 5 THERM 6 EXITJ 7 GND 8 5V 1 2 11 12 1 2 17 18 CN13 for laser scanner unit CN14 for KP 620 board 1 8 ...

Page 24: ...LENGTH SW3 1 2 1 2 1 2 CN27 1 2 3 4 5 6 7 8 9 10 24V OPSCK 5V OPRDY OPSL0 OPSL1 OPSL2 OPSDI OPSDO GND TO OPTION UNIT 10 9 8 7 6 5 4 3 2 1 10 9 8 7 6 5 4 3 2 1 CN27 1 2 3 5V HANDS GND 1 2 3 1 2 3 1 2 3 GND HAND 5V MANUAL FEED PAPER SENSOR MANUAL PAPER FEED ROLLER TONER MOTOR 1 2 3 4 5 6 7 8 9 10 11 12 13 14 15 24V MHVDR THVDR1 CHVON THVDR2 PSEL SPVDR1 SPVDR2 BIAS HVCLK TONR TNSCN 5V GND TNRDR S2023...

Page 25: ...ocates the error with a specific item it calls for operator s atten tion by showing the appropriate message on the operator panel display The diagnostic test is done on the following systems simultaneously Engine system E errors Controller system F errors Flowcharts on the following pages show the order and the items diagnosed in each system Note Diagnostic test is cancelled if one of the user acc...

Page 26: ... Engine is ready 8 E4 Heater error 14 Polygon motor OK 4 E4 Fuser error 10 E6 Engine ROM error 9 The heater lamp is turned on The scanner polygon motor revolves Eraser array OK 5 The polygon motor stops revolving The main motor revolves The eraser array turns on Main motor OK 6 The eraser array turns off Heater temperature OK 7 The main motor turns off No Yes Yes Yes Yes Yes No No No No No ...

Page 27: ... to the results of diagnostics refer to section Service errors on page 6 19 Power on 1 System ROM cheksum OK 2 Communication established between engine and main CPUs 3 Yes F2 System memory error 8 Controller is ready 5 System memory OK 4 E0 Communication error 7 F1 System ROM error 6 No Yes No No Yes ...

Page 28: ...eder Duplex unit rear cover open User recoverable error with DU 25 duplexer Replace Toner Clean printerb User recoverable error Missing Waste toner bottle User recoverable error If not recovered refer to Replace Waste toner bottle User recoverable error Clean printer Press CONTINUE User recoverable error Paper jamb User recoverable error Face down tray paper fill User recoverable error MEMORY CARD...

Page 29: ...Out Option interface Error User recoverable error Toner low TK 20 Clean printer User recoverable error Warning Low memory Battery error MEMORY CARD User recoverable error Format error MEMORY CARD User recoverable error Warning battery MEMORY CARD User recoverable error Ready Table 6 4 Message priority Error message Category Remarks ...

Page 30: ... Note the maintenance message on the message dis play and consult Table Side cover Open Open the side cover then close tightly Paper feed unit Open Open the paper feed unit then close tightly Face down tray paper full The face down tray has become full approx 250 pages Remove all printed pages from the face down tray When the printer senses that the face down tray is empty again it will continues ...

Page 31: ...toner bottle See Section The printer does not operate when this message is dis played Memory overflow Press CON TINUECONT The total amount of data received by the printer exceeds the printer s internal memory Try adding more memory expansion RAM Press the CONTIN UECONT key to resume printing You can abandon printing by the CANCEL key Print overrun Press CON TINUECONT The data transferred to the pr...

Page 32: ...ng flashes to indicate that a loss of raster data occurred when the data was compressed to be fitted within the currently available memory Flashing FIT extinguishes automatically when the job times out the printer receives the next data from the host computer or if you press any key on the printer s control panel Try adding more memory in the printer to prevent this error Processing PAR 600 A4ÍPro...

Page 33: ... the destination 09 SRAM Memory card data full error An attempt was made to write data exceeding the capacity of the memory card Abandon the writing operation on the host computer first Press CONTINUE key when the message turns to Waiting press FORM FEED key Ready 10 Reserved 11 SRAM Data name full An attempt was made to write more than 127 destination data names Press CONTINUE key Ready 12 Reserv...

Page 34: ...the appropriate instructions provided in this section Call service person Fn 123456 Controller error n 0 1 2 Follow the appropriate instructions provided in this section Call service person Cn 123456 Option equipment error n 0 1 2 Ö This message per tains to either the sorter or duplexer C1 through C3 are relevant to the duplexer C4 through C6 to the sorter See the service manual appropriate to th...

Page 35: ...ne system deactivating the progam flash ROM Verify connector connections Replace the engine board and or the main controller board Table 6 9 E1 error Meaning Suggested causes Corrective action The main motor is over torqued Overcurrent in the main motor circuitry due to an axcessive torque Loose connector to motor Defective gate array on the engine board No response from the main motor due to the ...

Page 36: ...of KP 620 No No Yes Is 3 MOTOR of CN3 of KP 620 L Replace harness S02259 bet motor and KP 620 Turn printer power off then on agai Print a status page Yes Turn printer power off then on again Print a status page 3 Is 1 of CN1 of motor 24V Yes Does motor clock appear at 4 of CN1 of motor Yes 2 No 1 Turn printer power off then on again Print a status page No Replace driver unit ...

Page 37: ...clock appear at 10 of CN1 of KP 620 Yes Conducted Yes No 1 Replace harness bet motor and KP 620 S02259 Turn printer power off the on again Print a status page Replace KP 620 board Does motor clock appear at 10 of CN14 of KP 616 No Turn printer power off then on again Print a status page Replace harness bet KP 620 and KP 616 Yes Connect tester bet 10 of CN14 of KP 616 and 46 of CN21 of KP 614 Repla...

Page 38: ...ted Yes No 2 Replace harness bet main and KP 620 Replace KP 620 Is volt bet 14 and 16 of CN14 of KP 616 24V No Connect tester bet 14 and 16 of CN14 of KP 616 Replace harness bet KP 620 and KP 616 Yes Connect tester bet 14 16 of CN 14 of KP 616 and either pin of 37 41 45 49 53 and 57 of CN21 of KP 614 Replace KP 616 Replace KP 614 No Is volt bet 5 and 9 of CN22 of KP 614 24V Replace KP 628 No Yes ...

Page 39: ... printer power off then on again Print a status page Is 12 of CN14 of KP 616 Yes Conducted Yes 3 Replace KP 620 Turn printer power off then on again Print a status page Replace harness bet KP 620 and KP 616 Connect tester 12 of CN14 of KP 616 and 50 of CN21 of KP 614 Replace KP 616 Replace KP 614 No No ...

Page 40: ... not deliver a synchronous output L within the predetermined period of time Timeout in the predeter mined period of lead time which the scanner motor speed has to be reached at start up SCRDY Connector insertion error Defective gate array on the engine board Time out dur to the defec tive scanner motor driver transistor Follow the flow chart on the next page ...

Page 41: ... tester to 10 of CN13 of KP 616 Turn printer power off then on again Print a status page Does clock appear at 8 of CN1 of KP 622 Does clock appear at 8 of CN13 of KP 616 No Is 10 of CN13 of KP 616 Yes No Turn printer power off then on again Turn printer power off then on again Print a status page Replace harness bet KP 616 and scanner unit No Yes No Yes 1 2 3 Yes ...

Page 42: ...1 Is 9 of CN1 of KP 622 low Yes Turn printer power off then on again Print a status page Connect tester to 9 of CN13 of KP 616 and 26 of CN21 of KP 614 Conducted Replace KP 614 Yes Replace laser scanner unit No Replace harness bet KP 616 and laser scanner unit Replace KP 616 No Are 14 16 of CN14 of KP 616 24V Repplace KP 628 No Yes Connect tester bet 14 16 of CN14 of KP 616 and either of 37 41 45 ...

Page 43: ...6 24 FS 6700 Figure 6 7 E2 error End 2 Connect tester bet 8 of CN13 of KP 616 and 22 of CN21 of KP 614 Conducted Replace KP 614 Yes Replace KP 616 No 3 Connect tester bet 10 of CN13 of KP 616 and 30 of CN21 of KP 614 Conducted Yes No ...

Page 44: ... action Beam detection is failed The photo detector board does not deliver a synchronous output L No beam hit due to the laser diode defect PD Improper connector inser tion Soiled defective beam detector pin photo diode sensor Defective safety lock Unoperative gate array input port Follow the flow chart on the next page ...

Page 45: ...Yes Is 4 of CN13 of KP 616 low Does low level pulse appear at 7 of CN13 of KP 616 Replace harness bet KP 616 and laser scanner unit Turn printer power off then on again Replace laser scanner unit No Yes No Yes Does low level pulse appear at 7 PD of CN1 of KP 622 Turn printer power off then on again Yes No Turn printer power off then on again Print a status page Yes Turn printer power off then on a...

Page 46: ...6 27 FS 6700 Figure 6 9 E3 error Continued 1 Connect tester 7 of CN13 of KP 616 and 18 of CN21 of KP 614 Conducted Replace KP 614 Yes Replace KP 616 No 2 Connect tester to 4 of CN13 of KP 616 and 6 of CN21 of KP 614 Conducted Yes No ...

Page 47: ...The fuser heater is not intact due to disconnection or the circuit failure Blown out thermistor Improper connector inser tion Blown out halogen heater Blown out thermostat Comparator defect on the engine board Defective engine CPU input port Defective gate array input output port opera tion Follow the flow chart on the next page ...

Page 48: ...d remove power cable Less than 1MΩ Yes No Measure DC resistance between 5 and 8 of YC721 on KP 499 fuser board 180 220 C End Replace KP 614 board If not solved replace power supply Replace fuser unit Replace KP 614 board If not solved replace harness between KP 499 and KP 614 boards Measure fuser roller temperature Replace fuser unit Yes Yes No No ...

Page 49: ...oes not reach to the eraser Blown out LED chip s Connector insertion error Defective gate array input output port Follow the flow chart on the next page Measure resistance between 1 and 3 of YC741 on KP 500 Infinity Replaceeraser drum unit If not recovered replace KP 500 Yes Replace harness between KP 614 and KP 505 If not recovered replace KP 505 No Take the drum unit out E5 Eraser error ...

Page 50: ... flash ROM Replace the engine board Table 6 15 E9 error Meaning Suggested causes Corrective action The toner motor is over torqued Overcurrent in the toner motor circuitry due to an axcessive torque Loose connector Defective gate array on the engine board Defective toner motor overcurrent detector Follow the flow chart on the next page E9 Toner motor error Replace with a new developer unit E9 goes...

Page 51: ...tive action Checksum is failed with EPROMs on the main con troller board Replace the main controller board To remove the main controller board see page 2 9 Table 6 18 F2 error Meaning Suggested causes Corrective action Checksum is failed with the RAM on the main controller board Replace the main controller board To remove the main controller board see page 2 9 Table 6 19 F3 error Meaning Suggested...

Page 52: ...Figure 6 13 False error Feed unit cover open False error Feed unit cover open Connect tester to 10 of CN1 on KP 628 Is 10 FCOVER low Replace KP 614 board No Connect tester to 10 of CN22 on KP 614 Is 10 low Replace KP 628 Replace KP 614 Yes No Yes ...

Page 53: ...rs 6 34 FS 6700 Figure 6 14 Falser error Top cover open False error Top cover open Is 11 TCOVER of CN1 on KP 628 low Replace KP 628 board No Connect tester to 11 of CN22 on KP 614 Is 11 low Replace KP 628 Replace KP 614 Yes No Yes ...

Page 54: ...ors 6 35 FS 6700 Figure 6 15 False error Side cover open False error Side cover open Is 1 SCOVER of CN1 on KP 628 low Replace KP 628 board No Connect tester to 1 of CN22 on KP 614 Is 1 low Replace KP 628 Replace KP 614 Yes No Yes ...

Page 55: ... 6700 Figure 6 16 False error Missing waste toner bottle False error Missing waste toner bottle Is 4 TNCON of CN1 on KP 628 low Replace KP 628 board No Connect tester to 4 of CN22 on KP 614 Is 4 low Replace KP 628 Replace KP 614 Yes No Yes ...

Page 56: ...o this take out the main charger unit from the printer then reinstall it care fully Check point Suggested remedy Clean the main charger Open the side drum access cover Pull out the green knob on the main charger Pull and push in several times For details see page 5 3 3 Cleaning the printer Note the spacing of the defects Use the Repetitive defect gauge on page6 43 If the defects occur at regular i...

Page 57: ... knob in and out several times Check point Suggested remedy Check the front display for indication of Toner low If the display shows that the toner is running out replace the toner container with a new one See page 3 Toner container replacement Check the print density set ting Operate the operator panel to see if the print density set ting is adequate Check the paper thickness setting If thick pap...

Page 58: ...colored cleaning knob in and out several times Check point Suggested remedy Check toner contamination in various parts Dirty edges and back of the paper can be caused by toner accummulated on such parts as the paper chute paper transportation paths the bottom of the developer unit and the fuser inlet Clean these areas and parts to remove toner Check the transfer roller If the transfer roller is co...

Page 59: ... additioin to the regular cleaning procedure made automatically in a photographics cycle In this mode the drum turns for the period of approximately three minutes with no main charging dispersed over the drum Since the cleaning blade in the drum continu ously attempt to scrape soils and paper dust on its surface the drum can be brought in a clean state Table 6 20 Papser size matrix Paper size Swit...

Page 60: ...E 2 Press repeatedly until Others is indicated 3 Press 4 Press repeatedly until Service is indicated 5 Press The display should show Developer 6 Press the display should show Drum 7 Press ENTER The display should show 8 Press ENTER The drum then starts turning and stops after approx 3 minutes The printer reverts to Ready ...

Page 61: ...Troubleshooting Print quality problems 6 42 FS 6700 This page left blank intentionally ...

Page 62: ...m unit page 5 8 Replacing the drum unit page 5 9 Main charger unit page 5 9 Top side cover page 5 10 Removing covers page 5 10 Removing front cover page 5 11 Removing the main motor page 5 12 Removing the drive assembly page 5 12 Removing the fuser unit page 5 13 Removing the heater lamp page 5 13 Installing the fuser roller page 5 14 Removing the thermistor and thermal cutout page 5 15 Replacing ...

Page 63: ... is un plugged from the printer See Warning below Warning To avoid injury to human bodies make sure that AC power is removed and the power cord is unplugged from both the power line and the printer Screws hardware Screws and hardware used in the printer are listed in the beginning section of the Parts catalog Symbol numbers also given in the list for these screws are referred to in the disassembli...

Page 64: ...tempt to operate the printer with a component removed Caution The printer uses electrostatic sensitive parts inside on boards laser scanner etc Provide an antistatic discharging device such as a wrist strap that can effectively discharge your body before touching boards laser scanner etc Removing the developer unit Open the top cover The toner container must be removed first Pull the toner con tai...

Page 65: ...he developer Do not place floppy disks near the developer Shipping the developer unit If the developer unit is shipped the developer must be shipped separately if the printer is shipped it must be fit in the shipping container supplied originally with the printer First flap the magnet roller protective cover down Put the developer unit in the plastic bag supplied with the shipping container Put th...

Page 66: ...be removed from the printer without using tools First be sure to remove the paper cassette entirely out Otherwise the paper feed unit will not come out To remove the paper feed unit first remove the paper cassette out While holding and pushing the locking tabs at both sides of the paper feed unit draw the paper feed unit all the way out 1 The protective cover is not provided with the developer uni...

Page 67: ...xle holders that hold the roller axle at both ends Hold and pull the gear at the right end of the roller up then remove the left end Cleaning the transfer roller To clean the transfer roller hold it by its gear so that the roller hangs down hori zon tally Use a vacuum cleaner moving nozzle along the roller but do not let the nozzle directly touch on the roller Thoroughly clean the entire surface o...

Page 68: ...e paper feed unit out of the printer To remove the paper feed unit see page 5 5 Removing the paper feed unit Remove the registration rollers cover The cover is locked by two catches that lock it onto the paper feed unit These catches can be accessed through the holes on the cover Insert a screw driver as shown below and release the locks ...

Page 69: ...r underneath Removing the drum unit Caution Before removing the drum unit be sure to remove the developer unit and draw out the paper feed unit half way Do not attempt to forcibly pull out the drum without first having done all of these procedures Top regist roller Top regist roller 1 Remove this screw and pull out the drum unit 2 Draw the feed unit half way out 3 Remove the developer unit ...

Page 70: ...e the drum unit into the printer be sure to align the guides and rails on the drum unit with each other Do not force to slide the drum unit in unless they are properly aligned with each other Main charger unit Pull the main charger until it stops While pushing the white locking peg in wards the printer pull the main charger unit all the way out The main charger unit is explained on page 3 5 Main c...

Page 71: ...n pull it upwards to remove Removing covers The left and right side covers are snapped onto the chassis by catches and holes No screws are used To remove the left and right side covers release those catches and holes at the front and the rear from each other by inserting a small flat blade screw driver between the cover and the chassis Then free the catches at the bot tom by lowering the top side ...

Page 72: ...e two screws at the front side Detach the catches at the left and right bottom of the cover as marked by circles below To disengage these catches proceed to the next step Remove the ground wire and the connector below Disengage the catches at the left and right shown bottom of the cover ...

Page 73: ...otor Remove the right side cover first page 5 10 Removing covers Remove the four screws Then remove the connector Removing the drive assembly Remove the right side cover first page 5 10 Removing covers Remove the five screws Remove the connectors to Remove the drive assembly ...

Page 74: ...until it cools down Detach all connectors from the fuser unit first Remove the four screws Pull out the fuser unit from the printer Removing the heater lamp Warning The heater is extremely hot immediately after the printer was run ning Allow substantial period of time until it cools down Also the heater is fragile Handle it with great care Remove the two screws Remove the cover from the fuser unit...

Page 75: ...ter lamp be sure that the lamp terminal end is properly hitched by the fuser terminal Installing the fuser roller Remove the four screws to remove the cover When lifting the cover hold the heat roller so as not to drop the roller To remove the heat metal roller first remove plate fuser up by using a small flat blade screwdriver as shown below Note Special care should be taken not to let the screwd...

Page 76: ...Disassembly Disassembly Main unit printer 5 15 FS 6700 Removing the thermistor and thermal cutout plate fuser up Heat roller Thermistor Thermal cutout ...

Page 77: ...he heat roller retainer back in place Removing the controller box Before removing the controller box several parts must be removed first Refer to the following pages and refer to the section titled as follows page 5 3 Removing the developer unit page 5 8 Removing the drum unit page 5 10 Top side cover page 5 10 Removing covers page 5 11 Removing front cover Remove the screw below This also disenga...

Page 78: ...sassembly Main unit printer 5 17 FS 6700 Remove the high voltage board at the left side of the printer To do this remove the three screws Remove the two screws at the left side of the printer Disengage the connectors ...

Page 79: ...embly Main unit printer 5 18 FS 6700 Remove the two screws on the front side Hold the upper frame and lift to remove On the controller box remove the six screws on top and the two screws at the rear side Remove the cover ...

Page 80: ...Disassembly Disassembly Main unit printer 5 19 FS 6700 Removing the face down pulley assembly Remove the screw to remove the face down pulley assembly Face down assembly ...

Page 81: ... paper feeder PF 25 for the FS 6700 printer Before proceeding Disconnect power from the printer Remove the printer and the duplexer if installed Removing the feed roller Remove the paper cassette from the option paper feeder Then remove the paper feed roller by unlatching it at both ends 8 cdr Removing the top cover Remove the six screws on the top cover 9 cdr ...

Page 82: ...FS 6700 Removing the motor assembly To remove the motor assembly remove the two screws atop that secure the motor bracket and the one screw at the bottom 10 cdr The following picture shows the motor assembly and the gears mounted on the motor bracket ...

Page 83: ...Disassembly Disassembly Option paper feeder 5 22 FS 6700 This page left blank intentionally ...

Page 84: ... WUD IHHGLQJ SDJH 7055 3DSHU MDP VHQVLQJ SDJH 7056 717 DVLF HQJLQH IXQFWLRQV SDJH 7057 DVLF VHTXHQFH RI RSHUDWLRQ SDJH 7057 718 QJLQH FRQWUROOHU V VWHP SDJH 7058 ODVK PHPRU SDJH 7058 3ULQW GHQVLW FRQWURO SDJH 7058 LJK0YROWDJH JHQHUDWRU SDJH 7058 DVHU VFDQQHU FRQWURO SDJH 7058 3RO JRQ PRWRU FRQWURO SDJH 7058 6DIHW LQWHUORFN SDJH 7059 7KH HQJLQH JDWH DUUD SDJH 705 3LQ DVVLJQPHQW SDJH 705 3RZHU VXSSO...

Page 85: ...RJUDSK ýV VWHPýXVHGýLQýWKHýSULQWHUýýDUHã çííýGSLýUHVROXWLRQ 1HZO ýGHYHORSHGýDPRUSKRXVýVLOLFRQýGUXPýZLWKýQRýKHDWLQJýGHYLFH LRGHýODVHUýVFDQQLQJ 0RQRýFRPSRQHQWýWRQHU OHFWURSKRWRJUDSKLF V VWHP 7KHýHOHFWURSKRWRJUDSK ýV VWHPýRIýWKHýSULQWHUýSHUIRUPVýDýF FOLFýDFWLRQýPDGHýRIý VHYHQýVWHSVýDVýGLDJUDPPHGýEHORZï LJXUH 714 OHFWURSKRWRJUDSKLF F FOH PRUSKRXV0VLOLFRQ GUXP 7KHýSULQWHUýXVHVýWKHýORQJýODVWLQJýDPRUSKRX...

Page 86: ...LQýFKDUJHUýZLUHýõLQýWKHýPDLQýFKDUJHUýXQLWôý PDUNHGý ýLQýWKHýGLDJUDPïý ý VýWKHýGUXPýõ ýDERYHôýURWDWHVýLQýDý FOHDQýõQHXWUDOô ýVWDWHñýLWVýSKRWRFRQGXFWLYHý OD HUýLVýJLYHQýDýXQLIRUPñýSRVLWLYHýõòôýHOHFWULFDOýFKDUJHýGLVSHUVHGýE ýWKHýPDLQý FKDUJHUýZLUHýõ ôï XHýWRýKLJKðYROWDJHýVFRURWURQýFKDUJLQJñýWKHýFKDUJLQJýZLUHýFDQýJHWýFRQWDPLQDWHGýE ý R LGL DWLRQýDQGýWKHUHIRUHýPXVWýEHýFOHDQHGýSHULRGLFDOO ýIURPýWLPHýWRý...

Page 87: ...GHýDFFXPXð ODWHGýDURXQGýWKHýFKDUJLQJýZLUHï 7RQHU 7KHýWRQHUýLVýIHGýIURPýWKHýWRQHUýSDFNý7 ðëíî ïý7KHýWRQHUýLVýFRPSULVHGýRIýWKHýIROORZð LQJýVXEVWDQFHVï SRVXUH 7KHýFKDUJHGýVXUIDFHýRIýWKHýGUXPýõû ûôýLVýWKHQýVFDQQHGýE ýWKHýODVHUýEHDPýIURPýWKHý VFDQQHUýXQLWýõû ûôï 6LQJOH FRPSRQHQW WRQHU 7 0532 0 5HVLQ 0 HUULWH 0 6LOLFD 0 3ROLVKHU ...

Page 88: ...HGñýWKHýSRWHQWLDOýRQýWKHýSKRWRFRQGXFWRUýLVý DOVRýORZHUHGýWRýëí9ñýHIIHFWLYHO ýGULYLQJýWKHýFKDUJHýWKURXJKýWKHýDð6LýOD HUýGRZQýWRý WKHýDOXPLQXPýEDVHï 6FDQQHU XQLW 7KHýçííýGSLýVFDQQHUýXQLWýLQFOXGHVýWKHýGLRGHýODVHUýWKDWýSURGXFHVýWKHýçæíýQPýZDYHð OHQJWKýODVHUýEHDPïý7KLVýZDYHOHQJWKýLVýVSHFLILFDOO ýGHVLJQHGýWRýPDWFKýWKHýSKRWRFRQð GXFWLYHýUHVSRQVHýRIýDPRUSKRXVýVLOLFRQïý 57305939 DVHU EHDP 57305939 DVHU EHD...

Page 89: ...ïý 7KHýHIIHFWLYHýOHQJWKýRIýOLQHýõû ñûýû ûýEHORZôýWKHýODVHUýEHDPýGUDZVý RQýWKHýGUXPýEHFRPHVýORQJHUýDVýWKHýODVHUýEHDPýKLWVýFORVHUýWRýWKHý GUXPýHGJHVïý QýWKHýILJXUHýEHORZñýGLVWDQFHVýUHSUHVHQWHGýE ýû ûý DQGýû ûýDUHýQRWýWKHýVDPHýõ ôýXQWLOýWKHýIWKHWDýOHQVHVýDUHýSURð YLGHGýEHWZHHQýWKHýSRO JRQýPLUURUýDQGýWKHýGUXPýõ ôï LYHUVLRQýPLUURU GLYHUWVýWKHýODVHUýEHDPýYHUWLFDOO ýRQWRýWKHýGUXPïý1RWHýWKHýGLIð IXVHGýODV...

Page 90: ...YHU ýìîçííýLQFKýGLVWDQFHýKRUL RQWDOO ïý7KHýGLDPHWHUýRIýDýGRWýLVýW SLFDOO ýæíý WRýåíýµPïý KHQý 5ëýLVýRQñýWKHýLQWHQVLW ýRIýWKHýEHDPýLVýVZLWFKHGýLQýIRXUýGHJUHHVý FRPSHQVDWLQJýIRUýWKHýVPRRWKHGýLPDJHï 6 QFKURQL LQJýWKHýRXWSXWýGDWDýZLWKýRQHýVFDQQLQJýOLQHýLVýDFKLHYHGýE ýWKHýSKRWRýVHQð VRUýSURYLGHGýQH WýWRýWKHýILUVWýPLUURUïý WýWKHýEHJLQQLQJýRIýHDFKýODVHUýVZHHSLQJñýWKHý EHDPýKLWVýWKHýSKRWRýVHQVRUýZKLFKýLQý...

Page 91: ...GýDUHDVýRIýWKHýGUXPýUHSHOýWKHýSRVLWLYHO ðFKDUJHGýWRQHUýDVý WKHVHýDUHDVýPDLQWDLQýWKHýSRVLWLYHýFKDUJHï 7KHýGHYHORSLQJýUROOHUýLVýDOVRýELDVHGýZLWKýDQýDFýSRWHQWLDOýWRýDSSO ýFRPSHQVDWLRQýWRý WKHýWRQHUªVýDWWUDFWLRQýDQGýUHSHOOLQJýDFWLRQVýIRUýPRUHýFRQWUDVWýLQýWKHýGHYHORSPHQWï 7KHýIROORZLQJýGLDJUDPýGHSLFWVýWKHýFKDQJHýLQýWKHýGUXPýVXUIDFHýSRWHQWLDOýGXULQJý GHYHORSPHQWïý7KHýYHUWLFDOýGLVWDQFHýUHUHSUHVHQWVýWKHýG...

Page 92: ...JLYHQýE ýWKHýWRQHUýLWVHOIýDQGýWKHýWUDQVIHUý UROOHUýõ ýEHORZôïý7KHýWUDQVIHUýUROOHUýLVýQHJDWLYHO ýELDVHGýVRýWKDWýWKHýSRVLWLYHO ý FKDUJHGýWRQHUýLVýDWWUDFWHGýRQWRýWKHýSDSHUýZKLOHýLWýLVýSLQFKHGýE ýWKHýGUXPýDQGýWKHý WUDQVIHUýUROOHUï 7KHýSDSHUýLVýDXWRPDWLFDOO ýSHHOHGýRIIýWKHýGUXPýEHFDXVHýRIýWKHýVPDOOýGLDPHWHUýRIýWKHý GUXPïý7RýSUHYHQWýWKLQýSDSHUýZUDSSLQJýDURXQGýWKHýGUXPñýWKHýVWDWLFýGLVFKDUJHUý EUXVKýLVýSU...

Page 93: ...DOXHï XVLQJ 7KHýWRQHUýRQýWKHýSDSHUýLVýSHUPDQHQWO ýIXVHGýRQWRýWKHýSDSHUýDVýLWýSDVVHVýEHWZHHQý WKHýIORULQðILQLVKHGýKHDWýUROOHUýõ ýEHORZôýDQGýWKHýSUHVVXUHýUROOHUýõ ýEHORZôýLQýWKHý IXVHUýXQLWïý7KHýWRQHUýLVýPROWHQýDQGýSUHVVHGýLQWRýWKHýSDSHUïý7KHýKHDWýUROOHUýKDVýDý KDORJHQýODPSñýWXUQLQJýIUHTXHQWO ýRQýDQGýRIIýWRýPDLQWDLQýDýSUHKHDWýWHPSHUDWXUHýDWý DSSUR LðPDWHO ýìæè ï 7KHýKHDWýUROOHUýWHPSHUDWXUHýLVýFRQVWD...

Page 94: ...IUHVKHUýUROOHUýõ ý EHORZôïý7KHýUHIUHVKHUýUROOHUýGULYHVýWKHýWRQHUýWRýWKHýVSLUDOýõILQVôýUROOHUýõ ýEHORZôýDWý RQHýHQGýRIýZKLFKýWKHýZDVWHýWRQHUýERWWOHýLVýFRQQHFWHGýWRýFROOHFWýWKHýZDVWHýWRQHUï IWHUýWKHýGUXPýLVýSK VLFDOO ýFOHDQHGñýLWýWKHQýPXVWýEHýFOHDQHGýWRýDQýHOHFWULFDOO ýQHXð WUDOýVWDWHïý7KLVýLVýQHFHVVDU ýWRýHUDVHýDQ ýUHVLGXDOýSRVLWLYHýFKDUJHVñýUHDG ýWRýDFFHSWý WKHýQH WýXQLIRUPýFKDUJHïý7KHýUHVLGXDOýFK...

Page 95: ...UýEHJLQVý UHYROYLQJýõ ýDERYHôïý 6ý 7XUQVýRQýWKHýGHYHORSHUýELDVýõRQýWKHýPDJQHWýUROOHUôïý7KHýGXUDWLRQý RIýWKLVýVLJQDOýLVýGHSHQGHQWýRQýWKHýFXUUHQWýSDSHUýVL Hýõ ôýDQGý WXUQVýRIIýEHWZHHQýSDJHVýõ ôïý 7 9 5ýõ7UDQVIHUý LJKý9ROWDJHý 5LYHôý 7XUQVýRQýWKHýWUDQVIHUýELDVïý1RWHýWKDWýWKHýWUDQVIHUýELDVýLVýUHYHUVHý õòêíí9ôýDWýWKHýEHJLQQLQJýRIýDýSULQWýMREýõ ôXQWLOýWKHýSDSHUýLVý DFWXDOO ýIHGýRQWRýWKHýWUDQVIHUýUROOHUï...

Page 96: ...WLPLQJ FKDUWV 7KHýIROORZLQJýFKDUWVýVKRZýWLPLQJVýDPRQJýWKRVHýVLJQDOVýWKHýHQJLQHýFRQWUROOHUýLVVXHVý WRýFRQWUROýSULQWLQJïý7KHýFKDUWVýLQFOXGHýGLIIHUHQWýWLPLQJVýGHSHQGLQJýRQýWKHýSDSHUý VL HVýDQGýSDSHUýVRXUFHVï LJXUH 718 0DLQ FDVVHWWH2 8 RU 7 HHG VSHHG 5 4 198 PP2V ...

Page 97: ...2SHUDWLRQ WKHRU 3ULQW WLPLQJ FKDUWV éðìé 609 33 LJXUH 719 0DLQ FDVVHWWH2 6 HHG VSHHG 5 4 198 PP2V ...

Page 98: ...2SHUDWLRQ WKHRU 3ULQW WLPLQJ FKDUWV éðìè 609 33 LJXUH 71 3 058 IHHGHU2 8 RU 7 HHG VSHHG 4 5 3175 PP2V ...

Page 99: ...2SHUDWLRQ WKHRU 3ULQW WLPLQJ FKDUWV éðìç 609 33 LJXUH 71 3 058 IHHGHU2 6 HHG VSHHG 4 5 3175 PP2V ...

Page 100: ...2SHUDWLRQ WKHRU 3ULQW WLPLQJ FKDUWV éðìæ 609 33 LJXUH 71 6HFRQG 3 058 IHHGHU2 8 RU 7 HHG VSHHG 5 5 3175 PP2V ...

Page 101: ...2SHUDWLRQ WKHRU 3ULQW WLPLQJ FKDUWV éðìå 609 33 LJXUH 7143 6HFRQG 3 058 IHHGHU2 6 HHG VSHHG 5 5 3175 PP2V ...

Page 102: ...2SHUDWLRQ WKHRU 3ULQW WLPLQJ FKDUWV éðìä 609 33 LJXUH 7144 03 WUD 2 8 RU 7 HHG VSHHG 03 4 61556 PP2V ...

Page 103: ...2SHUDWLRQ WKHRU 3ULQW WLPLQJ FKDUWV éðëí 609 33 LJXUH 7145 03 WUD 2 6 HHG VSHHG 03 4 61556 PP2V ...

Page 104: ...ïý WýILQDOO ýGHOLYHUVýWKHýSULQWHGýSDJHýWRýHLWKHUýWKHý IDFHðGRZQýRUýIDFHðXSýWUD ï 7KHýILJXUHýEHORZýVKRZVýWKHýSDSHUýIHHGLQJýSDWKýZLWKLQýWKHýSULQWHUïý ROORZLQJýRQýWKHýQH WýSDJHýLVýDQRWKHUýGLDJUDPýVKRZLQJýORFDWLRQVýRIýVHQVRUVñýUROOHUñý DQGýVROHQRLGVýDUUDQJHGýDORQJýZLWKýWKLVýSDSHUýSDWKï 3DSHU DVVHWWH HHG UROOHU UXP 7UDQVIHU UROOHU MHFW UROOHUV DFH0GRZQ RXWSXW WUD 0DQXDO IHHG UROOHU FOXWFK VHQVRU FOXWFK...

Page 105: ...VWDUWLQJýWRýIHHGýSDSHUýWRZDUGVýWKHýGUXPï 7KHýSDSHUýLVýDGYDQFHGýWRýWKHýGUXPñýWRýWKHýIXVHUýXQLWñýWULJJHULQJýWKHýH LWýVHQVRUý õ 7 óôñýDQGýILQDOO ýGHOLYHUHGýHLWKHUýWRýWKHýIDFHðGRZQýWUD ýRUýWKHýIDFHðXSýWUD ýDVý VZLWFKHGýE ýWKHýRXWSXWýVWDFNýVHOHFWRUýWDEï 0XOWL SXUSRVH WUD IHHGLQJ 7KHýSULQWHUýUHFRJQL HVýWKHýH LVWHQFHýRIýSDSHUýRQýWKHýPXOWLýSXUSRVHýWUD ýZKHQýWKHý PDQXDOýIHHGýVHQVRUýLVýSXVKHGýXSýõ 1 6óôï KH...

Page 106: ...FKýIRUýWKHýIHHGýUROOHUï LW VHQVRU 7KLVýýLVýDýSKRWRýSHQHWUDWLRQýVHQVRUñýFRPELQHGýZLWKýDQýDFWXDWRUýDUPýH ð WHQGLQJýWRýWKHýIXVHUýERDUGïý7KHýDFWXDWRUýLVýLQýWKHýZD ýEDFNýDWýWKHýIXVHUýRXWOHWïý7KHý UHðIOHFWRUýDWýRQHýHQGýRIýWKHýDFWXDWRUýLVýQRUPDOO ýVHDWHGýLQðEHWZHHQýWKHýSKRWRýWUDQVð PLWWHUýDQGýVHQVRUýõìôïý WýLVýGUHVVHGýDZD ýRXWýRIýWKHPýZKHQýWKHýSDSHUýLQýWKHýIXVHUý VHQVRUýSXVKHGýXSýWKHýDFWXDWRUýõëôñýDOORZL...

Page 107: ...VWHP 0DLQýORJLFýFRQWUROOHUýV VWHP 3DSHUýIHHGýV VWHP 3RZHUýV VWHP DVLF VHTXHQFH RI RSHUDWLRQ 7KHýIROORZLQJýILJXUHýLVýDýVLPSOLILHGýEORFNýGLDJUDPýRIýWKHýSULQWHUýHQJLQHýV VWHPïý HWDLOVýRQýHDFKýVHJPHQWýIROORZï LJXUH 7147 QJLQH V VWHP 0DLQ KDUJHU D06L UXP HDW 5ROOHU XVHU 8QLW DFH0XS 6WDFN 50B 61 5 UXP 8QLW 7UDQVIHU 5ROOHU 3DSHU HHG 5ROOHU 3DSHU DVVHWWH 3DSHU HHG 8QLW HYHORSHU 5ROOHU 7RQQHU RQWDLQHU HYHO...

Page 108: ...HQVLW ýLVýORZHUýZKHQýWKHýFORFNýIUHTXHQF ýLVýORZï LJK0YROWDJH JHQHUDWRU 7ZRýPDLQýFORFNVýRIý 9 ìýDQGý 9 ëýDUHýSURJUDPðGLYLGHGýWRýJHQHUDWHýWKHý RVFLOODWRUýRXWSXWïý7KLVýLVýXSðYHUWHGýXVLQJýDýWUDQVIRUPHUýLQýWKHýKLJKðYROWDJHýFLUFXLWïý 7KHýGLYLVRUýIUHTXHQF ýLVýGHWHUPLQHGýE ýWKHýåðELWýUHJLVWHUïý7KHýRVFLOODWLRQýLVýWRJJOHGý E ýWKHýHQJLQHý 38ï DVHU VFDQQHU FRQWURO QýRUGHUýWRýDFWLYDWHýWKHýODVHUýVFDQQHUñýWKHýHQ...

Page 109: ...VñýZKHQýWKHýDSSOLFDEOHý FRYHUýLVýRSHQñýRSHQýDQGýGLVFRQQHFWýWKHý ýSRZHUýWRýWKHýODVHUýVFDQQHUýDVýIROORZVïý 7KHýODVHUýHPLVVLRQýLVýGHDFWLYDWHGýZKHQýHLWKHUýFRYHUýLVýRSHQýLQýWKHýIROORZLQJýV VWHPï 7KHýLQWHUORFNýSRZHUýVXSSO ýRIýòè9ýLVýJHQHUDWHGýE ýGRZQYHUWLQJýWKHýòëé9ý ýSRZHUý XVLQJýWKHýêðWHUPLQDOýUHJXODWRUïý7KHýòè9ý ýLVýXVHGýDVýWKHýSRZHUýVXSSO ýIRUýWKHý VFDQQHUý 3 ýFLUFXLWýWKDWýLVýFXWýRXWýZKHQýHLWKHUýFRY...

Page 110: ...QW 426 3LQ QR1 6LJQDO J2D VLJQDO Q22XW XQFWLRQ RJLF 5HPDUNV ì 7 9 5ìó 7 9 5 287 7UDQVIHUýFKDUJHUýYROWDJHýì 1HJï 9ýERDUG ë 921ó 5 9 1 287 7UDQVIHUýELDVýFRQWUROýRXWSXWñý ãý2Q 1HJï 9ýERDUG ê 9 9 3RZHUýWHUPLQDOýõòè9ô é 966 966 3RZHUýWHUPLQDOýõ URXQGô è 0 9 5ó 0 9 5 287 0DLQýFKDUJHUýFRQWUROýRXWSXWñý ãý2Q 1HJï 9ýERDUG ç 6ó 6 287 LDVý ýYROWDJHýFRQWUROýRXWSXWñý ãýìíí9ñý ãýìíí9 1HJï 9ýERDUG æ 5 6 ó 5 6 1 2...

Page 111: ...VKý520 êè 03 62 ó 3 ì 287 0XOWLýSDSHUýIHHGýVROHQRLGýFRQWUROñý ãý2Q 1HJï 03ýXQLW êç 5ó 3 í 287 3DSHUýSLFNXSýUROOHUýFOXWFKýFRQWUROñý ãý2Q 1HJï OXWFK êæ 5 5ó 3 æ 287 5HJLVWïýUROOHUýFOXWFKýFRQWUROñý ãý2II 3RVï OXWFK êå 6 6 287 3RO JRQýPRWRUýFORFN 3RVï 6FDQQHU êä 3 1 3 1 1 HDPýGHWHFW 1HJï 6FDQQHU éí 966 966 3RZHUýWHUPLQDOýõ URXQGô éì 121 7 287 1RWýXVHG 3RVï ð éë 121 6 287 1RWýXVHG 3RVï ð éê 121 6 7 287...

Page 112: ...ýDGGUHVV åë é é 287 QJLQHý 38ýDGGUHVV 520ýýDGGUHVV åê ê ê 287 QJLQHý 38ýDGGUHVV 520ýýDGGUHVV åé ë ë 287 QJLQHý 38ýDGGUHVV 520ýýDGGUHVV åè ì ì 287 QJLQHý 38ýDGGUHVV 520ýýDGGUHVV åç í í 287 QJLQHý 38ýDGGUHVV 520ýýDGGUHVV åæ 03 62 ó 3 ë 1 0XOWLýSDSHUýIHHGýFOXWFKýFRQWUROñý ãý2Q 1HJï 03ýXQLW åå 77 3 ç 287 XVHUýKHDWHUýFRQWUROñý ãý2Q XVHU åä 9 2 9 2 1 1 9LGHRýGDWD 1HJï 6FDQQHU äí 966 966 3RZHUýWHUPLQDOýõ...

Page 113: ...XSîGRZQýVWDFNýVROHQRLGV OXWFKHVýõUHJLVWUDWLRQñýIHHGñýPDQXDOðIHHGô UDVHU DQV LJKðYROWDJHýJHQHUDWRUýõERDUGô 0DLQýPRWRUýDQGýODVHUýSRO JRQýPRWRU OXWFKHVñýPRWRUVñýVROHQRLGVýZLWKLQýWKHýRSWLRQýXQLWV 7KHýëé9ý ýSRZHUýLVýIRUFLEO ýLQWHUUXSWHGýIRUýVDIHW ýZKHQHYHUýWKHýSULQWHUýWRSýFRYHUý RUýWKHýGUXPýXQLWýDFFHVVýGRRUýLVýRSHQHGïý RUýGHWDLOVñýVHHýSDJHýëçñý6DIHW LQWHUORFNï 89 SRZHU OLQH 7KHýè9ý ýDWýWKHýVHFRQGDU ýRX...

Page 114: ...2SHUDWLRQ WKHRU QJLQH FRQWUROOHU V VWHP éðêì 609 33 LJXUH 7149 3RZHU VXSSO FLUFXLW GLDJUDP ...

Page 115: ...ýIROORZLQJýVHFWLRQïý ý VLPSOLILHGýGLDJUDPýLVýVKRZQýRQýSDJHýêêñý LJXUHýéïìæï 7DEOH 71 7 0DLQ FRQWUROOHU VSHFLILFDWLRQV WHP 6SHFLILFDWLRQ 38 3RZHU3 çíêHðìíí0 6 VWHPý520ýVL H éý0 ýõìçý0ELWýÕýëô 5 0ýVL H 6WDQGDUG éý0 ýõìçý0ELWýÕýëô 0D ï çåý0 ýõëý3 ý6 00ýVORWVô RQWV 5HVLGHQW éý0 ýõêëý0ELWýÕýìô 6RFNHW ëý0 ý 3 ðèýõ2SWLRQô 3 ý520 èìëýN 0HPRU ýFDUG ìýVORWî ýéïëýRUý3 0 ýëïí QWHUIDFH 3DUDOOHO LJKðVSHHGýELðGL...

Page 116: ...V S R E Q N P D O U T N S C F P D I R F P C L K F P D A T A O U T P E N V S R E Q N R E S E T N 1 O P 1 C S N C T L R D Y 1 O P 1 D A C K N L I O R N 1 L I O W N 1 D 3 2 C S N 0 0 0 1 D 3 2 O E N 0 D 3 2 W E N 0 D 3 2 A 0 2 0 4 F O N T O E N 1 3 C A R D C E H N C A R D C E L N C A R D O E N C A R D W E N C A R D R E G N C A R D R S T N C A R D R D Y C A R D W P B V D 1 2 O P 1 A C K N O P 1 I R N ...

Page 117: ...WHUýPHPRU ýLVý UHOHDVHGïý7KXVýWKHýYLGHRýGDWDýDUHýWUDQVIHUHGýWRýWKHýODVHUýVFDQQHUýWRJHWKHUýZLWKýWKHý KRUL RQWDOýV QFKURQL DWLRQýVLJQDOýDQGýWKHýYLGHRýFORFNï 2QýUHFHSWLRQýRIýWKHýYLGHRýGDWDñýWKHýODVHUýGLRGHýWXUQVýRQýDQGýRIIýWRýFRQVWLWXWHVýWKHý SULQWýLPDJHýRYHUýWKHýGUXPïý7KHýLPDJHýRQýWKHýGUXPñýUHIHUUHGýWRýDVýWKHýVWDWLFýODWHQWý LPDJHñýLVýDSSOLHGýZLWKýWRQHUñýWUDQVIHUUHGýRQWRýWKHýSDSHUñýDQGýILQDOO ýIXVHGý...

Page 118: ...LQVWDOOHG LQWR WKH OHIW0KDQG VLGH VORW ZKLFK LV FORVHU WR WKH SDUDOOHO LQWHUIDFH 1 7KHýRSWLRQýLQWHUIDFHýKDVýWKHýIROORZLQJýIHDWXUHVã 7KHýIROORZLQJýWDEOHýVKRZVýSLQýDVVLJQPHQWVýIRUýWKHýRSWLRQýVORWVï 7DEOH 71 SDQVLRQ 6 00 1XPEHUýRIý6 00ý VRFNHWV ì 6RFNHWý1RVï 6ë 1XPEHUýRIýSLQV æë 6L H ìîëîéîåîìçîêëý0 FFHVVýVSHHG áåíýQV 7DEOH 71 2SWLRQ LQWHUIDFH DUGýFRQQHFWRU çí SSOLFDEOHýLQWHUIDFHý FDUG 6 ý FR 1ýëííí ...

Page 119: ...ý5HTXHVW êêýõ ìæô 1 ð êéýõ ìæô 0 ó Q 0 ý FNQRZOHGJHýõ ô êèýõ ìåô 25ó Q î2ý5HDGý6WUREHýõ ô êçýõ ìåô 2 ó Q î2ý ULWHý6WUREHýõ ô êæýõ ìäô 5 6 7ó Q 5HVHWýõ ô êåýõ ìäô 1 ð êäýõ ëíô ìè Qî2XW 6 VWHPý DWDýìè éíýõ ëíô ìé Qî2XW 6 VWHPý DWDýìé éìýõ ëìô 1 ð éëýõ ëìô ìê Qî2XW 6 VWHPý DWDýìê éêýõ ëëô ìë Qî2XW 6 VWHPý DWDýìë ééýõ ëëô ìì Qî2XW 6 VWHPý DWDýìì éèýõ ëêô ìí Qî2XW 6 VWHPý DWDýìí éçýõ ëêô ä Qî2XW 6 VWHP...

Page 120: ...KHýYDFDQWý56ðëêë ýWHUPLQDOVïýõ6HHý SSHQGL ý ýIRUýWKHýLQWHUIDFHýODWHUýLQýWKLVýPDQXDOýIRUýGHWDLOVïô 7KHýVHULDOýLQWHUIDFHýKDVýWKHýIROORZLQJýIHDWXUHVã QJLQH LQWHUIDFH 7KHýLQWHUIDFHýWRýWKHýHQJLQHýV VWHPýLVýEDVHGýRQýWKHýVHULDOýLQWHUIDFHñýQRWýWKHýSDUDOOHOý LQðWHUIDFHýWKDWýZDVýXVHGýZLWKýWKHýSUHYLRXVýOLQHðXSýRIýWKHý FRV VýSULQWHUVïý7KHý VHULDOðWRðSDUDOOHOýFRQYHUVLRQýLVýH HFXWHGýRQýDýKDUGZDUHýEDVLVï 7KHýHQJ...

Page 121: ...HýHQJLQHýV VWHPýE ýIRUZDGLQJý 6 ýWRýWKHýHQJLQHï 6 1 RPPDQGð X6 ðVLJ1DO RZ HWHUPLQHVýZKLFKýGLUHFWLRQýIRUýWKHýFRQWUROOHUýV VWHPý WRýWUDQVIHUýWKHýFRPPDQGýGDWDïý Iý 6 1ýLVýWUXHñýWKHý FRQWUROOHUýFDQýWUDQVIHUýWKHýFRPPDQGýGDWDýWRZDUGVýWKHý HQJLQHýV VWHPýE ýIRUZDGLQJý6 ýWRýWKHýHQJLQHýV Vð WHP 6î 6WDWXVðGDWDî RPPDQGð GDWD ð 7KLVýLVýDýELðGLUHFWLRQDOýVHULDOýGDWXPýFRQWDLQLQJýWKHýVWDð WXVýGDWDýDQGýFRPPDQGýGDWD...

Page 122: ...2SHUDWLRQ WKHRU RJLF FRQWUROOHU V VWHP éðêä 609 33 QJLQH LQWHUIDFH EORFN GLDJUDP ...

Page 123: ...2SHUDWLRQ WKHRU RJLF FRQWUROOHU V VWHP éðéí 609 33 7KLVýSDJHýOHIWýEODQNýLQWHQWLRQDOO ...


Page 124: ... 608 3DSHU HHG 8QLW SDJH 60 617 DQGOLQJ WKH GHYHORSHU XQLW SDJH 60 5HPRYLQJ WKH GHYHORSHU XQLW SDJH 60 6KLSSLQJ WKH GHYHORSHU XQLW SDJH 60 618 QLWLDOL LQJ WKH GHYHORSHU SDJH 6044 619 8SGDWLQJ WKH HQJLQH ILUPZDUH SDJH 6045 LUPZDUH GDWD IRUPDW SDJH 6045 RZQORDGLQJ HQJLQH GDWD SDJH 6045 RZQORDGLQJ FRQWUROOHU GDWD SDJH 6046 RZQORDGLQJ GDWD IURP D PHPRU FDUG SDJH 6046 RZQORDGLQJ HUURUV SDJH 6047 61 GMX...

Page 125: ...FDQýEHýIRXQGýLQýFKDSWHUýæñý3DUWV DWDORJï 7DEOH 61 4 LIH H SHFWDQF RI PRGXOHV LW 0RGXOH LIH 5HPDUNV 7 ðëí 7RQHUýFRQWDLQHU ìíñííí 8VHUýUHSODFHDEOH 7 ðëí 7RQHUýFRQWDLQHU ëíñííí 8VHUýUHSODFHDEOH ðëè UXPýXQLW êííñííí 9ðëè HYHORSHUýXQLW êííñííí ðëè XVHUýNLW êííñííí ðëè DVHUýVFDQQHU êííñííí HHGýXQLW êííñííí ULYHýJHDUýDVVHPEO êííñííí 0 ðëè 5HIXUELVKPHQWýNLW êííñííí QFOXGHVýDý ðëèñý 9ðëèñý ðëèñý DQGýDýIHHG...

Page 126: ...èøýDYHUDJHýWRQHUýGHQVLW ôñýHYHQWXDOO ýWKHýWRQHUýVXSð SO ýEHLQJýH KDXVWHGýDWýZKLFKýSRLQWýWKHýSULQWHUýZLOOýVWRSýSULQWLQJýDQGýWKHýIROORZLQJý PHVVDJHýZLOOýEHýGLVSOD HGã 5HSODFH 7RQHU OHDQ SULQWHU 5HSODFH 7RQHU OHDQ SULQWHU 5HSODFH 7RQHU OHDQ SULQWHU 5HSODFH 7RQHU OHDQ SULQWHU 7KLVýLQVWUXFWVýWRýLQVWDOOýDýQHZýWRQHUýNLWýWRýEULQJýWKHýSULQWHUýEDFNýLQýQRUPDOýRSHUDð WLRQïýý OHDQLQJýYDULRXVýSDUWVýLQVLGHýPXVWý...

Page 127: ...GýLQVWDOOýLQýWKHýSULQWHUýDFFRUGð LQJýWRýSDJHýéñý DVWH WRQHU ERWWOHï 1RWHýWKDWýWKHýSULQWHUýKDVýDýVHQVRUýWKDWýPRQLWRUVýWKHýSUHVHQFHýRIýWKHýZDVWHýWRQHUý ERWWOHïý7KHýSULQWHUýGRHVýQRWýRSHUDWHýZLWKRXWýDýERWWOHýLQVWDOOHGï RUýWKHýUHIHUHQFHñýWKHýZDVWHýWRQHUýERWWOHýFDQýKROGýXSýWRýDSSUR ïýìííJýRIýZDVWHý WRQHUïý7KHýQRPLQDOýDPRXQWýRIýZDVWHýWRQHUýGHULYHGýDIWHUýìíñíííýSDJHVýKDYHýEHHQý SULQWHGýLVýëíýWRýêíJýõ HWWH...

Page 128: ...ýSDUWV WKHýZLUHýDQGýJULGýõ6HHý WKHýSLFWXUHýEHORZïôýðýZKHQHYHUýWKHýWRQHUýFRQWDLQHUýLVýFKDQJHGïý OHDQLQJýRIýWKHýPDLQý FKDUJHUýFDQýEHýGRQHýZLWKRXWýQHHGLQJýDQ ýWRROVýWKDQNVýWRýLWVýVHOIðFOHDQLQJýV VWHPï 7RýFOHDQýWKHýPDLQýFKDUJHUñýILUVWýRSHQýWKHýGUXPýDFFHVVýGRRUïý3XOOýWKHýFOHDQLQJýNQREý õJUHHQôýVORZO ýLQýDQGýRXWýDýIHZýWLPHVïý7KLVýSXOOVýDýFOHDQLQJýSDGýLQVLGHýWKHýGUXPý XQLWýDORQJýWKHýZLUHï KDUJHU ZLUH ULG...

Page 129: ...WKýZDWHUïý3HUIRUPýWKHýIROORZLQJýFOHDQLQJý SURFHGXUHýEHIRUHýWKHýSDGýGULHVï WWDFKýWKHýJULGýFOHDQHUýWRýWKHýSULQWHUýZLWKýWKHýSDGýXSSHUPRVWñýDVýVKRZQýLQýWKHýGLDð JUDPýEHORZï KHQýWKHýJULGýFOHDQHUýLVýSURSHUO ýILWñýJUDVSýWKHýJUHHQýSDUWýRIýWKHýPDLQýFKDUJHUñýOLIWý LWýVOLJKWO ñýDQGýSXOOýRXWZDUGVïý5HSHDWýWKHýDERYHýIRUýDSSUR ïýILYHýWLPHVïý7KHýZHWýSDUWý RIýWKHýJULGýFOHDQHUýFOHDQVýWKHýJULGýRIýWKHýPDLQýFKDUJHUýXQ...

Page 130: ...ýWRýSDSHUýGXVWýDQGýGHEULVñýFOHDQýWKHýSDSHUýIHHGý XQLWýLQýWKHýIROORZLQJýPDQQHUï 3XOOýWKHýSDSHUýIHHGýXQLWýUHOHDVHýOHYHUýXSýDQGýGUDZýWKHýSDSHUýIHHGýXQLWýDOOýWKHýZD ý RXWýXQWLOýLWýVWRSVïý LSHýWKHýSDSHUýGXVWýRQýWKHýUHJLVWUDWLRQýUROOHUýDQGýWKHýSDSHUý UDPSýXVLQJýWKHýZLSHUýFORWKýLQFOXGHGýLQýWKHýWRQHUýNLWï DXWLRQ R QRW WRXFK WKH WUDQVIHU UROOHU EODFN VSRQJH UROOHU ZKHQ ZLSLQJ WKH SDSHU UDPS1 5HJLVWUDWLRQ U...

Page 131: ...0DLQWHQDQFH OHDQLQJ WKH SULQWHU êðå 609 33 7DNHýRXWýWKHýFOHDQLQJýEUXVKýVXSSOLHGýZLWKýWKHýSULQWHUïý OHDQýWKHýVHSDUDWLRQý FKDUJHUýXVLQJýWKHýEUXVKï 6HSDUDWLRQ FKDUJHU ...

Page 132: ...GHVFULEHGýLQý618 QLWLDOL LQJ WKH GHYHORSHUñýSDJHýêðììï 5HPRYLQJ WKH GHYHORSHU XQLW HWDFKýWKHýGHYHORSHUýFRQQHFWRUïý3UHVVýWKHýGHYHORSHUýUHOHDVHýOHYHUVýIURQWZDUGVïý 5HPRYHýWKHýGHYHORSHUýXQLWýE ýOLIWLQJýLWýDVýVKRZQýEHORZï 6KLSSLQJ WKH GHYHORSHU XQLW 7KHýSULQWHUýLVýVXSSOLHGýZLWKýDýGHYHORSHUýFRQWDLQHUýSDFNDJHýWKDWýVKRXOGýEHýUHWDLQHGý IRUýIXWXUHýVKLSPHQWýRIýWKHýGHYHORSHUïýý 7RýSDFNýWKHýGHYHORSHUýLQýWKHýF...

Page 133: ...0DLQWHQDQFH DQGOLQJ WKH GHYHORSHU XQLW êðìí 609 33 QVHUWýWKHýGHYHORSHUýLQWRýWKHýFRQWDLQHUýDVýVKRZQýEHORZï ...

Page 134: ...ýE ýXVLQJýWKHýVHUYLFHýPHQXý LQýWKHýSULQWHUªVýPRGHýVHOHFWýURXWLQHýDVýDFFHVVHGýE ýLWVýIURQWýFRQWUROýSDQHOïý ROORZý WKHVHýVWHSVýWRýXVHýWKLVýIHDWXUHñýWRSýWRýERWWRPýõ RUýGHWDLOVýRQýXVLQJýWKHýIURQWýFRQWUROý SDQHOýNH VñýUHIHUýWRýWKHýSULQWHUªVýXVHUªVýPDQXDOôï 4 3UHVVý02 ï 5 3UHVVý ýXQWLOýWKHýPHVVDJHýGLVSOD ýGLVSOD Vý2WKHUV 2WKHUV 2WKHUV 2WKHUV ï 6 3UHVVý ï 7 3UHVVý ýXQWLOýWKHýPHVVDJHýGLVSOD ýGLVSOD Vý 6HU...

Page 135: ...ýILHOGýXVHïý7RýVWRUHýõZULWHôýGDWDýLQýDý PHPRU ýFDUGñýDQGýUHUHDGýWKHPýLQWRýWKHýSULQWHUýWKURXJKýWKHýVORWñýUHIHUýWRýWKHý SULQWHUªVý8VHUªVý0DQXDOï 1RWH DFK VLQJOH GDWD PXVW EH ZULWWHQ RQ D PHPRU FDUG1 R QRW ZULWH PRUH WKDQ RQH GDWD RQ D PHPRU FDUG1 LUPZDUH GDWD IRUPDW 7KHýGDWDýLVýLGHQWLILHGýXVLQJýWKHýIROORZLQJýQDPLQJýV QWD ã RZQORDGLQJ HQJLQH GDWD 7KHýHQJLQHýILUPZDUHýGDWDýLVýGRZQORDGHGýE ýXVLQJýWKHý3U...

Page 136: ...OD ýUHYHUWVýWRý5HDG 5HDG 5HDG 5HDG ï 8 7XUQýSRZHUýRIIñýWKHQýRQýDJDLQïý KHFNýWKHýGLVSOD ýVKRZVý5HDG 5HDG 5HDG 5HDG ïý IýQRWñýUHIHUýWRý RZQORDGLQJýHUURUVýVHFWLRQýWKDWýIROORZVï RQILUPýWKHýVWDWXVýSDJHýVKRZVýWKHýQHZýHQJLQHýYHUVLRQýõ6HHý SSHQGL ý ñýSDJHý ðéôïý IýWKHýPHVVDJHýGLVSOD ýLQGLFDWHVý DOO VHUYLFH SHUVRQ Q DOO VHUYLFH SHUVRQ Q DOO VHUYLFH SHUVRQ Q DOO VHUYLFH SHUVRQ QýõQ íñýìñýïïïôñýUHIHUýWRý VHF...

Page 137: ...ýRQFHñýWKHQýRQýDJDLQïý 7U ýGRZQORDGLQJýDJDLQï DOO VHUYLFH SHUVRQ DOO VHUYLFH SHUVRQ DOO VHUYLFH SHUVRQ DOO VHUYLFH SHUVRQ 4 4 4 4 0DFKLQHýFRPSDWLELOLW ýHUURU 7KHýGDWDýWRýEHýGRZQORDGHGýLVýQRWýFRPSDWLEOHý ZLWKýWKHýSULQWHUï 2EWDLQýFRUUHFWýGDWDýIRUýWKHýSULQWHUýPRGHOï DOO VHUYLFH SHUVRQ DOO VHUYLFH SHUVRQ DOO VHUYLFH SHUVRQ DOO VHUYLFH SHUVRQ 5 5 5 5 9HUVLRQýFRPSDWLELOLW ýHUURU 7KHýYHUVLRQýRIýWKHýGDWDý...

Page 138: ...ñýSHUIRUPýWKHýIROORZLQJýVWHSVã 4 3UHVVý02 ï 5 3UHVVýòýXQWLOýWKHýPHVVDJHýGLVSOD ýGLVSOD Vý3DSHU W SH 3DSHU W SH 3DSHU W SH 3DSHU W SHïý 6 3UHVVý 17 5ï 7 3UHVVýòýWRýWRJJOHýDPRQJý7KLQ 7KLQ 7KLQ 7KLQñý1RUPDO 1RUPDO 1RUPDO 1RUPDOñý7KLFN 7KLFN 7KLFN 7KLFNñýDQGý2 3 2 3 2 3 2 3ï 8 KHQýWKHýGHVLUHGýSDSHUýW SHýLVýLQGLFDWHGñýSUHVVý 17 5ï 7DEOH 61 7 3DSHU W SH RSWLRQV 3DSHU W SH 7 SLFDO SDSHU ZHLJKW 7KLQ 7KLQ ...

Page 139: ...0DLQWHQDQFH GMXVWLQJ WKH WUDQVIHU ELDV IRU WKLFN SDSHU êðìç 609 33 7KLVýSDJHýOHIWýEODQNýLQWHQWLRQDOO ...
Page 140: ...LQJ PHPRU SDJH 50 0LQLPXP PHPRU UHTXLUHPHQWV SDJH 50 6 00 WR EH XVHG SDJH 50 1RWHV RQ KDQGOLQJ WKH PDLQ FLUFXLW ERDUG DQG 6 00V SDJH 50 5HPRYLQJ WKH PDLQ FLUFXLW ERDUG SDJH 50 QVWDOOLQJ 6 00V SDJH 50 7HVWLQJ WKH H SDQVLRQ PHPRU SDJH 5043 518 8VLQJ WKH RQWURO 3DQHO SDJH 50 44 QGLFDWRUV SDJH 5044 URQW SDQHO NH V SDJH 5045 0RGH VHOHFWLRQ PHQX SDJH 5045 6HUYLFH PRGH SDJH 5045 ...

Page 141: ...SDFNLQJ 7KHýIROORZLQJýGLDJUDPVýVKRZýKRZýWRýXQSDFNýWKHýSULQWHUýLQýWKHýVKLSSLQJýFDUWRQïý KLOHýXQSDFNLQJýWKHýSULQWHUñýFKHFNýWKDWýWKHýSDUWVýVKRZQýEHORZýDUHýDOOýSUHVHQWï 7RQHU NLW 7 053 3RZHU FDEOH 0DQXDOV LOOHUV HYHORSHU FRQWDLQHU 609 33 SULQWHU ...

Page 142: ... ëðê 609 33 515 QVWDOOLQJ WRQHU 7DNHýWKHýWRQHUýFRQWDLQHUýIURPýWKHýWRQHUýNLWýõ7 ðëíôýVXSSOLHGýZLWKýWKHýSULQWHUïý LYHý LWýDýJRRGýVKDNHýõèýWRýçýWLPHVôï 3HHOýRIIýWKHýVHDOýRQýWKHýERWWRPýRIýWKHýWRQHUýFRQWDLQHUýE ýFDUHIXOO ýSXOOLQJýRIIï ...

Page 143: ...DWLQJýSLQVýDWýWKHý ERWWRPýRIýWKHýFRQWDLQHUýZLWKýWKHýPDWLQJýKROHVýLQýWKHýGHYHORSHUýXQLWï DXWLRQ 7R DYRLG WURXEOH WRQHU VSLOOLQJ HWF1 WKH WRQHU FRQWDLQHU PXVW EH FRU0 UHFWO VHDWHG DQG ORFNHG LQ WKH SULQWHU1 7R GR WKLV SUHVV WKH IDU VLGH RI WKH FRQWDLQHU DW WKH OHIW DQG ULJKW 386 5 PDUNV XQWLO D FOLFN LV KHDUG1 ...

Page 144: ... 609 33 QVWDOOLQJ WKH ZDVWH WRQHU ERWWOH 7KHýZDVWHýWRQHUýERWWOHýLVýDOVRýVXSSOLHGïý WýPXVWýEHýLQVWDOOHGýLQVLGHýWKHýGUXPýDFFHVVý GRRUýLQýWKHýOHIWýVLGHýRIýWKHýSULQWHUïý2SHQýWKHýGUXPýDFFHVVýGRRUýDQGýLQVWDOOýLWýDVý VKRZQï DVWH WRQHU ERWWOH ...

Page 145: ...RýSULQWýDýMREï 7KLVýGHOD ýLVýQHFHVVDU ýIRUýWKHýSULQWHUýWRýILOOýWKHýGHYHORSHUýUHVHUYRLUýZLWKýDýVXIILð FLHQWýDPRXQWýRIýWRQHUýWRýFRQWLQXRXVO ýVXSSRUWýDýSULQWýMREïý7KHýSHULRGýRIýWLPHýIRUý WKLVýGHOD ýLVýDSSUR LPDWHO ýìíýPLQXWHV 6LQFHýWKHýDXWRPDWLFýLPSOHPHQWDWLRQýRIýWKHýGHYHORSHUýLQLWLDOL DWLRQýLVýGRQHýRQO ý RQFHýDWýILUVWýVZLWFKLQJýSRZHUýRQñýLIýDýQHZýGHYHORSHUýLVýLQVWDOOHGýLQýWKHýSULQWHUñýWKHý GHYHORSHU...

Page 146: ...FDXWLRQVã HIRUHýWRXFKLQJýWKHýPDLQýFLUFXLWýERDUGñýWRXFKýDýZDWHUýSLSHýRUýRWKHUýODUJHýPHWDO REMHFWýWRýGLVFKDUJHý RXUVHOIýRIýVWDWLFýHOHFWULFLW ïý KLOHýGRLQJýWKHýZRUNñýLWýLVýUHFð RPPHQGHGýWKDWý RXýZHDUýDQýDQWLVWDWLFýZULVWýVWUDSï 7RXFKýWKHýPDLQýFLUFXLWýERDUGýDQGý6 00ýRQO ýE ýWKHýHGJHVï ROORZýWKHýLQVWUXFWLRQVýWKHý6 00ýPDQXIDFWXUHUýSURYLGHVï 5HPRYLQJ WKH PDLQ FLUFXLW ERDUG 7KHýPDLQýFLUFXLWýERDUGýRIýWKHýSU...

Page 147: ...LWFKýRIIïý5HPRYHýWKHýPDLQýFLUFXLWýERDUG E ýUHPRYLQJýWKHýWKUHHý õSODWHGôýVFUHZV IURPýWKHýUHDUýFRYHUï 3XOOýWKHýPDLQýFLUFXLWýERDUGýDOOýWKHýZD ýRXWýRIýWKHýSULQWHUï DXWLRQ HIRUH SXOOLQJ WKH ERDUG RXW FOHDQ DQ DUHD RQ WKH WDEOH HWF1 DW WKH EDFN RI WKH SULQWHUtV UHDU SDQHO1 RUHLJQ REMHFWV DFFLGHQWDOO VWLFNLQJ WR WKH EDFN RI WKH PDLQ ERDUG FDQ FDXVH VHULRXV GDPDJH WR WKH SULQWHU1 5HIHUýWRýSDJHýäñý LJXUHýë...

Page 148: ...Q FLUFXLUW ERDUG QVWDOOLQJ 6 00V QVHUWýWKHý6 00ýÔýLQWRýWKHýVRFNHWýDVýVKRZQïý DUHIXOO ýSXVKýWKHýERDUGýXSULJKWýXQWLOý LWýVQDSVýLQWRýSODFHïý0DNHýVXUHýWKDWýWKHýFDWFKHVýDWýWKHýHQGVýRIýWKHýVRFNHWýILWýLQWRýWKHý KROHVýDWýWKHýHQGVýRIýWKHý6 00ýERDUGï 6 00 VRFNHW ...

Page 149: ...HýSULQWHUýWRýVHHýLIýWKHýLQVWDOODWLRQýKDVý EHHQýVXFFHVVIXOïý7RýWHVWýWKHýH SDQVLRQýPHPRU ñýWXUQýSULQWHUýSRZHUýRQýDQGýSULQWýDý VWDWXVýSDJHï IýWKHýLQVWDOODWLRQýKDVýEHHQýVXFFHVVIXOñýWKHý7RWDOýPHPRU ýõ0HPRU ý OORFDWLRQôýRIý WKHýVWDWXVýSDJHýZLOOýVKRZýWKHýH SDQGHGýPHPRU ýVL HýFRUUHVSRQGLQJýWRýWKHýDPRXQWý RIýPHPRU ýDGGHGï ...

Page 150: ...KDSWHUýçïô 6WHDG 7KHýSULQWHUýQHHGVýDWWHQWLRQýIRUýDýSUREOHPýWKDWýFDQýEHýFOHDUHGýE ý WKHýXVHUï 0DQXDOýIHHGýLQGLFDWRU LJKWVýZKHQýSDSHUýLVýIHGýIURPýWKHýPXOWLðSXUSRVHýIHHGýWUD ïý Iý WKLVýIODVKHVñýSDSHUýMDPýLVýVXJJHVWHGýLQýDýSDUWLFXODUýORFDWLRQñý UHIHUýWRýFKDSWHUýçï DFHðGRZQýVWDFNýLQGLFDWRU LJKWVýZKHQýSULQWHGýSDJHVýDUHýGHOLYHUHGýWRýWKHýIDFHðGRZQýRXWSXWý WUD ïý IýWKLVýIODVKHVñýSDSHUýMDPýLVýVXJJHVWHGýLQýD...

Page 151: ...SOHQLVKPHQWýIRUýDýQHZýGHYHORSHUï 7KHýVHUYLFHýPRGHýLVýDYDLODEOHýRQO ýZKHQýWKHýSULQWHUýLVýUHDG ïý KLOHýLQýVHUYLFHý PRGHñýWKHýSULQWHUýDFFHSWVýSULQWýGDWDýEXWýGRHVýQRWýSULQWýLWï RUýGHWDLOVñýVHHýFKDSWHUýêñýSDJHýêðìêï 7DEOH 51 7 XQFWLRQV RI NH V H XQFWLRQ 21 1 6ZLWFKHVýWKHýSULQWHUýRQðOLQHýDQGýRIIðOLQHï 217 18 HSHQGLQJýRQýWKHýPHVVDJHýEHLQJýLQGLFDWHGñýWKHUHýDUHýFDVHVýZKHUHýRSHUDWLRQý ZLOOýFRQWLQXHýDIWHUýSU...

Page 152: ... regulations page 1 11 Ozone concentration page 1 11 FCC notice page 1 12 Important note on the interface connectors page 1 12 Canadian Department of Communications compliance statement page 1 13 Avis de conformité aux normes du ministère des Communications du Canada page 1 13 ISO 7779 page 1 13 1 5 Installation page 1 14 Environmental requirements page 1 14 Clearance page 1 14 Places to avoid pag...

Page 153: ...nter identification labeling The printer bears its model and serial numbers on a label at its back The label also contains other safety precautions Figures below show the printer labels in two dif ferent destinations versions Figure 1 1 Printer labels Europe Asia version US Canada version ...

Page 154: ...n paper Paper cassette capacity Main cassette Approx 250 sheets 75g or 0 1mm thickness paper MP tray Approx 100 sheets 75g or 0 1mm thickness paper Paper output tray capacity Face down tray Approx 350 sheets Face up tray Approx 250 sheets Controller section CPU PowerPC603e 100MHz System ROM 4 MB 16 Mbit 2 Resident font ROM 4 MB 32 Mbit 1 Main RAM 4 MB 16 Mbit 2 Expansion RAM SIMM 32 MB max 36MB in...

Page 155: ...B A standby 38 dB A sleeping unmeasur ably low a Printing the same page in copy mode b Excluding peaks measured at 1m facing printer as per ISO7779 Table 1 2 Recommended flash cards Make Model Capacity AMD AmC001CFLKA 1 MB AmC002CFLKA 2 MB AmC004CFLKA 4 MB AmC101CFLKA 10 MB AmC004DFLKA 4 MB AmC008DFLKA 8 MB AmC020CFLKA 20 MB Fujitsu MB98A81063 1 MB MB98A81183 2 MB MB98A81273 4 MB MB98A81373 8 MB M...

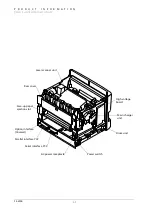
Page 156: ...and internal views 1 5 FS 6700 1 3 Front and internal views Front operator panel Feed unit release lever Paper cassette Paper ejection roller Power switch Toner bottle drum access door MP tray Feed unit release lever Feed unit Memory card slot ...

Page 157: ... and internal views 1 6 FS 6700 Internal Component Laser scanner unit Paper ejection roller Upper unit ventilation fan Liaison board Main motor Memory card slot Regist roller clutch Feed roller clutch manual feed actuator Top cover safety lock ...

Page 158: ...nt and internal views 1 7 FS 6700 Rear cover Option interface AC power receptacle Power switch Drum unit Main charger High voltage board unit Covered Serial interface YC3 Parallel interface YC2 Face up paper ejection slot Laser scanner unit ...

Page 159: ...he printer during any phase of user operation Laser notice The printer is certified in the U S to conform to the requirements of DHHS 21 CFR Subchapter for Class I 1 laser products and elsewhere is certified as a Class I laser product conforming to the requirements of IEC 825 Class I laser products are not considered to be hazardous The printer contains internally a Class IIIb 3b laser that is nom...

Page 160: ...s for laser products on August 2 1976 These regulations apply to laser products manufactured after August 1 1976 Compliance is mandatory for products marketed in the United States A label indi cating compliance with the CDRH regulations must be attached to laser products marketed in the United States Ozone concentration Laser printers generate ozone gas O3 which may concentrate in the place of ins...

Page 161: ...r Connect the equipment into an outlet on a circuit different from that to which the receiver is connected Consult the dealer or an experienced radio TV technician for help Change or modifications not expressly approved by the manufacturer for compli ance could void the userís authority to operate the equipment Interference cable to the computer shall be used with shielded circular cable Any modif...

Page 162: ... the Canadian Interfer ence Causing Equipment Regulations Avis de conformité aux normes du ministère des Communications du Canada Cet appareil numérique de la classe B respecte toutes les exigences du Règlement sur le matériel brouilleur du Canada ISO 7779 Maschinenlärminformationsverordnung 3 GSGV 18 01 1991 Der höchste Schall druckpegel beträgt 70 dB A oder weniger gemäß ISO 7779 ...

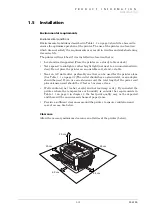
Page 163: ...e printer on an unstable cart stand or table Near an AC wall outlet preferably one that can be used for the printer alone See Table 1 1 on page 3 The outlet should have a ground slot or an adaptor should be used If you use an extension cord the total length of the power cord plus extension cord should be 17 feet or 5 meters or less Well ventilated not too hot or cold and not too damp or dry If you...

Page 164: ...power sources Disconnect the printer from the power source before attempting removal or re placement of an electrical component or a printed circuit board The printer should not be connected to a power source until the instruction is given to do so when performing tests described in this manual In connecting the printer power exercise an extreme care in handling the power supply or any other elect...

Page 165: ...used with the Kyoceraís proprietary toner Kyocera do not recommend to use any refilled toner containers that may be available commercially This is because Kyocera have no means for control over how such refilled toner could affect the print quality and the reliabil ity of the printer Toner container handling To loosen and mix the toner inside with the label side down thoroughly shake the toner con...

Page 166: ...satisfy the following environmental conditions Note If the toner container is removed from the printerís developer unit put it in a protective bag and keep it in a dark place Caution If the printer is shipped for return etc do not ship it with the toner container installed Otherwise toner may leak and contamination may result in the printer Table 1 3 Toner storage conditions Temperature 20 C to 40...

Page 167: ...P R O D U C T I N F O R M A T I O N About the toner 1 16 FS 6700 This page left blank intentionally ...

Reviews: