


7
Utility Mode Operations
7-32
Di2510/Di3010/Di3510
5
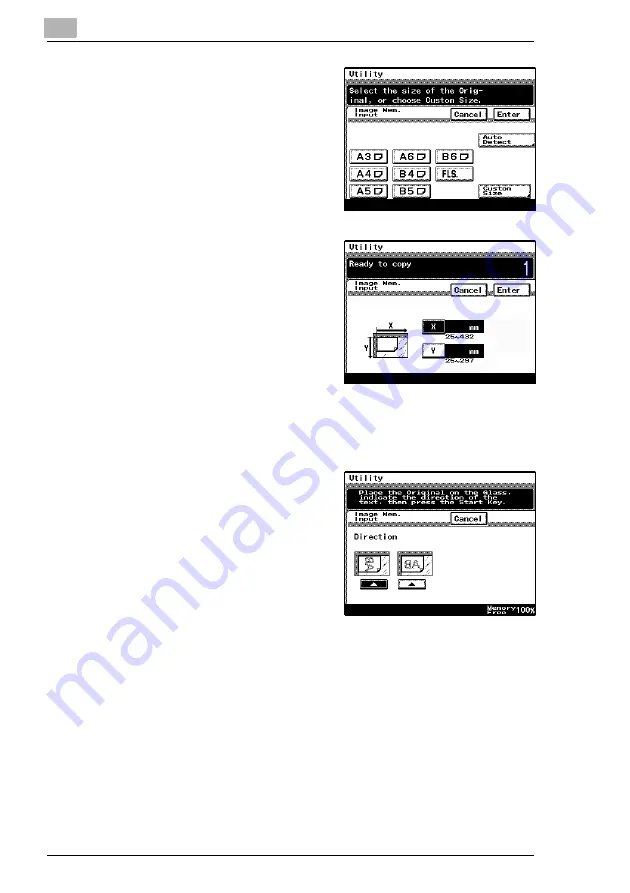
Select the size of the image
document.
Touch [Enter].
To continue scanning a standard-
sized image document, skip to
step 9.
H
To scan a non-standard-sized
image document, touch
[Custom Size].
6
Press the [C] key to erase the
current value, and then use the
10-Key Pad to type in the length of
side X for the image document
(between 25 and 432 mm).
Touch [Y], and then press the [C]
key to erase the current value.
Use the 10-Key Pad to type in the
length of side Y for the image
document (between 25 and
297 mm).
7
Touch [Enter].
8
Position the document on the glass,
and then select the orientation of
the document.
9
Press the [Start] key.
The image is scanned.
The image stamp is registered.
Summary of Contents for DI2510
Page 2: ... ...
Page 44: ...2 Safety Information 2 16 Di2510 Di3010 Di3510 ...
Page 58: ...3 Available Features 3 14 Di2510 Di3010 Di3510 6 Press the Start key ...
Page 63: ...Available Features 3 Di2510 Di3010 Di3510 3 19 9 Touch Enter ...
Page 64: ...3 Available Features 3 20 Di2510 Di3010 Di3510 ...
Page 90: ...4 Before Making Copies 4 26 Di2510 Di3010 Di3510 ...
Page 180: ...8 Administrator Management Operations 8 24 Di2510 Di3010 Di3510 ...
Page 200: ...9 Copy Paper 9 20 Di2510 Di3010 Di3510 ...
Page 232: ...10 Original Documents 10 32 Di2510 Di3010 Di3510 ...
Page 266: ...11 Specifying Copy Settings 11 34 Di2510 Di3010 Di3510 ...
Page 276: ...12 Touch Panel Messages 12 10 Di2510 Di3010 Di3510 8 Open then shut the misfeed clearing door ...
Page 315: ...Appendix 14 Di2510 Di3010 Di3510 14 11 14 3 Function Combination Table ...
Page 316: ...14 Appendix 14 12 Di2510 Di3010 Di3510 ...


