background image

Page

10

2

SOUNDS

…

 Step 7

Press the 

RIGHT 1

 panel button.

The 

RIGHT 1

 box will become highlighted, with 

Concert Grand

 written in large letters to indicate 

that the Concert Grand sound is selected, and that 

the part is active.

The LED indicator for the 

RIGHT 1

 panel button will 

also turn on.

…

 Step 8

Play the keyboard.

The sound of both the Concert Grand and Warm Strings will be heard simultaneously.

Once again, repeat the steps above, experimenting with different sounds for the 

RIGHT 1

 and 

RIGHT 2

 parts.

Continue to activate and deactivate the two parts until you become familiar with this important control system.

„

 THE ‘LEFT/SPLIT’ PART

Having familiarized ourselves with the

RIGHT 1

 and 

RIGHT 2

 parts, let's continue this introduction of the part controls 

by experimenting with the

LEFT/SPLIT

 part.  The 

LEFT/SPLIT

 part allows a third instrument sound to be assigned to 

the left side of the keyboard.  This is often used to play bass parts within the lower two octaves of the keyboard, however 

the exact length (i.e. number of keys) can be freely altered by adjusting the 

SPLIT POINT

.

…

 Step 1

Press the 

LEFT/SPLIT

 panel button.

The 

LEFT/SPLIT

 box will become highlighted to 

indicate that the part is active.

The LED indicator for the 

LEFT/SPLIT

 panel button 

will also turn on.

A keyboard image will appear in the bottom area of 

the display.

…

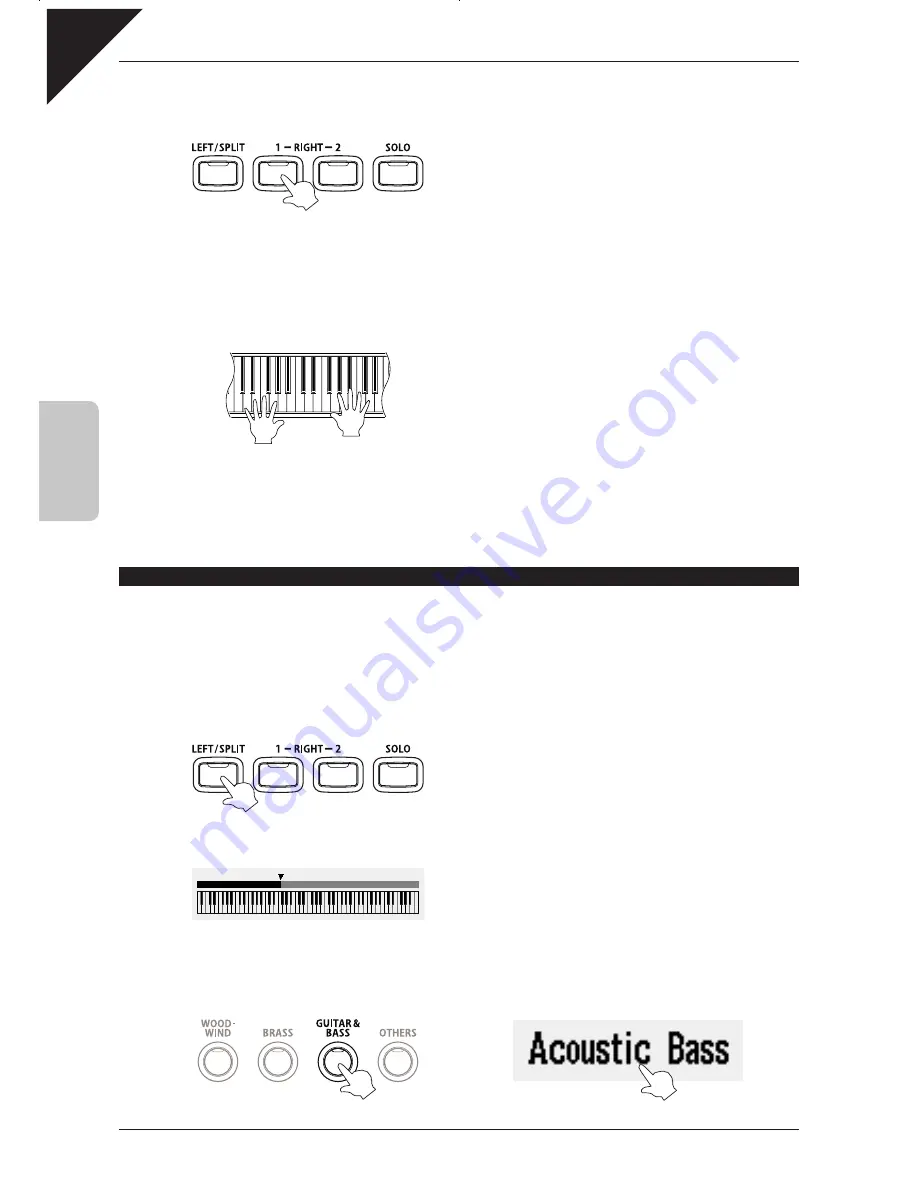
 Step 2

Select the 

Acoustic Bass

 sound for the 

LEFT/SPLIT

 part.

„

„

„

„

„

¨

Summary of Contents for Concert Performer CP139

Page 1: ...1 OVERVIEW OF CONTROLS 2 SOUNDS 3 STYLES 4 RECORDER 5 USB USAGE Quick Start Guide ...

Page 2: ......

Page 3: ...a song Deleting saving and loading a song Saving and loading a song to from USB memory Playing MP3 audio files from USB memory Saving MP3 audio files to USB memory TABLE OF CONTENTS 1 OVERVIEW OF CONTROLS 4 PANEL BUTTONS 4 TEMPO VALUE DIAL VOLUME SLIDERS 4 TOUCH SCREEN DISPLAY 5 2 SOUNDS 6 THE RIGHT 1 PART 6 THE RIGHT 2 PART COMBINING WITH RIGHT 1 8 THE LEFT SPLIT PART 10 ADJUSTING THE SPLIT POINT 1...

Page 4: ... functions Finally many of the buttons also contain an LED indicator which will turn on or off when a function is activated or deactivated The position and grouping of the panel buttons should become familiar reasonably quickly allowing you to navigate around the CP139 almost instinctively and concentrate on making truly great music TEMPO VALUE DIAL VOLUME SLIDERS The Tempo Value dial is used to i...

Page 5: ... button on the LCD display Press the RIGHT 1 panel button If no panel buttons are pressed and the LCD display is not touched while showing different screen menus such as the sound or style category lists the LCD display will automatically return to the MAIN screen after a period of 20 seconds To adjust this waiting period or to prevent the MAIN screen from returning automatically please refer to t...

Page 6: ... CP139 with buttons to the left of the display associated with selecting and adjusting accompaniment styles and buttons to the right of the display used to select and adjust instrument sounds Step 1 Turn on the instrument After a brief wait the MAIN screen will appear as seen below The RIGHT 1 box is highlighted with Concert Grand written in large letters to indicate that the Concert Grand sound i...

Page 7: ...ess the PIANO panel button A selection of acoustic piano electric piano and keyboard instrument sounds will be shown in the LCD display Initially all sounds within a category will be available for selection the full list will often span several pages To display a particular type of sound such as just the available acoustic pianos touch the corresponding sub category Step 5 Touch the Acoustic sub c...

Page 8: ...eriod or to prevent the MAIN screen from returning automatically please refer to the Display Control instructions in the main CP139 owner s manual THE RIGHT 2 PART COMBINING WITH RIGHT 1 The CP139 allows four different sound parts to be defined to the keyboard at any one time The RIGHT 1 and RIGHT 2 parts are used most frequently and can either be played separately or together In the following step...

Page 9: ...r a few seconds to return to the MAIN screen The RIGHT 2 box will be highlighted and Warm Strings will be written in large letters to indicate that the Warm Strings sound is selected and that the part is active Step 6 Play the keyboard The beautiful sound of Warm Strings will be heard The procedure above allows us to assign different sounds to the RIGHT 1 and RIGHT 2 parts activating and deactivat...

Page 10: ...ant control system THE LEFT SPLIT PART Having familiarized ourselves with the RIGHT 1 and RIGHT 2 parts let s continue this introduction of the part controls by experimenting with the LEFT SPLIT part The LEFT SPLIT part allows a third instrument sound to be assigned to the left side of the keyboard This is often used to play bass parts within the lower two octaves of the keyboard however the exact...

Page 11: ...ends and where the RIGHT 1 and RIGHT 2 parts begin The default SPLIT POINT is between keys F 2 and F 2 Step 1 Press and hold the LEFT SPLIT panel button Step 2 Press a key on the keyboard This key will be used as the new SPLIT POINT defining the length of the LEFT SPLIT part and the RIGHT 1 and RIGHT 2 parts It is also possible to increase or decrease the SPLIT POINT incrementally by touching the W...

Page 12: ... for playing monophonic voices such as flute saxophone and other woodwind instruments When two or more keys are pressed simultaneously only the highest note will be played however this behavior can be adjusted if necessary For more information please refer to the Solo Settings instructions in the main CP139 owner s manual It is also possible to define an additional SPLIT POINT for the right side of ...

Page 13: ...d stopping the accompaniment with introduction and ending phrases adding fill in patterns and also adjusting the tempo SELECTING A STYLE Step 1 Press the LATIN ISLAND panel button A selection of popular accompaniment styles from the Latin Island category will be shown in the LCD display Step 2 Touch Piano Bossa Step 3 Press the START STOP panel button The LED indicator for the START STOP panel butt...

Page 14: ...ss one of the four FILL IN panel buttons The LED indicator for the pressed FILL IN panel button will turn on briefly Additional patterns will be added to the drum rhythm helping to punctuate the end of each phrase Step 7 Touch the TEMPO box in the LCD display The TEMPO box will become highlighted to indicate that the tempo function has been selected Step 8 Rotate the TEMPO VALUE dial The tempo of t...

Page 15: ...con will also appear indicating that the chord sequence of the accompaniment style can be controlled by pressing single keys within the bass split region Step 2 Press the SYNC FADE OUT panel button The LED indicator for the SYNC FADE OUT panel button will turn on indicating that the SYNC FADE OUT function is activated If as in this case the button is pressed before the accompaniment style has star...

Page 16: ...eyboard The Piano Bossa accompaniment will start to play in the key of C with a 2 bar introduction passage When One Finger mode is active it is possible to change the key of the accompaniment backing simply by pressing one or two keys For more information on the the various key recognition modes and a complete explanation of how to play different chords using the One Finger mode please refer to th...

Page 17: ...nds and tempo allowing you to play the piece immediately In the follow steps we will use the Song Stylist to select and play the John Denver song Take Me Home Country Roads however please feel free to select an alternative song of your choosing if preferred Step 1 Press the SONG STYLIST panel button An alphabetical list of letters will be shown in the LCD display Step 2 Touch the C category A list...

Page 18: ...starts Step 5 Press the second top most C key in the bass split region of the keyboard The backing accompaniment to Take Me Home Country Roads will begin with an introduction passage Control the backing accompaniment by playing chords with the left hand while playing the song melody with the right hand Step 6 Press the SYNC FADE OUT panel button The backing accompaniment and the main keyboard soun...

Page 19: ...The LED indicator for the REC panel button will start to flash indicating that the recorder function is in Ready mode The EASY RECORD screen will be shown in the LCD display When the recorder function is active buttons to control the style and individual keyboard parts will appear at the bottom of the screen Using these buttons it is possible to record play or mute each part Initially all parts wil...

Page 20: ...paniment has stopped the recorder will continue to capture notes from the keyboard In order to stop the recording we must also press the PLAY STOP panel button Step 6 Press the PLAY STOP panel button The LED indicator for the PLAY STOP panel button will turn off indicating that recording has stopped The STYLE RIGHT 1 and SOLO part buttons shown at the bottom of the screen will now be set to PLAY m...

Page 21: ...anel button LED indicator for the PLAY STOP panel button will turn on indicating that a song is currently playing The recorded song will start to play Step 2 Press the RWD and or FWD panel buttons to rewind or fast forward the song Step 3 Press the RESET panel button The song will stop playing and the playing recording position of the song will reset to the beginning ...

Page 22: ...o remain available after the instrument is turned off it must be saved to the internal song memory Step 1 Touch the MORE button in the bottom left corner of the LCD display The part buttons shown at the bottom of the screen will be replaced by BACK SAVE DELETE and MY SONGS buttons Step 2 Touch the SAVE button The SAVE MY SONG screen will be shown in the LCD display This screen functions as a virtu...

Page 23: ...all song data allowing a new song to be recorded from scratch Note that this is not the same as deleting a song from the internal song memory the two memories operate independently of one another As mentioned previously the recorder memory is to be used temporarily and will be cleared automatically when the instrument is turned off Step 1 Press the PLAY STOP panel button The LED indicator for the ...

Page 24: ...ch the YES button The recorder memory will be cleared Let s confirm this point by once again by attempting to play the recorder song Step 5 Touch the BACK button then press the PLAY STOP panel button No song will be heard thus confirming that the recorder memory has been cleared In addition the part buttons shown at the bottom of the screen will all show empty lines ...

Page 25: ...opic by familiarizing ourselves with loading songs from the internal memory back into the recorder memory Step 1 Press the PLAY STOP panel button No song will be heard however the EASY RECORDER screen will be shown in the LCD display Step 2 Touch the MORE button in the bottom left corner of the LCD display The part buttons shown at the bottom of the screen will be replaced by BACK SAVE DELETE and ...

Page 26: ... the internal song memory into the recorder memory Step 5 Press the PLAY STOP panel button LED indicator for the PLAY STOP panel button will turn on indicating that a song is currently playing The recorded song will start to play confirming that the load operation was successful Continue recording deleting saving and loading songs to familiarize yourself with the basic operation of the instrument s...

Page 27: ...our recordings as MP3 files for emailing to friends and family or listening to on an iPod etc SAVING A SONG TO USB MEMORY While we have already learned how to save and load songs to and from the CP s internal memory the following steps will explain how to save your performances to USB memory allowing songs to be played on other instruments or imported into computer sequencing software First let s s...

Page 28: ...ve song format used by KAWAI Concert Performer instruments SMF The Standard MIDI File format compatible with most MIDI instruments Stylist The Internal format plus additional Registration settings Select the desired song format by rotating the TEMPO VALUE dial When SMF format is selected data in the STYLE part will automatically be copied to tracks 9 16 of the SMF thus erasing any existing data th...

Page 29: ...NG FROM USB MEMORY The following steps will explain how to load your performances from USB memory In order to properly test this function please clear the temporary recorder memory by repeating the DELETING A SONG FROM RECORDER MEMORY steps explained on page 23 Step 1 Connect a USB memory device to the USB port then press the USB panel button The LED indicator for the USB panel button will turn on...

Page 30: ... currently stored on the connected USB memory device Step 3 Touch the country roads song saved in the previous topic The USB LOAD SONG screen will be shown in the LCD display Step 4 Touch the EXEC button The country roads song will be loaded from the USB memory device into the recorder memory ...

Page 31: ...audio files stored on USB memory to be played back directly through the instrument s speaker system This feature is particularly useful when attempting to learn the chords or melody to a new piece or when you simply wish to play along with your favorite song First prepare a selection of MP3 audio files and copy them to a USB memory device Step 1 Connect a USB memory device to the USB port then press...

Page 32: ... LIST screen will be shown in the LCD display listing MP3 files currently stored on the connected USB memory device Step 3 Touch the desired MP3 audio file The AUDIO PLAY screen will be shown in the LCD display Step 4 Touch the button The MP3 audio file will begin to play ...

Page 33: ...nue to play The MAIN screen will be shown in the LCD display allowing instruments sounds to be changed etc To return to the AUDIO PLAY screen press the USB button once again Playback of the MP3 audio file can be controlled by touching the transport buttons at the bottom of the screen For more information about the Play Audio functions please refer to the Playing MP3 WAV Audio instructions in the ma...

Page 34: ...ing them to be emailed to friends and family or played back on other devices such as an iPod Step 1 Connect a USB memory device to the USB port then press the USB panel button The LED indicator for the USB panel button will turn on The USB MENU screen will be shown in the LCD display Step 2 Touch the Record Audio text The AUDIO RECORD TYPE screen will be shown in the LCD display allowing the name ...

Page 35: ...UDIO RECORD screen will be shown in the LCD display This screen is similar to the MAIN screen and allows sounds and styles to be adjusted before creating the recording Step 4 Touch the button The audio recorder will enter Ready mode Step 5 Touch the button ...

Page 36: ...on The audio recorder will stop recording and a new digital audio file will be saved to the USB memory device Exit the Audio Recorder and return to the Audio Player to check that the new digital audio file has been created If successful the new MP3 audio file should appear in the AUDIO PLAY LIST screen and will play when selected For more information about the Record Audio functions please refer to t...

Page 37: ...ope that this introductory step by step guide has allowed you to familiarize yourself with some important features of the instrument while also providing a glimpse of the power of this incredible instrument On behalf of everyone at KAWAI may your new instrument bring you many years of musical enjoyment The CP139 Team ...

Page 38: ...Page 38 USER NOTES ...

Page 39: ...Page 39 ...

Page 40: ...CP139 Quick Start Guide KPSZ 0318 816763 OW1037E I0911 Version 1 Printed in Indonesia Copyright 2009 KAWAI Musical Instruments Mfg Co Ltd All Rights Reserved ...

Page 41: ...ons 11 Appendices 2 Listening to the Piano 3 Playing the Piano Basic Controls 4 Recording a Song 5 Using a Style 6 Concert Magic 7 System Menu 8 Vocal Harmony Mic Effects 9 Using USB Memory 10 CD Operations Owner s Manual ...

Page 42: ...All descriptions and specifications in this manual are subject to change without notice ...

Page 43: ...hestrated music in hundreds of musical genres Thanks to the Song Stylist feature you will never have to worry about finding the best sounds and style to perform a particular song The Concert Performer incorporates many professional features such as a 16 track Recorder Microphone Input USB to Device functionality and MP3 recording playback For the non player KAWAI s unique Concert Magic feature crea...

Page 44: ...g Edit 55 Bar Editing 56 Event Edit 62 Style Maker 63 My Songs 63 Piano Music Maker 64 5 Using a Style 66 1 Selecting and Playing a Style 66 Intro Ending 67 Fill In and Variation 68 2 Auto Accompaniment System 69 3 1 2 Play 71 4 Registration 72 5 Song Stylist 75 6 Keyboard Harmony 78 7 Creating Your Own Styles 79 8 Conductor 80 Easy Edit 80 Advanced Edit 81 User Conductor Styles 83 9 Making a Styl...

Page 45: ...ns 144 1 CD R Operations 144 2 Playing an Audio CD 145 3 Recording to CD 146 Recording Concert Magic Songs to CD 147 Recording to CD with additional sound sources 148 4 Closing Finalizing Your CD 149 5 Advanced Options 150 Delete Last Track CD RW only 150 Formatting a CD RW 151 11 Appendices 152 1 Connection Examples 152 2 Assembly Instructions 154 3 USB MIDI Information 157 Notes on USB MIDI Usag...

Page 46: ...ese instructions 3 Heed all warnings 4 Follow all instructions 5 Do not use this apparatus near water 6 Clean only with dry cloth 7 Do not block any ventilation openings Install in accordance with the manufacturer s instructions 8 Do not install near any heat sources such as radiators heat registers stoves or other apparatus including amplifiers that produce heat 9 Do not defeat the safety purpose...

Page 47: ...yboard When using the headphones do not listen for long periods of time at high volume levels It is a good practice to have the instrument near the AC outlet and the power cord plug in a position so that it can readily be disconnected in an emergency because electricity is always charging while the plug is in the AC outlet even in a power switch off condition The chair must be used properly it mus...

Page 48: ...allow any foreign matter to enter the product Doing so may cause the illumination to fall over resulting in fire Do not place naked flame such as lighted candles on the product CAUTION Indicates a potential hazard that could result in injury or damage to the product or other property if the product is handled incorrectly Using the product in such areas may result in product breakdown Use the produ...

Page 49: ...e collection point You should not mix it with general household waste Disposing of this product correctly will prevent potential negative effects on the environment and human health which could otherwise arise due to inappropriate waste handling For further details please contact your local authority European Union only Changes or modifications not expressly approved by the party responsible for c...

Page 50: ...71 This button is used to automatically choose an appropriate sound and setup for the selected style k STYLE page 66 These buttons are used to select an Accompaniment Style to play along with l TAP TEMPO page 34 67 This button is used to tap in the desired tempo for a song or Style m METRONOME page 34 This button is used to turn the Metronome on off n ACC ON OFF page 69 This button is used to turn...

Page 51: ...E PERFORMANCE page 36 This button provides quick access to performance settings for Solo and Left Split parts as well as left pedal F KBD HARMONY page 78 This button turns on off the Harmony for instrument sounds Press and hold the button to select the Harmony settings menu G EFFECTS page 30 This button is used to select the Effects and Chorus settings menu H REVERB page 28 This button turns on of...

Page 52: ...phone Jack This jack is used to connect a microphone or other comparable mic level sound Rear Terminals T S U T S U Y EXP Pedal This jack is used to connect an optional expression pedal Z Video Out This jack is used to connect the CP to aTV set or external monitor display Line Out Jacks These jacks are used to provide stereo output of the CP s sound to amplifiers tape recorders or similar equipment...

Page 53: ...in capital letters for clarity Most of these buttons have an LED Indicator small light on them This Indicator will be turned ON when a function is in use so that you can quickly see if that function is active LCD Touch Screen The LCD Touch Screen is the window through which the Concert Performer communicates with you The large display size allows many items to be clearly displayed at the same time...

Page 54: ...turn to the MAIN screen after a period of 20 seconds To adjust this waiting period or to prevent the MAIN screen from returning automatically please refer to the Display Control instructions on page 124 of this owner s manual Dial The Dial is used to change data values and scroll through options that are displayed on the LCD screen When you turn the Dial you will notice that whatever item on the L...

Page 55: ...ction provides a basic introduction and overview of most of the features found in the CP There are also many built in Demonstration songs that really show off the musical potential of the Concert Performer These songs were composed by some of the top musicians in the music industry and will undoubtedly impress and inspire you 2 Using the Help To get Help simply press the HELP button to the left of...

Page 56: ...uch the screen to change the language of the HELP text English German French and Spanish are available Use the L and R buttons to selct a Help topic INDEX Takes you to the Help menu LANGUAGE Selects the language Step 5 To leave Help press the EXIT button ...

Page 57: ...emporary piano music as long as you remain in that screen The songs are randomly selected from the Piano Music feature To listen to a Sound Style Demo Step 1 Press the DEMO button The Demonstration menu will be displayed Step 2 Select your preferred Demo Touch KEY FEATURES to select the Key Features demo Press a SOUND category button to select a SOUND category demo Press a STYLE category button to...

Page 58: ...ng the appropriate button To select to a Key Features Demo Step 1 Press the DEMO button The Demonstration menu will be displayed Step 2 Touch KEY FEATURES to enter the Key Features Demo menu Step 3 Touch the desired Key Features topic The selected topic s text and graphics are displayed in the LCD screen Touch the Key Features topic that you would like to read about GUIDED TOUR Plays the Guided To...

Page 59: ... It is also possible to create your own My Piano Music library using recorded or imported songs stored in the internal memory To listen to the Piano Music Step 1 Press the PIANO MUSIC button The Piano Music menu will be displayed Step 2 Touch your preferred Piano Music category Step 3 Touch the song that you wish to listen to PAGE Display additional songs on the other pages CATEGORIES Takes you ba...

Page 60: ...ng then touch the SONG LIST buttons to return to the category s song list Step 7 Touch the SKIP button to skip randomly to another song Step 8 To exit press the EXIT PLAY STOP or PIANO MUSIC buttons Making your Favorites list You can make your Favorites list for each Piano Music category Ten songs can be programmed in the order of playback NOTE You cannot select between songs in different categori...

Page 61: ...t function is not available when using My Piano Music My Piano Music It is also possible to create your own My Piano Music collection using recorded or imported songs stored in the internal memory Please refer to the My Piano Music instructions in he Advanced Recorder section of this owner s manual for more information regarding how to create custom Piano Music songs To load your My Piano Muisic c...

Page 62: ... The SOLO part can also be set to split the keyboard so that the sound assigned to the SOLO Part is only heard when you play above a specified key split point on the keyboard See Solo Settings on page 110 for details Activating the LEFT SPLIT Part automatically splits the keyboard so that the sound assigned to the LEFT SPLIT Part is only heard when you play below a specified key split point Each Par...

Page 63: ...ve as the split point The key you press will become the lowest note the Right hand Parts will play RIGHT1 RIGHT2 and SOLO The LEFT SPLIT sound will be heard when keys below the split point are played Step 3 The split point for the LEFT SPLIT part can also be set from the PERFORMANCE button menu You may also touch the W and X arrows either side of the keyboard diagram to move the split point On the...

Page 64: ...be stored and recalled simply and conveniently To select a Sound Step 1 In the main play screen select the touch the Part to which you wish to assign a new sound The selected Part will become highlighted Step 2 Press the SOUND button for the sound category that you are interested in Sounds from the first page of the Master tab will be displayed The Master tab lists all available instruments from th...

Page 65: ...f predefined Favorite sounds PAGE Selects the different pages SOUND SELECT Chose the sound for the selected Favorite position Step 2 Touch one of the Favorite sound names That entry will become selected Step 3 Touch the SOUND SELECT button The Favorites screen will enter EDIT mode Step 4 Press one of the SOUND category buttons Step 5 Select the desired sound The selected sound will become a Favorit...

Page 66: ...UTTONS Selects the part to adjust HARMONY Show the Harmony screen Step 2 Touch the buttons at the bottom of the screen to select the Part to be adjusted Step 3 Touch the slider that you wish to adjust A larger version of the selected slider will be shown BACK Return to the main Mixer screen PART BUTTONS Selects the part to adjust HARMONY Show the Harmony screen Step 4 Use the Dial or touch and dra...

Page 67: ...r screen touch the STYLE MIXER button The Style Mixer screen will be shown BACK Return to the main Mixer screen PART BUTTONS Selects the Section to adjust Step 2 Touch the buttons at the bottom of the screen to select the Part to be adjusted Step 3 Use the Dial or touch and drag the slider to adjust the value Step 4 Touch the the BACK button to go back the previous Mixer screen or press the EXIT b...

Page 68: ...rument For example a moderate Delay effect is used on the Church Organ to recreate the sense of being in a large church and a Rotary speaker effect is used on the Drawbar organ to give it an authentic vintage feel If you wish you can change any of these effect settings separately for each sound then save them as the new Preset effect settings for that Sound In addition by setting the Effect For So...

Page 69: ...ates the sound of a metallic plate reverb The LED Indicator on the REVERB button will be lit whenever Reverb is turned on for the any Part except ACC regardless of each part s Effect Priority See Effect Priority Guidelines later in this chapter for an explanation of Effect Priority Adding Chorus Step 1 Press the EFFECTS button The EFFECT CHORUS select screen will be displayed EFFECT EDIT Show the ...

Page 70: ...types when in the Chorus Settings menu There is a fifth chorus type which is assigned as an Effect from the Effect Settings menu In this way you can actually have two chorus effects active if so desired Adding an Effect Step 1 Press the EFFECTS button The EFFECT CHORUS screen will be displayed EFFECT EDIT Show the Effect Edit screen CHORUS EDIT Show the Chorus Edit screen Step 2 Touch the EFFECTS E...

Page 71: ...y discernible in a mix Distortion Adds frequencies that were not present in the original sound resulting in a fuzzy or warmer tone Effect Priority Guidelines Reverb and Chorus are global effects In other words all of the Parts and the Accompaniment Style must share the same Reverb and Chorus type However each of these Parts can have a different amount of Reverb and Chorus applied to them In additi...

Page 72: ... can however turn the effect on for any Part by adjusting the Effect On Off option in the display for that Part Example Assume that your CP is set up according to the following chart SOLO RIGHT1 RIGHT 2 LEFT Part Inactive Active Inactive Active Effect On On Off On If you then select a different sound for RIGHT1 the Effect setting for the SOLO RIGHT2 LEFT will be turned off automatically This is be...

Page 73: ...r of the LCD screen The LCD screen shows you a number telling you how many half steps up or down you have transposed the piano 5 for example represents a transposition that is 5 half steps lower Step 2 To cancel the Transpose setting press both the W and X buttons at the same time The transpose amount will disappear from the LCD screen indicating that the CP is now back to its original setting To ...

Page 74: ...to change the TEMPO or BEAT value You can also adjust the tempo by tapping on the TAP TEMPO button Simply tap on the button with your finger three or more times at the desired tempo and the CP will automatically translate that into a tempo value on the screen Step 4 Touch the VOLUME button Step 5 Use the dial or touch the VOLUME and VOLUME buttons to adjust the metronome volume Step 6 To stop the m...

Page 75: ...it any function or editing screen except for Concert Magic and immediately return to the Main Screen When you are using Concert Magic pressing the Piano Only button will change the Concert Magic song s preset sounds to Concert Grand piano Pressing and holding the PIANO ONLY button will revert the panel settings to their original factory settings You can also use the Piano Only button as a panic bu...

Page 76: ...crement Switches from one Registration to another 8 to 1 To set the pedals Step 1 Press and hold the PERFORMANCE button The Performance screen will be displayed Step 2 Touch LEFT PEDAL OVERRIDE or CENTER PEDAL OVERRIDE and use the dial to select the function to be assigned to the pedals When Glide or Modulation is selected additional settings can be adjusted using the edit button Step 3 Press the ...

Page 77: ...s and hold the PERFORMANCE button The Performance screen will be displayed Step 2 Touch PERFORMANCE BUTTON ASSIGN and use the dial to assign a function Step 3 Press the PERFORMANCE button to exit Step 4 Press the PERFORMANCE button The LED will light and the function assigned to the button will be activated If Portamento is assigned the word BUTTON will be displayed in the upper left on the main s...

Page 78: ...o play only one note at a time monophonic it is important to select which note will be played by the Solo part when more than one key is played at a time There are three options Top Note The Solo part plays only the highest note among the notes played at one time Bottom Note The Solo part plays only the lowest note among the notes played at one time Last Note The Solo part plays only the last key ...

Page 79: ... above them There is no arrow to indicate the Solo split point because the split point for the Solo Part cannot be changed on the main screen To set the Solo Mode and Solo Split point Step 1 Press and hold the PERFORMANCE button The Performance screen will be displayed Step 2 Touch SOLO MODE and use the dial to select the mode Step 3 If the Solo Mode is set to Split then touch SOLO SPLIT POINT and...

Page 80: ... read both Type 1 and 0 SMF files Please read the following sections carefully to learn more about the capabilities of the Easy and Advanced recorder 1 Easy Recording The Easy Recorder will record all of your playing as well as any settings you have made on the front panel or in the mixer screen at the touch of a button Simply press the REC button and the CP will begin recording with the first note ...

Page 81: ...eps You can also change sounds tempo and make other changes to the panel settings before you continue recording To Re record or make other changes to a previously recorded section of a song please read the section titled Re recording or adding another Part on page 42 To play back the recorded song Step 1 Press the RESET button in the RECORDER section of the front panel to return to the first bar of...

Page 82: ...e When you first record a song all Parts and the Style will be automatically set to REC but only the active Parts and the Style will be recorded When you are finished recording the status for any active Parts and the Style will automatically change from REC to PLAY After recording the status for any RIGHT LEFT SOLO Parts that were not active during recording will be automatically changed to to show ...

Page 83: ...sed for entering a name of the song Step 3 Touch the screen to enter a name for the song Step 4 Touch the EXEC button to store the song Erasing the song Whenever a Part is selected for recording the new performance is written right over any existing one that may be there for that Part In this sense the Easy Recorder is just like a tape machine A new song will simply erase the old song during the r...

Page 84: ... the pedal you assigned the Easy Loop Loop top will be selected and the Loop will be displayed Step 4 Depress the pedal again Loop end will be selected and the bars between Loop top and Loop end will be repeated Step 5 To clear the loop depress the pedal again or stop the playback by pressing the PLAY STOP button Display of a Score In the Easy Recorder screen a score can be displayed Touch the SCO...

Page 85: ...n CHORD Show hide the name of the chord CHORD CH Select the channel to be used for chord recognition BACK Takes you to the previous screen MORE Takes you to the next screen Transpose Allows the key signature of the notated score to be changed Quantize Allows the length and timing of recorded notes to be corrected automatically C Adjusts the transpose amount QUANTIZE Quantize the notes BACK Takes y...

Page 86: ...e Track Settings Select the sound to be assigned to each of the 16 tracks and change the track s recording and play back status Loop Settings Edit loop settings for the song Song Edit Edit the general settings for the song Bar Edit Edit the song by bars Event Edit Edit the song by MIDI events Style Maker Create your own new user Style PAGE Shows additional recording options Real time Recording Wit...

Page 87: ...ogether Repeatedly touching REC MODE switches between the REPLACE and OVERDUB MENU Cancels the real time recording setup and returns you to the Advanced Recorder menu MIXER Takes you to the Mixer menu TRACK SETTINGS Shows the Track Settings menu LOOP Turns the Loop feature on off When you select a Style to record the default tempo for that Style is ignored The Style will use the current tempo sett...

Page 88: ...zoomed version of the selected area will be shown allowing adjustments to be made more easily BACK Returns you to the Advanced Recorder menu Step 5 At this point you can start recording or go to another menu to continue setting up You can make changes on the Mixer screen at any time except while the CP is busy recording The Mixer screen is accessible from the Advanced Recorder menu Track Settings ...

Page 89: ...ring playback will select Play or Mute Touching the STATUS button after entering Real time record but before recording begins will select Play MIDI Rec or Mute Rec can only be selected from the Real time Record screen The Track settings screen cannot be accessed during recording To use the Track Settings screen Step 1 Touch TRACK SETTINGS in the Advanced Recorder menu Step 2 Touch the arrows at th...

Page 90: ...he Advanced Recorder menu Step 2 Touch the screen to select the different loop settings then use the Dial to change the values LOOP Turns the Loop ON OFF START BAR Specifies the starting bar END BAR Specifies the ending bar MENU Takes you back to the Advanced Recorder menu Step 3 Touch LOOP to turn the Loop ON OFF Step 4 Touch START BAR to specify the bar where you want the Loop to start Step 5 Touc...

Page 91: ... Touch STYLE PASTE while you are in the Advanced Recorder menu The LCD screen will prompt you for confirmation NO Cancels the Style Paste YES Proceeds with Style Paste Step 2 If you would like to proceed touch theYES button or touch the NO button to cancel Punch In Recording Punching In means being able to automatically start recording right in the middle of a track that is playing back continue re...

Page 92: ...UTO PEDAL switches between the Auto and Pedal MENU Takes you to the Advanced Recorder menu MIXER Takes you to the Mixer Settings menu REHEARSAL Plays the song for rehearsal LOOP Turns Loop on off If you set the CP to Punch In at the very first measure of the song the metronome will automatically play a two measure intro to assist you with the timing These ticks will not be recorded as part of the t...

Page 93: ...and use the Dial to adjust values REC TRACK Selects the recording track REC SOUND Selects which sound is assigned to the track START BAR Selects which measure you d like to start recording at B M Changes the time signature REC MODE Selects the recording mode REPLACE erases the previous data and records the new data in its place OVERDUB mixes the new data with the previous data so that both are hea...

Page 94: ...Ebutton WhenyouareusingtheREPLACE mode for recording every time you press DELETE the list of your entered notes on the screen scrolls back one event and that event is erased immediately Therefore if you scroll back to the first beat of bar 5 of a 10 barlistofnotes everythingfrombar5onwillbeerased InOVERDUBmode however youcandeleteonly the most recently added note and scrolling back over the list us...

Page 95: ...ach space represents 24 clock pulses Therefore the number of displayed spaces per partition represents the duration of the beat For example if you choose the 4 4 time signature in the Step Recording settings the navigator should look as illustrated below Beat Measure BAR 3 4 partitions 4 beat rhythm 4 dot spaces 4 x 24 96 clock pulses a quarter note rhythm The dots do not represent the duration of...

Page 96: ...nitial tempo of the song TRANSPOSE Adjusts transposition MENU Takes you to the Advanced Recorder menu DELETE Deletes the song Bar Editing Bar Edit contains many useful editing functions You can edit your song one bar or any number of bars at a time To use Bar Edit Step 1 Select Bar Edit in the Advanced Recorder menu select Bar Edit The Bar Edit screen will be displayed Step 2 Use the touch screen ...

Page 97: ... will use to shift the notes you want to quantize For example setting a quarter note resolution will shift all of the quantized notes to the nearest quarter beat Setting an eighth note resolution will shift all of the quantized notes to the nearest eighth beat and so on In the Advanced Recorder quantize values are expressed in note values and as a number that indicates how many clock beats each no...

Page 98: ... be placed FROM TRACK Selects the track to be copied Use the Dial to select the track numbers 1 16 Tempo or Chord START BAR Selects the bar where the data that you are copying starts Use the Dial to change the bar number END BAR Selects the bar where the data that you are copying ends Use the Dial to change the bar number BACK Returns you to the Advanced Recorder menu UNDO Undoes the copying This ...

Page 99: ...enu will be displayed You can insert empty bars into a track between bars that have data or at the first blank bar at the end of the track TO TRACK Selects the track where the empty bars are going to be inserted Choose 1 16 Tempo Chord or All BAR Selects the location in the destination track where you want the empty bars inserted Use the Dial to choose the location BAR Selects the number of empty b...

Page 100: ... where you want to copy data Choose 1 16 BACK Returns you to the Advanced Recorder menu UNDO Undoes the merge This option is not always available EXEC Proceed with the merge Gate Time Modify Gate time refers to the length of a note as a percentage Whatever the length of a note is when it is first recorded this value is considered as its Gate time of 100 By editing the length of the note you can sho...

Page 101: ...at the CP Advanced recorder divides each beat in a bar into 96 clock beats also expressed as a quarter note Therefore there are 48 clocks per eighth note and 24 clocks per sixteenth note and so on This relationship holds true regardless of the song s tempo On the CP you can shift the timing of all notes in a track by shifting the entire track ahead negative values or behind positive values the bea...

Page 102: ... 2 Select the track that you want to edit using the TRACK buttons Note that the Style Chord and Tempo track can be edited as well ARROWS Moves the cursor up and down the list of entered notes in OVERDUB mode DELETE Removes the selected event INSERT Creates a new event REPLACE Modifies the existing event MENU Takes you to the Advanced Recorder menu TRACK Selects the track to work with CURSOR Moves t...

Page 103: ...ent Edit changes Step 6 Touch the EXEC button to proceed or press CANCEL The CP will prompt you for confirmation Step 7 Touch the MENU button to return to the Advanced Recorder menu when you are done editing Style Maker The Style Maker allows you to create your own Style accompaninments See page 79 for more information My Songs The My Songs screen allows you to load save and delete Easy Recorder an...

Page 104: ...tored in the CP s internal song memory to be used as custom My Piano Music pieces Before the songs can be used however they must first be converted into the two track Piano Music format Selecting a song for My Piano Music Step 1 From the Piano Music Maker menu select the Select Song option The display will show a list of songs stored in the internal memory Step 2 Select a song to be used as a My Pi...

Page 105: ... Music Maker menu select the Delete option The display will show a list of custom My Piano Music songs Step 2 Select a song to be deleted and touch EXEC The Piano Music song will be deleted Loading My Piano Music songs Please refer to the instructions in on page 132 for more information ...

Page 106: ...ed into 15 categories 6 of which are accessible directly using the dedicated STYLE SELECT button on the front panel while the remaining 9 categories are accessible through a separate screen assigned to the OTHERS panel button As with the SOUND category buttons the FAVORITES button allows up to 20 of your favorite styles to be group together for easy access without needing to remember in which cate...

Page 107: ...reviously chosen in the same category When you switch from one Style to another while it is running the new Style will wait until the beginning of the next measure before it begins to play Intro Ending When one of the Intro Ending buttons is pressed to start a Style the selected Intro pattern will be played before the selected Variation pattern plays There are both major and minor versions for eac...

Page 108: ...a musically appropriate spot Fill ins can also be used as a short intro First press the SYNC FADE OUT button then press one of the FILL IN buttons to select a desired Fill in Press any key on the keyboard to start the style After the Fill in plays the selected Variation will play To select a Variation press one of the four VARIATION buttons to select the desired Variation The Selected VARIATION bu...

Page 109: ... a chord anywhere across the 88 keys before the ACC System will recognize the chord type This mode is similar to Fingered however Full Keyboard recognizes chord types from three or more notes played anywhere across the 88 keys not just below the split point Bass Inversion When Bass Inversion is on the Bass Section of the Style will follow the lowest note of the chord voicing played on the keyboard...

Page 110: ...ing the chords one is selected by the front panel and the other is pre programmed for the Style This is because the sounds used by the Auto accompaniment Style are independent of the Left and Right Part sound settings Therefore you will hear the instrument sounds played by your hand as well as those generated by the accompaniment In most cases these are just duplicate notes being played using diff...

Page 111: ... to play Step 2 Press the 1 2 PLAY button The 1 2 Play indicator will become lit and the words 1 2 Play are displayed in the Main Screen The SYNC button is activated as well Step 3 Activate one of the INTO ENDING buttons if you want the Style to begin with an introduction Start the Style by playing a key on the left side of the keyboard or by pressing the START STOP button Step 4 Press the 1 2 PLA...

Page 112: ...ration group is designed to take full advantage of certain types of sounds available in the instrument Switching from one Registration Group to another instantly changes the Registration buttons from Pipe Organ settings to Orchestra settings for example The default Registration Group is American Pop a family of registrations designed to play popular music from the 1940 s through today With 8 Regis...

Page 113: ...STRATION GROUPS button Step 2 Touch the SAVE button then touch one of the five Registration Groups listed in which to save your setup Touch the PAGE buttons to view the 20 Registration Groups in sets of five Touch the name to select the Registration Group PAGE Display Registration Groups listed on pther pages Step 3 Press one of the 8 REGISTRATION buttons to specify which location you d like to save...

Page 114: ... display will show a virtual keyboard Step 4 Touch the screen to enter a new name for the Registration Group BACK Takes you to the previous menu SAVE Saves the new Registration Group name Step 5 Touch the SAVE button to confirm the new Registration Group name ...

Page 115: ... begin The Song Stylist contains no prerecorded music only the setup to play the chosen song You must play the actual music yourself To use the Song Stylist Step 1 Press the SONG STYLIST button The Name Menu list appears showing alphabet letters to search for the SONG STYLIST Touch the relevant part of the screen to begin searching for the title of a song Touch the screen to select your desired so...

Page 116: ...r usual manner You can operate the CP normally and make any changes to the Song Stylist setup that you wish STYLE Highlights the Style TEMPO Adjusts the Tempo LEFT Highlights the LEFT Part ARROW Adjust the split point SOLO Highlights the SOLO Part RIGHT 1 Highlights the RIGHT 1 Part RIGHT 2 Highlights the RIGHT 2 Part ARROW Adjusts the split point VOLUME Adjusts the volume level for the sound SONG...

Page 117: ...sical genres for the SONG STYLIST Step 2 Touch the SEARCH BY NAME buttons Touch the screen to take you to the first letter of the name of the desired song Step 3 Touch the PAGE buttons to search for the name of your song Then touch the song name to select it The CP automatically returns to the Main Screen ready with all of the settings for that song ...

Page 118: ...ghest note played in the right hand and doubles it an octave down Octave Duet Adds an Octave note and a Duet note Vocal 1 Adds a single note above the top note of the right hand based on the chord Vocal 2 Adds three notes based on the chord The lowest note will always be the root of the chord To use Harmony Step 1 Press the KBD HARMONY button The button will be lit to show that it is active The Ha...

Page 119: ... are the Conductor and the Style Maker The Conductor allows you to edit the Style data and personalize it to your taste The Conductor offers two ways to edit Easy Edit and Advanced Edit The Style Maker allows you to create Styles of your own There are three ways of using this feature Make a New Style Edit an Existing Style and Phrase Combination The CP can store up to 20 User Styles on board at on...

Page 120: ...d match the different phrases for each section to create your own unique arrangements Once you are satisfied with your edits you can save your Easy Style edits to the PRESET STYLE Advanced Style Edit This allows you to edit the finer details within a Style You have control over each Section s Sound Assignment volume level panning chorus and reverb settings Once you are satisfied with your edits you c...

Page 121: ...yles back to their original factory settings after you have pressed the SAVE button use reset Conductor on the Soft Reset screen See the section titled Soft Reset on page 122 Note Easy Edit doesn t allow you to edit the Intro Ending and Fill ins However muting a Section in the Style will result in automatic muting of the same Section in the Intro Ending and Fill ins If you mute a certain Section y...

Page 122: ...r Style NAME Names your Style switches to virtual keyboard screen BACK Back to the Advanced Style Edit SAVE Proceeds with saving the Style Step 7 Press the EXIT button to exit the Advanced Style Edit screen Important Note If you are using a User Style as the Source Style of your User Conductor that User Style must always be kept at the same location in the CP or else the User Conductor will not be...

Page 123: ... any User Conductor Styles available they will be displayed Step 2 Touch the screen to select your desired User Conductor Style Touch the screen to select your desired User Conductor Style PAGE Show User Conductor Styles on the other pages DELETE Deletes the selected User Conductor Style ...

Page 124: ...d with Section data copied from the initial source Style that you were asked to choose at the beginning of the Style Maker process The different Sections can be of varying bar lengths as long as they stay within the limit Having them all the same length may make the Style easier to use in a song but you may find that having uneven bar lengths among the Sections can create interesting musical result...

Page 125: ...phrase in the recording that you want to convert BAR LENGTH Selects the last bar of the phrase in the recording that you want to convert CHORD Enter the key that the phrase was in SAVE Saves the new Style EXEC Generates the new Style from your settings MORE Takes you to the next menu for more options PART Selects which Section s you are working with Pressing twice deactivates the Section so that i...

Page 126: ...a particular section in a pattern will be analyzed by the Auto accompaniment ACC System There are Two Accompaniment Types Chordal and Scalic melodic Chordal Phrases usually consist of block chords or arppegiated chords You should set this kind Phrase to Chordal Scalic Phrases usually play melodic phrases that serve to add interest to the style as well as provide counter melodies and riffs Melodic ...

Page 127: ... find the one that works best with each Phrase Bass Limit This is an option for the Bass section and sets the limit for the lowest note the Bass will play If a note in a Bass Phrase falls below the limit it will automatically be transposed up an octave To adjust the auto accompaniment system Step 1 Touch the buttons on the left side of the screen to select the settings you wish to change BACK Takes...

Page 128: ...uch the ENTER button to proceed to the next screen The LCD screen will display the first Phrase Combination screen Step 4 Touch the screen to select which of the four Fill ins and Variations you would like to change ARROW Selects the pattern to change Choose Variation 1 4 or Fill in 1 4 Selects the Section to be modified ARROW Selects the pattern to change Choose Variation 1 4 or Fill in 1 4 BACK Ta...

Page 129: ...e location to be saved NAME Names the style PRESET TEMPO Sets the default tempo for the style BACK Takes you to the previous menu SAVE Saves the style to User Style Step 11 Touch the SAVE TO button then use the Dial to select the location that the style should be saved to Step 12 Touch NAME then use the virtual keyboard to enter a name for the new Style Step 13 Touch the SAVE button ...

Page 130: ...t Settings Each of the CP instrument Sounds has preset Chorus and Effect settings that are applied automatically whenever that sound is selected You can change these settings to suit your tastes and save them so they become the preset settings for that Sound To adjust the settings Step 1 Select the sound you want to edit and touch the SOUND EDIT button The LCD screen will display the Sound Edit Me...

Page 131: ...ound Attack determines how quickly a sound reaches its maximum volume after you press a key Positive values produce a slower attack that is more gradual and smooth while negative values produce a faster attack that is more percussive in nature Decay determines how quickly the volume of the sound decreases after it reaches it maximum volume while the key is still held down Positive values produce a...

Page 132: ...he SAVE button The Sound Edit Save screen will be displayed SAVE TO USER SOUND Selects the location where the sound will be saved NAME Names the Sound BACK Takes you to the previous menu SAVE Saves the editted sound to User Sound Step 7 Touch SAVE TO USER SOUND then use the Dial to select the User Sound location where the new sound will be save Step 8 Touch NAME then enter the name for the User So...

Page 133: ...s the song is played a Bouncing Ball makes its way over the lyrics following the player s performance and encouraging everyone around the instrument to sing along The Concert Performer can also automatically play any of the Concert Magic songs Listening to the song first can make it easier to play There is also a Chain Play mode giving you options to listen to groups of CM songs 1 Selecting a Conce...

Page 134: ...176 song titles in alphabetical order You may also use the Dial to scroll through all the titles one after another If you wish to play a CM song from a USB memory device touch the USB button to see the list of songs available Step 3 When you have found the song that you want to play touch the name to choose it The Note Navigator screen will be displayed and you are ready to perform ...

Page 135: ...rack of where you now are When you get to the bottom of the screen the top lines change to show the next lines of music as if you had turned the page When you get to the end of the song you will see a double line and then the song will reset to the beginning To play a selected CM song Step 1 In the Note Navigator screen touch PLAY if you want to first listen to the song The CP will play the song To...

Page 136: ...ature A Concert Magic song is made of two parts a melody part and accompaniment part Many of the songs have different instrument sounds assigned each part to make the music more interesting You can select different sounds for each part separately The RIGHT1 Part plays the melody To change its sound press any Sound category button and select a new sound The LEFT Part handles the accompaniment To ch...

Page 137: ...4 Touch the PLAY button to start playing the songs Step 5 To exit Concert Magic press the CONCERT MAGIC button again Concert Magic Song Arrangements Concert Magic songs are specially arranged so that they will work well with your key tapping Each of the 176 CM songs falls into one of three categories of musical arrangements of varying difficulty EASY BEAT These are the easiest songs to play To perf...

Page 138: ...ngement as simple as possible Concert Magic pauses the song after every note as it waits for you to tap the next key If there are complex rhythm patterns that have many notes per beat the song may become overly difficult to play Here are some suggestions for creating a Concert Magic song Step 1 Record the melody first using the RIGHT 1 Part in the Easy Recorder or Track 2 in the Advanced Recorder St...

Page 139: ...SOLO part settings VIDEO OUT Selects Video Out settings PAGE Selects the different System Menu pages EFFECT FOR SOUND Selects Effect priority settings TEMPERAMENT Selects the Temperament settings SOUND SELECT MODE Sound Select Mode settings STYLE SELECT MODE Style Select Mode settings MIDI Selects the MIDI settings POWER UP SETTINGS Selects the Power up mode settings REGIST FILTER Selects registra...

Page 140: ...t value is set to the modern standard A 440 0 Hz You can also adjust the tuning for each Part separately This can be used to simulate a chorus like effect by layering the same sound in RIGHT1 and RIGHT2 and slightly detuning them Each Part can be raised or lowered by up to 50 cents 50 cents 1 4 tone MASTER TUNE Selects the master pitch LEFT Selects the pitch for the LEFT Part SOLO Selects the pitc...

Page 141: ...r 1 2 You can create two of your own custom touch curves LIGHT and HEAVY do not represent the physical weight of the keys These are settings that affect the sensitivity of the keys which determines the volume level in response to the key movement Normal Selects the normal setting Light 1 Selects a moderately light touch Light 2 Selects a light touch Heavy 1 Selects a moderately heavy touch Heavy 2...

Page 142: ...eeds with saving procedure Step 4 Use the Dial to select either User 1 or User 2 as the location for your new touch curve Step 5 Touch the EXEC button to save your new touch curve The CP will ask for your confirmation Step 6 TouchYES to confirm The user touch curve data is saved automatically even after the power is turned off However You must re select the user touch curve each time the power is tu...

Page 143: ... an external source the Flat EQ setting is recommended The Flat EQ setting is the default If you want to save a different EQ setting as the default you must select the Save Current Settings on the Power Up Settings screen See Power Up Settings on page 120 Touch the screen to select your desired EQ setting MENU Takes you to the previous menu EDIT Takes you to the User System EQ screen To create a U...

Page 144: ... tone throughout the entire dynamic range Mellow Produces a mellower tone throughout the entire dynamic range Dynamic The tone will change dramatically from mellow to bright according to your playing The current voicing selection is global for all the instrument Sounds You cannot have an individual setting for each Sound While voicing is a technique used for optimizing the tone of an acoustic pian...

Page 145: ...he strings of other notes that you play if they are part of the same harmonic series In addition adjacent notes will also be resonated The String Resonance function simulates this phenomenon You can select the level of resonance from 0 off 1 to 10 The default setting is 5 String resonance is not active when the damper pedal is depressed Key Off Noise Especially for low pitched tones when a key is ...

Page 146: ...he Concert Magic songs will be played with Preset Plays all the Concert Magic songs with the Preset Sounds assigned to each song Piano Plays all the Concert Magic songs with the Concert Grand piano Preset Selects Preset sounds Piano Selects Piano sound MENU Takes you to the System menu ...

Page 147: ...gistration to another You may choose the order 1 to 8 or 8 to 1 Style Variation Switches from one Style Variation to another You may choose the order 1 to 4 or 4 to 1 Intro Ending Plays the Intro or Ending Fill In Plays the Fill in currently selected Break Interrupts the whole Style Drums Only Interrupts the Style except Drum part Sync Fade Out Controls the SYNC FADE OUT button Glide Bends the pit...

Page 148: ...ight pedal Damper Center Selects the Center pedal Sostenuto Left Selects the Left pedal Soft Expression Selects the Expression pedal MENU Takes you to the System menu Step 2 Touch the screen to select the setting and use the Dial to change its value FUNCTION Selects a function to assign to the pedal Touch the other parameters and use the dial to adjust the values BACK Back to the Pedal Assign menu...

Page 149: ...N button is pressed Fill ins will only be played if a FILL button is pressed Auto A Fill in will be played each time a VARIATION button is pressed The Fill in that is played will be the one that accompanies the Variation that you are leaving For example if Variation 1 is currently active and you select Variation 2 the Fill in for Variation 1 will be played Normal Selects Normal mode Auto Selects A...

Page 150: ...olo priority is set to Top Note and you release the highest note the Solo part will only play a note when you press a key that is higher than the currently held notes Portamento Time Portamento Time determines how long it takes for the pitch to slide up or down from one note to the next when portamento is active Solo Mode When using Solo Part you can select between two Solo Modes Layer The sound a...

Page 151: ... be output by the Video Out Jack NTSC The TV video signal system mainly used in North American countries and Japan PAL The TV video signal system mainly used in European countries OFF The video signals are not output NTSC Selects NTSC PAL Selects PAL OFF Selects OFF MENU Takes you to the System menu ...

Page 152: ...t be used In other words changing the Sounds will not change the Effect types and other settings for the Effects This allows you to set each Effect section REVERB CHORUS and EFFECTS to your own taste and use your Effect settings for all sounds The Panel setting is very useful if you only want to use certain Effects at all times or if you want to prevent the Effects from constantly changing each ti...

Page 153: ...h the piano If no piano sound is active the tuning for any active sounds will not be stretched Brief explanation of temperaments Temperament Keys Limitless modulation of the key became available only after the invention of Equal temperament When you use a temperament other than Equal temperament you must carefully choose the key to play in For example if the song you are going to play is written i...

Page 154: ...es the characteristic melodies of the Pythagorean temperament It is used primarily for classical music written in the Baroque era to revive the original characteristics Arabic Some oriental scales including the Arabic are characterized for quarter tone which is half of a half tone 50 cents This makes the music sound very different from traditional western music The CP Piano provides two of the mos...

Page 155: ...und page within a category You can also use the dial to scroll through all of the categories one by one Manual Select The sound does not change automatically when you press a Sound Selection button or select a new sound page within a category The sound only changes when you select the desired sound by touching the LCD screen In Manual Select mode the Dial wheel cannot be used to select sounds Auto...

Page 156: ...e automatically when you press a Sound Selection button or select a new sound page within a category The style only changes when you select the desired style from the current style page by touching the LCD display This mode is helpful when searching for a particular style while a style is running In Manual mode the CP waits for you to select a style instead of automatically selecting and changing ...

Page 157: ...the MIDI receive channel for chord data being sent to the CP The Accompaniment System can be controlled remotely on this MIDI channel by an external MIDI controller You can select MIDI channels 1 16 OFF All or MIDI Accordion When set to ALL the Accompaniment System will respond to any chord data it receives on ANY MIDI channel Local Control ON OFF This determines whether the CP s sound will be pla...

Page 158: ...lock On Off Determines whether or not the CP s Clock data will be transmitted ACC On Off Determines whether or not the data from the Auto Accompaniment System will be transmitted KEYBOARD Selects whether note data is transmitted PROGRAM BANK Selects whether Bank and Program Change data is transmitted CONTROL EXCEPT BNK Selects whether Controller data is transmitted EXPRESSION Selects whether Expre...

Page 159: ... 16 CHORD CH LEFT Selects receive channel for the Chord Left part Choose 1 16 PAGE Selects the other MIDI Settings pages MIDI Sound Settings On page five of the MIDI Settings you can determine which sound will be played by the CP when it receives note information from an external MIDI device for each MIDI channel Touch the screen to select the MIDI channel then use the Dial to select the defined sou...

Page 160: ...e the current panel settings automatically as the default settings when the CP is turned on Select Restore Factory Settings to return the CP to the factory default settings The original factory settings will now be used by the CP when it is turned on The CP never automatically stores Panel and System settings If you make any new changes that you want to save you must use the Save Current Settings ...

Page 161: ...ation is selected ACC On Off Determines if the memorized ACC mode ACC on off or Bass on off value will be used On or ignored Off when a registration is selected Left Pedal On Off Determines if the memorized Left Pedal setting will be used On or ignored Off when a registration is selected Sound Only On Off When set to ON only the sound settings for the registration will be used All other memorized ...

Page 162: ...nes you want to Reset at the touch of a button To perform a Soft Reset Step 1 Touch SOFT RESET on Page two in the System menu The Soft Reset screen will be displayed Step 2 Touch the screen to choose the type of data you want to reset MENU Takes you to the System menu without resetting data EXEC Proceeds with the Reset Step 3 Touch EXEC button Step 4 TouchYES to proceed or NO to return to the prev...

Page 163: ...nstalled on the CP To show the software version Step 1 Touch Software Version on Page two in the System menu Step 2 The software version will appear in the LCD screen MENU Takes you to the System menu The version number of the software installed on your CP instrument may be different to that shown in the image above ...

Page 164: ...witching This adjustable time function is effective with the following menus x Sound Select menu x Style Select menu x Performance Settings menu called up by holding down the PERFORMANCE button x Effect Chorus Settings menu called up holding down the EFFECTS button x Reverb Settings menu called up by holding down the REVERB button x Keyboard Harmony Settings menu called up by holding down the KBD ...

Page 165: ...Mix Quartet with Bass Jazzy Quartet Jazzy Quartet Mix Chorale Trio Trio Mix Trio Up Trio Sub Trio Mix Sub Duet Duet Spread Duet Close Duet Up Duet Sub Duet Spread Sub Duet Close Sub Duet Up Sub Octave Duet Octave Duet Up Octave Duet Sub Octave Duet Up Sub Octave Up Octave Down Octave Up Sub Octave Down Sub 2 Octaves Down 2 Octaves Down Sub Double Stereo Double Double Sub Lead Substitution To add V...

Page 166: ...ave harmonies add a voice up or down as indicated by the harmony names The Double harmonies add a recording studio quality effect to your voice to make it thicker and smoother sounding The effect is similar to the double tracking vocal technique performed in professional recordings The Lead Substitution harmony replaces your voice with one that has been pitch corrected Chordal Harmonies All other ...

Page 167: ...ne of the Quartet harmonies For lighter harmonies choose a Trio or Duet harmony Words such as Mix Up and Spread will give you further clues to the function and sound of the harmony Make sure to adjust both your Mic input volume found beside the Mic Input Jack and the Mic Level parameter in the Mic Effects menu Also adjust the Harmony Level found by touching the EDIT button in the Harmony Type scre...

Page 168: ... air conditioners etc while still allowing the desired louder signal Vocal instrument etc to be heard This can also be very useful for recording to CD R MP3 in a noisy room Higher Gate settings cut out more background noise 0 All sounds are heard 100 Almost no sound is heard Echo Adds delay or echoes to the sound Time Determines the delay time between each echo Higher values add longer delays Leve...

Page 169: ...uch the screen to highlight the Effect type then use the DIAL to adjust its settings MIC LEVEL Adjusts the Mic level EQ Turns the EQ On and Off GATE Adjusts the Gate time ECHO VIBRATO Turns the Echo Vibrato On and Off REVERB Adjusts the Reverb level F7 Edits the chosen Effect Step 4 To edit the settings of the EQ or ECHO VIBRATO effect touch the EDIT button then use the dial or touch the screen to...

Page 170: ...isk so that you can retrieve it at a later time You can save the following data Song Song data currently in the Recorder You can save it as the CP s own unique format Internal or as Standard MIDI File format SMF or Stylist format Internal format plus Registration setting User Style Each User Style or all 20 User Styles at once User Conductor Each User Conductor setting or all 40 User Conductor set...

Page 171: ...SMF Standard MIDI File format or CP Stylist format Example Saving a Style USER STYLE Selects which file you would like to save or if all files are to be save as a single all file NAME Names the data file BACK Takes you to the previous menu SAVE Saves the data file to the USB memory device Example Saving a Song NAME Names the data file FORMAT Selects which format the data should be saved as The data save...

Page 172: ...ttings Loads the All Settings file from USB My Piano Music Song data that can be used with the My Piano Music function Favorite Sound Sounds that can be stored in the Favorites sound category button Favorite Style Styles that can be stored in the Favorites style category button To load the data from USB memory Step 1 In the USB menu touch LOAD The USB Load menu will be displayed Step 2 Connect a US...

Page 173: ...ct the data to load Step 6 Touch the the EXEC button to proceed The screen will display the destination where the data will be loaded Step 7 When loading an individual data file touch NAME then use Dial to select the preferred destination TO Selects the destination to load individually a Style Conductor Sound or Registration BACK Takes you to the previous menu EXEC Loads the data Step 8 Touch the E...

Page 174: ... displayed Step 2 Connect a USB memory device Step 3 Touch the screen to select the type of data to erase Step 4 When you erase User Style User conductor User Sound or Registration data select whether you wish to erase individual data files EACH or all data ALL by touching the relevant button Touch the screen to select the data BACK Takes you to the previous menu PAGE Displays more selections INT D...

Page 175: ...3 TouchYES then touch EXEC to proceed The screen will prompt you for confirmation Step 4 TouchYES again to start formatting or TOUCH NO to cancel formatting and go back to the previous menu NO Cancels formatting and takes you to the USB menu YES Starts formatting the USB memory device The amount of time required to fully format a USB memory device will vary depending on the size of the device Once ...

Page 176: ...s long as they have DOS file names ending with MID There are two types of Standard MIDI File formats Format 0 and 1 The CP can read the song data of both formats however it will only display the lyrics of a song written as format 0 Songs that have been composed with the General MIDI GM standard will sound fine without any additional work because data in the files will inform the CP as to what sounds ...

Page 177: ...ng The part has no data to play Transpose and Octave Shift are available when a song is playing Octave Shift affects only the notes you play live on the keyboard not the music playing from the song file Transpose can be applied separately to the keyboard sound and the song sounds This lets you play the keyboard in your preferred key along with a song recorded in a different or more difficult key Use...

Page 178: ...n to the Song Play screen TEMPO Adjusts the tempo of the song Song Transpose Raise or lower the pitch of the song without affecting the keyboard PLAY SCREEN Returns to the Song Play screen PART xCH Turns the song parts on off MORE Displays the status of the next set of 4 song parts Ch 5 8 Ch9 12 Ch 13 16 You cannot record or permanently edit the song while using the USB Song Play function If you w...

Page 179: ...nu will be shown in the LCD display Step 2 Select Play Audio A list of playable MP3 audio files stored on the USB memory device will be shown in the LCD display Step 3 Touch the screen to select the desired MP3 audio file You can also select a song by using the Dial then touching the SELECT button Touch the WAV button to show WAV files stored on the USB memory device Touch the screen to select the de...

Page 180: ... of the MP3 WAV audio file can be controlled by touching the transport buttons at the bottom of the screen Step 6 Touch the REPEAT AB button once to set the start of the section to be repeated Touch the REPEAT AB button again to set the end of the section to be repeated The AB section will repeat continuously until the REPEAT AB button is touched for a third time thus deactivating the function and ...

Page 181: ...udio file SELECT FORMAT The audio format to be used for the new recording MP3 or WAV BACK Return to the main USB menu EXEC Accept the name and format and continue to AUDIO RECORD screen Step 3 Touch INPUT SONG NAME and enter a name for the new recording using the virtual keyboard Touch SELECT FORMAT to set the audio format for the new recording Touch EXEC to accept the name and audio format and con...

Page 182: ... additional sound sources It is also possible to record MP3 WAV audio files while the CP is playing back a song from MIDI MP3 WAV or CD or even a combination of all three Step 1 Repeat steps 1 4 in the previous section to prepare for recording audio Step 2 Touch the SOURCE SELECT button The SOURCE SELECT screen will be shown in the LCD display BACK Return to the previous menu To select a MIDI Song ...

Page 183: ...nto the CP s CD drive Step 4 Touch CD Track A list of playable CD tracks will be shown in the LCD display Touch the PAGE buttons to show CD tracks on the other pages Select the desired CD track to be played and added to the recording Step 5 Touch the z button then press the PLAY STOP panel button to play the selected CD track The CD track will be recorded as a digital audio file along with any othe...

Page 184: ...blank CD R or CD RW into the CD R drive and press the CD button on the panel Step 2 The LCD screen shows the CD menu Step 3 Touch the screen to select your desired function Play Shows the CD Play screen Record Shows the CD Record screen Close CD Shows the Close CD screen Advanced Options Shows the Options screen When you insert a blank CD into the drive only the Record option will be available in ...

Page 185: ...turn to the MAIN SCREEN PLAY MODE Selects the Play mode All Plays all tracks Select Plays the selected track only Random Plays all tracks at random Program Plays the tracks in programmed order TIME Shows the Play Time VOCAL Turn s Vocal mode On and Off REPEAT AB Repeat one section of a song continuously MENU Return to the USB menu TRANSPORT BUTTONS Control playback of CD audio Some copy protected ...

Page 186: ...The Concert Performer will check the CD and automatically set the recording track number TRACK NUMBER Shows the recording CD track number STYLE The selected Style TEMP The tempo of the selected Style LEFT The sound assigned to the LEFT part TIME REMAINING Shows the remaining time available for recording to CD SOLO The sound assigned to the SOLO part RIGHT1 The sound assigned to the RIGHT1 part RIG...

Page 187: ...inuing to record to CD While recording to CD the panel of the Concert Performers operates normally You can add and change sounds balance the volumes and change accompaniment styles during your CD recording Highlight a Part or Style by touching the screen then turn the Dial to change the volume Press any SOUND category button to change the sound for a highlighted part Press any STYLE category butto...

Page 188: ... the LCD display Touch USB SONGS to list songs stored on the connected USB memory device Select the desired MIDI song to be played and added to the CD recording Step 4 Touch the z button then press the PLAY STOP panel button to play the selected MIDI song The MIDI song will be recorded to the CD along with any other sounds produced To select a USB Song Audio Play Song source Step 3 Touch Audio Pla...

Page 189: ...n in the main CD menu The Close CD screen will be displayed prompting you to confirm the operation MENU Cancels and goes back to the CD menu EXEC Closes the CD R Step 2 Touch the EXEC button to close the CD or Touch the MENU button to cancel and return to the CD menu Tips and Suggestions A Closed CD can be played on any audio CD player including car stereo and personal computers You can give your C...

Page 190: ...u Delete Last Track CD RW only This function allows the last track on a CD RW to be deleted To delete the last track Step 1 Insert a CD RW that contains audio song data into the CD Drive and press the CD button on the panel Step 2 In the CD menu touch Advanced Options The Advanced Options menu will be displayed Step 3 Select Delete Last Track The Delete Last Track screen will be displayed with the...

Page 191: ...ns The Advanced Options menu will be displayed Step 3 Select Format The Format screen will be displayed prompting you to confirm the operation BACK Cancels format and returns to Advanced Options menu EXEC Formats the disk Step 4 Touch the EXEC button A final confirmation will be displayed once again prompting you to confirm the operation Step 4 Touch theYES button to format the CD RW or Touch the NO b...

Page 192: ...n jacks The sound of your stereo playing a tape CD or even radio will be heard through the CP s speaker system and mixed in with any sounds from the CP itself enabling you to play along with your favorite songs Connect the CP with your CD player or other device as illustrated C Recording Your Performance with Your Tape Recorder You can still make a recording from your CP using the Line out Jacks S...

Page 193: ...models of these interface devices Once you have your computer connected to your Concert Performer you can think of it as a powerful extension of the CP s own music processing abilities There are hundreds of software programs available that you can use to do everything from learn the basics of piano playing to creating film scores for your home movies to composing the next great digital symphony If ...

Page 194: ...e Panels B to the Pedal Board C using a single short screw I for each side After ensuring that the correct Side Panels are used for the left and right side and that the pedal cable is not caught between the assembled parts securely fasten the Side Panels to the Pedal Board using an additional four short screws I on each side 2 Fasten the Back Panel D to the left and right Side Panels B using a sin...

Page 195: ...sing two Long Bolts J on either side Turn the Adjuster L anti clockwise extending the bolt until it makes contact with the floor and supports the pedals firmly 5 Insert the pedal connection cord that comes from Pedal Board C into the piano s pedal jack and fasten with cord clamps Connect the power cable to the AC IN terminal on the base of the main body then pass the cable through the back board ape...

Page 196: ... 7 A headphone hook M is included with the CP139 digital piano and can be used to hang headphones when not in use If desired attach the headphone hook to the underside of the main Unit using the two tapping screws N provided ...

Page 197: ...com archive download_archive_2 html Read the instruction manual thoroughly before connecting the unit to the computer and make sure to install the driver If you connect the unit to the computer without installing the driver the USB MIDI driver may not operate correctly If this occurs use the driver update function of the OS to install the appropriate USB MIDI driver or delete the driver by using t...

Page 198: ...lowing situations while installing the USB driver while starting up the computer while MIDI applications are performing tasks while the CP139 digital piano is communicating with the computer while the computer is in energy saver mode If there are any further problems experienced with USB communication while the CP139 digital piano is connected please consult the documentation provided with your co...

Page 199: ... Rock Rock Ballad Modern Ballad 3 90 s Ballad Guitar Pop Waltz Rock Ballad 2 Pop Ballad Rock Shuffle Modern Waltz Cont 8 Beat Pop Ballad 2 Pop 3 4 Contemp R B Ballad Cont 8 Beat 2 Pop Piano Ballad Modern Ballad 80 s Pop 2 8 Beat R B 6 8 R B Ballad 80 s Pop 3 Piano Rock R B Ballad 2 80 s Pop 80 s Dance 2 Piano Rock Ballad Slow Funk 80 s Dance Pop Shuffle Guitar Rock Ballad LATIN ISLAND PAGE 1 PAGE 2 ...

Page 200: ... 6 8 March Jazz Swing Latin Jazz Kids 2 Beat Jazz Bossa Latin Jazz 2 Kids 2 Beat Shuffl Jazz Pop Fast 4 Beat Kids Folk 2 Beat Smooth Jam Jazz Rock Kids 3 4 Jazz R B Jazz Waltz 2 3 4 Lullaby Jazz Waltz Afro Cuban 4 4 Lullaby 5 4 Jazz OTHERS SHOW ORCHESTRAL OTHERS SOLO PIANO PAGE 1 PAGE 2 PAGE 1 PAGE 2 Fast Show Beat Fast Show Beat 2 Swing Fast Show Medium Show Beat Medium Show Beat 2 Two Beat Swing ...

Page 201: ...rnia Dreamin California Girls Call Me Call Me Irrespons Camelot Can You Feel Love Canadian Sunset Candle In The Wind Candy Can t Buy Me Love Can t Get Enough Can t Get Started Can t Help Falling Can t Hurry Love Can t Smile Can t Stop Loving Cara Mia Careless Whisper Celebration C est Si Bon Chain Of Fools Chances Are Change Of Heart Change The World Chanson D Amour Chantilly Lace Chapel of Love C...

Page 202: ...tle The I I Am In Love I Am I Said I Believe I Believe In You I Can t Help It I Could Have Dance I Could Write Book I Don t Have Heart I Don t Know How I Don t Want 2 Set I Dreamed A Dream I Fall to Pieces I Get Around I Got A Name I Got Plenty O Nut I Got Rhythm I Heard the Bells I Just Called to I Just Fall N Love I Know A Place I Love Paris I Love Rock n Roll I Love You I Loved Every One I Need...

Page 203: ... Oh My Pa Pa Oh What A Beautiful Oh Lonesome Me Oklahoma Ol Man River Old Cape Cod Old Devil Moon Old Lamplighter Old MacDonald Old Rugged Cross Old Soft Shoe Old Time R R Old Time Religion On A Clear Day On Street Where U On The Road Again On The Sunny Side On Top Ole Smoky One Chorus Line One More Try One Sweet Day One Tin Soldier One Toke Over Line Only You Ooh Baby Baby Open Arms Opposites Att...

Page 204: ...urn Tutti Frutti Tuxedo Junction Twinkle Twinkle Twist Shout Twist The U Unchained Melody Under Boardwalk Unexpected Song Unforgettable Up On Housetop Up Up Away Up Where We Belong V Vaya Con Dios Ventura Highway Vision Of Love Viva Las Vegas W Wabash Cannonball Wake Little Susie Wake Me Up Walk On By Walkin Midnight Walking N Sunshine Walking The Floor Wasted Days and Watch What Happens Wave Way ...

Page 205: ...e Ocean MP Song Title Type Lyrics In The Good Old Summertime EB For He s A Jolly Good Fellow MP Bill Bailey Won t You Please Come Home EB Give My Regards To Broadway SK Clementine MP Fascination SK Home On The Range MP Take Me Out To The Ballgame EB Auld Lang Syne MP Michael Row The Boat Ashore MP Oh Susanna SK On Top Of Old Smokey EB Bicycle Built For Two EB The Camptown Races MP The Band Played ...

Page 206: ...re SK Can Can SK Emperor Waltz SK March Militaire by Chopin SK Grand March from Aida by Verdi SK Gymnopedie by Sati SK Gypsy Chorus from Carmen by Bizet SK Largo from Symphony No 9 by Dvorák SK Prelude In A by Chopin MP Pizzicato Polka SK Rondeau by Mouret SK Voice Of Spring EB Allegro Moderato from Symphony Nr 8 by Schubert SK Special Occasions Bridal Chorus from Lohengrin by Wagner MP Wedding Ma...

Page 207: ...n asterisk indicate easy fingerings that can be recognized in One Finger mode C Maj C7 C Δ7 C6 C sus4 C b5 C aug C6 9 C add9 C9 C11 C13 C7 b5 C7 5 C7 sus4 C7 b9 Cm Cm7 Cm6 Cm6 9 Cm 5 Cm7 b13 Cm7 11 b13 Cm7 b5 Cm7 b5 b9 Cm7 b5 11 Cm7 b5 9 C Δ7 5 C Δ7 b5 C Δ9 13 C Δ9 11 C Δ9 C Δ7 13 CΔ7 11 13 CΔ9 11 13 CΔ 9 11 13 Cm9 C dim C dimΔ7 C dim b13 C dim 9 C dim 11 C7 9 C7 11 C7 b9 11 C7 b9 11 C7 9 11 C9 13 ...

Page 208: ...121 0 Contrabass 44 121 0 Viola 42 121 0 Slow Violin 41 121 1 Fiddle 111 121 0 Slow Fiddle 111 95 1 Slow Cello 43 95 1 Harp 47 121 0 Pizzicato 46 121 0 String Harp 49 95 6 Strings Bell 49 95 5 Harp Sweep Up 47 121 0 Harp Sweep Down 47 121 0 Harp Cascade Up 47 121 0 Harp Cascade Down 47 121 0 Strings Piano 1 95 4 Strings Piano 2 1 95 5 Strings Brass 49 121 1 Orchestra Hit 56 121 0 ORGAN cont Be 3 1...

Page 209: ...one Tenor 58 95 1 Lead Bone Tenor 58 95 10 Soft Tpt Bone 57 95 17 Trombone Tpt 58 95 6 Trombone Tpt 2 57 95 15 Mute Brass Ens 60 95 3 Brass Sax 62 95 5 Trumpet Ensemble 57 95 2 French Horn Strg 61 95 1 Trumpet Alto 57 95 4 Wide Horn Section 61 95 2 Jump Brass 63 121 3 Brass Pad 62 95 2 Brass Synth 62 95 3 Brass Synth 2 62 95 4 Synth Brass 63 121 0 Synth Brass 2 64 121 0 Synth Brass 3 63 121 1 Synt...

Page 210: ...83 121 0 Charang 85 121 0 Square 2 81 121 1 Clean Square 81 95 1 Wire Lead 85 121 1 Soft Wire Lead 88 121 1 Sequenced Analog 82 121 4 Analog Brass 63 121 2 Analog Brass 2 64 121 2 Polysynth 91 121 0 Polysynth 2 91 95 1 Big Saw 82 95 1 Octave Saw 82 95 2 Saw Comp 89 95 4 Square Comp 89 95 5 Saw Comp 2 89 95 6 Chiff Comp 89 95 7 Analog Brass 3 64 95 1 Euro Hit 56 121 3 Bass Hit Plus 56 121 1 6th Hit...

Page 211: ...Japan 126 95 11 War Games 128 95 1 Game Show 127 95 5 Counting 127 95 6 Mystery Theater 123 95 3 Seashore 123 121 0 Stream 123 121 4 Rain 123 121 1 Thunder 123 121 2 Wind 123 121 3 Wind Chime 125 121 5 Dog Barking 124 121 1 Cat 124 95 1 Horse Gallop 124 121 2 Crow 124 95 2 Crickets 124 95 5 Crickets 2 124 95 6 Cu Coo 124 95 7 Rooster 124 95 9 Cow 124 95 10 Bird Tweet 124 121 0 Bird Tweet 2 124 121...

Page 212: ... t S 5 4 A A i n a p m i T 2 m o T d i M h s u r B 2 m o T d i M e c n a D A 46 Std1 HHO Std2 HHO Std1 HHO Std1 HHO Std2 HHO Analog HHO Dance HHO Std2 HHO Brush HHO Timpani A 1 m o T d i M g o l a n A 1 m o T d i M t c e l E 1 m o T d i M r e w o P 1 m o T d i M m o o R 1 m o T d i M 1 d t S 7 4 B h s u r B 1 m o T d i M e c n a D MidTom1 Timpani B m i T 2 m o T i H h s u r B 2 m o T i H e c n a D...

Page 213: ... n i k a e r C r o o D 9 5 B C3 C 60 Door Ready g n i p p o t S r a C r e t i r w e p y T h c t a r c S 1 6 C Nou Voice 3 D 62 Wind Chime Play D 63 Car Engine Typewriter E 64 Car Stop Kiss Nou Voice 4 F 65 Car Pass Finger Cymbal Wind Car Crash Exposion Chick Peep Footstep Game Show Wrong Three F 66 Car Crash Game Show Wrong G 67 Siren Game Show Correct Nou Flute G 68 Train Telephon A 69 n r o H r ...

Page 214: ... Funk HHP Funk HHP Funk HHP A 45 AmbiMidTom2 FunkMidTom2 FunkMidTom2 FunkMidTom2 A 46 Ambi HHO Funk HHO Funk HHO Funk HHO B 47 AmbiMidTom1 FunkMidTom1 FunkMidTom1 FunkMidTom1 C 49 Ambi Crash1 Funk Crash1 Funk Crash1 Ambi Crash1 D 50 AmbiHiTom1 FunkHiTom1 FunkHiTom1 FunkHiTom1 D 51 Ambi Ride1 Funk Ride1 Ambi Ride1 Ambi Ride1 E 52 F 53 Ambi Cup Ambi Cup Ambi Cup Ambi Cup F 54 G 55 Funk Splash Funk S...

Page 215: ... 70 O O Sustain Level 71 X O Resonance 72 O O Release Time 73 O O Attack Time 74 O O Cutoff 75 O O Decay Time 76 X O Vibrato Speed 77 O O Vibrato Depth 78 X O Vibrato Delay 84 O O Portamento Control 91 O O Reverb Send Level 93 O O Chorus Send Level 0 95 5 X O General Controller 98 99 X O NRPN LSB MSB 100 101 O O RPN LSB MSB Program Change O O 6 Program Number True 0 127 6 1 128 System Exclusive O ...

Page 216: ... Accompaniment Volume Transpose Octave Shift Tune Damper Effect String Resonance Virtual Voicing Portamento Metronome Touch Curve Selection Light1 2 Normal Heavy1 2 Off User 1 2 MIDI 16 Part Multi Timbral Capability Recorder 16 Tracks and separate Style Chord and Tempo tracks Punch In Recording Step Recording Editing capability Play MIDI Song Reads Writes Standard MIDI file format Lyrics Total memo...

Page 217: ...Page 177 11 Appendices User Notes ...

Page 218: ......

Page 219: ......

Page 220: ...CP139 Owner s Manual KPSZ 0317 816762 OW1037E I0911 Version 1 Printed in Indonesia Copyright 2009 KAWAI Musical Instruments Mfg Co Ltd All Rights Reserved ...

Reviews: