background image

9

NOTE:

on label means: “This article cannot be ironed” 

[e.g. chlorofibre, acrylic, elastodiene]

Label Code

Kind of Textile

Variable Steam Control

[see garment instruction]

[advised position]

synthetic

modacry

polypropylene

polyurethane

acetate

triacetate

matalized

cupro

plyamide [nylon]

polyester

modal

viscose [rayon]

silk

wool

cotton

linen

Steam Control Chart

To Operate the Steam Control

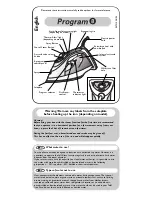
The Steam Control Chart above indicates 

the amount of steam recommended 

for various fabrics. The amount of steam 

used while ironing can be adjusted using 

the steam control switch. 
Hold the iron by the handle and use your 

thumb to slide the switch forward to your 

desired steam setting. The iron will be at 

the maximum steam output when the 

switch is fully forward.
To dry iron, slide the steam control switch 

back fully to 

 ‘NO STEAM’

Using the Shot Of Steam

The shot of steam function provides an 

extra burst of steam. This is useful when 

trying to remove stubborn creases and 

when ironing heavier fabrics. The shot of 

steam function can be used at all steam 

levels (from ‘NO STEAM’ to ‘MAX STEAM’) 

as long as the iron has reached the pre-

set temperature. 
Holding the iron horizontally and slightly 

above the fabric surface, press the shot 

of steam button firmly and release.  

The steam will penetrate the fabric and 

assist in the removal of wrinkles as you 

iron over the fabric.
Alternatively, hold the iron vertically 

and slightly away from the fabric and 

firmly press the shot of steam button. This 

function is useful for getting wrinkles out 

of hanging garments or curtains when 

the fabric can not be ironed.

MIN STEAM

MAX STEAM

NO STEAM

Summary of Contents for KIR931 series

Page 1: ...ivate Bag 94411 Botany Manukau Auckland 2163 New Zealand Customer Service Line Spare Parts 0800 273 845 Customer Service Fax 0800 288 513 www kambrook co nz Kambrook Australia Ground Floor Suite 2 170...

Page 2: ...Suits all KIR931 models INSTRUCTION BOOKLET...

Page 3: ...tralia or 0800 273845 New Zealand Alternatively visit us on our website at www kambrook com au or www kambrook co nz As part of our commitment to the environment and as members of the Australian Packa...

Page 4: ...3 Contents Kambrook Recommends p4 Safety First Your Kambrook FabriGuard p7 One Temperature Iron Using Your Kambrook Iron p8 Care Cleaning and Storage p12...

Page 5: ...rts list before discarding the packaging Always ensure the iron is properly assembled before use Follow the instructions provided in this book Do not touch hot surfaces High temperatures are generated...

Page 6: ...his booklet and immediately after use The iron incorporates a thermal safety fuse to protect the iron from overheating However the iron should not be left unattended while it is connected to the power...

Page 7: ...and or repair Any maintenance other than cleaning should be performed at an authorised Kambrook Service Centre This appliance is for household use only Do not use this appliance for anything other tha...

Page 8: ...mperature for all fabric types Water cup for filling the water tank Your Kambrook FabriGuard One Temperature Iron 1 Ionic ceramic soleplate with over 460 steam holes to maximise steam delivery and eff...

Page 9: ...mperature Iron unless it is particularly hard in which case it is recommended that distilled or demineralised water be used Using Your Kambrook Iron CAUTION Never add perfume vinegar or other chemical...

Page 10: ...output when the switch is fully forward To dry iron slide the steam control switch back fully to NO STEAM Using the Shot Of Steam The shot of steam function provides an extra burst of steam This is us...

Page 11: ...perature Iron is equipped with an anti drip system The iron will automatically close the steam valve when the soleplate temperature is too low to produce steam This prevents water from the water tank...

Page 12: ...ady to use again After Each Use Once you have finished ironing slide the steam control switch to NO STEAM and place the iron on its heel Switch the power off at the power outlet and disconnect the pow...

Page 13: ...the iron off at the power outlet and remove the plug Allow the iron to cool completely before storing NOTE Repeat the self clean process if the iron still contains a lot of impurities CAUTION Do not...

Page 14: ...nd dry thoroughly with a soft dry cloth To clean the steam holes use a damp cloth to wipe away any built up lint or starch To clean the outer housing of the iron use a soft damp cloth and polish with...

Page 15: ...14 Notes...

Page 16: ...15 Notes...

Reviews: