12
Getting Started
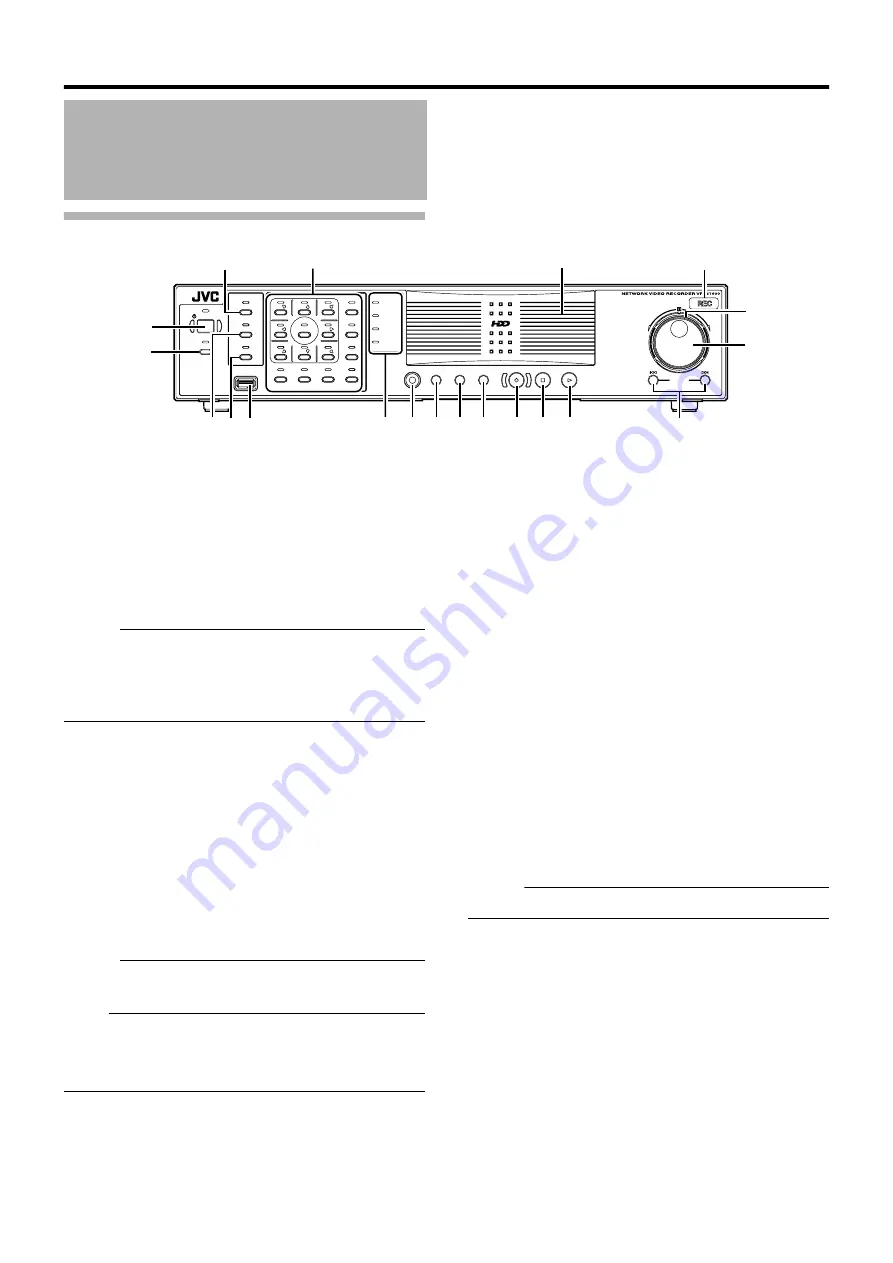
Front
A
[OPERATE] Button/Indicator
Switches operation on or off. Press the button to turn operation
A
ON
B
and hold down the button to turn operation
A
OFF
B
. The
indicator blinks while the recorder is starting up or shutting down.
B
[REC CONTROL] Button/Indicator
Switches the recording control mode on or off. The indicator lights
up when the recording control mode is set to on.
Press and hold the [FUNCTION] button, and press the [REC
CONTROL] button at the same time to display the menu.
Memo :
●
The main menu cannot be displayed in the recording control
mode or during recording.
●
The recording control mode performs recording in accordance
with the settings in the [Camera Record Setting] menu.
C
[SELECT] Button/Indicator
Use the
S
key to set to the camera selection mode. The indicator
lights up when the camera selection mode is set to on. (
D
[PTZ/PRESET] Button/Indicator
Switches between the PTZ mode and PRESET mode of the
S
key.
The mode changes each time the button is pressed. The indicator
lights up when PTZ mode is selected and blinks when PRESET
mode is selected.
E
[SERIAL] Terminal
For connecting the communication control terminals on a mouse
(sold separately), flash memory (sold separately) or UPS (sold
separately).
Memo :
●
Use the [SERIAL1 to 4] port on the rear panel for additional hard
disk drive connection. (
Note :
●
Attach the serial port cover supplied with this product if this port
is not in use.
●
This product may malfunction due to the presence of static
electricity. Remove any static before starting operation.
F
Status indicators
䡵
[WARNING] Indicator
Lights up when an error occurs. (
Press and hold the [ALARM CLEAR] button to turn off the light.
䡵
[ALARM] Indicator
Lights up when an alarm is activated.
Goes off when the [ALARM CLEAR] button is pressed.
䡵
[HDD] Indicator
Lights up when the built-in hard disk drive is accessed.
䡵
[LOCK] Indicator
Lights up when operation is locked. (
G
[FUNCTION] Button
Press the [FUNCTION] together with another button to use the
corresponding features.
[Special Key Operations] (
H
[SEARCH] Button
Displays the date and time search screen when in the playback
mode. (
I
[KEY] Button
When [KEY] button is pressed while pressing [FUNCTION] button,
key operation on front panel will be disabled. (Key locked mode)
To disable, perform same procedure again.
Press to display or hide the
A
software keyboard
B
.
Memo :
●
Use the software keyboard to input characters. (
J
[ALARM CLEAR] Button
Clears the [ALARM] display when an event occurs or motion is
detected. Press and hold this button to turn off the [WARNING]
indicator.
K
[REC/STOP] Button
Press to start recording in all cameras. (When the recording control
mode is turned on, recording on all cameras starts after turning off
the recording control mode. ) Press and hold down to stop
recording.
When in the recording control mode, press and hold this button to
exit the recording control mode.
Part Names and Functions
(VR-N1600U/E)
OPERATE
REC CONTROL
LIVE/BROW
S
E
S
ELECT
PTZ/PRE
S
ET
S
ERIAL
㧝
㧞
㧟
㧠
㧡
㧢*1/'
㧣
㧥
㧤
CANCEL
ZOOM OUT
ZOOM IN
ENTER
WARNING
ALARM
HDD
LOCK
S
EARCH
FUNCTION
ALARM CLEAR
KEY
REC/
S
TOP
S
TOP(PB)
PLAY
S
KIP
REV
FWD
A
T
B
G
F
E
D
C
I
H
J K
M
L
O
N
P
Q
R
S
Summary of Contents for LST0728-001C
Page 2: ...IMPORTANT SAFEGUARDS I ...
Page 7: ...VI ...
Page 8: ...SICHERHEITSVORKEHRUNGEN for Germany VII ...
Page 9: ...VIII E VR N900U 1600E VR N900U E VR N900U 1600E VR N900U E VR N900U E VR N900U ...
Page 167: ...159 ...
Page 168: ...LST0728 001C NETWORK VIDEO RECORDER VR N1600U VR N1600E VR N900U ...


