JUKI FX-3R Maintenance Manual Download Page 52

FX-3R Maintenance Guide 


4-8 

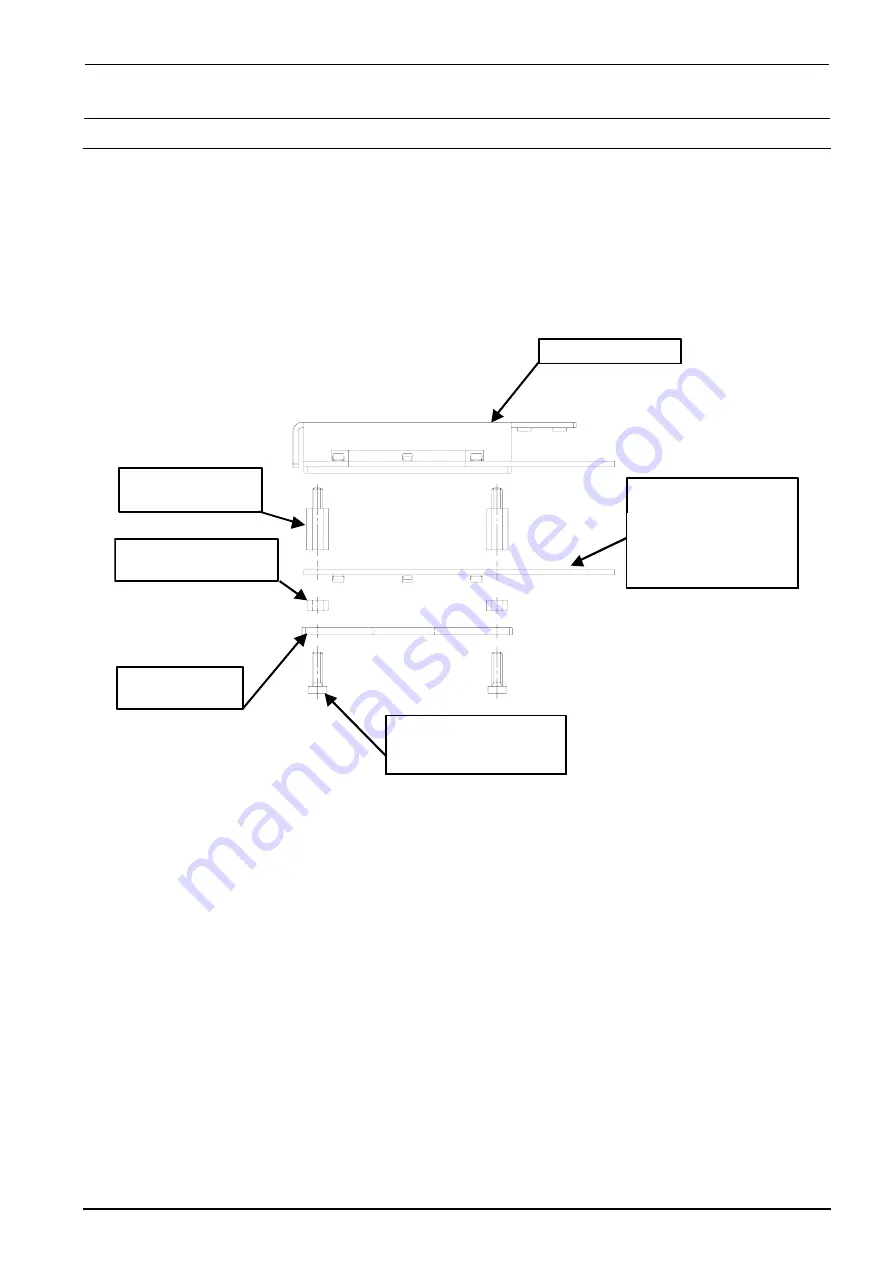
4-7.  Replacing the Solder Recognition Light Board 

<Procedure> 

1)  Remove the brazier head screws to detach the PRISM BASE, OCC angle light board, and 

board spacers. 

2)  Reassemble the components in the reverse order of disassembly. 
3)  After the solder recognition light has been replaced, adjust the OCC light. (See 4-8, List of 

Readjustment Items after Replacement.) 


HX00335000G
基板スペーサ :4個

角度照明ユニット

HX00354000D
基板スタッド :4個

40032433
低頭ねじ  M3×10 :4個

40014043
PRISM BASE

40047508
OCC A LIGHT PCB ASM
取付け向きに注意
(LED面下向き)


Angle light unit 

Board stud: 4 pcs. 

Board spacer: 4 pcs. 

Carefully check the 
mounting orientation. 
(LED surface faces 
downward.) 

Brazier head screw   
M3 

×

 10: 4 pcs. 


Rev. 1.00 

Summary of Contents for FX-3R

Page 1: ...High Speed Modular Mounter FX 3R MAINTENANCE GUIDE JUKI CORPORATION CUSTOMER SUPPORT DEPARTMENT ELECTRONIC ASSEMBLY SYSTEMS BUSINESS UNIT...

Page 2: ...f you have any question or find any error or omission in writing contact our dealer or JUKI Corporation 4 JUKI Corporation shall disclaim all the responsibility for any trouble resulting from the user...

Page 3: ...g the Roller Lubrication Part 1 10 2 HEAD UNIT 2 1 2 1 Replacing and Adjusting the Head 2 1 2 2 Replacing the Motor 2 7 2 2 1 Replacing the Z Motor 2 7 2 2 2 Replacing the Motor 2 9 2 3 Replacing the...

Page 4: ...2 Replacing the Transport Pulley 5 2 5 2 1 Transport Pulley A Assembly E21117150A0 5 2 5 2 2 Transport Pulley B Assembly E20897210A0 5 2 5 3 Replacing the STATION IN OUT and JOINT Motors 5 3 5 4 Repl...

Page 5: ...8 2 8 1 3 Replacing the Bank Up Detection Sensor Optional Replacement Table 8 2 8 1 4 Replacing the Selector Switch Optional Replacement Table 8 3 8 1 5 Replacing the Roller Lever Optional Replacement...

Page 6: ...3 1 Switch Main Unit 10 3 10 3 2 Operation Key 10 4 10 4 Replacing the Push Button Switch CE Marking Machine 10 5 11 REPLACING AND ADJUSTING THE FEEDER FLOAT SENSOR 11 1 12 OTHER UNITS 12 1 12 1 LCD...

Page 7: ...47559 13 44 13 7 3 Adjusting the Stepping Driver 13 44 13 8 Head Unit 13 47 13 8 1 Adjusting the Boards of the Head Unit 13 47 13 9 Covers 13 49 13 9 1 Structure of Operation Unit 13 49 13 9 2 Jumper...

Page 8: ...Guide vi Rev 1 00 15 3 Replacing the Movable Cutter Blade Bottom Blade of the Tape Cutter 15 10 15 4 Replacing the Fixed Cutter Blade Upper Blade of the Tape Cutter 15 12 15 5 Grease up 15 13 16 FX 3...

Page 9: ...bracket 2 Peel off the old magnescale 3 Degrease the magnescale mounting surface and magnescale completely Note 1 Before replacing the magnescale put the magnescale near the machine and leave it for...

Page 10: ...viewed from the front and that for the LR RR is indicated by the mark off line on the left when viewed from the rear Adjust the position of the Z phase marking on the magnescale side to the mark off...

Page 11: ...S Specification value Magnescale affixing position Displacement in the direction parallel with the head movement 0 1mm Figure 1 1 2 1 Y Axis Magnescale Affixing Position Left Figure shown above Y fram...

Page 12: ...Y frame S Figure 1 1 3 2 Y Axis Side 1 1 4 Re obtaining the Parameters after Replacement of the Magnescale Follow the work steps stated in section 2 3 Y Setup of the MS parameters to obtain the offset...

Page 13: ...s is the Z phase of the magnescale Therefore there is no home position sensor for the X axis 1 2 1 Replacing the X Limit Sensor and X Near Sensor X NEAR SENSOR X LIMIT SENSOR X LIMIT SENSOR is located...

Page 14: ...base becomes 5 mm make the adjustment so that each limit sensor is turned ON and then secure each limit sensor with the screws YB NEAR SENSOR Y LINEAR BASE Y LIMIT SENSOR Since two X beams are provid...

Page 15: ...so that each limit sensor is turned ON and then secure each limit sensor with the screws Figure 1 2 3 1 Replacing the X axis Interference Sensor Y C Sensor Interference Sensor Y C Sensor Y limit brac...

Page 16: ...he reference applying amount is that whitish grease can be checked 4 Reassemble the parts and components in the reverse order of disassembly At this time pay special attention so that any cables are n...

Page 17: ...The reference applying amount is that whitish grease can be checked 4 Reassemble the parts and components in the reverse order of disassembly At this time pay special attention so that any cables are...

Page 18: ...ing part to the lubrication part and assemble it into the bracket Lubrication part replacement part Spring part replacement part Bracket Surface A 4 To assemble the lubrication part make the surface s...

Page 19: ...e head main stay 2 Detach the head main stay stay stands L R 3 Detach the head cable guide 4 Detach the head fan 5 Disconnect the connectors Z motor connectors and optical fibers etc from three ZT dri...

Page 20: ...vels of the stay stands L R and Z power connector base and then assemble them The Fig below shows the LF head Replace other head in the same manner as described above Apply Loctite 242 to the head ass...

Page 21: ...N 4 pcs Head cable guide Head main stay Upper side SL6040892TN 5 pcs Lower side SL6040892TN 4 pcs Wind direction Head fan Fan guard SL4042591SC 4 pcs SL6041092TN 2 pcs Stay stand R Opposite side L SL6...

Page 22: ...FX 3R Maintenance Guide 2 4 ZT driver board ZT driver support Right side Same as the left side SL6041492TN 6 pcs one side Z power connector base SL6040892TN 4 pcs Z motor power cable Rev 1 00...

Page 23: ...FX 3R Maintenance Guide 2 5 SV support A SL6030692TN 4 pcs Solenoid valve Head cover SL6030692TN 2 pcs Head unit SL6052092TN 6 pcs XM base Rev 1 00...

Page 24: ...5 Z6 3 4 Z3 Z4 1 2 Z1 Z2 LF Axis 1 Axis 2 Axis 3 Axis 4 5 6 Z5 Z6 3 4 Z3 Z4 1 2 Z1 Z2 RR Axis 1 Axis 2 Axis 3 Axis 4 5 6 Z5 Z6 3 4 Z3 Z4 1 2 Z1 Z2 RF Axis 1 Axis 2 Axis 3 Axis 4 5 6 Z5 Z6 3 4 Z3 Z4 1...

Page 25: ...ure Timing belt Z Pull by the force of 21 6N 2 2kgf Figure 2 2 1 2 Timing Belt Z c Put the screw in the tap of the Z motor and lock the mounting screw with the screw pulled in the direction indicated...

Page 26: ...sure that the PWB top surface height falls between 2 and 2mm Stroke for one rotation of the Z axis ball screw 6 mm 2 to 2 mm Stable area Z phase signal of the Z motor encoder Figure 2 2 1 4 Z phase si...

Page 27: ...ws M2 L 5 6 Follow the steps below to adjust the belt tension Belt tension adjustment procedure c Make a ring using a tie up band or belt at the top end of the T pulley of the motor Hang the bar tensi...

Page 28: ...isassembly Before mounting the components remove Loctite sticking to the sensor bracket as much as possible When attaching the sensor insert the sensor pin into the positioning hole of the bracket fir...

Page 29: ...down sensor Figure 2 4 2 Mounting of Nozzle Down Sensor 6 Mount the nozzle down sensor Adjust the nozzle down sensor bracket position so that the clearance between the sensor and release bar is 2 mm 7...

Page 30: ...Z Figure 2 5 1 Removing the Z motor Adjust the belt tension following section 2 2 1 2 5 2 Replacing the Timing Belt After the timing belt has been replaced it is absolutely necessary to re input the M...

Page 31: ...f the coupling 2 Detach the Z slide shaft from the Z slide bracket 3 Reassemble the components in the reverse order of disassembly Secure the coupling with it kept pushed in and make sure that any ver...

Page 32: ...be input from the left in order When inputting a laser offset after the head unit assembly Z motor and or timing belt Z have been replaced obtain the laser offset again after the height of the top sur...

Page 33: ...3 PARTS AROUND THE HEAD 3 1 Replacing the Solenoid Valves Before replacing the solenoid valves always shut down the main compressed air 1 Remove the SEMS cap bolts c 2 and SEMS cap bolts d 2 to detac...

Page 34: ...0046835 Solenoid valve 40068170 Solenoid valve B 40068169 Solenoid valve V Round head screw f 2 c SL6030692TN SEMS cap bolt with washer M3 6 d SL6030692TN SEMS cap bolt with washer M3 6 e SL6030692TN...

Page 35: ...low ON OFF of the manual control Replacing the filter for release to atmosphere 1 Remove the SEMS cap bolts e 2 to detach the SV cover 2 Loosen the SEMS cap bolts f 2 to detach the filter for release...

Page 36: ...o detach the lens f 3 Reassemble the parts and components in the reverse order of disassembly In the same manner as described above remove the BMR lens bracket B for LR head Nuts d 2 pcs and washer e...

Page 37: ...en mounted properly input the bad mark sensor offset of the MS parameters For details about how to input MS parameters see MS Parameters Figure 3 2 2 1 Adjusting the Lens Height CAUTION To prevent any...

Page 38: ...check that the fiber is not disconnected After that close the case cover 2 Projection Multi core fiber Single core fiber Light receiving side Light emitting side Figure 3 3 4 3 Inserting the Fiber 1...

Page 39: ...L Light ON operation Mode switch Electronic volume position 8 Maximum sensibility T Teaching mode Figure 3 3 5 1 Bad Mark Sensor Indication The orange and green LEDs come on simultaneously Stable oper...

Page 40: ...h from RUN to SELECT SELE appears on the display d Each time the button 2 black is pressed the operation mode display changes sequentially in the order of L LO LF LOF D DO DF and DOF Select L and rese...

Page 41: ...HMS Head 3 4 2 Replacing the Amplifier 1 Remove the cap bolts c 2 to detach the head handle When an optional bad mark reader is mounted detach the fiber unit from the bad mark amplifier c SM6032002TN...

Page 42: ...that both the FAR and NEAR indicators are lit After the distance has been adjusted to a specified level secure the height sensor with the SEMS cap bolts c at two locations NEAR indicator FAR indicato...

Page 43: ...omponents in the reverse order of disassembly Since the head main board is delivered after it has been adjusted correctly no adjustment work is required Follow the steps stated in Head Vacuum Level an...

Page 44: ...the SEMS cap bolts c 8 from the ZT driver support to detach the ZT driver board The trimmer on the ZT driver board needs to be adjusted Adjust the trimmer while referring to section 13 6 Z Unit 3 Reas...

Page 45: ...ies 3 Reassemble the components in the reverse order of disassembly At this time apply Loctite 242 to the SEMS cap bolts c 2 and M4 SEMS cap bolts 2 4 After the lens assembly has been replaced it is a...

Page 46: ...y The camera mounting orientation may vary depending on the type of the head Apply Loctite 242 to the SEMS cap bolts c 2 and then fix them with a tightening torque of 1 0N m 4 After the CCD camera and...

Page 47: ...d 4 to replace the OCC angle light board assembly 4 Reassemble the components in the reverse order of disassembly 5 After the OCC light board has been replaced it is necessary to adjust the light fil...

Page 48: ...d screws f 4 to detach the lens filter 4 Reassemble the components in the reverse order of disassembly 5 After the filter has been replaced it is necessary to adjust the polarizing filter and OCC ligh...

Page 49: ...3 In the brightest status re stick the OCC light label as shown in the figure below Rev 1 00 2 3 Slit 40015962 OCC label Light filter U support Figure 4 4 2 Filter Adjusting Position and Sticking the...

Page 50: ...out 5 sec to move from the minimum point to the maximum point or from the maximum point to the minimum point 5 Since the maximum value of the focus status display is determined adjust the OCC height s...

Page 51: ...be seen to adjust the light quantity Line drawing direction Figure 4 5 5 OCC Focus Adjustment Jig 4 6 Adjusting the OCC Light Quantity Procedure 1 Check that the OCC light goes on with manual control...

Page 52: ...e reverse order of disassembly 3 After the solder recognition light has been replaced adjust the OCC light See 4 8 List of Readjustment Items after Replacement HX00335000G 4 HX00354000D 4 40032433 M3...

Page 53: ...t quantity U Common mark adjustment X beam parallelism check OCC offset CAL block offset CAL piece holder offset Head offset HMS offset BMR offset ATC offset U AWC offset U Pick Up reference position...

Page 54: ...of the belt with no tension exerted and adjust the position of the transport pulley along the slot so that the belt length increases by 0 5 Adjustment procedure Use a pencil or similar tool to put tw...

Page 55: ...t of the transport belt resulting in wear on the belt Always refer to relevant mounting procedure when mounting the transport pulley 5 2 1 Transport Pulley A Assembly E21117150A0 Figure 5 2 1 1 Transp...

Page 56: ...measurement Enter the following values to the tension meter and make a measurement Table 5 3 1 Transport Motor Tension Adjustment Values L specification XL specification STATION IN OUT JOINT STATION...

Page 57: ...ted 2 Place a matte black glass epoxy PWB under the sensor and rotate the sensitivity adjustment knob of the sensor counterclockwise Then gradually rotate it clockwise up to the position at which the...

Page 58: ...e WAIT STOP C OUT Sensor 5 5 2 Replacing the Amplifier Unit How to mount the amplifier unit 1 Insert the groove part A on the front of the amplifier unit into the DIN rail 2 Push the rear of the ampli...

Page 59: ...IT L SENSOR ASM 40047774 STOP L SENSOR ASM For transport unit L 40047773 COUT L SENSOR ASM 40047775 WAIT R SENSOR ASM 40047777 STOP L SENSOR ASM L specification For transport unit R 40047776 COUT R SE...

Page 60: ...d to the set value Driven rail can be located at any position during percentage tuning setting The set value is determined to 60 1 Press the AUTO OK button once momentarily Figure 5 5 3 2 AUTO OK Butt...

Page 61: ...ODE key setup indication 5 Md Press the triangle button i to set the power tuning run mode PtUn 6 Press the square button of the operation key i to display the power tuning target value setup indicati...

Page 62: ...0 mm Keep the square button of the operation key i pressed for 3 sec or longer to perform the power tuning At this time pay special attention so that a portion between the transport rails does not int...

Page 63: ...opper cylinder reassemble the components in the order of steps 3 to 1 At this time assemble the cylinder so that the orientation of the speed controller is opposite to that of the stopper tip Addition...

Page 64: ...ach the sensor bracket and replace the sensor When reassembling the components adjust the position of the sensor bracket by loosening the adjustment screw and moving the sensor bracket up and down so...

Page 65: ...y the air 0 49 MPa to check that the cylinder moves smoothly The cylinder mounting direction of the front reference machine is different from that of the rear reference machine For the rear reference...

Page 66: ...e replaced with new ones After the components have been reassembled adjust the sensor position in the same manner as described in 5 10 Replacing the T PIN Sensor Figure 5 10 1 Centering Pin Table 5 10...

Page 67: ...osen the set screws i to detach the torque support assembly from the shaft of the BU motor j 5 Assemble the parts and components in the reverse order of above steps 1 to 3 When assembling the parts an...

Page 68: ...st the tension within the required range Values to be input to the sonic belt tension meter L specification XL specification Weight 2 5 Width 9 0 12 0 Span 170 Required range 42 5 2 5N m 5 11 3 Placin...

Page 69: ...ence among four measured points is 0 02mm or less If all of three screws screws around the adjustment screws fixing the ball screw are loosened the table may be lowered To prevent such trouble always...

Page 70: ...to detach the BU ENC assembly g 5 When installing a new BU ENC reassemble the components in the order of steps 4 to 1 Adjust the flatness of the support table as described in 5 11 Replacing the Suppor...

Page 71: ...he sensor from the cylinder retract status in the B direction After the sensor has been turned ON LED goes off further move the sensor 1 mm and secure it firmly 3 To adjust the speed controller loosen...

Page 72: ...5 13 2 Figure 5 13 2 Solenoid Valve Assembly L Specification 43 C OUT STOP WAIT STOPPER SHAPE Y BU EN BU EN SHAPE Y STOPPER C OUT WAIT STOP L R Figure 5 13 3 Solenoid Valve Assembly XL Specification A...

Page 73: ...D VALVE 3 PV150209300 5 PORT SOLENOID VALVE 9 PV150209300 5 PORT SOLENOID VALVE 4 40047772 WAIT L SENSOR ASM 10 40047775 WAIT R SENSOR ASM 5 40047774 STOP L SENSOR ASM 11 40047777 STOP R SENSOR ASM 6...

Page 74: ...mponents in the reverse order of steps 1 to 4 At this time assemble the components so that the end face of the motor shaft is aligned with the end face of the pulley f 6 Adjust the tension of the driv...

Page 75: ...s 1 mm Figure 5 14 2 1 AWC Origin Sensor 5 14 3 Replacing the Transport Stopper Interference Sensor 1 Adjust the clearance between the sensor dog and the transport stopper interference sensor to 1 mm...

Page 76: ...the Table below g TEST switch The following operations can be performed with this switch Test mode is started When this switch is pressed instantaneously 2 sec or less the BL 600 series reads the bar...

Page 77: ...left right transport machine For the right left transport machine the barcode reader is assembled to a position opposite to that shown in this Figure Figure 5 15 1 1 Remove the flat head screws e 2 p...

Page 78: ...ble route for the left right transport while the blue line shows that for the right left transport Figure 5 15 3 4 Mount a new BARCODE READER with the flat head screws e while referring to its orienta...

Page 79: ...olt 4 Remove the M3 SEMS cap bolts g two locations to detach the board h from the CAL side cover f and 4 air tube c The CAL board assembly h can then be taken out 5 After the board has been replaced r...

Page 80: ...nt the speed controller on a new air cylinder BT0400251EA Air tube 4 40042709 Air cylinder SM6040802TN SEMS cap bolt M4 8 E3528729000 ATC joint Figure 7 1 1 Replacing the Air Cylinder 4 Adjust the air...

Page 81: ...e 7 1 4 When Closed 6 Connect a 4 air tube Refer to the Figure 7 1 5 and connect the speed controller to the solenoid valve with an air tube 4 Solenoid valve Speed controller Air tube 4 Figure 7 1 5 A...

Page 82: ...the opening closing time of the slide plate to the standard adjustment value As a guide rotate the knob about two and a half turns from the fully closed position 2 After adjustment fix the knob Check...

Page 83: ...and valve 5 Remove the lifter supporter assembly mounting screws 6 Pull out the bank lifter upward Bank lifter to be replaced 7 Remove four bank up cylinder mounting screws to detach the cylinder 8 Mo...

Page 84: ...eed To be adjusted by the lower speed controller If the down speed of the left cylinder is too fast turn the speed controller adjustment screw clockwise 3 If the up and down speeds of the left and rig...

Page 85: ...the cap 4 Supply the main compressed air to the main unit Figure 8 1 4 1 Selector Switch Assembly 40000585 8 1 5 Replacing the Roller Lever Optional Replacement Table Before replacing the roller lever...

Page 86: ...HK065120060 Portion A Figure 8 1 6 1 Replacement Table when Viewed from Mounter From Obliquely downward View Field d When mounting the connector pay special attention to its orientation as shown in t...

Page 87: ...d Disconnect the cable from the cable securing materials cable band and cable clamp e After the cable has been replaced secure the cable and connect it to the connector in the original manner RFID JOI...

Page 88: ...f the antenna array Antenna array 40073664 RFID JOINT CABLE ASM 40079659 Figure 8 1 7 1 Replacement Table when Viewed from the Front Feeder Insertion Side 2 Remove the screws 6 pcs securing the antenn...

Page 89: ...02680000 UP Tightening direction Make the tape matched with the lower end position Shield bracket 60 40081207 Antenna array 40073664 Conductive tape HX002680000 Figure 8 1 7 3 Cautions on Antenna Arra...

Page 90: ...nk and Replacement Table for Mechanical Feeder 8 2 1 Overall Drawing 40063859 Drive cylinder 40047264 Bank lifter RS 40047249 Drive bracket E2708729000 Driver bracket 30 40047265 Bank lifter LS Figure...

Page 91: ...ght air tubes and connectors 4 Remove the driver bracket mounting screws BT0600400EC Air tube 6 40047249 Drive bracket SL6053092TN SEMS cap bolt with washer M5 30 Connector Figure 8 2 2 1 Part Names W...

Page 92: ...of the speed controller firmly After the nut has been secured recheck that the cylinder functions correctly Figure 8 2 3 1 Speed Controller of Drive Cylinder Speed controller 7 Reassemble the componen...

Page 93: ...bank PCB 3 Remove the round head screws 8 pcs to detach the mechanical bank PCB and replace it with a new one 4 Reassemble the components in the reverse order of disassembly SL6030692TN SEMS cap bolt...

Page 94: ...ork 8 3 1 Overall Drawing Replacement Table for ETF 40084841 EF setup cable 1 bracket assembly 40084666 E_Trolley cover R 40084636 FDC bracket 40084831 EF IF CBL 26 30 ASM 40084829 EF IF CBL 16 20 ASM...

Page 95: ...FX 3R MaintenanceGuide 8 13 40084914 Bank PCB box assembly Figure 8 3 1 2 Overall Drawing From Obliquely downward View Field Rev 1 00...

Page 96: ...nanceGuide 8 14 8 3 2 Overall Drawing Lifter Unit 40063873 Lifter LL assembly 40063872 Lifter LR assembly PA630850100 Air cylinder PV010505000 Mechanical valve Figure 8 3 2 1 Overall drawing Lifter Un...

Page 97: ...electric bank PCB 3 Remove the PCB mounting screws round head screw with washer M3 L 8 to replace the PCB 4 Reassemble the components in the reverse order of disassembly 40084914 Bank PCB box assembly...

Page 98: ...the connectors from the electric bank PCB and replace the cables 4 Reassemble the components in the reverse order of disassembly 40084636 FDC bracket 40084826 EF IF CBL 1 5 ASM 40084827 EF IF CBL 6 10...

Page 99: ...he off line setup and the relay cable to the electric bank PCB After that replace the connector for the off line setup 3 Reassemble the components in the reverse order of disassembly Rev 1 00 40084841...

Page 100: ...ve the sensor together with the bracket the sensor height needs to be adjusted To replace only the sensor start the work from step 4 LF RF RR LR REAR FRONT LEFT RIGHT Rec Rec Rec Rec Emit Emit Emit Em...

Page 101: ...R ETF detection sensor Top surface of bank Figure 8 3 6 2 Height Adjustment of ETF Incorrect Insertion Detection Sensor 4 Adjust the optical axis c Connect the connector of each sensor to the specifie...

Page 102: ...6 2 Adjustment of Potentiometer Potentiometer Precision screwdriver Right Left c Turn the potentiometer on the light emitting side toward the Min side left side to put the sensor in the interruption...

Page 103: ...g the maintenance and adjustment work 8 4 1 Overall Drawing 40084841 EF setup cable 1 bracket assembly 40089564 FDC bracket 40095345 Fixed bank unit for ETF 40084826 EF IF CBL 1 5 ASM 40084827 EF IF C...

Page 104: ...FX 3R MaintenanceGuide 8 22 40095349 Bank PCB box assembly EO Figure 8 4 1 2 Overall Drawing From Obliquely downward View Field Rev 1 00...

Page 105: ...the cable of the connector for the off line setup and the relay cable to the electric bank PCB right side surface of FDC bracket After that replace the connector for the off line setup 3 Reassemble t...

Page 106: ...re bracket C kept pushed Cover SB_A 5 Reassemble the components in the reverse order of disassembly Figure 9 1 1 Cover SB_A Front Side 40045958 DIGITAL PRESSURE SW Resin fixing part Bank switch bracke...

Page 107: ...surement mode 2 Setting a detection level threshold value and hysteresis c In the measurement mode press the button and current threshold value are displayed alternately d Press the or button The nume...

Page 108: ...replacing the filter element on the micromist separator side turn the filter element counterclockwise to detach it 4 Reassemble the components in the reverse order of disassembly CAUTION Before repla...

Page 109: ...er of disassembly Cover SB_A Figure 9 3 1 Cover SB_A Front Side 40047090 PRESSURE SWITCH Resin fixing part Bank switch bracket C Figure 9 3 2 Digital Pressure Switch 9 3 1 Adjusting the Digital Pressu...

Page 110: ...easurement mode 2 Setting a detection level threshold value and hysteresis c In the measurement mode press the button and current threshold value are displayed alternately d Press the or button The nu...

Page 111: ...rack Visual check Cup packing 4 Check for unusual wear hardening or crack Visual check Gasket 4 Check for deformation hardening or crack Visual check Inside of vacuum pump Suction valve backup 4 Check...

Page 112: ...g the Cables 6 Loosen the hexagon socket head cap bolts M6 L16 fixing the handle with an Allen wrench having a width between across flats of 5 mm Figure 9 4 3 Removing the Bolts 7 Detach the handle an...

Page 113: ...Cover Set Screws 2 Detach the head cover Head cover Figure 9 4 6 Detaching the Head Cover Detaching the cylinder 1 Before detaching the cylinder put a mark on the casing and cylinder with an oil felt...

Page 114: ...an oil felt pen so that it meets the mark on the casing Figure 9 4 10 Putting a Mark 2 Loosen four countersunk head screws of the support plate Figure 9 4 11 Removing the Countersunk Head Screws 3 Det...

Page 115: ...r After the washing has been completed blow the air to the head cover and replace the gasket with a new one Gasket Figure 9 4 16 Gasket 6 Wipe off the washing solution with a cloth rag and degrease th...

Page 116: ...10 SWITCHES 10 1 Replacing the Push Button Switch On line switch Start switch Servo free switch Keyboard setting switch Origin return switch Stop switch Single cycle switch Figure 10 1 1 Switch Names...

Page 117: ...assembly Turn Turn Mounting nut Edge Stop metal fitting Groove Panel Pull out Case Figure 10 1 4 Back of Cover Figure 10 1 5 Detaching the Switch The list of replacement parts is described in section...

Page 118: ...cover f and the operation key can be inserted into the switch properly After the new switch has been mounted make sure that the safety cover f is mounted correctly and that the operation key g is ins...

Page 119: ...intenance Guide 10 4 10 3 2 Operation Key 1 Remove two mounting screws c to replace the SAFETY_SWITCH_KEY d SL6041042TN SEMS cap bolt with washer M4 10 SAFETY_SWITCH_KEY Figure 10 3 2 1 Operation Key...

Page 120: ...tch Start switch Keyboard setting switch Origin return switch Stop switch Single cycle switch Maintenance key switch Figure 10 4 1 Switch Names on Front Operation Panel Start switch Keyboard setting s...

Page 121: ...he case from the cover surface 4 Reassemble the components in the reverse order of disassembly Turn Turn Mounting nut Edge Panel Case Groove Pull out Stop metal fitting Figure 10 4 3 Back of Cover Fig...

Page 122: ...ket it becomes necessary to adjust the sensor height When replacing only the sensor start the sensor replacement work from step 4 Top view of mounter Front Rear Rear left Front right Rear right Rear l...

Page 123: ...3 14 EA9500B0100 Tie up band Sensitivity adjustment side of check LED 40047495 Feeder float sensor FF light emission assembly FSD bracket 40001312 OCC shim C E2157729000 FSD spacer Check LED 40047498...

Page 124: ...vity adjustment side of check LED 40070400 Feeder float sensor RR light receiving assembly FSD bracket 40001312 OCC shim C E2157729000 FSD spacer Check LED 40070397 Feeder float sensor RF light emissi...

Page 125: ...der float spacer 126 6 0 1mm Figure 11 6 Adjusting the Height of the Feeder Float Sensor 4 Adjust the light axis c Connect the connectors of the sensors to their specified positions and turn on the po...

Page 126: ...the Feeder Float Sensor Units and tools to be used for adjustment NF12 NF16 or NF24 is also accepted Non lock type NF16N NF12N or NF24N is also accepted The above units are used for adjustment of the...

Page 127: ...direction If this occurs loosen the sensor mounting screws and move the sensor back and forth 4 If the sensor mounting position is changed in work step 3 adjust the light axis and perform the adjustme...

Page 128: ...s ON the sensor If a shielding object with a height of 35 6 mm turns ON the sensor remove the FSD spacer E2157729000 and insert the shim Conversely if a shielding object with a height of 36 0 mm does...

Page 129: ...n lamp lit 4 Set the NF32 feeder at the same positions as described in step 3 and open the top cover by hand to check that the sensor is turned OFF when the top cover is raised 10 mm or less Raise the...

Page 130: ...crews and to detach the LCD bracket F from the LCD bracket R 2 Remove the SEMS cap bolts to detach the LCD bracket F from the LCD monitor 3 Reassemble the components in the reverse order of disassembl...

Page 131: ...After the LCD monitor has been replaced it is necessary to set up the touch panel 1 Check the MENU and buttons on the front of the LCD monitor 2 Press the MENU button to display the Monitor Setting s...

Page 132: ...djust the touch panel use finger or touch pen with a round tip Do not use any propelling pencil or sharp object Always press the center portion of the calibration point The target is 1 mm or less If a...

Page 133: ...replacing the SSD 12 2 1 1 Required Components ENVIROMENT SYSTEM 132 ASM SSD FX 3R needs the ENVIRONMENT SYSTEM 132 ASM SSD that contains the OS environment including Windows and RTX necessary to ope...

Page 134: ...the SSD from the weight plate 4 Reassemble the components in the reverse order of disassembly Rev 1 00 1 2 3 4 5 6 7 8 9 Figure 12 2 1 2 1 Replacement of SSD List of Replacement Parts Table 12 2 1 2...

Page 135: ...Recognition of the SSD You may check whether or not the BIOS recognizes the SSD correctly If no automatic startable SSD or FDD is found after memory check the following message will appear Operating...

Page 136: ...edCore tm Setup Utility Main Advanced Security Boot Exit Item Specific Help Reset Configuration Data No Large Disk Access Mode DOS Local Bus IDE adapter Primary Select Yes if you Legacy USB Support En...

Page 137: ...5 Change PCI IRQ B Move the cursor to PCI IRQ B and set 5 Change PCI IRQ C Move the cursor to PCI IRQ C and set 5 Change PCI IRQ D Move the cursor to PCI IRQ D and set 5 Change PCI IRQ E Move the cur...

Page 138: ...Boot menu screen operating procedures 1 Changing the order in Boot priority order Move the cursor to an item you want to move with the or key Move the cursor up or down with the or key 2 Moving from...

Page 139: ...ges Exit Discarding Changes Load Setup Defaults Exit System Setup and Discard Changes save your change to Save Changes CMOS F1 Help Select Item Change Values F9 Setup Defaults Esc Exit Select Menu Ent...

Page 140: ...munication between the FX 3R and the IS it is absolutely necessary to set up the network Setting procedures Setting up the TCP IP Setting up a shared folder Registering a user 12 2 3 1 Setting Up the...

Page 141: ...ocal Area Connection icon on the dialog box stated in step 3 and then click the Properties command with the right button to select it Rev 1 00 5 The LOCAL Area Connection Properties dialog box appears...

Page 142: ...low the instructions given by the network administrator of your company If no rules are specified set an IP address which has not been set in other FX 3 connected to the HLC In this description set 11...

Page 143: ...hared folder for the network communication Create a folder named D machine Prg under the D drive and make this Prg folder shared 1 Start up Explorer 2 Select the drive D and select the commands from t...

Page 144: ...Click the Sharing tab from this dialog box and select the Share this folder radio button to check to see if Prg is entered as the Share Name If Prg is not entered in the Shared Name field change the e...

Page 145: ...prg dialog box Check to see if Everyone is set to Full Control by checking its check box Note Full Control is allowed for the access privilege described above by default when the network is shared on...

Page 146: ...ou must input to start up the PC personal computer where the IS has been installed 1 Check the user name and password which are used to start up the PC on the IS 2 Select the User accounts icon form t...

Page 147: ...screen that allows you to set a user name appears on the screen Enter a user name and click the Next button 5 The screen that allows you to set the user type appears on the screen Select the Computer...

Page 148: ...FX 3R Maintenance Guide 12 19 6 Select the user account you set 7 The screen that allows you to change the account settings appears on the screen Select the item Create a password Rev 1 00...

Page 149: ...to enter the same password in both Type a new Password and Type the new Password again to confirm fields and click the Create password button After you have finished all necessary settings perform th...

Page 150: ...system program installation files 2 Click the Start button of Windows and run Explorer from Programs in the Start menu 3 Select Setup exe from the system program installation disk prepared in step 1 I...

Page 151: ...ng the Next button will move to step 6 6 The Confirmation screen for the License Agreement will appear Check on I accept the terms in the license agreement and click the Next button to move to step 7...

Page 152: ...nfirmation dialog box will appear Click the Install button to move to step 8 8 The Setup Type selection screen will appear Clicking the OK button will start the installation 9 The progress status is s...

Page 153: ...FX 3R Maintenance Guide 12 24 10 When the installation is completed the InstallShield Wizard Completed screen will appear Click the Finish button to complete the installation Rev 1 00...

Page 154: ...art menu 3 Select Setup exe from the FlexlineDB installation disk prepared in step 1 In the Explorer window double click Setup exe you have selected to start the installation 4 As Setup Exe is started...

Page 155: ...the OK button 7 If any installation destination directory does not exist the Setup screen will appear prompting you to confirm the directory creation Click the Yes button CAUTION The button displays m...

Page 156: ...When the installation is completed the Setup Complete screen will appear Check on No I will restart my computer later and click the Finish button The system is restarted after the C drive update opera...

Page 157: ...Prompt from Programs in the Start menu 2 In the Console window DOS screen type ewfmgr exe c commit The following screen will appear 3 Select Turn Off Computer from the Start menu of Windows to restart...

Page 158: ...so may cause system runaway Select File and Control Date Management to restore the control data in the SSD For the detailed procedure of restoration see Section 13 3 3 Restoring the control data from...

Page 159: ...ut down the OS Therefore update the C drive first 1 Click the Start button of Windows and run Command Prompt from Programs in the Start menu 2 In the Console window DOS screen type ewfmgr exe c commit...

Page 160: ...he OK button 5 The Safe Position setup dialog box will appear Click the OK button 6 The System message dialog box will appear Click the OK button When performing this operation the OS is then shut dow...

Page 161: ...n of Windows and run Explorer from Programs in the Start menu 3 Select Setup exe from the system program installation disk prepared in step 1 In the Explorer window double click Setup exe you have sel...

Page 162: ...ng the Next button will move to step 6 6 The Confirmation screen for the License Agreement will appear Check on I accept the terms in the license agreement and click the Next button to move to step 7...

Page 163: ...isplays may vary depending on the language specification of the OS Do you renew Mech Control Parameter Yes Mechanical control parameters are initialized and the default values are set No Currently set...

Page 164: ...ta The following shows the major setting data to Speed data for head operation Speed data for X Y axis operation Speed data for support table operation R P M of AWC Center motor Time data for ATC cont...

Page 165: ...ion 12 Follow the steps stated in section 12 2 4 2 Installing the FlexlineDB to install the FlexlineDB suitable for the system version 13 Follow the steps stated in section 12 2 4 3 Updating the C dri...

Page 166: ...supply is connected to the controller Online Shows that the network connection with the server is established Link Shows that the electrical connection with the network is valid Activity Shows the da...

Page 167: ...position shown below First disconnect the cables from the HUB BOX HUB BOX mounting position Front of machine Figure 12 3 1 Top View of Machine Remove the cover set screws from the HUB BOX to detach t...

Page 168: ...tup Instructions of Instruction Manual for Intelli SCS to register the MPC Replacing the SWITCHING HUB c Disconnect the Ethernet cable from the HUB and the power cable from the power terminal block d...

Page 169: ...40 When mounting the cover again assemble the cable as shown in the Figure so that it does not block the cover window Make sure that the LED lamps can be seen through the window Cover window Figure 12...

Page 170: ...ad mark reader Optional g Mouse h Keyboard i Power switch j FDD k SSD l Control unit Inside CPU board POSITION board IEEE1394A board IP X5 board CPCI back board 20 Figure 13 1 1 Front View Outside Sup...

Page 171: ...d 11 15 c LCD monitor d Head unit e Transformer f YL LF axis motor g YR LF axis motor h YL LR axis motor i YR LR axis motor j YL RF axis motor k YR RF axis motor l YL RR axis motor 11 YR RR axis motor...

Page 172: ...PS 1 CN 039 Pin No 3 6V and Pin No 9 6VRTN 6 3 to 6 5V 3 24V PS 2 CN 039 Pin No 4 24VA and Pin No 10 24VARTN 24V 0 1V 4 24V PS 3 CN 039 Pin No 5 24VB and Pin No 11 24VBRTN 24V 0 1V 5 24V PS 4 CN 039...

Page 173: ...am of the Power Supply Unit Standard specifications Front view PSU front cover PS5 PS1 PS2 Top view Figure 13 3 1 2 1 Block Diagram of the Power Supply Unit The above Figure shows the power supply uni...

Page 174: ...5 EN specifications Front view PSU front cover Top view PS5 PS1 PS2 PS3 PS4 Figure 13 3 1 2 2 Block Diagram of the Power Supply Unit EN The above Figure shows the power supply unit with the PSU front...

Page 175: ...otector 10A 1 CP5 9 HA005600000 Circuit protector 40A 1 CP1 10 HB001100000 Relay 1 RL4 11 HB00128000C Relay 5 RL1 ST specification only RL5 to 8 12 HB001740000 Relay 1 RL1 EN specification only 13 HB0...

Page 176: ...0VA 3 3A AC100V INPUT AC100V OUTPUT 100N FG 100L 100N FG 48V 48V 14 24 34 13 23 33 44 43 A1 A2 24VA 2 2B SVON N CN064 to XY RELAY BOARD 2 5C P107 48V 24VD 6V 24VA 24VB 24VC 48VRET 24VDRET 6VRET 24VAR...

Page 177: ...4 1 8 6 5 7 TB 24VA 2 2B 3 TB5 OK R N CARRY SVON N CN066 100VB3F 0VB3F CN065 POWER UNIT INSIDE to overall replacement table R to overall replacement table F to XY RELAY BOARD CP7 12A TB1 AC N FG IN OU...

Page 178: ...ELEC BANK I F FRONT CN069 CN070 CP12 25A HA00527000C IN OUT P401 P402 to POWER MONITOR CN067 P407 HX006750000 to ELEC BANK I F REAR to FEEDER PCB P409 AC100V INPUT TF 100L TF 100N FG P403 P405 Figure...

Page 179: ...IN OUT CP3 15A HA00542000D IN OUT 100VB1 0VB1 CN062 TB CN063 P101 P103 P103 P103 P103 P111 P104 P105 TB1 P108 P109 P110 100VA 0VA 3 3A AC100V INPUT AC100V OUTPUT 100N FG 100L N FG 100 48V 48V 14 24 3...

Page 180: ...WER UNIT INSIDE to overall replacement table R to overall replacement table F to SAFETY UNIT CP7 12A TB1 AC N FG IN OUT AC L P210 P211 P212 P215 P216 P217 P219 P218 P218 P221 P222 P309 P307 N C 1 5C S...

Page 181: ...ELEC BANK I F FRONT CN069 CN070 CP12 25A HA00527000C IN OUT P401 P402 to POWER MONITOR CN067 P407 HX006750000 to ELEC BANK I F REAR to FEEDER PCB P409 AC100V INPUT TF 100L TF 100N FG P403 P405 Figure...

Page 182: ...FX 3R Maintenance Guide 13 13 Figure 13 3 1 3 7 Connection Diagram for the Z Power Supply Board Rev 1 00...

Page 183: ...silk screen printing Note 2 Indicate the signal names of CN039 by silk screen printing excluding N C Note 3 Connect the OK signals of CN024 and 025 so that 24VARET patterns sandwich them Note 3 Note...

Page 184: ...SL4033591SC shown below and changing the air flow direction of the fan enables to swap the left fan with the right fan and vice versa For the fan for the EN specification the fan mounting position ca...

Page 185: ...t the boards are mounted correctly while referring to these figures c h g e POS2 h f e POS1 d Figure 13 4 1 1 Board Layout Drawing FX 3R Table 13 4 1 1 Boards Used for Control Unit Part No Part name c...

Page 186: ...f Shutdown status HDD Flashes in green when accessing to the SSD RESET Push switch with LED This switch functions as the reset switch The LED functions as the Power ON LED Do not press this switch Lit...

Page 187: ...f The emergency stop switch is detected to stop the XY axis and Z axis Switch settings Since the FX 3R uses two position boards the settings may vary depending on the position board which has been rep...

Page 188: ...unication standards also called FireWire 400 Additionally the power DC 12V is supplied to the LNC60 through the communication cable In addition to four IEEE 1394 ports this board contains four RS232C...

Page 189: ...ON SW2 8 ON SW4 1 OFF SW4 2 OFF SW4 3 OFF SW4 4 OFF SW4 5 OFF SW4 6 OFF SW4 7 OFF SW4 8 OFF SW1 1 OFF SW1 2 OFF SW1 3 ON SW1 4 OFF SW5 OFF Note SW5 is not mounted on the board 40048066 Figure 13 4 5 1...

Page 190: ...OFF SW8 3 OFF SW8 4 OFF SW4 1 OFF SW4 2 ON SW4 3 OFF SW4 4 ON SW4 5 ON SW4 6 ON SW4 7 ON SW4 8 ON SW5 1 OFF SW5 2 ON SW5 3 OFF SW5 4 OFF SW5 5 ON SW5 6 ON SW5 7 ON SW5 8 ON SW7 1 OFF SW7 2 OFF SW7 3 O...

Page 191: ...itches have been set properly at the delivery of the machine When setting the board in the control unit check the DIP switch settings portions show the switch positions Figure 13 4 7 1 MOUSE KEYBOARD...

Page 192: ...R_BRACKET located on the right side of the control box and replace it with a new one e After MK_SELECTOR_BRACKET has been taken out remove SL4030691SC 4 pcs to detach the KEYBOARD MOUSE selector 40003...

Page 193: ...witch SW2 as follows Figure 13 4 8 1 Slide Switch SW2 Meaning of LED There are four LEDs on the board The following shows the meanings of the indications Location No Color Silk print Indication conten...

Page 194: ...ox Therefore take out the control box and replace the SUPERIMPOSE board e After the control box has been taken out remove SL4030691SC 6 pcs to detach the SUPERIMPOSE board f Replace the detached SUPER...

Page 195: ...power supply Meaning of LED There are no LEDs on the ATX power supply Adjustment items after replacement Figure 13 4 9 1 ATX Power Supply There are no particular adjustment items Replacement procedur...

Page 196: ...n disconnected from the ATX bracket the ATX power supply can then be detached i Replace the detached ATX power supply with a new one and reassemble the parts and components in the reverse order of dis...

Page 197: ...y unit Meaning of LED The following shows the status of the LED for indication of the battery unit Figure 13 4 10 1 Battery Unit Table 13 4 10 1 LED Status Indications Power supply status AC input DC...

Page 198: ...1 pc on the right to detach the battery unit together with the BATTERY SUPPORT PLATE 40092122 e Remove four inch screws 40048047 to detach the battery unit from the BATTERY SUPPORT PLATE 40092122 Add...

Page 199: ...our AC servo amplifiers that drive the X axis and eight AC servo amplifiers that drive the Y axis twelve amplifiers in total are mounted 40104695 X axis AMP 40104696 Y axis AMP X LF X LR YL LF YR LF Y...

Page 200: ...not perform the origin return Table 13 5 1 1 Rotary Switch Settings Servo amplifier Axis selection switch set values X LF 0 X LR 1 YL LF 0 YR LF 1 YL LR 2 YR LR 3 X RF 0 X RR 1 YL RF 0 YR RF 1 YL RR 2...

Page 201: ...nship among each motor and servo amplifier LF RR c d e LR RF e d c Figure 13 6 1 1 Structure of Z Unit Motor outputs Z axis 30W axis 10W Table 13 6 1 1 Z Unit Layout Relational Diagram Axis No on ampl...

Page 202: ...mbination of RD2 and AL2 see the Table below 6 RD3 Green 7 AL3 Red Shows the status of axis No 3 L1 L3 and L5 axis For details about the status expressed by the combination of RD3 and AL3 see the Tabl...

Page 203: ...the transport L motor transport R motor transport L sensor transport R sensor and WAIT sensor inside the transport unit according to the reference and flow direction BU L BU R L specification XL speci...

Page 204: ...BUFFER R STATION OUT BUFFER IN OUT L WAIT L COUT L STOP L WAIT R COUT R STOP R IN OUT R Transport direction Sensor layout for R L IN BUFFER L STATION JOINT BUFFER R STATION OUT BUFFER IN OUT L WAIT L...

Page 205: ...806 CENTER MOTOR R CABLE ASM 40048074 1 CENTER MOTOR ASM OUT R end 40047809 OUT MOTOR CABLE ASM 1 The transport motor was changed from the motor E93417290A0 and these motors have the interchangeabilit...

Page 206: ...048259 BU LOCK RELAY CABLE ASM EN Safety unit CN912 EN only 40048076 BU MOTOR ASM 40047831 40047832 40047835 40047836 CN657 CN667 Common for ST EN E94337290A0 BU ENC ASM 40047841 40047842 CN658 CN668...

Page 207: ...7832 40089951 40089952 CN657 CN667 Common for ST EN E94337290A0 BU ENC ASM 40089920 40089921 CN658 CN668 Common for ST EN 40089916 BU L MOTOR CABLE ASM ST only 40089951 BU L MOTOR CABLE ASM EN EN only...

Page 208: ...y 40047838 AWC R MOTOR CABLE ASM EN EN only 40047801 AWC DRV PWR CABLE R ASM ST only 40047802 AWC DRV PWR CABLE R ASM EN EN only 40047857 AWC DRV FG CABLE R ASM ST only 40047858 AWC DRV FG CABLE R ASM...

Page 209: ...BU R ENC CABLE ASM ENC2 CN18 40047841 BU L ENC CABLE ASM ENC1 CN19 CN20 Not used 40047903 SBR CABLE ASM SPWR R CN21 40047844 AWC R ENC CABLE ASM ENC4 CN22 40047843 AWC L ENC CABLE ASM ENC3 CN23 400478...

Page 210: ...SM ENC1 CN19 CN20 Not used 40089926 SBR CABLE ASM SPWR R CN21 40089845 AWC R ENC CABLE ASM XL ENC4 CN22 40089844 AWC L ENC CABLE ASM XL ENC3 CN23 40047847 SV L CABLE ASM SOL L CN24 40089925 SBL CABLE...

Page 211: ...ort For R L transport 40047917 TPN L SENS CABLE ASM SBL2 4 SBL2 S4 40047918 AWC L SENS CABLE ASM SBL2 5 SBL2 S5 SBL2 S6 Not used SBL2 S7 Not used SBL2 S8 Not used 40047906 SBL2 RELAY CABLE ASM Relay c...

Page 212: ...BL2 4 SBL2 S4 40047918 AWC L SENS CABLE ASM SBL2 5 SBL2 S5 SBL2 S6 Not used SBL2 S7 Not used SBL2 S8 Not used 40047906 SBL2 RELAY CABLE ASM Relay cable between SBL1 and SBL2 40047920 OUT SENS CABLE AS...

Page 213: ...ification HX005450000 5 phase stepping driver 13 7 3 1 Adjusting the Drive Current of the Transport Stepping Motor Adjustment Procedure c Before starting the adjustment procedure make sure that the DC...

Page 214: ...For support table STOP For auto width adjustment 9 5 RUN C M1 0 Rotate the rotary switch so that the arrow points to the STOP RUN L HV C D 2 1CK TEST M1 d Set the DIP switches to the values in the ta...

Page 215: ...pport table STOP For auto width adjustment 9 5 RUN C M2 0 M1 0 d Set the DIP switches to the values in the table below No Switch Settings 1 TEST OFF 2 2 1CK OFF 3 C D OFF 4 L HV ON 5 M SEL OFF Figure...

Page 216: ...orresponding to the head position SW1 SW2 SW5 SW3 SW4 W4 W5 Check that the W4 W5 are set as described below portion shows the switch set position and receptacle mounting position Check that the SW1 SW...

Page 217: ...is turned ON LD26 Not used Lights up when the home position sensor of the LZ2 axis is turned ON LD27 Not used Lights up when the home position sensor of the LZ3 axis is turned ON LD28 Not used Lights...

Page 218: ...settings on the operation board assembly and the operation board rear assembly while referring to Figure 13 9 2 1 Additionally check also the jumper switch settings on the operation board front assem...

Page 219: ...Short Mount receptacles at the portions of the straight headers W1 W2 and W3 to make them short circuited Jumper switch setting rear W1 W2 W3 1 2 Open 1 2 Short 1 2 Open 3 4 Open 3 4 Short 3 4 Open 5...

Page 220: ...me Element Actuator LED Bezel Lenz Remarks SW1 ONLINE HA005340010 HA005340020 HA005340070 HA00534004A HA00552001B Bezel is provided with a cover SW2 ORIGIN HA005340010 HA005340020 HA00534007A HA005520...

Page 221: ...W11 START HA005340010 HA005340020 HA005520030 HA00552001B SW12 STOP HA005340010 HA005340020 HA005520030 HA005520010 HA00552001A Bezel is provided with a cover SW13 SERVO FREE HA005340010 HA005340020 H...

Page 222: ...04A HA00552001B Bezel is provided with a cover SW2 ORIGIN HA005340010 HA005340020 HA00534007A HA005520030 HA00552001A SW3 START HA005340010 HA005340020 HA005520030 HA00552001B HA005520010 SW4 STOP HA0...

Page 223: ...53002A OPTION REAR MONITOR If the rear motor OP is not provided HX00326000A is mounted SW17 EMERGENCY 4008956 SW16 CONSOLE CHENGE 40048036 HA005530010 HX00326000A is assembled SW15 RIGHT FEEDER SW14 L...

Page 224: ...or HA005340020 Procedure c Fit the bezel black into the cover panel The bezel has a projection to stop rotation Attach the bezel so that the projection faces to the left when viewed from the front d I...

Page 225: ...viewed from the back side of the operation panel as shown in the Photo The Photo shows the back side of the operation panel on the front of the machine with the ST specifications Regardless of the fr...

Page 226: ...rt the actuator assembled at 3 into the black bezel insert the bezel silver from the back of the panel and secure it with the fixing nut 3 CONSOLE CHANGE Parts used Use the CONSOLE SW ASM 40048036 Bez...

Page 227: ...ow to replace the fuse Fuse part No HF0013005P0 Time lag fuse 500mA Three fuses are supplied with the machine as accessory parts Procedure 1 Open the bottom cover on the rear at the center c 2 The fus...

Page 228: ...shipment from the factory Therefore do not change this switch setting The above Figure shows just an example SW3 ST specifications Setting before shipment from factory EN specifications SW3 to 8 are i...

Page 229: ...RF _Phase B Not used Linear scale B phase signal H L Lit Off LD18 Orange YL RF _Origin sensor Not used Origin sensor detected Lit LD19 Green YR RF _Phase A Not used Linear scale A phase signal H L Li...

Page 230: ...n shows the switch set position and receptacle mounting position DSW1 DSW2 Adjustment items after replacement After that follow the steps below to update the FLASH memory c Select Options and Change U...

Page 231: ...re monitored to prevent the over current from flowing to the vacuum pump caused by the electromagnetic switch thermal protector in the noise filter assembly Settings Setting current dial adjustment va...

Page 232: ...e FPI Front from the Machine Main Unit As shown in the Figure below the FPI bracket assembly is secured to the FPI bracket L R with the SEMS cap bolts M6 12 which has been fixed to the base frame Remo...

Page 233: ...M6030402TN M3 4 2 SM6030402TN M3 4 4 WP0320501SC M3 2 E6068729000 3 WP0320501SC M3 3 SM6030402TN M3 4 3 CN561 CN551 CN541 40047994 FPI LED 2 F 1 40047993 FPI LED 1 F 1 FPI LED cable 2 F assembly 1 pc...

Page 234: ...0 1 SM6030402TN M3 4 2 SM6030402TN M3 4 4 WP0320501SC M3 2 E6068729000 3 WP0320501SC M3 3 SM6030402TN M3 4 3 CN561 CN551 CN541 40048173 FPI LED 2 R 1 40048172 FPI LED 1 R 1 Flat washer M3 2 pcs M3 4 2...

Page 235: ...n at the SMT training center are allowed to replace the movable cutter blade and fixed cutter blade 15 TAPE CUTTER OPTIONAL 15 1 Overall Drawing This tape cutter unit is composed of a cutter main unit...

Page 236: ...ixed bank specification is different from that for the replacement table specification Tape cutter for electric fixed bank specification Lower discharge guide shape This shape is different from the cu...

Page 237: ...mble the shim and spacer used for the cutter main unit mounting part in the same manner as the original manner 8 Make the upper discharge guide in contact with the opening in the cutter cover push tow...

Page 238: ...aintenance Guide 15 4 Rev 1 00 Figure 15 2 1 Disconnection of Air Tube and Solenoid Valve Connector Mechanical valve Solenoid valve Manual switch CN381 Solenoid valve connector connection Air tube con...

Page 239: ...harge Guide Figure 15 2 3 Bottom of Cutter Base SM3030552TN Round screw M3 L 5 SL6061292TN Hexagon socket head cap bolt with washer M6 L 12 Upper discharge guide Cutter main unit SM3040652TN Round scr...

Page 240: ...FX 3R Maintenance Guide 15 6 Rev 1 00 Figure 15 2 4 Detachment of Cutter Main Unit Cutter main unit SL6062092TN Hexagon socket head cap bolt with washer M6 L 20 40084697 Spacer A 40084698 Spacer B...

Page 241: ...FX 3R Maintenance Guide 15 7 Rev 1 00 Figure 15 2 5 Adjustment of Upper Discharge Guide Push all the way Bank down No interference 2 0 5mm Bank up ETF...

Page 242: ...mm Additionally check that the bottom cover angle does not interfere with the cover FB_A If the adjustment allowance is insufficient loosen the assembly screws of the cover FB_A and cover FB_B to mak...

Page 243: ...ver FB_A and cover FB_B to make the adjustment 2 Assemble the bottom cover angle to the bottom of the cutter base 3 Assemble the bottom discharge cover EO to the bottom discharge guide EO and joint an...

Page 244: ...them in contact with the joint bar to assemble them Degrease the set screws and apply Loctite 277 to them 7 Assemble the upper tape guard while shifting it toward the cylinder 8 Reassemble the compone...

Page 245: ...3 Replacement of Movable Cutter Blade SM6041402TN Hexagon socket head cap bolt M4 0 7 L 14 40084688 Bottom blade R 40084687 Bottom blade L 40084689 Joint bar 40084692 Upper tape guard SM6040802TN Hex...

Page 246: ...e 1 of M11_TAPE_CUTTER in the QA table 6 After the fixed cutter blade has been replaced apply the grease Alvania grease For details about grease application locations and procedures see section 15 5 G...

Page 247: ...ade Rear A B 40084687 40084688 Bottom blades L and R Figure 15 5 1 Grease Up Locations 1 4 Adjust the pushing pressure of the fixed blade See page 1 of M11_TAPE_CUTTER in the QA table 5 Apply the grea...

Page 248: ...amera offset Common for KE2000 series and KE700 series E2107998000 Ceramic board 2 inch Adjustment of OCC camera illumination Common for KE2000 series 40046648 ATC offset boss 70 ATC offset assembly p...

Page 249: ...osition adjustment 40069368 X MSC installation jig X magnescale sticking jig Newly set for FX 3 40008106 MSC clearance jig For adjustment of magnet scale detector head T 0 25mm T 0 35mm T 0 45mm 40108...

Page 250: ...Revision record Rev Date Revised locations Revision contents Remarks 1 0 May 2011 First edition...

Page 251: ...S UNIT 2 11 1 Tsurumaki Tama shi Tokyo 206 8551 JAPAN PHONE 81 42 357 2299 FAX 81 42 357 2297 http www juki co jp Copyright 2011 JUKI CORPORATION The specification and appearance may be changed withou...

Reviews: