SECTION 3 - CHASSIS & TURNTABLE
3-72
3121200
3.
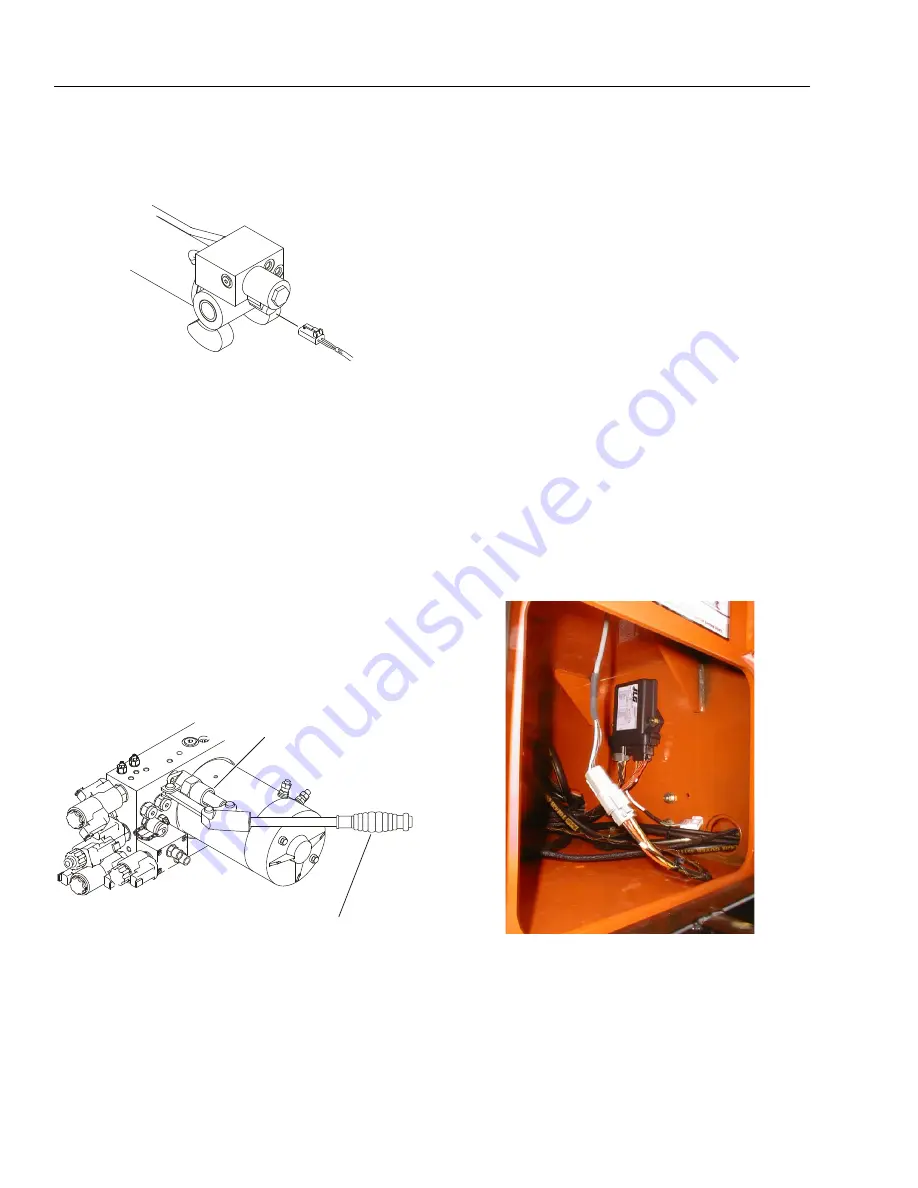
On the right front outrigger cylinder, remove the electri-
cal connector from the electrical solenoid. Plug the ser-
vice outrigger retract harness plug labeled right front
outrigger into the outrigger cylinder connection.
4.
Repeat step 3 for the left front, right rear, and left rear
outriggers.
5.
Power to operate the retract function can be supplied
from any 12 volt power source. Connect the harness’ red
alligator clip to positive and the black alligator clip to
negative.
6.
Located on the harness is a push button switch. Pushing
the switch will activate all five solenoids, the four on the
outrigger cylinders and the one on the control valve. At
this point the outriggers will automatically begin
retracting until the tires and tongue jack are resting on
the ground.
7.
To complete the retraction of the outriggers, the hand
pump located on the control valve must be utilized. The
pump handle is located inside the valve compartment.
Insert the handle into the pump jack on the control
valve. Pump the handle until all outrigger are fully
retracted. Remove the pump handle and store in the
control valve compartment.
8.
Disconnect the service outrigger harness from the four
outriggers and control valve. Reconnect the wiring con-
nectors to each cylinder’s solenoid and the solenoid on
the control valve.
3.21
DRIVE & SET
The Drive & Set Option is used to position the machine after it
has been towed to the job site. Before the drive function can
be operated, the machine must be in the stowed position and
the hand brake set. The control system senses this by using a
proximity switch on the frame to see that the boom is com-
pletely lowered, by the telescope limit switch to see that the
boom is fully retracted, and by a proximity switch near the
brake release cylinder to see that the brake is set.
Pushing down on the Drive Engagement Release Valve causes
hydraulic oil to extend the Drive Engage Cylinder.
Hydraulic flow from the drive enable valve is routed to the
flow divider which, in turn, provides flow to the Drive Direc-
tional Valve. The Drive Directional Valve receives electrical sig-
nals through the control system from the joystick in the
platform to route the flow to the drive motors in the appropri-
ate manner to achieve drive in the desired direction.
The Drive & Set system consists of the Propulsion Module,
Drive Enable Valve, Drive Directional Valve, Flow Divider, Man-
ual Pull Valve, Drive Motors, Drive Wheels, Brake Release Cylin-
der, and Drive Engage Cylinder.
The Propulsion Module is located in the frame near the battery
charger. It is used to control the Drive Directional Valve and
the Drive Enable Valve. The module is connected to and com-
municates with the Ground Control Module through the CAN-
BUS system.
RIGHT
FRONT
OUTRIGGER
EMERGENCY
OUTRIGGER
HARNESS
PUMP
HANDLE
Summary of Contents for T500J
Page 1: ...Service and Maintenance Manual Model T500J PN 3121200 July 25 2018 Rev I AS NZS...
Page 2: ......
Page 16: ...xii 3121200 LIST OF TABLES TABLE NO TITLE PAGE NO This page left blank intentionally...
Page 36: ...SECTION 2 GENERAL 2 8 3121200 NOTES...
Page 143: ...SECTION 3 CHASSIS TURNTABLE 3121200 3 107 Figure 3 45 Battery Charger Schematic...
Page 234: ...SECTION 5 BASIC HYDRAULIC INFORMATION SCHEMATICS 5 60 3121200 NOTES...
Page 246: ...SECTION 6 JLG CONTROL SYSTEM 6 12 3121200 Figure 6 5 System Test Flow Chart Platform Tests...
Page 304: ...SECTION 7 BASIC ELECTRICAL INFORMATION SCHEMATICS 7 32 3121200 NOTES...
Page 305: ......


