background image

JANOME Embroidery Software Instruction Book

Appendix A Quick Reference

246

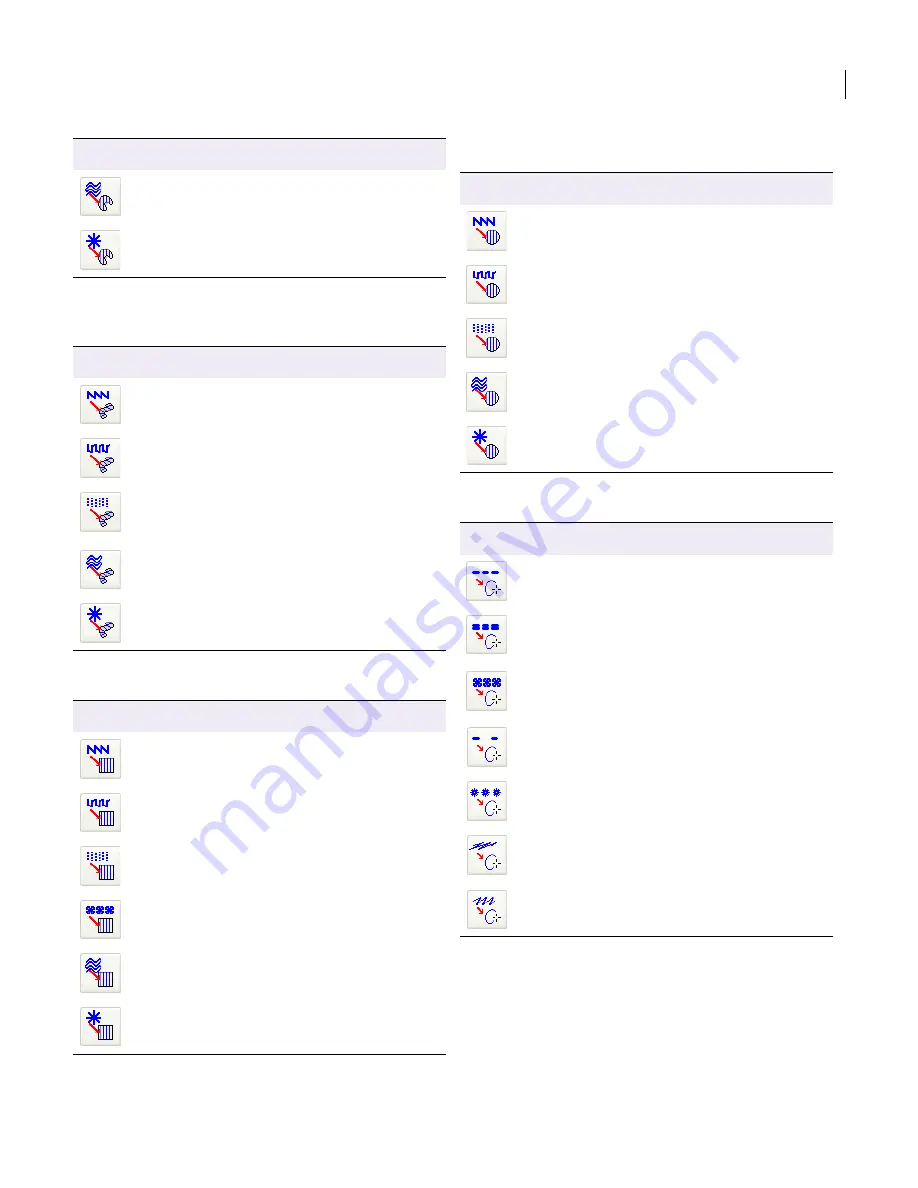
Turning Angle Fill Flyout

Parallel Fill Rectangle Flyout

Parallel Fill Circle Flyout

Run Line Flyout

Use Parallel Contour Fill to digitize closed 
shapes with Contour fills.

Use Parallel Radial Fill to digitize closed shapes 
with Radial fills.

Tool

Description

Use Turning Angle Satin Fill to create columns 
of varying width and stitch angle.

Use Turning Angle Weave Fill to create Weave 
fill columns of varying width and stitch angle.

Use Turning Angle Embossed Fill to create 
Embossed fill columns of varying width and 
stitch angle.

Use Turning Angle Contour Fill to create Contour 
fill columns of varying width and stitch angle.

Use Turning Angle Radial Fill to create Radial fill 
columns of varying width and stitch angle.

Tool

Description

Use Parallel Satin Fill: Rectangle to digitize 
squares and rectangles in Satin fill.

Use Parallel Weave Fill: Rectangle to digitize 
squares and rectangles in Weave fill.

Use Parallel Embossed Fill: Rectangle to digitize 
squares and rectangles in Embossed fill.

Use Parallel Motif Fill: Rectangle to digitize 
squares and rectangles in Motif fill.

Use Parallel Contour Fill: Rectangle to digitize 
squares and rectangles in Contour fill.

Use Parallel Radial Fill: Rectangle to digitize 
squares and rectangles in Radial fill.

Tool

Description

Tool

Description

Use Parallel Satin Fill: Circle to digitize circles in 
Satin fill.

Use Parallel Weave Fill: Circle to digitize circles 
in Weave fill.

Use Parallel Embossed Fill: Circle to digitize 
circles in Embossed fill.

Use Parallel Contour Fill: Circle to digitize circles 
in Contour fill.

Use Parallel Radial Fill: Circle to digitize circles 
in Radial fill.

Tool

Description

Use Single Run Line to place a row of single run 
stitches along a digitized line.

Use Triple Run Line to place a row of triple run 
stitches along a digitized line.

Use Motif Run Line to place a row of motif run 
stitches along a digitized line.

Use Sculpture Run Line to place a row of 
sculpture run stitches along a digitized line.

Use Candlewicking Run Line to place a row of 
candlewicking run stitches along a digitized line.

Use Backstitch Run Line to place a row of 
backstitch run stitches along a digitized line.

Use Stemstitch Run Line to place a row of 
stemstitch run stitches along a digitized line.

Summary of Contents for DigitizerPro

Page 1: ...Embroidery Software JANOME DigitizerPro JANOME Digitizer MB Requires a Digitizer MB dongle V3 0 EasyDesign EasyEdit Instruction Book ...

Page 2: ...above limitation may not apply to you To the extent allowed by applicable law implied warranties on the JANOME Embroidery Software are limited to ninety 90 days Limitation of Liability JANOME s liability under the warranty shall be limited to the cost of the Software Media and Documentation Under no circumstances shall JANOME be liable for any consequential incidental or indirect damages including...

Page 3: ...you will learn how to start the application create or open a design print designs and how to use some of the essential tools and features that JANOME Embroidery Software provides Note Use the procedure outlined in the System Setup chapter to install JANOME Embroidery Software software on your computer as new About JANOME Embroidery Software There are two products within the software EasyDesign and...

Page 4: ... design Cut copy duplicate and paste stitch blocks Resize mirror and rotate stitch blocks Travel through the design to view stitching sequence Load and view designs from your hard disk CD ROM or floppy disk These can be designs from another embroidery software package Save files in a number of file formats including the standard JEF and SEW formats Printed documentation DigitizerPro provides you w...

Page 5: ...enu Using onscreen help Onscreen Help can be accessed from the Help menu in JANOME Embroidery Software To use the onscreen help 1 Select Help Help Topics The EasyDesign Help window opens 2 Click Contents to display the main list of topics Topics are grouped under high level headings with book icons 3 Double click a book to view the list of topics then double click a topic Alternatively click Find ...

Page 6: ...ble click Click the mouse button twice without moving the mouse Shift click V Hold down Shift and click a mouse button Click OK or j Click OK with the mouse or press the Enter key on the keyboard to complete the action Shortcut Description C S While holding down the Control key Ctrl press the lowercase letter S key C V H While holding down the Control key Ctrl press Shift and the H key For a compl...

Page 7: ...Software read through all necessary installation steps carefully before getting started Step 3 When the installation is complete you will be prompted to restart your computer Step 4 Attach your security dongle only when prompted If you have an existing version of the software and have been provided with a new upgrade dongle attach your old dongle as well See System security for details Step 5 Conn...

Page 8: ...date of delivery If it is faulty it may be exchanged If it is physically damaged return it to your distributor and a replacement can be purchased However in case of loss or theft you will need to purchase an entire JANOME Embroidery Software replacement system For this reason you should consider insuring your dongle Upgrading dongles If you are upgrading from an earlier version of JANOME Digitizer...

Page 9: ...llow the dongle upgrade process after the computer is rebooted in order to transfer serial number and identity code from the old dongle to the new Attach your new upgrade dongle together with your old JANOME dongle only when prompted upon re booting your computer after software installation See also Installation checklist To install a JANOME Embroidery Software Upgrade 1 Close all Windows programs...

Page 10: ...l continue to work after the new installation 11 Select whether to merge versions and click Next The Ready to Install screen appears 12 Click Install Component Description Embroidery Software Main JANOME JANOME Embroidery Software product Design Gallery The Design Gallery design browser application Onscreen Help Context sensitive help to invoke use the F1 function key or click Help in the dialog b...

Page 11: ...uld manually delete this folder and its contents using Windows Explorer Modifying an existing JANOME Embroidery Software installation Whether you are updating your current JANOME Embroidery Software software or wanting to uninstall it you follow the same procedure When you run the installation program again it will automatically detect if there is an existing copy of JANOME Embroidery Software on ...

Page 12: ... models JANOME Embroidery Software supports the following machine models MC11000 MC10001 and MC10000 machines can be connected by cable directly to your PC See Connecting to your machine for details MC10000 V2 2 or earlier machines must be upgraded to Version 2 21 Visit our website at http www janome com to download the necessary upgrade The MC9700 MC9500 MC300E and MC350E machines do not support ...

Page 13: ...computer is a laptop there may be a slot where you can insert the ATA PC card and its adapter directly If you have desktop computer you may need an ATA PC card reader writer connected to a USB port USB memory sticks The latest machine models can read from and write to USB memory sticks These are very convenient portable memory devices which can hold large amounts of data in a small stick Linking y...

Page 14: ...e installed 4 Choose an option and click Next to start installing The following dialog appears when installation is complete 5 Click Finish to close and restart your computer Setting up scanners JANOME Embroidery Software supports TWAIN compatible scanners Note Peripheral devices can be connected to your computer via serial ports parallel ports a specialized network card or an ethernet network To ...

Page 15: ...dery Software select another scanner driver from the list There are usually two installed for each scanner Calibrating the monitor You need to calibrate your monitor so that designs at 1 1 scale appear at real size Do this when you first install EasyDesign or whenever you change your monitor To calibrate the monitor 1 Select Setup Screen Calibration The Screen Calibration dialog opens 2 Measure th...

Page 16: ...ssible sources for suitable artwork include books of embroidery patterns and children s story books printed table cloths or tea towels business cards post cards and wrapping paper clip art libraries of your word processing or graphics program Internet or CD clipart libraries samples in the EasyDesign C Embroidery Album folder original artwork e g children s drawings Try this Be sure to check the c...

Page 17: ...tch density or quality Selecting objects JANOME Embroidery Software EasyDesign provides various ways to select the objects that comprise an embroidery design You can select all objects to modify the design as a whole or individual objects for more precise modification See Selecting Objects for details Viewing designs EasyDesign provides numerous ways to view an embroidery design You can show or hi...

Page 18: ...ates a glossy high quality effect It is well suited to stitching narrow shapes or columns where each stitch traverses the width of the column See Creating satin fills for details Weave Fill stitch consists of rows of run stitches and is suitable for filling large irregular shapes You can select from many attractive Weave Fill patterns Generally the default size and spacing will produce the best re...

Page 19: ... best Artwork that is not in digital format needs to be scanned correctly to produce good quality images Before using bitmaps for automatic digitizing you must prepare them using the EasyDesign artwork preparation tools See Preparing Images for Automatic Digitizing for details Automatic digitizing The Click to Stitch tools are useful for quickly creating embroidery objects from images that do not ...

Page 20: ...p menu See Arranging and Transforming Objects for details Note The scalability and stitching quality of a design ultimately depend on its original source Only native JAN designs contain the complete set of design information required for 100 perfect scaling and transformation See Embroidery design formats for details Reshaping and editing objects JANOME Embroidery Software lets you modify object s...

Page 21: ... reduce puckering and pulling especially on larger designs Embroidery stitches pull fabric inward where the needle penetrates This can cause gaps to appear in the embroidery For an object to sew out correctly it must have correct stitch spacing sufficient pull compensation together with a suitable underlay for the combination of cover stitch type object type object shape and fabric Most designs us...

Page 22: ...ntal or vertical baseline curve lettering around a circle or arc baseline or digitize your own JANOME Embroidery Software gives you interactive control over many baseline settings Letter and line spacings can be determined before or after creating lettering objects and placing them in your design See Creating Embroidery Lettering for details JANOME Embroidery Software gives you interactive and pre...

Page 23: ...esign images and production worksheets to disk or email them See Reading and Writing Design Files for details By default EasyDesign saves to its native file format JAN This format contains all information necessary both for stitching a design and for later modification Saving a design records its file name location and format and updates it with any changes you make JAN format files are automatica...

Page 24: ...plains the design viewing modes available in JANOME Embroidery Software as well as the various design viewing settings It describes how to view the stitching sequence in both EasyDesign and EasyEdit and how to view the stitching sequence in slow motion Access to design information is described as well as viewing and hiding images See Viewing Designs for details Selecting objects This section descr...

Page 25: ...s used for creating designs while EasyEdit is used for modifying existing designs Warning If the security device is removed or loses connection while you are working in JANOME Embroidery Software error messages will display Cancel the messages then exit JANOME Embroidery Software You will lose any unsaved changes to your design Re attach the security device to your computer making sure that it is ...

Page 26: ...ou select to free hand digitize EasyDesign opens with a new blank design Design1 4 Customize the Design Window by showing or hiding the grid changing the grid dimensions and showing and hiding toolbars See Displaying the grid and Showing or hiding toolbars for details Starting EasyEdit Open JANOME Embroidery Software EasyEdit using the desktop icon or the Windows Start menu To start EasyEdit Doubl...

Page 27: ...gns in EasyEdit JANOME Embroidery Software EasyEdit opens JEF and SEW files See Embroidery design formats for details Warning You cannot open files created with a later version of the software to the one you are running To open a design in EasyEdit 1 Click the Open icon The Open dialog opens 2 Select a folder from the Look In list 3 If the design is not in JEF format select a file type from the Fi...

Page 28: ...igitize toolbar To select commands from toolbars Rest the pointer over a tool icon to see its name in a tooltip Click the icon to activate the command Access flyouts on the Digitize toolbar by clicking the flyout arrow which appears in the bottom left corner of the tool The flyout remains open until you select any enabled tool To close the flyout without selecting anything simply click anywhere ou...

Page 29: ...supports various sets of machine model Some Janome machines can be connected by cable directly to your PC via the USB port Older style machines do not support direct connection but they do read ATA PC cards and or USB memory sticks See also Sending and writing designs Note JANOME Embroidery Software records the embroidery area of custom hoops to JEF file which can then be read by multi needle mach...

Page 30: ... details If you choose the MB 4 option the Machine menu items will appear as shown See Outputting to MB 4 machine for details Creating new designs When you start JANOME Embroidery Software a new file Design1 is automatically created ready for you to start digitizing By default Design1 is based on the NORMAL template Templates contain pre set styles defaults or objects to make digitizing quicker an...

Page 31: ...the stitching area for the selected hoop a warning appears when saving This prevents you from accidently stitching outside this area and damaging your machine by hitting the hoop with the needle You can show or hide the hoop at any time To display the hoop Click the Display Hoop icon to toggle hoop display on or off Alternatively select View Hoop Alternatively right click a blank part of the Desig...

Page 32: ...tails Saving current design Saving a design records its file name location and format and updates it with any changes you make When you save an existing design under a new name to a different location or format you create a copy of the original design See Saving designs for machine for details Try this Save your design early and often Do not wait until you finish working You can also set JANOME Em...

Page 33: ...em recovering design files from backup folder To set automatic save options 1 Select Setup Work Environment The Work Environment Display dialog opens 2 Select the Autosave tab 3 Select the Auto Save Design Every checkbox 4 Enter the auto save frequency in the Minutes field The design will be saved in the BACKUP folder of your JANOME Embroidery Software installation It will have the same name as th...

Page 34: ...cial instructions This section explains the design viewing modes available in JANOME Embroidery Software as well as the various design viewing settings It describes how to view the stitching sequence in both EasyDesign and EasyEdit and how to view the stitching sequence in slow motion Access to design information is described as well as viewing and hiding images Viewing design elements JANOME Embr...

Page 35: ...quence List Zooming and panning designs Magnify your view of the design by zooming in on individual stitches or details or zoom out to display more of the design in the window In addition to the scroll bars panning provides a quick way to view parts of a design which are not currently visible in the Design Window Panning is typically used after zooming in on an area To zoom and pan a design To dis...

Page 36: ...e Design Window See also Zooming and panning designs Note To change the view settings for the Overview window click it to make it the active window See Design viewing modes for details To work with the Overview Window 1 Click the Overview Window icon The Overview window opens 2 To zoom in or out click the Zoom button at the bottom of the window and drag a bounding box around the area to zoom 3 To ...

Page 37: ... When connectors become long enough to trim the software adds tie in and trim functions These are indicated by the symbols shown below The MB 4 machine will by default tie off and trim at the specified positions This behavior is alternately known as Trim By Jumps Jump Stitch Cutting or Jump Thread Trimming However the MB 4 machine also allows you to switch to automatic machine trimming This means ...

Page 38: ...d of the design click the Jump to Start End of Design icon then click the Forward travel icon Traveling by object In EasyDesign use the object travel tool or keyboard shortcuts to travel through the design by object This technique is useful if you need to locate a specific object in order to insert another object or delete it from the stitching sequence Use it in conjunction with the stitch travel...

Page 39: ...ing Traveling to the start or end of a design Use the Jump to Start End of Design tool or keyboard shortcuts to travel quickly to the start or end of the stitching sequence See also Appendices Glossary Index To travel to the start or end of a design To travel to the start of the design click the Jump to Start End of Design icon then click the Back travel icon To travel to the end of the design cli...

Page 40: ...stitching sequence click the Forward arrow on the toolbar To travel to the previous stitch click the Back arrow As you travel the current position marker moves to show the stitching sequence Try this You can also use the shortcut keys to travel by stitches through your design Press Esc then press the left and right arrows to jump backwards by 1 stitch the up and down arrows by 10 stitches and the ...

Page 41: ...nly a section of the design specify a start point for either forward or backward stitching in the Stitch Range field or via the slider control Select simulation options as required Viewing design information JANOME Embroidery Software provides information about designs in a variety of ways Before even opening JANOME Embroidery Software you can check design information directly from Windows Explore...

Page 42: ...rintouts The print preview contains a design preview and essential information including the size of the design color sequence and any special stitching instructions See also Printing Designs To preview a design printout 1 Click the Print Preview icon The design printout displays in a preview window 2 Adjust the view as required To change the orientation of the paper click Landscape or Portrait To...

Page 43: ... select individual stitches in EasyEdit See also Stitch Editing Selecting all objects in a design The Select tool provides various means for selecting objects including point and click bounding box selection and in conjunction with Shift Tab keys first last and next previous object selection You can also select all objects to apply changes to a whole design See also Quick Reference To select all o...

Page 44: ... objects with a bounding box 1 Click the Select icon 2 Drag a bounding box around the objects you want to select Objects are selected when you release the mouse button Note Unless they have already been grouped only objects completely within the bounding box will be selected when you release the mouse button See also Grouping objects Selecting a range of objects by point and click You can select a...

Page 45: ... by object for details 2 Click the Select icon 3 Click the Stitch Select While Traveling icon 4 Continue traveling through the design As you travel objects are selected 5 When you have finished selecting click the Stitch Select While Traveling icon again to turn it off Note If an object is already selected it is deselected when you travel through it To select more objects continue traveling with C...

Page 46: ...w as long as you need it and offers an easy way to select objects and view them It is synchronized with the Design Window dynamically updating whenever you manipulate objects It is normally docked on the right of the Design Window but can be dragged to any position and resized as required See also Objects and object details Note You can use the Resequence List to lock and unlock objects Use it als...

Page 47: ...s 3 Click an icon to select a color block and or individual objects When a color block is selected all of its component objects are selected as well To select a range of items hold down Shift as you click To select multiple items hold down Ctrl as you click To deselect all objects click away from objects or color blocks Click to view color sequence Right click to access popup menu ...

Page 48: ...s not appear in the list you can define a custom hoop from scratch or based on a standard hoop A representation of the selected hoop providing a guideline for sizing and positioning your design is displayed in the Design Window This section describes how to set grid spacing in JANOME Embroidery Software It also covers changing hoops and defining your own custom hoops It explains splitting designs ...

Page 49: ...cs based on samples packaged with the software Backgrounds are treated as design details and are saved with the design Changing background colors Set the color inside the hoop to match the fabric you intend to stitch out on You can also set a background color outside the hoop by way of contrast See also Working with fabrics To change the background color 1 Select Setup Work Environment or right cl...

Page 50: ...rics folder in any of the supported file formats You can also browse to another folder on your PC and select a file in any of these formats See also Supported embroidery file formats 4 Select a fabric sample and click Open or simply double click the file The selected fabric is displayed in the hoop preview in the Work Environment dialog 5 Click OK The selected fabric is applied to the whole Design...

Page 51: ...tion on screen for ease of digitizing See also Rotating hoops Make sure you have the correct hoop selected and that your design fits within the design area on your embroidery machine When the machine reads the JEF file the stitching area is limited by the selected hoop type See also Hooping large designs Warning Hoops used with AccuFil have two hooping areas AccuFil is software and machine firmwar...

Page 52: ...f the current Design Window while the design contains no stitches Otherwise the hoop center or offset center for old hoops is fixed at the 0 0 point of the current Design Window To center the hoop 1 Open the Work Environment dialog Select Setup Work Environment Right click on the Design Window with nothing selected and select Work Environment 2 Click the Automatic Centering checkbox in the Display...

Page 53: ...ts for details Hooping sequence When a large design or design layout requires multiple hoopings it is important to establish the stitching order so that objects in the foreground are sewn after those in the background EasyDesign allows you to set up the position and sequence of each hoop Multiple hoops are color coded as follows according to their position in the sequence Note In the unlikely even...

Page 54: ...ut See Creating ornamental layouts for details 6 Repeat these steps as required Try this You can select a different hoop at any time This will change all hoopings in the design 7 Re position additional hoops and if necessary rotate them so that they completely cover all objects in the design Click the Rotate Hoop icon with left or right mouse buttons to rotate a selected hoop 45 in either directio...

Page 55: ...ined by the selected hoop type If the file contains a non standard custom hoop code the hoop size is automatically based on the design size which is used to limit the stitching area Note If you open a JAN file which contains a custom hoop not included in the hoop list or if the hoop has the same name as a listed one but different type and or settings JANOME Embroidery Software creates a new custom...

Page 56: ...etting Width and Total Height fields to the same size Warning In order to avoid the possibility of the needle hitting the rim of the hoop the size definition must be of the embroidery area of the hoop and not its external dimensions 5 Save the new or edited hoop definition If you are saving a modified hoop click the Save Hoop button If you are saving the definition as a new hoop click the Save Hoo...

Page 57: ...tizing for details Fill stitches This section explains how to select a stitch type for an object as well as change stitch settings to obtain the best results Fill stitch types described here include Satin Weave and Embossed Fill See Outline Fill Stitches for details Embroidery stamps and motifs This section describes how to insert stamps into your design and how to adjust them to get the results y...

Page 58: ...Like design creation in graphics applications this involves the use of certain input or digitizing tools These are similar to drawing tools except that the end result are embroidery objects rather than vector graphics Selecting digitizing methods Different digitizing methods or tools are suited to creating different shapes or design elements Digitizing methods divide broadly into two categories ou...

Page 59: ... e g entry points See Reshaping objects for details Digitizing lines Use the Run Line tool to digitize lines of single or triple run stitching This tool is typically used to add borders to designs Try this JANOME Embroidery Software makes it easy to convert lines to Satin borders via the Object Details Line Stitch dialog See Setting column width and density for details Creating run lines Digitize ...

Page 60: ...o Creating motif runs To set Run Line stitch type 1 Double click the Run Line object The Object Details Line Stitch dialog opens 2 Select Single Run Line stitch type 3 Click OK Setting Run Line stitch length For Run Line stitches set the stitch length to suit the digitized shape Where the object has tight curves select a shorter stitch length To reduce the stitch count for flatter curves increase ...

Page 61: ...the last reference point then continue digitizing 3 When you have finished digitizing the line either Press Enter to keep the last stitch and place the exit point at the last point marked or Press Spacebar to omit the last stitch and place the exit point on the opposite side of the column Try this To make a border close the shape by entering the last reference point exactly on top of the first If ...

Page 62: ...exit point on the opposite side of the column Try this If you are joining two columns omit the last stitch on the first column so that the exit point is close to the entry point of the next column Digitizing complex shapes with fixed stitch angles Use Digitize Turning Angle Satin Fill to create Satin fill columns of varying width and stitch angle Use Digitize Turning Angle Weave Fill to create Wea...

Page 63: ...pe of reference point mark the last on top of the first and press Enter Note Boundaries must not overlap 4 Press Enter Note To adjust stitch angles in Parallel Fill objects see Adjusting stitch angles Digitizing circles Digitize circles and ovals with a few clicks You can use any fill stitch type with circles and ovals To digitize circles and ovals 1 Choose a Parallel Fill Circle method from the D...

Page 64: ...d rectangles 1 Click the Parallel Fill Rectangle icon 2 Digitize the square and rectangle Click to mark one corner of the rectangle Drag the pointer until the outline is the required size Release the mouse button To create a square hold the Ctrl key down whilst dragging the pointer Use Digitize Parallel Satin Fill Rectangle to digitize squares and rectangles in Satin fill Use Digitize Parallel Wea...

Page 65: ... particular digitizing method or apply new ones Default settings are stored in the design template This section explains how to select a stitch type for an object as well as change stitch settings to obtain the best results Fill stitch types described here include Satin Weave and Embossed Fill Selecting fill stitches Different stitch types are suited to different objects When you digitize an objec...

Page 66: ...in objects of any object type The feature is off by default Adjusting Satin stitch spacing Stitch spacing is the distance in millimeters between two needle penetrations on the same side of a column Where a column is narrow stitches are tight thus requiring fewer stitches to cover the fabric Where a column is very narrow stitches need to be less dense because too many needle penetrations can damage...

Page 67: ...electing Weave Fill patterns You can select from many Weave Fill patterns Generally the default size and spacing will produce the best results but you may like to change the stitch angle To select a Weave Fill pattern 1 Select and double click the Weave Fill object The Object Details Fill Stitch dialog opens 2 Click the spin box to cycle through a list of patterns or enter the number directly into...

Page 68: ... even greater variation Creating fills with Embossed Fill Create Embossed Fill objects with the following procedure To create fills with Embossed Fill 1 With no objects selected click the Object Details icon The Object Details Fill Stitch dialog opens 2 Select Embossed Fill 3 Create an object with the Parallel Fill or Turning Angle Fill tool Turn on Visualizer or view Display Needle Points to see ...

Page 69: ...lick the Embossed Fill object The Object Details Fill Stitch dialog opens 2 In the Spacing fields enter a new spacing value This value is the distance between patterns X is the horizontal and Y the vertical spacing To increase spacing enter a smaller value To decrease spacing enter a larger one 3 Click OK Adjusting Embossed Fill stitch angle You can change the stitch angle to get the best results ...

Page 70: ...itch pattern from a common central point Florentine Effect can be applied to Weave Fill objects to create a flowing stitch effect along a digitized line Creating contour fills Contour is a curved fill stitch type stitches follow the contours of a shape creating a curved light and shade effect It only works with column shapes There are two types Standard and Spiral both of which can be applied to a...

Page 71: ...ethod from the Digitize toolbar 2 Create a radial fill object See Digitizing complex shapes with fixed stitch angles for details 3 Double click to access object details 4 Select a pattern from the dropdown list as required 5 Adjust the pattern size and spacing settings in both vertical and horizontal directions as required 6 Click OK to apply Creating Florentine effects Florentine Effect can be ap...

Page 72: ...use as borders Available stitch types include backstitch stemstitch and candlewicking Try this You can also create decorative stitch effects with pattern runs See Creating motif runs for details Creating backstitch outlines Backstitch is an older style adaptable stitch which can be used for delicate outlines This stitch follows intricate curves well To create a backstitch outline 1 Click the Backs...

Page 73: ...Type list 4 Adjust the Line Thickness as required 5 Adjust the Spacing as required 6 Adjust Angle and Stitch Thickness settings as required 7 Click OK to apply Creating candlewick outlines Candlewicking is a traditional white on white embroidery technique usually done on white linen or cotton fabric with heavy cotton threads Stitches used are mostly knots To create a candlewick outline 1 Click the...

Page 74: ... this case it is recommended to use Hand looking Quilting Stitch of MC11000 Special Edition Test your design on a small piece of fabric before stitching your project To create a sculpture run outline 1 Click the Sculpture Run icon and digitize a sculpture run outline as you would a run stitch outline See Digitizing lines for details 2 Double click to access object details 3 If not already applied ...

Page 75: ...collection of ready made design stamps for you to include in your embroidery designs There are many stamps to choose from Once added to your design stamps can be edited resized or transformed They can also be used in motif runs and fills Note For a complete catalog of samples see Stamps Motifs and Border Samples Selecting and inserting stamps Embroidery Stamps are ready made design elements such a...

Page 76: ...ungroup the stamp Rotating flipping and scaling stamps You can rotate flip and scale stamps as you add them to your design using the keyboard and mouse You can also scale rotate and flip stamps later just like any other object To rotate flip and scale stamps 1 Select a stamp to insert See Selecting and inserting stamps for details 2 Move the pointer to the position you want to add the stamp and cl...

Page 77: ... input method that creates motif repeats along a digitized line You can create decorative outlines using any motif from the selection list You can modify the rotation angle orientation and scale and vary the space between motifs Creating Motif Run objects Use the Motif Run tool to create a string of motifs along a digitized line You can select motifs before or after digitizing You can also adjust ...

Page 78: ...motif for motif runs 1 Double click a Motif Run object The Object Details Line Stitch Motif Run dialog opens 2 Select a pattern from the dropdown list 3 Click OK The selected Motif Run object is updated according to the motif selected Try this Select a motif with no object selected and click OK to make the selection current Sizing and spacing motifs in motif runs Set the exact size and spacing of ...

Page 79: ...lettering objects See also Adjusting orientations To reshape Motif Run objects 1 Select a Motif Run object and click the Reshape icon Control points appear around the motifs 2 Adjust the outline and motif spacings as required Reposition and or change reshape nodes from corner to curve Add or delete reshape nodes Click and drag individual motifs to adjust spacing 3 Drag the proportional resize hand...

Page 80: ...ed See Adjusting motif fill settings for details 4 Select a pattern from the dropdown list and click OK The selected Motif Fill object is updated Try this Select a motif with no object selected and click OK to make the selection current Adjusting motif fill settings You can insert a motif fill at its original size and spacing and then adjust settings later You can also set the exact size and spaci...

Page 81: ...e 7 Click OK The digitized object is filled with the selected motif fill current settings applying Note If more than half a motif is outside the boundary it will be clipped along the boundary Laying out motif fills on screen Lay out motif fills on screen by using guide motifs to scale space transform and offset the entire motif fill There are three blue guide motifs Other sample motifs appear in y...

Page 82: ...oom in and adjust selected guide motifs to achieve the effect you require Use top guide motif to change row spacing row offset and to scale motifs Use middle guide motif to move rotate skew and scale motifs Use side guide motif to change column spacing and to scale motifs Rotate motifs by clicking the middle guide twice to display the rotation handles Click a corner handle and drag to rotate Skew ...

Page 83: ... example if your sample contains color changes which you do not require in the actual motif select this checkbox 6 Click OK 7 Click to mark two reference points for the motif These determine the default motif orientation in motif runs and fills Reference points also determine the spacing between each motif 8 Reference point 1 becomes the anchor point in the final motif Reference point 2 becomes th...

Page 84: ...he hoop Selecting thread colors The Color Chart has up to 128 color slots New objects are digitized using the currently selected color You can change color before or after digitizing JANOME Embroidery Software also lets you manage the thread colors in your Color Chart Select from a wide range of commercial thread charts Adjust the exact number of colors in the Color Chart as required Add extra slo...

Page 85: ... color change on any desired stitch in EasyDesign A color change of any selected color is inserted at the current cursor position This is particularly useful when working with monograms or other lettering objects including individual characters You can remove manually inserted color changes at any time To insert a manual color change 1 Press Esc to deselect all objects in the design and deactivate...

Page 86: ...n represents the threads available for use in the selected thread chart Note If a color is already being used by one or more objects in the current design a tick will appear in the color field of the Color Chart list 2 Set the exact number of colors required in the Number of Colors field If you are only using six colors limit the number in the Color Chart to those six Add extra slots as required 3...

Page 87: ...JANOME Embroidery Software Instruction Book Chapter 11 Thread Colors 85 7 Repeat for other color slots in the Color Chart Note The Color Chart you define here is saved with the current design ...

Page 88: ...o insert into JANOME Embroidery Software and save bitmap images as well as how to show and hide them as you digitize Editing images in external graphics packages is also covered See Digitizing with Backdrops for details Preparing images for automatic digitizing This section describes how to prepare both outlined and non outlined images for automatic digitizing See Preparing Images for Automatic Di...

Page 89: ...ired stitches See Digitizing images automatically with Click to Design for details Digitize complete images automatically with Click to Design You select the image and Click to Design automatically determines the shapes and stitches needed to digitize the design See Creating embroidery designs with Click to Design Advanced for details From within JANOME Embroidery Software you can open images in P...

Page 90: ...of solid color blocks Typically logos and simple drawings scanned from business cards letterheads books magazines cards fall into this category Noisy images typically need to be prepared by reducing the color count and sharpening the outlines See Image preparation techniques for details Dithered images Dithering is a software technique which combines existing colors in a checkerboard arrangement o...

Page 91: ...eate a drawing The higher the value the clearer the image but larger the file For digitizing purposes use a maximum resolution of 300 dpi dots per inch A resolution of 72dpi screen resolution will usually be sufficient Generally speaking the smaller the source image and or more detail it contains the higher the resolution needs to be Use the following table as a guide Color mode Most scanners also...

Page 92: ... differences which makes the image edges more defined It does not increase the image details it just makes them more obvious In general use sharpening with images that have well defined outlines Do not use it with non outlined images Importing images into EasyDesign Bitmap images can be inserted pasted or scanned into JANOME Embroidery Software for use as digitizing backdrops For both manual and a...

Page 93: ...o the design Note You may need to resize the image to fit within the dimensions of the selected hoop See Scaling objects using Object Details for details See also Editing images in graphics applications Scanning bitmap images You can scan images directly into JANOME Embroidery Software for use as digitizing backdrops The scanning feature in JANOME Embroidery Software allows you to use most TWAIN c...

Page 94: ... visible areas of the image However cropped images may produce unexpected results when used with Click to Stitch or Click to Design tools In this case the solution is to edit the image in a third party graphics application and remove the unwanted areas of the image altogether See Editing images in graphics applications for details To crop an image for digitizing 1 Scan or load the image you want t...

Page 95: ...tly in Paint Photopaint or Paint Shop Pro Images updated in this way are automatically re imported into JANOME Embroidery Software There are many graphics packages which can help you improve your scanned images At one end of the spectrum there is the simple Paint program This comes free with Windows but can handle few formats or color conversions At the other end there are professional tools such ...

Page 96: ...e displays in JANOME Embroidery Software overlaid with stripes This means that it is still open in the graphics package Try this Select File Exit Return Filename to exit the graphics package and show the updated image in JANOME Embroidery Software The stripes will disappear Background cleaned and eye outlined File still open in the graphics package ...

Page 97: ...n describes how to prepare both outlined and non outlined images for automatic digitizing Image preparation techniques Before applying automatic digitizing you frequently need to improve or clean up artwork To work effectively both Click to Design and Click to Stitch require solid color images as input You can improve artwork both with bitmap editing tools in graphics packages and or the image pro...

Page 98: ...tool Color reduction should only be applied if the loss of detail does not affect the image shapes Before color reduction the colored areas in the image below include many colors After reduction each area is reduced to a single color The detail is preserved If you are scanning images make sure you scan them correctly for best results See also Scanning artwork into EasyDesign Be aware that the Imag...

Page 99: ...g Your choice of tool depends on the image There are three tools Note Even if your image looks ready to stitch when inserted into the software it will need to be image processed before conversion The software will not let you apply automatic digitizing techniques without preliminary image processing Using image preparation tools It is important to use the correct preparation tools for your image T...

Page 100: ... colors Try this Depending on the quality of the scanned image you may need to touch it up manually before processing in JANOME Embroidery Software You would normally do this in order to eliminate backgrounds flood fill solid areas with Image Preparation used outlines not sharpened poor stitching Image with indistinct outlines Image with solid outlines Outlined Image Preparation used improved stit...

Page 101: ...rpens outlines and reduces noise Areas enclosed by a black outline are reduced to a single color Outline sharpening makes it easier for the software to recognize distinct areas in the image These areas then become the embroidery objects of the finished design Use it particularly if the outlines are blurry fuzzy or indistinct Try this Depending on the quality of the scanned image you may need to to...

Page 102: ... detected outlines Try this Move the slider to the right until there is too much black then move it slowly back to the left Stop when the image shows all the outlines you need 4 Click Show Color Areas to see the updated image 5 Click OK to apply the changes Click to preview results of noise reduction Number of colors in image Set outline appearance Move slider to sharpen outline and remove speckle...

Page 103: ...te embroidery from photographs or other images color or grayscale Photo Click designs consist of rows of stitches of varying spacing The effect resembles the output of a line printer This section describes how to automatically convert bitmap images to embroidery objects and complete designs as well as how to create embroidery from grayscale images Digitizing images with Click to Stitch Use Digitiz...

Page 104: ... Palette icon 4 Select a Click to Stitch digitizing method 5 Click the shape you want to digitize The object is digitized in the nearest palette color Note If Match to Palette is not selected the object is digitized in the current palette color Digitizing fills with Click to Stitch Click to Stitch can be used to create closed Weave Fill objects as well as objects with turning Satin Fills Use Click...

Page 105: ... can be modified Digitizing outlines with Click to Stitch Use Click to Stitch to digitize boundaries and details with run stitching Current properties are applied You can modify these as required before or after using the tools To digitize outlines with Click to Stitch 1 Scan or load an image See Scanning artwork into EasyDesign for details 2 Select the image and process it See Preparing Images fo...

Page 106: ...mage you want to convert and clicking the tool The system automatically determines the color to omit fill colors detail color and most suitable stitch types to apply to an image using the default settings It immediately generates stitches for the selected image Try this If you want the software to automatically omit the image background make sure the background color surrounds the design by at lea...

Page 107: ...idth and height values as well as the number of image colors Note If the image has not been correctly image processed no colors appear and the Image Preparation button is activated Click to process the image See Image preparation techniques for details 4 Click and drag any colors you want to omit from automatic stitch processing into the Omit column 5 Similarly click and drag or leave any colors y...

Page 108: ...en objects and or borders around the design itself You can select the outline colors to use at the time of converting the image Colors and object details of generated objects can be changed at any time To create embroidery designs with Click to Design Advanced 1 Scan or load an image See Scanning artwork into EasyDesign for details 2 Select the image and process it See Preparing Images for Automat...

Page 109: ... you wish omit all image colors from the selection criteria and choose to generate only outlines and or borders Creating embroidery from photographs Use Photo Click to create embroidery from photographs or other images color or grayscale Photo Click designs consist of rows of stitches of varying spacing PhotoSatin Fill The effect resembles the output of a line printer Adjust the angle of the rows ...

Page 110: ...h the image selected click one of the Photo Click icons If Photo Click Instantly is active the photo will be processed using the current settings and selected thread color If Photo Click Advanced is active the Object Details Photo Click dialog opens 4 In the Resolution panel select a resolution option Low Medium High or Extra High The coarser the resolution the more spacing between rows 5 In the B...

Page 111: ...Book Chapter 14 Automatic Digitizing 109 7 Click OK EasyDesign generates stitches for the selected image This process may take some time Try this Use Visualizer for a more accurate representation of the stitching Grain Angle 0 Grain Angle 90 ...

Page 112: ...how to resequence objects by cut and paste by color or object See Combining and Resequencing Objects for details Arranging and transforming objects This section describes how to position objects lock and group as well as how to scale rotate skew and flip objects See Arranging and Transforming Objects for details Reshaping and editing objects This section describes how to reshape objects with contr...

Page 113: ...nd placed on the Windows clipboard for temporary storage It can then be pasted any number of times within either the same or another design until replaced on the clipboard You can also cut copy and paste lettering objects within and between designs When you insert one design in another the two Color Charts are merged Inserting designs JANOME Embroidery Software lets you insert one design into anot...

Page 114: ...g objects You can copy objects to create multiple identical objects or to insert objects from other designs Note You can also remove objects from a design using the Cut command and paste them back in again Cut and Paste changes the stitching sequence in the design See Resequencing objects with cut and paste for details To copy and paste objects 1 Select the object s to copy 2 Click the Copy icon T...

Page 115: ...ts The Quick Clone feature lets you quickly duplicate selected objects by right clicking dragging and releasing at a new position To clone objects 1 Select an object or objects 2 Holding down the right mouse button drag the object s to a new position A black outline of the object appears The cursor icon includes a plus symbol Try this For more precise positioning hold down the Ctrl key while dragg...

Page 116: ...through designs in EasyEdit for details 2 Insert the second object To do this either digitize the object or cut and paste it into position The second object is nested in the stitching sequence of the first object All required functions are automatically inserted for the second object Try this To view the connectors that are generated for the nested object view in normal view Resequencing designs T...

Page 117: ... in the required stitching order The Resequence List is modeless meaning that it stays on the Design Window as long as you need it See also Selecting and viewing objects with the Resequence List To resequence selected objects 1 Click the Resequence icon The Resequence List opens 2 Click the Object button corresponding to the object you want to select See also Objects and object details 3 Select th...

Page 118: ...n as required 3 Select the first color you want to resequence Holding down Ctrl select multiple objects to resequence Holding down Shift select a range of objects to resequence 4 Use the buttons to reposition the selected color s in the stitching sequence See Resequencing selected objects for details Alternatively click and drag colors to reposition in the stitching sequence Click Edit Resequence ...

Page 119: ... of design information required for 100 perfect scaling and transformation See also Embroidery design formats This section describes how to position objects lock and group as well as how to scale rotate skew and flip objects Positioning and aligning objects Position objects in your design using the mouse to drag them to a new position nudging them with the arrow keys or by specifying the X Y coord...

Page 120: ...t The Align tools in Alignment toolbar offer a set of buttons to trigger corresponding functions found in the Align popup menu The tools are all enabled when two or more objects are selected To align objects 1 Select the objects you want to align Note Objects are aligned with the last object selected 2 Select the object you want to align with 3 Click an alignment tool or select Align in the popup ...

Page 121: ...ouping objects You can group selected objects or the whole design to keep them together for moving scaling and transforming actions To group objects 1 Select the objects to group 2 Select Edit Group Selected objects are combined into a group This can be selected moved resized and transformed as a single object Try this To select with a bounding outline simply drag the outline over one component ob...

Page 122: ... use a corner handle To change the height use the handles at the center top or center bottom To change the width use the handles at the center sides Try this To resize around a center anchor hold down Shift while you resize Scaling objects using Object Details You can scale selected objects or a whole design using Object Details This allows stitches to be regenerated and the original stitch densit...

Page 123: ...ck a rotation handle and drag it clockwise or anti clockwise An outline and cross hairs display as you rotate Rotating objects using Rotate CCW CW Use the Rotate 45 CCW CW tool to rotate objects by 45 rotations in either direction To rotate objects using Rotate CCW CW 1 Select object s with the Select tool 2 Click Rotate 45 CCW CW on the toolbar Click to rotate 45 counter clockwise Right click to ...

Page 124: ...object s to flip Click the Flip Horizontally tool to flip the object left right Click Flip Vertically to flip up down Alternatively right click the object and select Flip Horizontally or Flip Vertically from the popup menu Try this You can also access the commands via the Resequence List See also Resequencing selected objects Creating ornamental layouts The Easy Layout feature allows you to arrang...

Page 125: ...ectangular or circular spaces EasyDesign allows you to define a work area of up to 3m x 3m To define a work area 1 Click the Define Layout Work Area button to create a new work area The Easy Layout Work Area dialog is displayed 2 Select either a rectangular or round work area and enter the required size 3 Optionally click the Pick Color button to change the display color The Color dialog where you...

Page 126: ...lected objects to sew out in separate hoopings make sure they are grouped before proceeding Otherwise they will be color optimized for a single stitchout i e color block by color block See also Hooping large designs 4 Select the Copy And Mirror To Corners method Four wireframe copies are displayed and placed equidistant around the center of the work area Each copy is mirrored about the vertical or...

Page 127: ...work area Warning If you want the selected design s or object s to sew out in a separate hooping make sure it is grouped before proceeding See Hooping large designs for details 4 Select the Copy To Circle method 5 Use the spin box control to define the number of copies These are shown in wireframe and placed equidistant around the center of the work area Each copy is rotated about the center of th...

Page 128: ...so change the stitch entry and exit points of individual objects This is useful in order to reduce the number of travel runs connecting adjoining objects This section describes how to reshape objects with control points adjust stitch angles and change entry and exit points Reshaping objects You can change the shape of an object by selecting it with the Reshape tool and moving adding or deleting co...

Page 129: ... for repositioning or modification To select control points Click to select a single control point Holding down Ctrl click to select multiple control points Click and drag a bounding box around a group of control points to select Moving control points You can move control points to change an outline shape To move control points Click and drag a single control point to a new position Similarly clic...

Page 130: ...ot delete the control points from objects created with the Parallel Fill Circle tool See also Reshaping circle objects To delete control points 1 Select the control point or points 2 Press Delete Note If the object only has two control points or two pairs of control points as in the case of Turning Angle Fill objects deleting one deletes the whole object Reshaping circle objects You can change Cir...

Page 131: ...n to follow the shape You can however change the stitch angle of Parallel Fill Circle objects by moving the stitch entry point Adjusting Parallel Fill stitch angles by object details You can change the stitch angle of Parallel Fill objects using Object Details To adjust Parallel Fill stitch angles by object details 1 Select and double click a Parallel Fill object The Object Details Fill Stitch tab...

Page 132: ... stitch angles while in Reshape mode To edit stitch angles in Reshape mode 1 Select the lettering object 2 Click the Reshape icon and click the letter outline 3 Click and drag stitch angle points to their required positions The stitch angles change accordingly Note Notice that the mouse pointer changes to a stitch angle mouse pointer 4 Select and delete stitch angles by pressing the Delete button ...

Page 133: ... point in a Circle object changes its stitch angle To change entry and exit points 1 Select the object to change 2 Click the Reshape icon Control points appear including entry and exit points Note In Circle objects only the entry point appears 3 Select the entry or exit point as required and drag it to a different position on the object outline 4 Press Esc to finish Entry point Entry point Entry p...

Page 134: ... to apply create and maintain templates in EasyDesign See Object Details Fabrics and Templates for details Advanced digitizing techniques This section describes how to create cut and fill holes in objects as well as how to apply Feather Edge Gradient Fill and Travel on Edge effects to selected objects Details of the appliqué digitizing method are also provided See Advanced Digitizing Techniques fo...

Page 135: ...depends a lot on underlay which serves as a foundation for the cover stitching Although it increases the stitch count underlay helps to stabilize fabrics and reduce puckering and pulling especially on larger designs Embroidery stitches pull fabric inward where the needle penetrates This can cause gaps to appear in the embroidery For an object to sew out correctly it must have correct stitch spacin...

Page 136: ...Resequence List Note Properties or details of all embroidery objects can be modified in EasyDesign Even Manual objects can be modified When you Recognized objects Object Type Description The Run Line tool creates lines of single or triple run stitching This tool is typically used to add borders to designs The objects created are known collectively as Run Line objects The Turning Angle Fill tools c...

Page 137: ...mplate defaults To apply changes to all new designs based on the current fabric you need to change the default not the current details See also Working with fabrics Details of existing objects Details of existing objects are the settings stored with each object in the design You can make the details of a selected object into new current details or new defaults You can also apply current details to...

Page 138: ...eas and firm fabrics such as drill or leather At times when you want a full design with extra lift under the stitches a weave underlay is preferable On knits edge run is best See also Working with fabrics Applying automatic underlay The Underlay tool is a toggle button that allows you to apply automatic underlay to new or selected objects based on current settings The Underlay button is deselected...

Page 139: ...rrow columns e g 2 3mm wide Edge Run places stitches around the edge of an object Note You cannot use Center Run with Parallel Fill or Parallel Fill Rectangle objects To adjust Center Run or Edge Run underlay settings 1 Select and double click a fill object The Object Details dialog opens 2 Select the Underlay tab 3 Select Center Run or Edge Run from the Underlay Type list 4 Adjust Stitch Length s...

Page 140: ...in the embroidery Experienced digitizers can manually compensate for pull by overlapping objects as they digitize The Stretchiness Allowance setting in JANOME Embroidery Software however counters the pull effect by overstitching outlines of filled shapes on the sides where the needle penetrates Adjust the amount of overstitching you need by varying the stretchiness allowance This is handy if you w...

Page 141: ...e Because fabrics are not part of the template when you create a new design and possibly change templates JANOME Embroidery Software uses the current fabric You can continue to use that fabric change it immediately or change it later See also Working with design templates Changing fabric settings You can change fabric settings of existing designs Choose from a set of pre defined fabrics aimed at m...

Page 142: ...n and Lettering as well as enter details of any recommended stabilizers 5 Adjust the Stitch Length and Stitch Spacing settings for your Weave Embossed Fill objects as required Weave Fill stitch consists of rows of run stitches and is suitable for filling large irregular shapes See Creating weave fills for details Embossed Fill is a decorative stitch type Use it to fill wide and large areas with un...

Page 143: ...ric settings for details 14 Click OK Working with design templates Templates are special files used to store default settings Use templates when digitizing frequently used design types so that you do not have to set the current details every time For example a template may include standard objects and sample lettering It may simply have preferred stitch settings lettering font and size and colors ...

Page 144: ... new design or open an existing one 2 Adjust the object details and effects as required 3 Add the objects and lettering you want to appear in the template Try this You can enter lettering baselines on their own but it helps to include sample text You can overtype the sample text when using the template 4 Select File Save As The Save As dialog opens 5 Select Templates JMT from Save as type list JAN...

Page 145: ...le template files display 3 Select the template you want to modify and click Open 4 Modify object details styles and other settings as required 5 Select File Save As The Save As dialog opens 6 From the Save as type dropdown list select Templates JMT and click Save Try this To create a new template based on the modified one type a new file name and click Save 7 Click Yes to confirm The modified tem...

Page 146: ...stitching to fill backgrounds or for shading effects Automatically create all the stitching you need for appliqué using the Appliqué tool Up to three layers of stitching guideline tack and cover are generated depending on current settings This section describes how to create cut and fill holes in objects as well as how to apply Feather Edge Gradient Fill and Travel on Edge effects to selected obje...

Page 147: ...n the Status Line Use Slow Redraw See Simulating design stitchout for details Travel through the stitches See Traveling through designs for details Cutting holes in objects Use the Cut Hole tool to cut holes in objects in order to maintain shapes but eliminate areas of stitching Prevent a build up of stitch layers where they are not needed See also Filling holes in objects Note Cut Hole cannot be ...

Page 148: ...ls holes in selected Parallel Fill objects excluding objects created with the Parallel Fill Circle tool either by removing them altogether or by creating new objects based on the holes in the original object See also Cutting holes in objects To fill holes in objects 1 Select the source object 2 To use the default settings simply click the Fill Holes icon 3 To control overlaps or remove holes altog...

Page 149: ... offset objects to highlight details e g small Satin objects or create seamless borders You can center generated objects over the original outline or offset them To create offset objects 1 Select the source object 2 Click the Offset Object icon 3 The Offset Object dialog opens 4 Enter the required offset in millimeters 5 In the Offset Count field enter the required number of offset objects 6 Click...

Page 150: ...hich the effect is applied and the margin in which the stitches should fall To adjust Feather Edge settings 1 Select and double click the object The Object Details dialog opens 2 Select the Feathering tab 3 Select the Feathered checkbox 4 Enter a Maximum Width for the feathering this is the margin in which the stitches will fall 5 Use the Raggedness slider to indicate the required degree of textur...

Page 151: ...etails Applying Gradient Fill Use Gradient Fill to create perspective effects and shading It can be applied to Satin Fill Weave Fill Embossed Fill or Satin Border objects You can apply it using current settings These can be adjusted and the type of Gradient Fill changed either before or after you apply it To apply Gradient Fill Select an object and click the Gradient Fill icon The effect is applie...

Page 152: ...nds or for shading effects where the absence of travel runs under the fill is more important than exact spacing It is available for use with Parallel Fill or Parallel Fill Rectangle objects using Weave Fill stitching Travel on Edge automatically moves underlying travel runs to the edges of an object so they can t be seen It also applies consistent row spacing and prevents segments from overlapping...

Page 153: ...rial Cutting lines Cutting lines form a guide when trimming the appliqué patch in position Tackdown This zigzag stitch is used to fix appliqué patches to the background fabric before cover stitching is applied Note A frame out position is automatically set During stitchout this shifts the hoop out from under the needle making it easier to place and trim the appliqué shapes Creating appliqué object...

Page 154: ... stitched then trim in position after the cutting line has been stitched See Adjusting appliqué settings for details Adjusting appliqué settings The cover stitch is the border around the appliqué shape You can change stitch type Satin or Blanket cover stitch width as well as offset in relation to the inside or outside of the digitized outline Up to four layers of stitching placement line cutting l...

Page 155: ...hen trim in position after the cutting line has been stitched 8 Use the Inside and Outside percentage settings to adjust the cover stitch and tackdown offset For Satin stitch the cover stitch and tackdown are offset against the placement line using the slider The offset can be inside or outside the appliqué boundary For Blanket stitch the offset is always 100 inside 9 Click OK E Stitch Width 2 5 m...

Page 156: ...working with stitch files which do not contain design outline data See Embroidery design formats for details This section describes how to select and edit the stitches in a stitch based design using JANOME Embroidery Software EasyEdit Selecting stitches The Stitch Mode tool lets you select single stitches several stitches or a range of stitches by selecting their needle points or dragging a boundi...

Page 157: ... you release the mouse button Selecting stitches while traveling In EasyEdit you can select stitches as you travel through the design Traveling is usually associated with checking the stitching sequence See also Stitch Editing To select stitches while traveling 1 In EasyEdit use the travel tools to travel to the first stitch you want to select 2 Click the Stitch Select While Traveling tool on the ...

Page 158: ...mouse to where you want to insert the next stitch and right click 6 Continue right clicking as required Moving stitches In EasyEdit you can move individual or groups of selected stitches To move stitches 1 In EasyEdit click the Stitch Mode icon 2 Select stitches and drag them to a new position The stitch shadow outline shows the new position 3 Press Enter Splitting stitch blocks In both EasyEdit a...

Page 159: ...stitching sequence are split into separate objects or stitch blocks Deleting stitches You can delete individual or groups of selected stitches Warning If an object s stitches are regenerated for any reason all stitch editing functions are lost Where possible edit the object details rather than individual stitches See Adjusting Satin stitch spacing Adjusting Weave Fill stitch spacing and Adjusting ...

Page 160: ...bes how to edit lettering objects as well as scale and transform them It also describes how to adjust lettering orientations See Editing Embroidery Lettering for details Special lettering features This section describes how to apply different stitch types to lettering objects It covers converting TrueType fonts to embroidery as well as how to add special characters Creating special effects with Le...

Page 161: ... italics Orientation determines the shape of lettering objects in a design You can place lettering on a straight horizontal or vertical baseline curve lettering around a circle or arc baseline or digitize your own JANOME Embroidery Software gives you interactive control over many baseline settings Letter and line spacings can be determined before or after creating lettering objects and placing the...

Page 162: ... lettering objects directly on screen to achieve various artistic effects EasyDesign provides a font range suitable for many applications To create embroidery lettering 1 Click the Lettering icon The Object Details Lettering dialog opens 2 Enter the text you want to embroider in the text entry panel To start a new line of lettering press Enter Try this You can insert a color change between two let...

Page 163: ... or by means of the MS Windows Character Map See also Using the Character Map To select special characters 1 Click the Lettering icon The Object Details Lettering dialog opens Try this If you know the Alt key code for the special character you require you can key it directly into the text entry field The Character Map gives you codes for all characters See Using the Character Map for details 2 Cli...

Page 164: ...key The Character Map gives you codes for all characters 5 Click OK Continue creating the lettering object in the normal way Setting lettering orientations Orientation determines the shape of lettering objects in a design You can place lettering on a straight horizontal or vertical baseline curve lettering around a circle or arc baseline or digitize your own Different reference points are needed d...

Page 165: ... Create a new lettering object See Creating embroidery lettering for details 2 Select Free Line as the orientation 3 Click OK and click on screen to establish the start point of the baseline Try this You can adjust orientation settings at any stage See Adjusting orientations for details Creating fixed length horizontal orientations Both Free Line and Fixed Line baselines form straight horizontal o...

Page 166: ...intain their original height and proportions but width and spacing are reduced proportionately if the baseline length requires it Spacing and Size keep Proportions When selected letters maintain their original proportions but reduced size if the baseline length requires it Note With Fixed Line orientation lettering is not increased if the baseline is longer than needed to fit the specified letteri...

Page 167: ...the start point of the baseline on screen Try this You can adjust orientation settings at any stage See Adjusting orientations for details Creating circular orientations Use the Circle CCW or Circle CW orientation to place letters around a full circle For a circle you need to mark two reference points while for an oval you need to mark three The position of the second reference point determines th...

Page 168: ...tering dialog click the Any Shape orientation icon 2 Enter your text in the text entry box 3 Click OK 4 Mark the baseline reference points Mark curve points with the right mouse button Mark corner points with the left mouse button 5 Press Enter to complete Try this You can adjust orientation settings at any stage See Adjusting orientations for details Adjusting letter spacing Letter and line spaci...

Page 169: ... letter spacing on screen 1 Select the lettering object 2 Click the Reshape icon 3 Click the diamond control point in the middle of the letter Try this To select multiple or a range of letters hold down Ctrl or Shift as you select 4 Drag the letter s along the baseline to adjust the spacing Try this Alternatively to move multiple letters right click the diamond control point of the first letter an...

Page 170: ...JANOME Embroidery Software Instruction Book Chapter 21 Creating Embroidery Lettering 168 4 Release the mouse button to complete and press Esc to finish Drag line spacing control point ...

Page 171: ...sing a lettering object When you first create lettering it may be too big or too small Size can be adjusted both interactively and via settings Apart from scaling you can interactively skew and rotate lettering objects Lettering orientation too can be adjusted on screen after it has been placed in your design This section describes how to edit lettering objects as well as scale and transform them ...

Page 172: ...uired See also Scaling lettering Change slant settings as required Change orientation settings as required See Setting lettering orientations for details Try this Alternatively double click a selected lettering object or objects The Object Details Fill Stitch dialog opens Select the Lettering tab and edit settings as required Note Letters are filled with stitches according to current details in th...

Page 173: ...hape 1 Select the lettering object 2 Click the Reshape icon 3 Click and drag one of the dark triangular control points to resize the object horizontally vertically or proportionally A bounding box shows the new size of the lettering object as you drag 4 Release the mouse Scaling lettering via the Lettering tab You can scale your lettering objects vertically horizontally and proportionally via the ...

Page 174: ... tab 3 Adjust the width and height settings either as absolute values mm or as a percentage of the current settings 4 Click OK Transforming lettering objects Apart from scaling you can use the Select and Reshape tools to skew and rotate lettering objects See also Scaling lettering Transforming lettering with Select You can transform lettering objects by manipulating control points on screen with t...

Page 175: ...g with Reshape 1 Select the lettering object 2 Click the Reshape icon Control points appear around the lettering object 3 Click and drag one of the solid square control points on the baseline to rotate the lettering object A baseline shows the rotated position of the lettering object as you drag 4 Release the mouse 5 Press Esc to complete Adjusting individual letters As well as scaling and rotatin...

Page 176: ...vidual letters on screen by manipulating control points with the Reshape tool To transform individual letters on screen 1 Select the lettering object 2 Click Reshape Object Control points appear 3 Click the diamond control point of a letter Another set of reshape nodes appear around the letter 4 Click and drag a reshape node around the letter to transform it Recoloring letters on screen EasyDesign...

Page 177: ...so Setting lettering orientations To reshape a horizontal orientation 1 Select the lettering object 2 Click the Reshape icon to display control points Try this The large diamond and cross represent stitching start and end points You may need to move them to access baseline control points They will reposition themselves in the new entry and exit points based on the changes you make to the baseline ...

Page 178: ...r deleting control points along the baseline See also Setting lettering orientations To reshape a custom orientation 1 Select the lettering object 2 Click the Reshape icon to display control points Try this The large diamond and cross represent stitching start and end points You may need to move them to access baseline control points They will reposition themselves in the new entry and exit points...

Page 179: ...ncing 1 Click the Lettering icon The Object Details Lettering dialog opens 2 Select a letter stitching sequence in the Letter Sequence panel Options include In Line When selected lettering is stitched from left to right the default Center Out When selected letters to the left of center are stitched first going from right to left Next letters to the right of center are stitched going from left to r...

Page 180: ...e fonts generally contain many more characters than are available via your keyboard Use the Windows Character Map to provide quick access to special characters and symbols Apply Lettering Art effects to lettering objects to make them bulge or arch stretch or compress Create monogram designs using special monogramming fonts These alphabets provide three sets of the upper case alpha characters Add d...

Page 181: ...ngs for lettering objects 1 Double click a selected lettering object The Object Details Fill Stitch dialog opens 2 Move the slider to set the stitch density you want for your lettering 3 Click OK Try this Add extra texture to lettering by applying Feather Edge See Applying Feather Edge for details Adjusting Weave Fill settings for lettering objects You can fill lettering shapes with Weave Fill sti...

Page 182: ...ng the conversion settings Note Depending on the TrueType font complex Chinese Kanji characters with many strokes may not convert correctly into stitch data When this happens try selecting another available TrueType font or change the letter orientation and then try converting again Creating special effects with Lettering Art Apply Lettering Art effects to lettering objects to make them bulge or a...

Page 183: ...ject Details Fill Stitch dialog opens 2 Select the Lettering tab 3 Edit the text as required 4 Press OK The lettering is updated Removing Lettering Art Return an object to its original shape by removing the Lettering Art To remove Lettering Art Select the lettering object Select Lettering Art None The Lettering Art is removed and the letters return to their original shape Creating flair script des...

Page 184: ...d in the text entry panel 7 Adjust lettering as required See Creating embroidery lettering for details 8 Click OK 9 Click where you want to place the lettering or mark reference points for the selected baseline 10 Press Enter Try this Experiment with different flare characters to obtain the look you want Creating monogram designs JANOME Embroidery Software lets you create monogram designs using sp...

Page 185: ... and spacing in the fields provided 5 Click OK A lettering object is created using the settings entered The left most letter is replaced by its equivalent left character e g F is replaced by Left F Similarly the right most letter is replaced by its equivalent right character e g F is replaced by Right F All other letters are left unchanged Try this Add decorative borders such as rectangles ovals a...

Page 186: ...he lettering object e g instead of Left F you will see ampersand as per the table Use the table to edit the characters in the dialog See Monogram font mappings for details To edit a monogram 1 Select the monogramming object 2 Double click the object Alternatively right click it and select Object Details from the popup menu The Object Details Fill Stitch dialog opens 3 Select the Lettering tab 4 Ed...

Page 187: ...rder tool Borders are automatically sized to fit the current design Adjust border thickness and size as required To add a border 1 Select a lettering object 2 Click the Insert Border icon The Select Border dialog opens 3 Select a border and adjust the Border Width setting as required The default Border Width can be adjusted after insertion in the design 4 Click Make Current The Select Border dialo...

Page 188: ...JANOME Embroidery Software Instruction Book Chapter 23 Special Lettering Features 186 5 Adjust border thickness and size as required See Reshaping objects for details ...

Page 189: ...ptions print embroidery elements appliqué patterns as well as color layers See Printing Designs for details Reading and writing design files This section describes embroidery stitch and outline design formats as well as how to open embroidery files in JANOME Embroidery Software It also describes saving designs for machine as well as sending and receiving designs by direct connection Writing design...

Page 190: ... background color fabric as well as the current hoop Print a copy of the appliqué pattern to use to cut out the fabric pieces A Color Layers option allows you to include a list of color layers together with color and stitch information for each layer If you are using a color printer you can print in Visualizer mode See also Printing designs and catalogs This section describes how to preview printo...

Page 191: ...d cloth setter markings You can include a copy of the appliqué pattern as well as a list of color layers in the current design Design information includes author estimated length of upper thread per color and total bobbin usage Try this You can print design images directly onto a special fabric or transfer via your inkjet printer Printed images can then be combined with Photo Click to produce stit...

Page 192: ... Template mode 8 Check Cloth Setter Marking as required The option applies to both Template and Design modes In the latter case it is only available with Embroidery Elements and Actual Size selected Each hooping will have a number printed near the cloth setter mark to indicate the hoop stitching sequence See Printing design layouts for details 9 Check Work Area to include an outline of the work ar...

Page 193: ...oop Image The design image is included in the printout Try this You can print design images directly onto a special fabric or transfer via your inkjet printer Printed images can then be combined with Photo Click to produce stitch highlights on the image See also Creating embroidery from photographs Connectors All connecting stitches in the design are displayed Note With Visualizer the Connectors o...

Page 194: ...lick Options The Print Options dialog opens 3 Select Template Mode This shows the design outline with no stitches By default it includes cloth setter marks to allow accurate placement of designs within layouts on the item or fabric to be sewn Note While the cloth setting marking is supported in JEF and SEW files outlines are not Since JEF and SEW are stitch file formats they only contain stitch da...

Page 195: ...ssembled appliqué layout and individual patterns in the actual size are created on separate pages If the Fit to Page or of Actual options are selected the assembled appliqué layout is created in the selected size but individual patterns are still printed in the actual size on separate pages 4 Click Print Printing color layers The Color Layers option lets you include a list of color layers in the c...

Page 196: ...Number Number in the stitching sequence Color Color name listed in the associated thread chart Code Thread code for ease of ordering Brand Thread brand e g Isacord 40 Stitches Total stitch count for individual color layer Thread Used Total stitch length of the individual color layer in the measurement unit currently set for the system e g meters ...

Page 197: ... By default EasyDesign saves to JAN format while EasyEdit saves to JEF These formats contain all information necessary both for stitching a design and for later modification When opening designs created or saved in other formats EasyDesign converts the design internally to JAN format while EasyEdit converts to JEF format You can then modify it using the full range of JANOME Embroidery Software fea...

Page 198: ...ine functions Before you can stitch a design it must be in a format which can be interpreted by the embroidery machine Stitch or expanded designs are low level formats for direct use by machines They contain information about the position length and color of each stitch When they are read into EasyEdit stitch files do not contain object information such as outlines or stitch types but present the ...

Page 199: ...ll or outline stitch properties as well as general properties Stitch types are assigned as Satin or Weave depending on the pattern of needle penetrations If an object is not recognized it contains only general and connector properties only and will not scale well Recognized object outlines and stitch values are stored as object details in JANOME Embroidery Software This means you can scale and tra...

Page 200: ...o Supported embroidery file formats If outputting to a Janome machine select JEF as the file format The file is encoded to suit the currently selected machine model See Selecting machine models for details If outputting to a third party machine the Options button may become available See your machine manual for details 5 Click Save Note JANOME Embroidery Software supports JANOME MA and Giga hoops ...

Page 201: ... you can write to ATA PC card Flash Memory in a similar way as you would save to floppy disk The ATA PC card is a PCMCIA standard PC memory card that is used for storing designs in JEF format to be read written from to machine The ATA PC card is designated as a drive in your computer The drive designation may become E or F or some other letter After writing your design you simply insert the card i...

Page 202: ...ossible destinations Built in internal machine memory ATA PC Card PC memory card slot on machine which can be used as an ATA PC card reader writer USB Memory USB stick attached to your machine Try this Alternatively you can use an external Flash Memory ATA PC reader writer to write designs in JEF format directly to card See Writing to Flash Memory reader writer for details Sending the current desi...

Page 203: ... intended for make sure this is selected as your current machine After writing your design simply insert the card into the ATA PC card slot of your machine and read in the design Writing a design to ATA PC card The procedure for writing a single design to card varies slightly with the machine model but the principle is the same Whichever machine you are using the steps will involve one or all of t...

Page 204: ...chine model Select the machine model you intend to write to and select External Media Write Designs Read and Erase The particular dialog which opens will depend on the current machine model In addition to writing design files to machine you can generally receive or delete files from the destination folder Note For detailed procedures relating to your particular machine see Outputting to Machine Se...

Page 205: ...00E machines and MB 4 machine machines The first two sets of machine support direct connection although menu options change depending on the chosen machine set MC10000 V2 2 or earlier machines must be upgraded to Version 2 21 The MC9700 MC9500 MC300E and MC350E machines do not support direct connection but they do read ATA PC cards and USB memory sticks MC200E machines support USB memory sticks Di...

Page 206: ...one so select MC11000 as your current machine See Supported machine models and memory cards for details 2 Insert the ATA PC card or USB stick into your JANOME MemoryCraft machine if required Note Both ATA PC card and USB stick can be attached at the same time 3 Open or create the design you want to send 4 Click the Send to Machine icon or select Machine Send Current Design If the machine is correc...

Page 207: ... is divided in two sections source PC and destination sewing machine Note The machine itself must be in PC Link Mode in order to receive designs 4 Select a source folder from the PC list Only JEF files are displayed 5 Select the file or files that you want to send in the viewing panel 6 Select a storage location on the sewing machine machine memory built in folder ATA PC card or USB memory stick 7...

Page 208: ...ept that you select External Media Write Designs Read and Erase See Sending or receiving multiple designs for details Outputting to MC1000 machines If you have selected MC10001 and MC10000 V3 0 or higher as your current machine the direct machine connection option is available to you This means you can send individual or multiple design files directly to two possible destinations built in machine ...

Page 209: ... card 7 Click Send A confirmation box appears 8 Click Start File transfer begins The selected design is copied to the specified location Note In the unlikely event that a file exceeds the limits set it will be split into two or more files See Splitting large files for details Sending or receiving multiple designs You can simultaneously send more than one design in JEF file format to your machine Y...

Page 210: ...les from the machine to the current location folder on your PC Click Delete button to remove selected files from your machine storage location Writing to Flash Memory reader writer If you are using an external Flash Memory ATA PC reader writer you can write designs in JEF format directly to card Make sure the reader writer is securely plugged into the USB port of your PC If you are writing to a ca...

Page 211: ... design to machine When sending the current design to machine you can send the design file directly to two possible destinations built in machine memory of your JANOME MemoryCraft ATA PC card attached to PC memory card slot on your machine Note The procedure for sending a single design to machine is a little different to sending multiple designs See also Sending multiple designs to machine To send...

Page 212: ...s your current machine See Supported machine models and memory cards for details 2 Insert the ATA PC card into your JANOME MemoryCraft machine if required 3 Select Machine Send Designs The Select Designs dialog opens 4 Select a source folder from the Look In list 5 Select a file or files from the list The preview panel displays an image of the last selected design 6 Click Add to add to the list of...

Page 213: ...ns will be received from the PC Link built in memory Checked means designs will be received from Embroidery built in memory If you have selected ATA PC Card Unchecked means designs will be received from the PC Link folder on the ATA PC card You must put your machine in PC Link mode and press the ATA PC Card tab Checked means designs will be received from the Embroidery folder on the ATA PC card Yo...

Page 214: ...ory ATA PC reader writer you can write designs in JEF format directly to card Make sure the reader writer is securely plugged into the USB port of your PC If you are writing to a card intended for use with an MC10000 V2 21 machine model make sure this is selected as your current machine After writing your design simply insert the card into the ATA PC card slot on your machine and read in the desig...

Page 215: ...y done so select an MC9700 or lower machine model as your current machine See Supported machine models and memory cards for details 2 Make sure the reader writer is securely plugged into the USB port of your PC 3 Open or create the design you want to send 4 Click the Write to Card icon or select External Media Write a Design If the machine is correctly linked the Write a Design dialog opens Note T...

Page 216: ...you want to read or erase from the ATA PC card 10 Choose from the available options as required Click Read to copy files from the machine to the current location folder on your PC Click Erase button to remove selected files from your machine storage location Outputting to MC200E machines If you have selected an MC200E machine as your current machine the direct machine connection option is not avai...

Page 217: ... file directly to the built in machine memory of your MB 4 machine Note The procedure for sending a single design to machine is a little different to sending multiple designs See also Sending multiple designs to machine To send the current design to machine 1 Open or create the design you want to send Note This assumes you have MB 4 machine as your current machine 2 Click the Send to Machine icon ...

Page 218: ...ded in two sections source PC and destination sewing machine Note The machine itself must be in PC Link Mode in order to receive designs 2 Browse to the folder containing the JEF files to be sent to the machine using the shortcut icons in the PC list Designs Desk Top and My Document The contents of the source location appear in the display panel Only files of JEF format are listed Names of designs...

Page 219: ...s set it will be split into two or more files See Splitting large files for details Receiving and deleting designs from machine You can retrieve all the JEF designs stored in machine memory for editing and or to store them on hard disk or other location Delete them as necessary to free up space To receive or delete designs from machine 1 Select Machine Receive Designs When all designs are retrieve...

Page 220: ...the connected machine 2 To view the current status of a particular machine click one of the toolbar buttons The Machine Details dialog opens The machine shown in the dialog will show the current machine status as does the toolbar icon 3 Click Close to close the dialog Writing to Flash Memory reader writer If you are using an external Flash Memory ATA PC reader writer you can write designs in JEF f...

Page 221: ...idery object must fit entirely into one or other hoop position The behavior of the MA Hoop during loading and editing of embroidery designs is exactly the same as for a normal rectangular hoop of size 200 x 280 The fact that there are two sewing fields has no effect until you save the design or send it to a machine When sending to machine in most cases JANOME Embroidery Software will only create o...

Page 222: ...titches or too many color changes Sending designs with a Giga Hoop JANOME Embroidery Software supports the Giga Hoop This is a two position hoop which expands the available sewing area of the machine for which it is supplied Using the Giga Hoop is similar to the MA Hoop See also Sending designs with an MA Hoop In the list of available hoops the Giga Hoop is identified as Hoop D 220 x 190 Giga The ...

Page 223: ...ng message is displayed Click OK and use Combine mode to create two Hoop B hoopings as instructed See also Combining objects and designs 4 Select the design name and click the Send button Note The design will be sent to the machine as two individual JEF files Hoop position A and Hoop position B However the machine display will show the design as a single design unless the file cannot be stitched i...

Page 224: ...sign Gallery provides an efficient way for managing embroidery designs This design management tool can access design files stored on your computer hard disk CD ROM or floppy disk It recognizes all design file formats used by EasyDesign ...

Page 225: ...indow to show only certain file types You can also rename folders add sub folders and delete folders without leaving Design Gallery Opening Design Gallery Navigating to design folders with Design Gallery is very similar to browsing with Windows Explorer Your access to design folders on your network is only limited by network access rights determined by your System Administrator Design Gallery lets...

Page 226: ...k a folder in the folder listing to display its contents in the display window You can list the folder contents in different ways See Sorting files in folders for details Try this Close Design Gallery in View Design List mode so that it opens more quickly next time See Displaying design thumbnails and summary information for details Changing locale During installation of the Design Gallery softwar...

Page 227: ...ry from the dropdown menu Or select View Design Thumbnails and Summary To display the designs in a detailed list click the Change Design View icon and select List from the dropdown menu Or select View Design List Designs are listed showing design name file size file type version etc Click the column header to sort the list Note The number of selected designs is displayed in the status bar at the b...

Page 228: ... missing files for details Accessing designs in folders Design Gallery lets you select designs residing in folders Once selected you can manipulate them in a variety of ways e g cutting copying pasting editing the record and converting designs to other formats You can also open designs in EasyDesign directly from Design Gallery for viewing or editing Try this With the file selected right click to ...

Page 229: ...e Ctrl key Opening designs in EasyDesign Any designs selected in the Design Gallery display window can be opened in EasyDesign for viewing or editing To open designs in EasyDesign 1 Open Design Gallery and select a design folder 2 Select a design or designs Try this If you want to open several designs at once select the details list view See Displaying design thumbnails and summary information for...

Page 230: ...bove correct the problem re install EasyDesign 4 Check that the version of EasyDesign you are running is the same as that registered in Design Gallery Shortcut Properties Right click the Design Gallery icon on your Windows Desktop then select Properties The Design Gallery Properties dialog opens Click the Shortcut tab and read the last text in the Target field e g version0 1D This version should b...

Page 231: ...rting files in folders The simplest way to sort files in Design Gallery folders is by file type e g JAN files only Designs can be further sorted in the following ways As simple sorts using View Sort by Name Type Size or Date See Running simple sorts using the View menu for details As simple sorts using details list headings by File Name Size File Type Version Date Stitches or Description See Runni...

Page 232: ...tails list To run a simple sort using the details list 1 Open Design Gallery and select a design folder See Opening Design Gallery for details 2 List the designs as a details list See Displaying design thumbnails and summary information for details 3 Click the heading at a column to be sorted e g Name The designs will be sorted in the order of the selection 4 Click the heading again to reverse the...

Page 233: ...r smaller 5 Select Summary if you want design details to be printed 6 Click OK The Windows Print dialog opens 7 From the dropdown list select the name of the printer attached to your PC as required 8 Click Properties to modify paper size and other options in the Windows Print dialog 9 Click OK to print the catalog Try this If the catalog requires more than one page you can select which page to pri...

Page 234: ...etion Copying and pasting designs Once a selected design is copied it can then be pasted to another location using Paste A copied design can be pasted any number of times To copy and paste a design 1 Open Design Gallery See Viewing designs in Design Gallery for details 2 Select any number of designs See Selecting designs in folders for details 3 Select Edit Copy 4 Change to another folder using th...

Page 235: ...design in a folder 1 Open Design Gallery See Viewing designs in Design Gallery for details 2 Ensure that the design you select is not currently open in EasyDesign 3 Right click and select Rename from the popup menu The Design Name dialog opens 4 Enter a new name 5 Click OK The original design name is overwritten Deleting designs Delete designs to remove them permanently from your PC To delete desi...

Page 236: ...234 Part IX Software Feature Table ...

Page 237: ...ewing designs in Visualizer Show design needle points and connectors z z Viewing needle points Show hide selected objects z Viewing connectors Travel through design by stitches color function z Traveling through designs z Traveling through designs in EasyEdit Simulate design stitchout Slow Redraw z z Simulating design stitchout View design information z Viewing design information Preview design pr...

Page 238: ...ctangles Parallel Fill Rectangle z Digitizing squares and rectangles Fill Stitches Fill Stitches Satin fills Satin Fill z Creating satin fills Weave fills Weave Fill z Creating weave fills Embossed fills Embossed Fill z Creating embossed fills Stipple fills Stipple z Creating stipple fills Contour fills Contour Fill z Creating contour fills Radial fills Radial Fill z Creating radial fills Florenti...

Page 239: ...iting images in graphics applications Prepare non outlined images z Preparing non outlined images Prepare outlined images z Preparing outlined images Automatic Digitizing Automatic Digitizing Match palette colors to an image z Matching palette colors to an image Digitize fills with Click to Stitch Click to Stitch z Digitizing fills with Click to Stitch Digitize outlines with Click to Stitch Click ...

Page 240: ...underlays z Changing underlays Apply automatic underlay z Applying automatic underlay Compensate for fabric stretch z Compensating for fabric stretch Change fabric settings z Changing fabric settings Manage fabrics z Managing fabrics Create design templates z Creating design templates Advanced Digitizing Techniques Advanced Digitizing Techniques Reinforce outlines Backtrack Repeat z Reinforcing ou...

Page 241: ... on screen Adjust line spacing on screen z Adjusting line spacing on screen Edit lettering objects z Editing lettering Scale lettering z Scaling lettering Transform lettering objects z Transforming lettering objects Adjust individual letters z Adjusting individual letters Adjust orientations z Adjusting orientations Change letter sequencing z Changing letter sequencing Apply different stitch types...

Page 242: ...nd designs with an MA Hoop z z Sending designs with an MA Hoop Send designs with a Giga Hoop z z Sending designs with a Giga Hoop Design Management Design Management Open and view designs in Design Gallery Design Gallery z Viewing designs in Design Gallery Change locale z Changing locale Display design thumbnails and summary information z Displaying design thumbnails and summary information Select...

Page 243: ...241 Part X Appendices Glossary Index ...

Page 244: ...ttings Click Print Preview to preview the design printout on screen Click Cut to cut selected objects to the clipboard Click Copy to copy selected objects to the clipboard Click Paste to paste copied objects in the design EasyDesign only EasyEdit only Use Send to Machine to send a design to a machine for stitching Use Write to Card to send a design to an ATA card If EasyDesign or EasyEdit is alrea...

Page 245: ...point Use Backtrack to reinforce open outlines by double stitching in reverse direction Use Repeat to reinforce closed outlines by double stitching in the same direction Use Resequence to resequence selected objects by object or color Use Stitch Mode to select individual stitches for editing Tool Description EasyDesign only EasyEdit only Tool Description Click Align Left to left align selected obj...

Page 246: ...needle points in a design EasyDesign only EasyEdit only Use Display Images to show and hide backdrops Click Display Grid to hide or show the grid Click Display Hoop to hide or show the hoop Use Overview Window to toggle Overview window display on off Click Stitch Select While Traveling to select stitches while traveling Click Back to travel back through the stitch sequence Click Forward to travel ...

Page 247: ...ation to sharpen outlines and reduce noise in outlined images Tool Description Use Click to Parallel Weave Fill to digitize large artwork shapes with Parallel Weave Fill preserving any holes within Use Click to Parallel Weave Fill without Holes to digitize large artwork shapes with Parallel Weave Fill ignoring any holes within Use Click to Turning Angle Satin Fill to digitize narrow column artwork...

Page 248: ...bossed fill Use Parallel Motif Fill Rectangle to digitize squares and rectangles in Motif fill Use Parallel Contour Fill Rectangle to digitize squares and rectangles in Contour fill Use Parallel Radial Fill Rectangle to digitize squares and rectangles in Radial fill Tool Description Tool Description Use Parallel Satin Fill Circle to digitize circles in Satin fill Use Parallel Weave Fill Circle to ...

Page 249: ... to selection C T Add previous object to selection C V T Select all objects C A Deselect all objects E or X To Press Show hide images D EasyDesign only Measure a distance on screen M Show hide hoop V H Show hide whole hoop Show hide whole design 0 zero Show hide stitches S Show hide needle points period Show hide connectors V C Show hide function symbols V F Show hide grid V G Show hide work area ...

Page 250: ...ravel Keyb rd Keypad To start of design h 7 To end of design e 1 To next color d 3 To previous color u 9 100 stitches forward 100 stitches backward 10 stitches forward b 2 10 stitches backward t 8 1 stitch forward r 6 1 stitch backward l 4 Press Esc first Num Lock OFF EasyDesign only EasyEdit only ...

Page 251: ...ed to specific embroidery machines See also Reading and Writing Design Files Supported file formats JANOME Embroidery Software supports the following embroidery file formats Extension Format Read Write JAN Janome Design z z JAN DigitizerPro V1 0 V2 0 z JEF Janome Elna Kenmore z z JANOME Digitizer MB only JEF Janome Elna Kenmore z JMT Janome template z z SEW Janome Elna Kenmore z z CSD POEM Singer ...

Page 252: ...p formats Supported hoop types JANOME Embroidery Software supports a variety of hoop types used with the different machine models See also Selecting machine models The Hoop Type list is automatically filtered according to the current machine type Only those hoops supported by the current machine are available See Grids and Hoops for details Note If you attempt to save a design in a hoop size not s...

Page 253: ...tic underlay depending on size and fabric If applied the underlay may show outside the stitched columns See also Stabilizing with underlays You can create special characters in each font by holding down the Alt key on your keyboard and typing 0 zero its code using the numbers on the keypad For example to type ê with the code 234 type Alt 0234 The accented letter will appear when you release the Al...

Page 254: ...nts 252 Agatha 0 3 8 2 0 50 Ballantines Script 0 5 12 2 0 50 Bauhaus 0 4 10 2 0 50 Block1 0 27 7 1 8 45 Book Border 0 6 15 2 1 55 Bookcase 0 25 6 2 0 50 Brassplate 0 25 6 1 2 30 Bravo 0 32 8 3 0 75 Brush 0 32 8 2 0 50 Font Sample Recommended Sizes Min Max in mm in mm ...

Page 255: ...s 253 Cafe 0 25 6 2 0 50 Carla 0 4 10 2 0 50 Cecilia 0 4 10 1 4 35 Curly 0 6 15 2 9 75 Derbyshire 0 28 7 2 0 50 Drama 0 28 7 1 6 40 Elf 0 4 10 2 0 50 Fable 0 4 10 1 15 30 Flair Script 0 4 10 3 2 80 Firefly 0 28 7 1 6 40 Font Sample Recommended Sizes Min Max in mm in mm ...

Page 256: ...onts 254 First Grade 0 5 12 1 15 30 Gaelic 0 44 11 2 0 50 Galant 0 5 13 2 0 50 Gareth 0 28 7 2 0 50 Gaslight 0 25 6 2 4 60 Heidi 0 4 10 2 0 50 Hana 1 5 13 2 0 50 Heisei Gyosho 0 32 8 2 7 70 Heisei Kaisho 0 32 8 2 7 70 Font Sample Recommended Sizes Min Max in mm in mm ...

Page 257: ...Helvetica Small 0 2 4 0 0 3 7 0 Hollowblock 0 4 10 2 4 60 Honeypot 0 32 8 1 2 30 Iris UPC 0 6 15 1 8 45 Japanese Kaisho 0 32 8 2 7 70 Jonathan 0 28 7 1 8 45 Jupiter 0 25 6 1 2 30 Karin Script 0 5 12 2 0 50 Kudos 0 27 7 1 2 30 Font Sample Recommended Sizes Min Max in mm in mm ...

Page 258: ...256 Liberty 0 28 7 2 0 50 Lorenne 0 4 10 1 6 40 Lucky 0 28 7 1 4 35 Maestro 0 4 10 1 6 40 Micro Block 0 2 4 0 3 8 Nation 0 32 8 2 7 70 Natural 0 5 13 3 0 75 Nordic 0 35 9 2 0 50 Old English 0 3 8 2 0 50 Olivia 0 3 7 1 6 40 Font Sample Recommended Sizes Min Max in mm in mm ...

Page 259: ...257 Omyim Multi language release only 0 6 15 1 8 45 Orient 0 32 8 2 0 50 Pageant 0 4 10 3 0 75 Puppet 0 28 7 1 6 40 Radio 0 4 10 2 5 65 Register 0 25 6 1 2 30 Royale 0 5 13 2 4 60 Script 1 0 5 13 3 0 75 Serif2 0 3 8 1 2 30 Font Sample Recommended Sizes Min Max in mm in mm ...

Page 260: ...Sm High Tower 0 2 4 0 25 6 Sprite 0 31 8 1 2 30 Student 0 35 9 2 1 55 Student Border Run 1 0 25 3 0 75 Swiss Condensed 0 28 7 2 0 50 Swiss Modern 0 32 8 1 8 45 Techno 0 32 8 1 8 45 Times 0 4 10 1 8 45 Times Small 0 23 5 0 25 6 Font Sample Recommended Sizes Min Max in mm in mm ...

Page 261: ...oftware Instruction Book Appendix C Packaged Fonts 259 Tourist 0 28 7 1 6 40 Typist 0 5 13 2 0 50 Wild West 0 4 10 1 8 45 Wisaka Multi language release only 0 6 15 1 8 45 Font Sample Recommended Sizes Min Max in mm in mm ...

Page 262: ...ayon 60 75d Rayon 40 120d Needle DBX9ST 9 Blue tipped needle 11 Speed 600spm 600spm Density 100 100 Height Helvetica Small Uppercases Lowercases and Numbers 4mm 4mm Micro Block Uppercases Lowercases and Numbers 4mm 4mm Times Small Uppercases Lowercases and Numbers 4mm 4mm SM Hightower Uppercases 4mm 4mm SM Hightower Lowercases and Numbers 5mm 6mm ...

Page 263: ...he left set is designed to appear on the left side of a monogram The second or middle set is designed for the middle position s of a monogram The right set is designed to appear on the right side of a monogram Each set is mapped to a specific set of character equivalents in the alphabet Letter A B C D E F G H I J K L M Left Middle A B C D E F G H I J K L M Right a b c d e f g h i j k l m Letter N ...

Page 264: ...ing alphabet using three sets of the upper case alpha characters Alphabet contains Left Center and Right letters for 3 letter monogram Use symbols for the left letter upper case for the center letter and lower case for the right letter Colors 1 color Stitching Satin Recommended height Minimum 1 0 in 25 mm Maximum 4 0 in 100 mm ...

Page 265: ...mming alphabet using three sets of the upper case alpha characters Alphabet contains Left Center and Right letters for 3 letter monogram Use symbols for the left letter upper case for the center letter and lower case for the right letter Colors 1 color Stitching Satin Recommended height Minimum 0 7 in 18 mm Maximum 4 0 in 100 mm ...

Page 266: ...ing alphabet using three sets of the upper case alpha characters Alphabet contains Left Center and Right letters for 3 letter monogram Use symbols for the left letter upper case for the center letter and lower case for the right letter Colors 1 color Stitching Satin Recommended height Minimum 0 7 in 18 mm Maximum 4 0 in 100 mm ...

Page 267: ...ng alphabet using three sets of the upper case alpha characters Alphabet contains Left Center and Right letters for 3 letter monogram Use symbols for the left letter upper case for the center letter and lower case for the right letter Colors 1 color Stitching Satin Recommended height Minimum 0 7 in 18 mm Maximum 4 0 in 100 mm ...

Page 268: ...these tables to see what a particular item looks like The stamps are designed to be added as decorative items and are not intended to be greatly enlarged Do not exceed the recommended maximum size for each stamp as shown in the table The table also includes its original size If it has changed for any reason you can revert to the original settings using the values in these tables Stamps and motifs ...

Page 269: ...2 7 7 006 30 7 9 5 007 19 4 7 7 009 13 8 10 4 010 9 6 9 9 012 10 4 10 2 014 19 5 9 5 015 26 4 9 5 016 21 4 10 4 Size mm of original Stamp W H Min Max to fit hoop Antiq1 79 47 100 Antiq2 90 40 100 Bar1 77 9 100 Bar2 51 9 100 Bar3 36 11 100 Bdr1 36 11 100 Bdr2 53 52 100 Bdr3 72 52 100 Bdr4 40 40 60 150 Size mm of original Stamp W H Min Max to fit hoop ...

Page 270: ...Des5 30 1 12 Des6 44 25 9 Des7 15 4 20 9 Des8 27 9 12 4 Des9 31 8 17 3 Des10 30 11 Size mm of original Stamp W H Min Max to fit hoop Des11 28 7 4 7 Des12 27 7 9 9 Des13 15 7 15 7 Des14 30 7 14 5 Des15 30 2 13 2 Des16 30 3 13 6 Des17 30 1 9 1 Des18 30 3 12 5 Des19 30 5 10 8 Des20 36 5 25 3 Des21 20 1 14 Des22 10 4 9 9 Size mm of original Stamp W H Min Max to fit hoop ...

Page 271: ...0 5 8 Des005 6 3 9 3 Des006 8 0 5 5 Des007 8 0 5 3 Des008 18 5 10 8 Des009 17 9 7 3 Des010 4 8 4 3 Des011 5 9 8 0 Des012 5 9 6 2 Size mm of original Stamp W H Min Max to fit hoop Des013 5 0 11 4 Des014 10 5 2 Des015 9 5 9 7 Dog1 20 18 85 500 Flora1 25 16 100 Flora2 26 28 100 Flora3 25 18 100 Flora4 25 26 100 Flora5 25 20 100 Floral1 47 55 100 Size mm of original Stamp W H Min Max to fit hoop ...

Page 272: ...sh5 40 13 100 Flrsh6 41 17 100 Flrsh7 30 19 80 200 Flrsh8 36 19 100 200 Flower1 47 32 50 250 Kitch1 25 12 100 Kitch2 24 17 100 Size mm of original Stamp W H Min Max to fit hoop Kitch3 27 28 100 Kitch4 25 17 100 Kitch5 25 26 100 Laurel 46 30 80 Leaf1 43 46 35 200 Leaf2 20 20 50 350 Motif1 4 4 100 Motif2 4 4 100 Motif3 4 4 100 Motif4 4 4 100 Size mm of original Stamp W H Min Max to fit hoop ...

Page 273: ...13 4 3 100 400 Motif14 4 3 100 Motif15 4 3 100 Motif16 3 5 100 Motif17 3 5 100 Motif18 2 3 100 Size mm of original Stamp W H Min Max to fit hoop Motif19 2 3 100 Motif20 3 3 100 Motif21 4 4 100 Motif22 4 4 100 Motif23 6 5 100 200 Motif24 2 3 100 800 Motif25 4 3 100 Motif26 4 4 100 Motif27 5 4 100 Motif28 4 4 100 Motif29 4 4 100 Motif30 4 4 100 Motif31 4 4 100 Motif32 7 4 100 Size mm of original Sta...

Page 274: ...f fill settings for details Motif33 6 5 100 200 Motif34 6 3 100 350 Motif35 6 4 100 Motif36 8 4 100 900 Motif37 7 6 100 350 Motif38 10 7 100 Motif39 6 6 100 200 Motif40 8 4 100 Ornam1 40 52 100 Ornam2 22 41 100 Ornam3 8 40 100 Ornam4 40 42 100 Size mm of original Stamp W H Min Max to fit hoop Ornam5 67 41 80 Ornam6 30 15 90 Ornam7 52 14 50 300 Ornam8 23 10 60 420 Ornam9 31 12 60 475 Scroll1 64 19 ...

Page 275: ...ee Adding borders for details Motif Size mm Motif Size mm W H W H Scroll01 12 1 10 1 Scroll03 10 5 Scroll4 10 5 Square01 2 2 NBW1 43 25 NBW2 28 31 NBW3 22 7 NBW4 20 22 NBW5 23 14 NBW6 14 16 NBW7 14 11 NBW8 14 22 NBW9 21 63 NBW10 18 62 NBW11 32 36 NBW12 28 22 NBW13 14 16 NBW14 62 26 NBW15 22 23 NBW16 36 26 NBW17 47 65 NBW18 36 63 NBW19 11 11 NBW20 20 20 NBW21 22 22 Star5 4 4 DES008 18 11 Flora1 25 ...

Page 276: ...ents for details Border Border Border A border B border C border D border E border F border G border H border I border J border K border L border M border N border O border P border Q border R border S border T border U border V border W border X border Y border Accent Size mm Accent Size mm W H W H Accent1 16 59 Accent2 74 38 Accent3 34 45 Accent4 54 57 Accent5 51 13 Accent6 5 33 Accent7 40 64 Ac...

Page 277: ... Motifs and Border Samples 275 Accent11 44 44 Accent12 49 45 Accent13 52 54 Accent14 69 48 Accent15 44 47 Accent16 27 29 Accent17 29 44 Accent18 35 8 Accent19 50 19 Accent20 23 32 Accent21 19 41 Accent22 42 15 Accent23 55 16 Accent Size mm Accent Size mm W H W H ...

Page 278: ... the stitch angle If they have changed for any reason revert to the original settings using the value in this table See Creating embossed fills for details Number Embossed Fill Stitch Angle Arrow1 15 Arrow2 15 Arrow3 15 Basket 15 Blossom1 15 Blossom2 15 Blossom3 15 Blossom4 15 Blossom5 15 Blossom6 15 Brick 45 Chain 45 Chevron1 15 Chevron2 15 Chevron3 90 Chevron4 15 Chevron5 15 Chevron6 90 Number E...

Page 279: ...e6 15 Circle7 10 Clubs 90 Crazypave 15 Diamonds1 15 Diamonds2 15 Diamonds3 15 Diamonds4 15 Diamonds5 15 Number Embossed Fill Stitch Angle Diamonds6 90 Diamonds7 45 Diamonds8 15 Diamonds9 15 Doughnut1 15 Doughnut2 15 Doughnut3 15 Feather1 15 Feather2 90 Feather3 15 Hearts1 90 Hearts2 15 Hearts3 15 Hearts4 90 Number Embossed Fill Stitch Angle ...

Page 280: ... 15 Oval1 15 Oval2 15 Oval3 90 Oval4 10 Oval5 10 Patch1 45 Patch2 45 Patch3 45 Patch4 8 Patch5 8 Number Embossed Fill Stitch Angle Patch6 7 Patch7 8 Rectangle1 45 Rectangle2 30 Saturn 15 Snail 15 Spades 90 Splash1 0 Splash2 90 Splash3 10 Square1 45 Square2 15 SquarePatch 15 Squigle1 15 Number Embossed Fill Stitch Angle ...

Page 281: ...1 15 Star4pnt2 15 Star5pnt 15 Star6pnt 15 Star7pnt 15 Target1 15 Target2 15 Target3 8 Tiles1 15 Tiles2 15 Number Embossed Fill Stitch Angle Tiles3 15 Tiles4 15 Tiles5 15 Triangle1 15 Triangle2 15 Triangle3 15 Triangle4 15 Triangle5 45 Triangle6 15 Triangle7 15 Triangle8 15 Triangle9 15 Ziggy1 15 Ziggy2 15 Number Embossed Fill Stitch Angle ...

Page 282: ...JANOME Embroidery Software Instruction Book Appendix E Embossed Fill Samples 280 Ziggy3 15 Ziggy4 15 Ziggy5 15 Number Embossed Fill Stitch Angle ...

Page 283: ...Make sure you apply the correct stitch angle to each pattern The following samples have been digitized with a stitch angle of 0 Experiment with different stitch angles to get new effects See Creating weave fills for details No Stitch sample Needle point preview 1 2 3 4 5 6 7 8 9 10 11 12 No Stitch sample Needle point preview ...

Page 284: ...JANOME Embroidery Software Instruction Book Appendix F Weave Fill Samples 282 13 14 15 16 17 18 19 20 21 No Stitch sample Needle point preview 22 23 24 25 No Stitch sample Needle point preview ...

Page 285: ...ns and the version of Windows you are running to ensure they meet JANOME Embroidery Software requirements See Minimum requirements for JANOME Embroidery Software for details To check CPU RAM specifications 1 On the Windows desktop right click the My Computer icon and select Properties The System Properties General dialog opens 2 Check the Windows version the CPU and the amount of RAM Checking your...

Page 286: ...E Embroidery Software may stop working altogether Try this After entering new codes exit JANOME Embroidery Software and then restart Security device not found dongle Design dimensions Colors change in Visualizer Missing toolbar buttons Select to delete recovery files Message Security device not found Cause Software is unable to detect dongle or there is a conflict with another device on your PC Su...

Page 287: ...r Cause If you have the JANOME Embroidery Software Auto Save option enabled backups of JAN design files will be saved to the C Program Files Janome Digitizer Backup folder This is a basic way of backing up your files Suggestion Start Windows Explorer and browse to the C Program Files Janome Digitizer Backup folder Select the file and select File Rename Change the file extension to JAN e g DesignNa...

Page 288: ... them from various file sources or copy and paste them via the Windows clipboard Background The area inside the hoop in the Design Window The background color can be changed to match the color of the fabric you will be using for stitchout Backing See Stabilizer Backup The copying of files onto floppy disk or other storage media in order to duplicate and secure data Usually two copies are made and ...

Page 289: ... most objects you can also change control points from corner points to curves Copyright A right granted by the government or by international agreement giving the owner the exclusive privilege to publish and sell artistic work during the life of the creator plus 50 years Cover stitch The cover stitch is the Satin border around an appliqué shape You can change the width of the cover stitch and offs...

Page 290: ...wice without moving the mouse Double clicking carries out actions such as opening a program from an icon Download The process of transferring a copy of a file from a remote computer or the internet to a computer or other device such as an embroidery machine Drag An operation of the mouse Holding the left mouse button while moving the mouse Typically used for moving something on the screen Drawing ...

Page 291: ... letters may overlap The letter width is not changed With Fixed Line you need to mark two points to define the base See also Baseline Flagging Up and down motion of fabric under action of the needle so named because of its resemblance to a waving flag Often caused by improper framing of goods Flagging may result in poor registration unsatisfactory stitch formation and birdnesting Floppy disk A fle...

Page 292: ... open a stitch format file without outline recognition it becomes a single manual object This object type consists of a series of needle penetration points and has only general and connector properties When you transform scale rotate mirror a manual object the original stitch density does not change Max Min stitch length The minimum and maximum stitch lengths allowable in a design determine the ou...

Page 293: ...See also Stitch file Outline stitch Stitch such as Run or Satin used to outline an embroidery object Overview window Use the Overview window to view a thumbnail of the design The window is updated whenever you make a change and can be used to zoom in or pan across the Design Window Paint package Software application that creates or allows you to edit image files You can create lines and filled are...

Page 294: ... by color or using the Resequence List Resizing See Scaling Resolution Resolution determines the number of dots per inch dpi used to create an image The higher the value the clearer the image but the more storage space required A resolution of 75 dpi generally produces good results RGB RGB stands for red green and blue It is the system used by computer monitors to create color Right click To press...

Page 295: ... such as shine glitter iridescence or thickness The threads often are made from synthetic materials including rayon mercerized cotton metallics and textured nylon Stabilizer Also know as backing stabilizers are woven or non woven materials used underneath the item or fabric being embroidered to provide support and stability It can be hooped with the item or placed between the machine throat plate ...

Page 296: ...is thicker Density C is finer and Density D is very fine Thread thickness See Thread density Thread type Embroidery thread varies in thickness Types are A B C and D Stitch density should be set according to the thread type See also Thread thickness Tie ins Tie in stitches are inserted at the start of objects to prevent stitches from unraveling They are inserted inside the shape on the second stitc...

Page 297: ...ill look when stitched out It gives the screen image a three dimensional look TWAIN Industry standard which allows devices such as scanners to communicate directly with design and layout programs Both device and program must be TWAIN compliant This lets you use any TWAIN compliant scanner with your software Underlay Stitches sewn before other design elements to help stabilize fabrics The stitching...

Page 298: ...ng and unlocking 119 using bitmap images 90 backgrounds changing 53 changing colors 47 changing fabrics 48 color mixing 48 Backstitch outlines 70 stitch length 70 tool 70 Backtrack tool 144 243 backtracking objects 144 baselines adjusting 175 reshaping circular 175 reshaping custom 176 reshaping horizontal 175 bitmap images anti aliasing 88 dithered 88 supported formats 250 using as backdrops 90 b...

Page 299: ...ng 176 custom hoops creating 53 custom orientations 166 custom templates selecting 227 cut paste designs 232 objects 112 resequencing 114 Cut Hole tool 145 243 Cut tool 114 242 cutting lines appliqué 151 D decorative outlines creating 70 default object details 135 Delete Designs dialog 211 Delete Hoop tool 51 244 deleting designs 204 233 designs from machine 211 folders 232 objects 113 stitches 15...

Page 300: ...8 Parallel Contour Fill Rectangle 68 Parallel Embossed Fill 60 245 Parallel Embossed Fill Circle 61 246 Parallel Embossed Fill Rectangle 62 246 Parallel Fill 56 245 Parallel Fill Circle 245 Parallel Fill Rectangle 245 Parallel Fill Circle 56 Parallel Fill Rectangle 56 Parallel Motif Fill 60 78 79 245 Parallel Motif Fill Rectangle 62 78 79 246 Parallel Radial Fill 69 Parallel Radial Fill Circle 69 ...

Page 301: ...l 122 243 flipping stamps 74 Florentine Effect tool 69 Florentine effects creating 69 folders limiting file types 229 refreshing validating 226 renaming adding deleting 232 sorting 229 Folders icon 225 245 fonts flair script 181 formats design 196 embroidery file 196 expanded 196 outline 196 stitch 196 Forward tool 36 37 244 G gaps offsetting filled holes 146 Giga Hoop sending designs 220 Gradient...

Page 302: ...s changing spacing 167 reshaping 173 limiting files in folders 229 line spacing lettering 167 lines converting to borders 57 digitizing 57 locale changing languages 224 locate missing files 226 Lock command 119 locking backdrops 119 objects 119 M MA Hoop sending designs 219 machine deleting designs 211 formats saving 198 models 199 models selecting 27 outputting multiple designs 205 207 outputting...

Page 303: ... 119 locking and unlocking 119 moving 117 nesting 114 repeating 144 resequencing 114 reshaping 126 rotating 121 scaling 120 selecting 41 transforming 117 traveling by 36 ungrouping 119 See also modifying objects objects combining 111 Offset Object tool 147 offsetting filled holes Parallel Fill 146 onscreen help 3 onscreen manual 2 Open dialog 25 143 tool 24 242 open design sending to machine 209 O...

Page 304: ...e dialog 115 116 displaying hidden objects 44 selecting objects 44 Resequence tool 44 115 116 243 resequencing by color 116 by selection 115 objects 114 using cut and paste 114 reshape control points selecting 127 Reshape tool 77 92 127 129 130 166 167 171 176 243 reshaping letters 173 reshaping objects 126 circles 128 lettering 175 Motif Run 77 resolution scanning 89 reverse stitching Backtrack a...

Page 305: ...ew 40 189 191 193 242 Redo 27 242 Save 30 242 Send to Machine 200 204 206 209 215 219 220 242 Stop 242 Undo 27 242 Write to Card 201 206 218 242 Stemstitch outlines 71 stitch thickness 71 Stemstitch tool 71 stitch angles adjusting 129 Embossed Fill 67 fixed 60 setting for Parallel Fill 129 turning stitches 60 stitch blocks splitting 156 stitch files 196 supported formats 249 stitch length Run and ...

Page 306: ...erences 224 Zoom Whole Design 32 33 Zoom Whole Hoop 33 view settings adjusting 226 View toolbar Back 36 37 38 244 Display Grid 29 244 Display Hoop 244 Display Images 36 244 Display Needle Points 35 244 Forward 36 37 38 244 Jump by 1 Stitch 38 244 Jump by 10 Stitches 38 244 Jump by 100 Stitches 38 244 Jump by Color 37 244 Jump by Object 36 43 244 Jump to Start End Design 36 37 Overview Window 34 24...

Reviews: