SERVICE MANUAL FOR SXG323&326
14
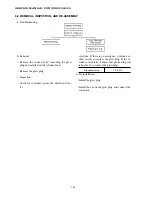
%&&)#)%.4 -/7).'
Important:
· Be sure to mow at full throttle (
r
).
· Choose an adequate traveling speed in
accordance with the height or other conditions
of grass to be cut.
· When the screens for the air-intake openings
and radiator are clogged with dust, clean them
at once. Never go on operating with clogged
screens.
· Mowing is desirable when the grass is
dew-free: in the afternoon or late afternoon,
thus preventing the mower from heavy
clogging.
· Always keep the mower deck clean.
· Check the blade ends for damage.
· Repeated mowing is recommended before the
grass grows to high.
· Cutting grass too closely may damage the
grass.
Too maintain a green lawn, never mow more
than one-third off the height of the grass in one
mowing.
· A slower traveling speed will result in
improved mowing. Avoid selecting such a
traveling speed that causes the lawn mower to
bounce.
· Short, fast turns will damage turf. Slow down
sufficiently when turning.
· Frequent sharpening of the mower blades
results in beautiful famishment and less load
on equipment, which leads to economical
operation.
&OR MOWING TALL GRASS
i. Mow grass twice.
First, mow the grass to a height low enough
for the next finishing pass. Then finish to the
desired grass height.
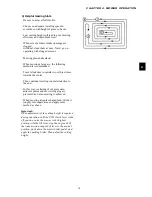
The second traveling pass should be shifted
side ways by 20 cm (8 in.) or so, or travel
perpendicular to the first passes, which will
result in a beautiful even finish.
ii. When trying to finish in one pass, select a
sufficiently slow traveling speed. It may also
be required to set the cutting width to half or
one-third of that for normal operation.
&OR MOWING HIGHLY MOIST GRASS OR ON WET
GROUND
i. If turf damage by the tyres could result, wait until the
grass and land have dried sufficiently.
ii. Wet grass requires a higher grass cutting height
setting than when mowing dry grass, as the cutting
height is often lower than expected during operation.
iii. Select a sufficiently slow traveling speed and avoid
sudden starts, turns, and stops. If not, the turf may be
damaged.
&OR MOWING LOW MOISTURE CONTENT GRASS OR
WHEN THRER IS MUCH DEAD GRASS
i. Advance should be in a direction where the dust does
not hit the operator by taking into consideration the
direction of the wind.
ii. When the air-intake screens are clogged, clean them
at once.
Important:
· When operating the lawn mower in dusty
circumstances, keep on paying attention to the coolant
temperature warning lamp.
Never continue operating when screens are clogged, or
engine breakdown may result.
Summary of Contents for SXG323
Page 1: ...LAWN MOWERS MOWER DECKS COLLECTORS SCMB48 SCMA54 SBC550X 600X ...
Page 5: ......
Page 11: ...SERVICE MANUAL FOR SXG323 326 10 ...
Page 14: ...CHAPTER 1 GENERAL INFORMATION 13 1 3 EXTERIOR VIEW Fig 1 4 ...
Page 17: ...SERVICE MANUAL FOR SXG323 326 16 ...
Page 33: ...SERVICE MANUAL FOR SXG323 326 32 ...
Page 51: ...SERVICE MANUAL FOR SXG323 326 50 3 3 CYLINDER BLOCK 3 3 1 EXPLODED VIEW Fig 4 55 ...
Page 67: ...SERVICE MANUAL FOR SXG323 326 66 ...
Page 70: ...CHAPTER 5 LUBRICATION SYSTEM 69 5 1 4 EXPLODED VIEW OF OIL PUMP Fig 5 4 ...
Page 73: ...SERVICE MANUAL FOR SXG323 326 72 ...
Page 89: ...SERVICE MANUAL FOR SXG323 326 88 42 3 33 Fig 8 3 2 2 7 2 6 3 TYPE Fig 8 4 ...
Page 93: ...SERVICE MANUAL FOR SXG323 326 92 ...
Page 97: ...SERVICE MANUAL FOR SXG323 326 96 2 OPERATING DIAGRAM OF HST Fig 10 2 ...
Page 99: ...SERVICE MANUAL FOR SXG323 326 98 Fig 10 5 Fig 10 6 ...
Page 100: ...CHAPTER 10 HYDROSTATIC TRANSMISSION 99 10 Fig 10 7 ...
Page 101: ...SERVICE MANUAL FOR SXG323 326 100 Fig 10 8 4 DISASSEMBLY AND REASSEMBLY ...
Page 102: ...CHAPTER 10 HYDROSTATIC TRANSMISSION 101 10 4 3 ...
Page 103: ...SERVICE MANUAL FOR SXG323 326 102 ...
Page 107: ...SERVICE MANUAL FOR SXG323 326 106 4 5 CRITERIA FOR REPLACING WORN PARTS ...
Page 117: ...SERVICE MANUAL FOR SXG323 326 116 ...
Page 124: ...CHAPTER 12 POWER STEERING SYSTEM 123 12 3 MAJOR TROUBLES AND CAUSES AND COUNTERMEASURES ...
Page 125: ...SERVICE MANUAL FOR SXG323 326 124 ...
Page 126: ...CHAPTER 12 POWER STEERING SYSTEM 125 12 ...
Page 127: ...SERVICE MANUAL FOR SXG323 326 126 ...
Page 130: ...CHAPTER 13 ELECTRICAL ACCESSORIES 129 13 2 WIRING DIAGRAM E TYPE Fig 13 12 ...
Page 131: ...SERVICE MANUAL FOR SXG323 326 130 3 WIRING DIAGRAM GE TYPE Fig 13 13 ...
Page 132: ...CHAPTER 13 ELECTRICAL ACCESSORIES 131 13 Fig 13 14 4 STARTER ...
Page 140: ...CHAPTER 13 ELECTRICAL ACCESSORIES 139 13 Fig 13 48 Fig 13 47 ...
Page 149: ......
Page 151: ...SERVICE MANUAL FOR SXG323 326 4 ...
Page 152: ...CHAPTER 1 FOR SAFETY LABELS 5 1 SAFETY LABELS SCMB48 54 CHAPTER 1 FOR SAFETY LABELS ...
Page 163: ...SERVICE MANUAL FOR SXG323 326 16 ...
Page 171: ...SERVICE MANUAL FOR SXG323 326 24 ...
Page 173: ...SERVICE MANUAL FOR SXG323 326 26 3 Gear box left hand ...
Page 175: ...SERVICE MANUAL FOR SXG323 326 28 SCMB48 54 Front Belt and Belt tension Blade and Blade hub ...
Page 183: ......
Page 185: ...SERVICE MANUAL FOR SXG323 326 4 ...
Page 188: ...CHAPTER 2 SPECIFICATIONS 7 2 SPECIFICATIONS CHAPTER 2 SPECIFICATIONS ...
Page 189: ...SERVICE MANUAL FOR SXG323 326 8 ...
Page 191: ...SERVICE MANUAL FOR SXG323 326 10 ...
Page 195: ...SERVICE MANUAL FOR SXG323 326 14 ...
Page 227: ...SERVICE MANUAL FOR SXG323 326 46 ...
Page 229: ...SERVICE MANUAL FOR SXG323 326 48 ...

