ADJUSTMENTS 10
en-72
10.13 HEIGHT OF CUT ___________________________________________________________
The height of cut for the cutting unit is adjusted from 1 to 5-1/2 inch (2.5-14 cm) in 1/2 inch (1.3 cm) steps. The height
of cut result can be different from the heights given because of the condition of the turf and other conditions.
Park the mower on a flat and level surface. Put 9 inch (22.7 cm) supports below the cutting units. Lower the cutting
units on the 9 inch (22.7 cm) supports. Engage the parking brake, stop the engine and remove the key.
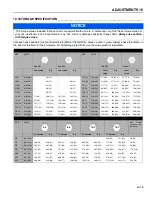
Refer to the decal on the cutting units or the chart below to set the height of cut.
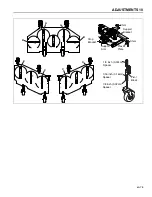
To change the caster wheel height of cut (10 locations) -
a
Check the caster arm mounting position. For height of cut from 1 to 2-1/2 inches (2.5 to 6.3 cm), use the lower
holes in the caster pivots to install the caster arms. For height of cut from 2-1/2 to 4 inches (6.3 to 10.2 cm), use
the center holes in the caster pivots to install the caster arms. For height of cut more than 4 inches (10.2 cm), use
the upper holes in the deck plates to install the caster arms.
b
Remove the retaining ring pins, washers and any spacers above the pivot block. Remove the caster wheel yoke
from the pivot block
c
Install the correct number of 1/2 inch (1.3 cm) spacers and one 1/16 inch (0.16 cm) thrust washer onto the caster
yoke. The trust washer must be on top of the spacers on the caster yoke.
d
Slide the caster wheel yoke into the pivot block. Place the remaining 1/2 inch (1.3 cm) spacers on caster yoke
shaft above the pivot block.
e
Assemble the retaining ring pins.
f
Repeat for the remaining caster wheels.
To change the gauge wheel height of cut (2 locations) -
a
Check the gauge wheel mounting position. For height of cut from 1 to 5 inches (2.4 to 12.7 cm) install the guide
wheel in the front hole (F). For 5-1/2 inch (14 cm) height of cut, install the gauge wheel in the rear hole (R).
b
Remove the snap ring and the clevis pin from the height of cut brackets. Refer to the decal on the front deck or
the chart below to install the clevis pin in the correct holes in the brackets and arms. Fasten the clevis pin with the
snap ring pin
NOTICE
When cutting rough areas, a lower height of cut can cause scalping. Adjust the height of cut to prevent damage to
the turf.
WARNING
To prevent injury, make sure the cutting units are on the supports. The supports will prevent the cutting units to lower
accidentally while you adjust the height of cut.
Make sure the parking brake is engaged, stop the engine and remove the key before you make adjustments to the
cutting units.
NOTICE
Note the location of the 1/8 inch (0.32 cm) spacers. The 1/8 inch (0.32 cm) spacers must be installed in the same
location.
!
Summary of Contents for HR-9016 Turbo
Page 13: ...SPECIFICATIONS 4 en 12 K L D B A P P N C J H M E G...
Page 28: ...5 DECALS en 27...
Page 90: ...13 NOTES en 89 13Notes...
Page 91: ...NOTES 13 en 90...


