background image

48

system

accessories, 1
boot up

banner message, 17
sequence, 20

password

changing, 27

system configuration

Windows NT Workstation, 11

System Introduction, 7
system software

installed, 2
Quick-Fix Engineering (QFE)

updates, 2, 9

T

TCP/IP networking information, 3
telephone support, ix
training, ix
troubleshooting

hardware, 36
system boot, 33
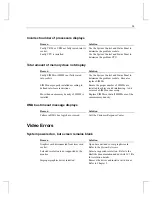
video, 11, 35

U

updates to the operating system, 15,

44

V

video display

changing the default video

display driver, 11

Last Known Good, 12

W

Welcome dialog

Repair Disk, 8
Startup diskette, 8
System Introduction, 7
using, 6

Windows NT

Emergency Repair Disk, 43

Windows NT Workstation

installing, 39
system configuration, 11

Windows NT Workstation 4.0,

installing, 40

Summary of Contents for StudioZ RenderRAX

Page 1: ...StudioZ RenderRAX System Setup June 1997 DHA021110...

Page 2: ...y software and its file formats and audio visual displays described herein all rights reserved may only be used pursuant to the applicable software license agreement contains confidential and propriet...

Page 3: ...does not exceed the Class A limits for radio noise emissions from digital apparatus set out in the Radio Interference Regulations of the Canadian Department of Communications Warnings Changes or modif...

Page 4: ......

Page 5: ...it 2 Keyboard Tray 2 Prepare for Windows NT Setup 2 Start the System 4 Going Through Windows NT Setup 5 Using the Welcome Dialog 6 Reviewing the System Introduction 7 Creating a Repair Disk 8 Creating...

Page 6: ...t message displays 35 Video Errors 35 System powered on but screen remains blank 35 Hardware Errors 36 Does not boot from drive A 36 I O card parity error message displays 36 Invalid configuration inf...

Page 7: ...OS describes using the AMIBIOS Setup program and reprogramming the BIOS u Chapter 4 Troubleshooting describes causes and solutions to system problems u Chapter 5 Installing System Software describes i...

Page 8: ...g that displays the first time you start the system System Introduction is a Windows Help 4 0 document Detailed reference information for your new system is available in the Rack Mount Workstation Ser...

Page 9: ...0 240 3000 Getting Telephone Support If you experience problems with your Intergraph product or have questions about the information in this document you can contact Intergraph for help u In the Unite...

Page 10: ...ine Intergraph s World Wide Web server 3 When connected respond to the login request by keying in your user ID If you have not connected before key in new to create a user ID 4 Follow the menus to fin...

Page 11: ...ntergraph com Put help in the body of the message the subject line is ignored to get information on such subjects as Intergraph s online services and where to get World Wide Web browsers u Participate...

Page 12: ...xii...

Page 13: ...when the disk access LED is on u After turning off power to the base unit wait at least 30 seconds before turning the power on again to ensure that the disk drives have stopped and the system has pow...

Page 14: ...ase Tab Keyboard Tray The keyboard tray uses a release tab on either side of the tray Press in the release tabs to allow the tray to retract Prepare for Windows NT Setup The operating system and assoc...

Page 15: ...em is connected to a network obtain and record the following information from your network administrator u Computer name for your system u Workgroup name if the system will be part of a workgroup u Do...

Page 16: ...talling a device driver from the Windows NT CD ROM key in the following when asked for the path to the file where drive is the drive letter for the CD ROM drive drive i386 Start the System RenderRAX u...

Page 17: ...een to continue the Setup process Take the default settings provided by Setup except as noted in the following text You can set up a user account and join a workgroup or domain after you configure the...

Page 18: ...lcome Dialog An Intergraph Welcome icon displays on the Desktop after Setup is complete To display the Welcome dialog double click the Welcome icon or select the Welcome option from the operating syst...

Page 19: ...jects as system features system controls and connections and Intergraph customer support Review the information in the System Introduction to become more familiar with your system NOTE You can also vi...

Page 20: ...nstalled along with the standard operating system drivers You should also update a Repair Disk after you finish configuring the system Refer to the operating system documentation and Help for informat...

Page 21: ...ble on the operating system software CD ROM or on backup diskettes delivered with expansion boards If the system requires Quick Fix Engineering QFE update software it is included in the system softwar...

Page 22: ...10...

Page 23: ...red with the video display drivers for detailed configuration information Refer to the operating system documentation and Help for information on using the Display Properties dialog to configure the d...

Page 24: ...cted in Video Configuration but only one video board is detected Clear the Dual Screen option u A multi sync monitor is selected in Video Configuration but a monitor with different video timings such...

Page 25: ...stem is connected Refer to the documentation for the installed network adapter for detailed configuration instructions Refer to the operating system documentation and Help for information on setting u...

Page 26: ...mination disabled or removed Disabling Ultra SCSI Capability To ensure proper operation of the external SCSI devices with a desktop system you should disable Ultra SCSI capability under the following...

Page 27: ...ing the Operating System Microsoft Service Packs contain the latest improvements and system fixes for Microsoft operating systems Service Packs are created by Microsoft for post release support You ca...

Page 28: ...16...

Page 29: ...the Flash Programming Utility FPU Refer to Reprogramming the BIOS for instructions Using AMIBIOS Setup The AMIBIOS Setup menus and options discussed in this chapter are for BIOS 782xx ROM where xx is...

Page 30: ...ion describes the parameters grouped in the AMIBIOS Setup menu Standard Standard allows you to set the system date and time and define floppy disk drive parameters Date Time Select the Date Time icon...

Page 31: ...Master Disk Slave Disk The Master Disk and Slave Disk icons represent parameters for Integrated Device Electronic IDE drives If installing IDE hard drives use the Detect Master and Detect Slave utilit...

Page 32: ...ard This parameter enables or disables BIOS keyboard testing Acceptable values are Absent and Present If Present default is selected the BIOS tests for the keyboard when the system boots and provides...

Page 33: ...is powered on The Change Password value enables you to press ENTER at the password prompt to disable this parameter ISA Video Shadow C000 32K ROM shadowing is a procedure in which BIOS code is copied...

Page 34: ...ter enables LBA mode for slave hard disks connected to the IDE controller LBA mode translates the physical parameters of the hard disk to logical parameters permitting the use of disk space beyond 528...

Page 35: ...empt to boot from first The device that you specify to be the boot device is assigned to drive C By default drive C is the system hard disk drive Refer also to the System Boot Up Sequence parameter in...

Page 36: ...n use PnP operating systems to manipulate this ESCD data to assign specific IRQs to specific system devices and option cards on subsequent system boots When the parameter is set to No default you can...

Page 37: ...led option boards and configures the on board components accordingly When set to Auto the default the system BIOS automatically detects the installed option boards during boot up When set to Manual th...

Page 38: ...port number as defined by the following table Value Parallel Port Address Range Interrupt 378h LPT1 378 37A IRQ7 or IRQ5 278h LPT2 278 27A IRQ7 or IRQ5 3B8h LPT3 3BC 3BE IRQ7 or IRQ5 Parallel Port Mo...

Page 39: ...made available for you to configure Security Menu The Security Menu allows you to change the system password and enable or disable virus protection Password Use Password to prevent unauthorized users...

Page 40: ...not be performed The default is Disabled to allow formatting of diskettes in all circumstances Default Menu The BIOS contains three configurations stored in CMOS RAM Original BIOS defaults Optimal BI...

Page 41: ...timal BIOS values 1 Select the Optimal icon from the AMIBIOS Setup Main Menu to load the best case BIOS values The following message displays Load Optimal Values 2 Select Yes to accept the values or N...

Page 42: ...ou must run the BIOS Setup again and reallocate the system resources in the Chipset Setup menu NOTE Reprogramming the flash EPROM erases all the parameter settings in the BIOS If you customized any BI...

Page 43: ...es 13 If you customized the BIOS for your system change the necessary parameters to their previous values 14 Exit AMIBIOS Setup and restart the system 15 If you have ISA boards or PC Card devices inst...

Page 44: ...n press ENTER 6 Select Exit and Save to exit AMIBIOS Setup 7 Restart the system Until the boot sequence is changed back to C A the system will check for a bootable diskette in the floppy disk drive be...

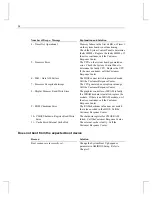
Page 45: ...uipment attached to the AC distribution box or UPS does not exceed the stated power limitations System Boot Errors Series of beeps and error message displays Number of Beeps Message Explanation and So...

Page 46: ...ion Interrupt The CPU generated an exception interrupt Call the Customer Response Center 8 Display Memory Read Write Error The graphics controller or WRAM is faulty If a WRAM module is installed repla...

Page 47: ...ber of SIMMs are installed to achieve valid interleaving Add or remove SIMMs as necessary More than one memory density of SIMM is installed Replace SIMMs so that all SIMMs are of the same memory densi...

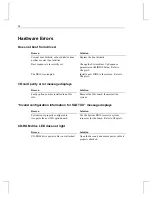
Page 48: ...Chapter 3 I O card parity error message displays Reason Solution Faulty option board is installed in an ISA slot Remove the ISA board then restart the system Invalid configuration information for SLOT...

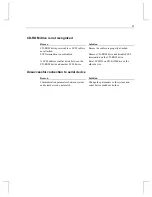
Page 49: ...ROM drive and disable SCSI termination on the CD ROM drive A SCSI address conflict exists between the CD ROM drive and another SCSI device Reset SCSI ID on CD ROM drive or the other device Unsuccessfu...

Page 50: ...38...

Page 51: ...skettes and documentation delivered with any expansion boards purchased from Intergraph u The Late Breaking News document delivered with your system System software required during re installation may...

Page 52: ...if you have an installed network adapter and the system is connected to the network u When prompted to create an Emergency Repair Disk do so After installing the operating system u Install drivers or...

Page 53: ...strator If necessary restart the system to complete the drive letter reassignments In the Windows NT Control Panel open the Performance tab in the System utility to make changes to your virtual memory...

Page 54: ...SI peripherals you should disable command queuing in the Windows NT Registry WARNING Do not change values in the Registry other than as directed If you introduce incorrect values into the Registry you...

Page 55: ...Repair Disk The files on the Emergency Repair Disk can restore a damaged registry to its original contents that is at the time Windows NT was installed along with the standard Windows NT drivers CAUT...

Page 56: ...u can obtain Service Packs from Microsoft s World Wide Web and FTP sites free of charge CAUTION If Intergraph provides a Service Pack through the IBBS or with a product or system it has been certified...

Page 57: ...eskside External SCSI Controller 23 Internal SCSI Controller 23 Desktop On Board SCSI Controller 23 Supervisor only External SCSI Controller 23 On Board SCSI Controller 23 boot up initial screen 17 se...

Page 58: ...20 BIOS password 27 default video display driver 11 system boot sequence 31 command queuing disabling Windows NT 42 Complementary Metal Oxide Semiconductor Random Access Memory CMOS RAM BIOS 17 confi...

Page 59: ...IOS defaults loading 28 P Parallel port BIOS parameter changing 26 password AMIBIOS Setup 27 PC Card operation 42 PCMCIA operation 42 precautions 1 Q Quick Fix Engineering QFE update software 2 9 Quic...

Page 60: ...nformation 3 telephone support ix training ix troubleshooting hardware 36 system boot 33 video 11 35 U updates to the operating system 15 44 V video display changing the default video display driver 1...

Reviews: