background image

3-11

3. Selecting the Paper

Makin

g

 Cop

ie

s

Ch

ap

ter

 3

Manual Bypass Copying

• Use Manual Bypass to make copies on paper not loaded in any drawer, or to copy onto OHP 

transparencies, thick paper, or any other special paper.

• When using the Multi Bypass Tray, you can load multiple sheets of paper.
• The setting of the paper size is needed for manual bypass copying.
• Manual Bypass cannot be used for a reserved job.

Types of Paper

• Plain paper (weighing 16 lb to 24 lb)
• Recycled paper
• Exclusive paper: Thick paper (weighing 24-1/4 lb to 41-3/4 lb), OHP transparencies, translucent 

paper

Paper Size

• Max. Size

: 11-3/4

×

17

• Minimum Size : 4

×

5-3/4

Capacity of the Multi Bypass Tray

• Plain paper, recycled paper   . . . . . . . . . . . . . . . . . . . . . . . . . . . . . . . . . Up to 50 sheets
• Plain paper (once-copied paper)   . . . . . . . . . . . . . . . . . . . . . . . . . . . . . Up to 20 sheets
• Exclusive paper: Thick paper, OHP transparencies, translucent paper. Up to 20 sheets

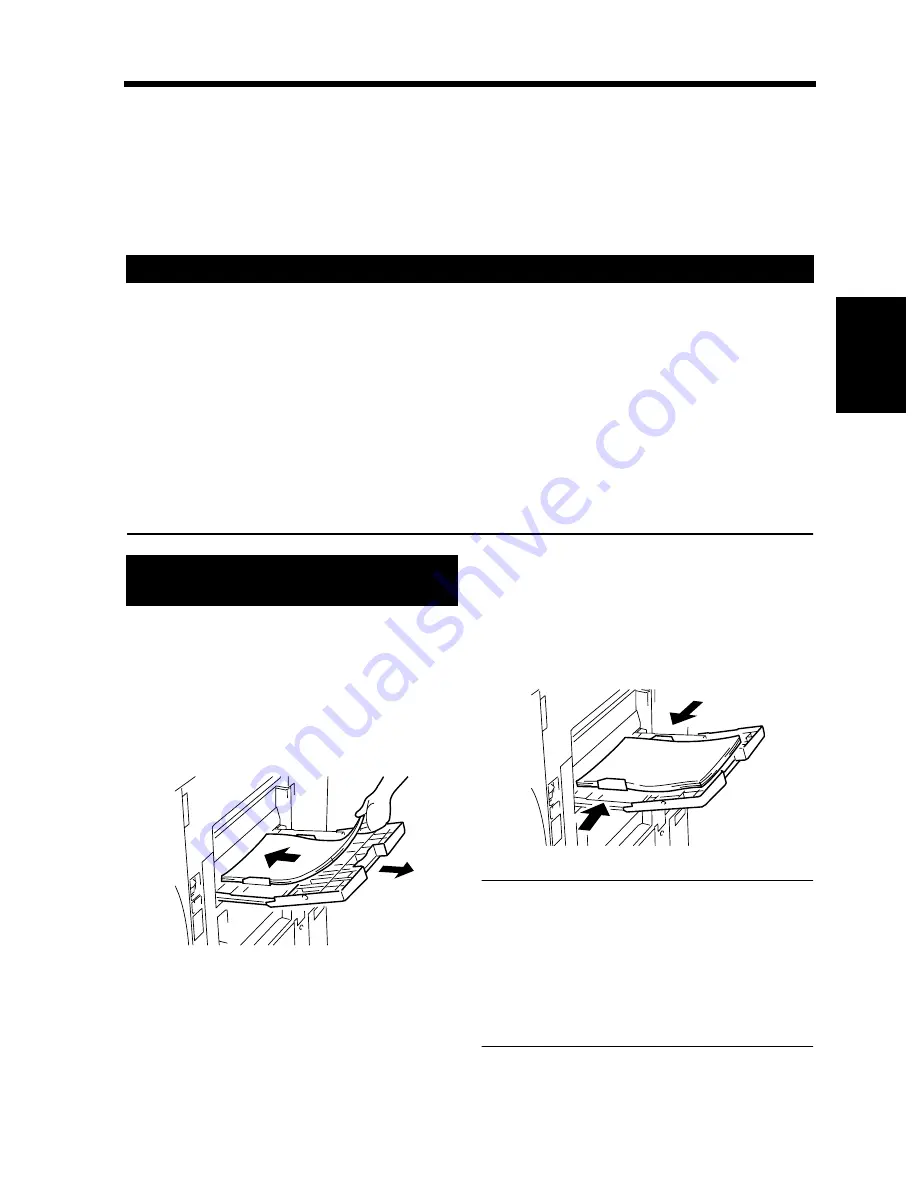
Place the original on the Original Glass and 
make the control panel settings.

Swing down the Bypass Tray and insert a 
neat stack of paper into the tray until it stops.
* Slide the Tray Extender out when using 

large-size paper.

Slide the Paper Guide Plate to the size of the 
paper.

NOTES
• The paper should be loaded no higher than the 

 (Max. Level Indicator).

• When loading OHP transparencies or 

translucent paper, fan the paper stack well.

• When loading thick paper, be sure first to 

eliminate any curl in the paper.

• The paper will be copied on the side facing up.

Paper that Can be Used for Manual Bypass

Using the Intelligent Multi Bypass 
Tray

1

2

4002O134AC

3

4002O135AC

Summary of Contents for DL460

Page 1: ...www imagistics com Operating Manual For use with Imagistics and Pitney Bowes DL460 550 copier printers DL460 550...

Page 2: ...atically switch to a low power mode after a period of inactivity An ENERGY STAR product uses energy more efficienty saves you money on utility bills and helps protect the environment As an ENERGY STAR...

Page 3: ...d in a commercial environment This equipment generates uses and can radiate radio frequency energy and if not installed and used in accordance with the instruction manual may cause harmful interferenc...

Page 4: ...agistics Copier Printer Supply Line at 1 800 462 6797 To speak to a technical support representative Call the Imagistics Digital Technical Support Line at 1 800 243 5556 To request on site maintenance...

Page 5: ...e 1 Typical Copies You Can Make with Your Machine Typical copies you can make with your machine 2 2 2 System Overview System Overview 2 6 3 Machine Parts and Accessories Machine Parts and Accessories...

Page 6: ...tamping 3 64 9 Selecting Mixed Orig Detection and Other Functions Mixed Orig Detection and Other Functions 3 66 10 Selecting the Job Functions Memory Recall 3 68 Reserve 3 69 Job List 3 70 Chapter 4 T...

Page 7: ...Appears 1 When the Message Replenish paper Appears Adding paper 6 2 2 When the Message Please add Toner Appears Replacing the Toner Bottle 6 6 3 When the Message Stapler is empty Appears Replacing the...

Page 8: ...vi Contents 3 Function Combination Matrix Function Combination Matrix 7 12 Conditions for Combined Functions 7 14 4 List of Paper Sizes and Zoom Ratios List of Paper Sizes and Zoom Ratios 7 15 Index...

Page 9: ...ixed at the position illustrated above Please write down the Model Name and Serial No of your machine here Model Serial No 4002O110AC 4002O336CA 4002O312CA For Europe For United States 1155O764AA CLAS...

Page 10: ...unit The print head unit is NOT A FIELD SERVICE ITEM Therefore the print head unit should not be opened under any circumstances CDRH Regulation This machine is certified as a Class I Laser product un...

Page 11: ...synlig laserstr ling ved bning n r sikkerhedsafbrydere er ude af funktion Undg uds ttelse for str ling Klasse 1 laser produkt der opfylder IEC60825 sikkerheds kravene LOUKAN 1 LASERLAITE KLASS 1 LASER...

Page 12: ...side onto the Copy Tray In the figure below the direction in which the paper is fed as indicated by the arrow is called the feeding direction Width and Length Terms and Symbols Used 4002O120AC 1139O1...

Page 13: ...Safety Notes Chapter 1 1 1 Chapter 1 Safety Notes...

Page 14: ...not subject to undue vibration A stable and level location A place where ammonia or other organic gas is not generated A place which does not put the operator in the direct stream of exhaust from the...

Page 15: ...ure that the outlet is visible clear of the machine or machine cabinet ALWAYS provide good ventilation when making a large number of continuous copies NOTE Locate the Machine in aWellVentilated Room A...

Page 16: ...fusing performance Legal Restrictions on Copying Certain types of documents must never be copied by the machine for the purpose or with the intent to pass copies of such documents off as the original...

Page 17: ...Getting to Know Your Machine Chapter 2 2 1 Chapter 2 Getting to Know Your Machine...

Page 18: ...ith to turn out different types of copies For the specific operations see the relevant pages indicated by p Original Copy p 3 36 4002O012AA Single Sided Single Sided Single Sided Double Sided Orig Cop...

Page 19: ...now Your Machine Chapter 2 Finishing p 3 20 Zoom Ratio p 3 14 4002O052AA Sort Staple Orig Copy 4002O019AA Orig Copy Copy 4002O053AA Group Hole punch Orig Copy 4002O311EA Orig Copy 4002O021AA Folding O...

Page 20: ...46 Page Insertion p 3 49 Orig Copy 4002O024AA Orig Copy 4002O025AA OHP Interleaving p 3 52 File Margin p 3 54 Orig Copy 4002O070AA Orig Copy 4002O071AA Erase p 3 56 Number Stamping Date p 3 60 Orig C...

Page 21: ...Can Make with Your Machine Getting to Know Your Machine Chapter 2 Mixed Original Detection p 3 66 4002O072AA Image Repeat p 3 58 Image Stamping p 3 64 Orig Copy 4002O073AA Orig Copy 4002O029AA Mixed...

Page 22: ...apable of automatically turning over 2 sided originals for scanning data on both sides 4002O098AA Finisher 9710 Option Automatically sorts groups sort staples or punches copies 4002O099AA Finisher 971...

Page 23: ...Equipped with a Duplex Unit that automatically turns over paper to make 2 sided copies and a storage drawer that serves as a handy storage for paper machine supplies or other things 4002O103AA Large C...

Page 24: ...ed Appears p 6 14 Control Panel Use to start a copy cycle or to make copy job settings See Control Panel Keys and Indicators p 2 14 Power Switch Use to turn the machine ON and OFF Intelligent Multi By...

Page 25: ...t alignment Original Length Scale Press your original up against this scale for correct alignment Original Glass The image of the original is scanned through this glass Place your original face down o...

Page 26: ...2 10 3 Machine Parts and Accessories Getting to Know Your Machine Chapter 2 Options 4002O112AB 4002O117AC 4002O115AA 4002O113AC 4002O114AB 1 2 3 4 5 6 7 8 9 10 11 12 13 14 15 16 17 18...

Page 27: ...paper 5 6 7 Large Capacity Cassette 9717 with Legal kit Lock Release Lever Use to unlock the cassette from the machine for clearing a misfed sheet of paper or performing other service job Paper Plate...

Page 28: ...2 12 3 Machine Parts and Accessories Getting to Know Your Machine Chapter 2 Options 4002O119AB 4002O117AC 4002O116AA 19 20 21 22 23 24 25 26 27 29 28 30 31 32 33...

Page 29: ...s plain paper or thick paper Grip Hold to slide the Finisher away from the machine to clear a misfeed or perform other service job 23 24 25 26 27 Mailbin Finisher 9709 Mailbins Receive outputs fed out...

Page 30: ...for the Scanner for details Copy Key Press to select the Copy mode Access Key Press to enter the access number p 2 20 This key becomes valid only when Copy Track of the Administrator mode available f...

Page 31: ...Utility Key Press to show the Utility Mode menu See Using the Utility Mode p 5 1 Job Recall Key Press to show the Job Recall screen on which you can check or recall a copy job program previously stor...

Page 32: ...Screen is Organized 4003P137CA Message Display Basic Function key Set Function Sub message Display 1 Supplementary Function Keys 2 3 4 5 Example Basic Screen 4003P004CA 1 Supplementary Function Keys T...

Page 33: ...ntly selected for use Touching a basic function key shows the corresponding basic function screen What is shown inside the key is the current setting ex Zoom 4003P139CA 4 Set Function Shows graphic re...

Page 34: ...e of 23 C Initial Mode When the Power Switch is turned ON the Basic screen appears on the Touch Panel The settings on this screen are called the initial mode serving as the reference for all panel set...

Page 35: ...e time for the machine to enter the Auto Shut OFF mode can be selected from 15 min to 90 min The Auto Shut OFF function can even be disabled For details see User s Choice p 5 16 Only when the Printer...

Page 36: ...eck for or change the current settings When you touch Exit after having checked the currently set functions the Basic screen reappears To change a certain function touch the corresponding key and then...

Page 37: ...3 1 Making Copies Chapter 3 Chapter 3 Making Copies...

Page 38: ...ions you make on the Touch Panel will change the exposure level zoom ratio the type of copy and so on 1 Press the copy key 4002O281CA 2 Placing the Original Load the originals face up in the Electroni...

Page 39: ...sing OHP Interleaving 8 Touch Auxiliary p 3 46 1 2 3 4 5 6 7 8 9 0 C 9 Setting the number of copies From the 10 Key Pad set the desired number of copies to be made The maximum number that can be set i...

Page 40: ...iginal weighing 16 to 24 lb Mixed Original Detection mode weighing 16 to 24 lb Original size 1 Sided Original 2 Sided Original Mode 11 17 L to 5 1 2 8 1 2 L Mixed Original Detection mode 11 17 L to Le...

Page 41: ...e Plate is in touch with the edges of the original stack If it s not pressed snugly against the original stack skewed feeding could result You can make copies automatically from originals of assorted...

Page 42: ...irection of the original on the Touch Panel p 3 38 Using plain paper or originals not suitable for the Electronic Document Handler Raise the Original Cover Place the original face down on the Original...

Page 43: ...opies with pages in incorrect order Do not look directly at the Original Glass surface as a strong beam of light is emitted NOTES Be sure to raise the Original Cover 15 or more before placing the orig...

Page 44: ...ight 9 1 4 to 41 3 4 lb Size 11 17L to 5 1 2 8 1 2 The following features will be canceled when using the SADF Mode Auto Paper Auto Zoom Staple Hole Punch Folding 2 sided Original Book 2 in 1 4 in 1 B...

Page 45: ...elect the paper size When the Electronic Document Handler is used the machine determines the paper size when the first original is taken up and fed in and uses that paper size for the subsequent origi...

Page 46: ...Inserts This setting precludes both Auto Paper mode and Automatic Drawer Switching Make this setting for the paper for inserts e g colored paper preventing that paper from being used for other purpos...

Page 47: ...ypass Tray Plain paper recycled paper Up to 50 sheets Plain paper once copied paper Up to 20 sheets Exclusive paper Thick paper OHP transparencies translucent paper Up to 20 sheets Place the original...

Page 48: ...her 9710 is mounted however Card Vellum can be combined with Hole Punch If a document containing two or more pages is copied using the Electronic Document Handler with OHP or Card Vellum selected you...

Page 49: ...to 7 3 16 is entered for X and a width in the range of 4 to 15 7 16 is entered for Y using Custom Size Touch or to set the whole number for X and touch X The underline moves to the fractional part Se...

Page 50: ...ul Tips This mode is very helpful for neat filing when you need to make copies from originals of assorted sizes Priority settings for the initial mode can be made using User s Choice p 5 13 The machin...

Page 51: ...mage from an original which has an image area covering its entire surface Touching or changes the zoom ratio in 0 001 increments You can hold down the key to change the ratio quickly Hold down or unti...

Page 52: ...made through the Original Glass and 0 250 to 2 000 when the Electronic Document Handler is used Touch Enter Using the X Y Zoom Touch Custom Zoom Touch X Y Zoom Touch X or Y to enter the desired zoom...

Page 53: ...l select the desired one Useful Tip It s a good idea for you to store frequently used zoom ratios in memory p 3 18 Touch Enter Using the X Y Zoom Touch Custom Zoom Touch X Y Zoom From among the three...

Page 54: ...tronic Document Handler is used Touch memory location key 1 or 2 or Minimal whichever is desired When the key is touched the ratio is shown on the key indicating that it has been stored in memory exce...

Page 55: ...set zoom ratio When the key is touched the ratio is shown on the key indicating that it has been stored in memory NOTES When a new ratio is stored the old one is erased When the Hard Disk Drive Kit i...

Page 56: ...sorted grouped stapled or punched Touch Non Sort NOTE Thick paper and OHP transparencies cannot be used for making copies in Staple Punch and or Folding Orig Copy 4002O056AA Sort This function is eff...

Page 57: ...ich has been sorted can later be stapled together p 3 26 Only when the Finisher 9708 is mounted Touch Staple Orig Copy 4002O285EA Hole Punch Only when the Finisher 9708 Finisher 9710 Mailbin Finisher...

Page 58: ...ul Tips If Crisscross is set to ON in User s Choice sorted copy sets will be stacked in a crisscross manner one set stacked lengthwise on top of another set stacked crosswise Otherwise if Crisscross i...

Page 59: ...United States and Canada Users Only when the Finisher 9708 is mounted The number of punch holes can be changed between 2 Hole and 3 Hole by using the Knob located inside the Finisher When changing th...

Page 60: ...key of your choice You have a choice of the following two stapling types When you touch a stapling key in the Non Sort mode the finisher is automatically set into the Sort mode 1 4003P332EA 2 4003P333...

Page 61: ...sher 9711 Mailbin Finisher is mounted Touch the desired finishing function key Touch Corner Staple NOTES When Corner Staple is touched with Non Sort selected the Finisher is automatically set into the...

Page 62: ...nd press the paper stack against the end bracket Up to 50 sheets of plain paper can be stapled Slide the Paper Guide Plate to the size of the paper NOTE Make sure that the Paper Guide Plates are in to...

Page 63: ...his feature is useful for stapling originals after making copies Open Staple Tray Cover FN10 and remove the stapled paper stack Close Staple Tray Cover FN10 Paper size 11 17L to Letter Number of sheet...

Page 64: ...ter L Width 8 1 4 to 11 3 4 Length 11 to 17 Make sure to select the correct stapling function when making copies with the Crease function if you want to make a stapled copy set Number of sheets 2 to 1...

Page 65: ...mber of sheets 2 to 10 NOTES Half Fold cannot be used if you make a copy from an original placed directly on the Original Glass Even if Staple is previously set to a corner or center position the sett...

Page 66: ...ctly on the Original Glass Even if control panel settings are made to make 2 sided copies from 1 sided originals the copies to be Z Folded will be 1 sided If control panel settings are made to make 2...

Page 67: ...3 31 5 Selecting the Finishing Making Copies Chapter 3 To set Hole Punch touch Hole Punch Touch Enter 5 4003P348EA 6...

Page 68: ...tion labels on the machine or the Electronic Document Handler Staple Panel Original Placement Corner Staple 2 Point Staple 4002O136AC Stapling Position 1155O430AA 4002O137AC Stapling Position 1155O431...

Page 69: ...ed using Hole Punch Using the Electronic Document Handler Placing the Original on the Glass Hole Punch Panel Original Placement 1155O568EA 4002O291EB Punched Hole Position 1155O570EA 4002O292EB Punche...

Page 70: ...0 sheets 2500 sheets no staple LetterL 100 sheets 2000 sheets no staple 11 17L LegalL 100 sheets 1500 sheets no staple 5 1 2 8 1 2 100 sheets Crisscross Sort Letter 100 sheets 1000 sheets no staple St...

Page 71: ...heets 1000 sheets no staple Staple Sort Group Corner 11 17L to Letter 100 sets or 1000 sheets Side LetterC 200 sets or 2000 Sheets 11 17L LegalL LetterL 200 sets or 1000 Sheets Center 11 17L to Letter...

Page 72: ...andler is mounted This setting allows you to make 2 sided copies from originals 4002P223AA Orig Copy Orig Copy 4002P224AA Single Sided Single 2in1 Select Single Sided Single 2in1 to make a 1 sided cop...

Page 73: ...1 Only when the Electronic Document Handler is mounted Select Double Sided Double 4in1 to make a 2 sided copy through reduction from four originals side by side 4002P231AA Orig Copy Orig Copy 4002P232...

Page 74: ...let Single 4in1 Double 4in1 Touch 4in1 Booklet Select the desired copy type and touch Enter Original Direction key Use this key when you want to place your original in a direction other than the stand...

Page 75: ...th in 1 16 increments within the range 0 to 3 4 Touch Enter Useful Tips If the margin position is set to Left and width to 0 the image on both the front and back sides of the copy has the same orienta...

Page 76: ...s or center touch Book Erase Useful Tip You have a choice of the following three types of erase Using a Book as original 1 2 4003P056CA 3 4003P057CA 4 4003P058CA 5 4003P059CA Frame Center Erase Erase...

Page 77: ...thin the range 1 4 to 3 4 The center erase width has been set to 1 2 Touch Enter Touch Single Sided or Double Sided under Copy NOTE When Book is used to make copies from none of 2in1 4in1 and Booklet...

Page 78: ...m ratio You can however choose another zoom ratio by changing the User s Choice setting p 5 14 User s Choice also allows you to program a specific page order for 4in1 p 5 15 If an original is placed d...

Page 79: ...nitial setting for the original copy type is 1 Sided 1 Sided If this setting is changed to 1 Sided 2 Sided or 2 Side d2 Sided the Basic screen shows a 1 Sided 1 Sided key Useful Tip User s Choice can...

Page 80: ...emphasizes outlines to produce clear cut text as it appears on the copy Auto Exposure When in the Auto Exposure mode the machine automatically adjusts the exposure level for the optimum copy image den...

Page 81: ...he copy Useful Tips To make the image darker touch Darker To make the image lighter touch Lighter The machine can make a faithful reproduction of an original having a halftone image such as photos Tou...

Page 82: ...e first and last page of an original set on different paper from the normal paper such as color paper There are six different Cover functions available Select the appropriate one according to your nee...

Page 83: ...nt cover Select the key for the back cover Load the paper for the cover e g color paper into the drawer Useful Tip You can use the Multi Bypass Tray as the paper source of the cover paper The tray how...

Page 84: ...3 48 8 Auxiliary Functions Making Copies Chapter 3 Select the paper source in which paper for cover has been loaded in step 5 Touch Enter Touch Enter 7 4003P377EA 8 9 4003P378EA...

Page 85: ...The machine inserts a blank sheet of paper for inserts e g color paper at any specified place between pages In the Page Insertion mode you must specify where to place an insert Use Automatic Detection...

Page 86: ...arker use standard size paper that is a size or loaded in a direction different from the originals Load the original set containing insert markers into the Electronic Document Handler Touch Page Inser...

Page 87: ...7 andY 5 1 2 to 11 3 4 Touch the paper size key for Insert Paper Select the paper source in which paper for inserts has been loaded in step 5 Touch Enter Touch Enter Press the Start key to let the mac...

Page 88: ...Select the appropriate one according to your need Copied Interleaves Non Copied Interleaves Load the originals Touch OHP Interleaving Functions 4002O044AB The machine copies onto OHP transparencies an...

Page 89: ...heets of OHP transparencies can be placed on the tray Select a transparency size Touch Enter Select whether to copy onto the interleaves With Image or not Blank Touch the key for Insert Paper Select t...

Page 90: ...ifferent ways available for making a file margin Use the one that is most suited to your need Shift for Margin Functions 1161O002BA The image of the original is shifted to the right to make a margin a...

Page 91: ...margin width Useful Tip You can change the margin width in 1 16 increments within the range 0 to 3 4 Touch Enter Useful Tips If the margin position is set to Left and width to 0 the image on both the...

Page 92: ...n erasing the communications record on a document received by fax One of three different erase functions can be selected Use the one that is most suited to your need Left Edge Erase Top Edge Erase Fra...

Page 93: ...can change the erase width in 1 16 increments within the range 1 4 to 3 4 Touch Enter NOTE The erase width represents that on the original not on the copy So use care when making a reduction or enlar...

Page 94: ...an be produced based on the paper size and zoom ratio Load the originals Select the desired paper size and zoom ratio Paper Size p 3 9 Zoom Ratio p 3 14 Touch Image Repeat Touch Auto Detect NOTE If yo...

Page 95: ...nal and touch Enter When the original is a nonstandard size Touch Size Input then touch Custom Size in step 4 Touch or to set the whole number for X and touch X The underline moves to the right to the...

Page 96: ...ch copy set Distribution Date Page Distribution Functions 1155O546AB Places the date of copying on each copy The image area on which the date is printed may be erased Orig Copy 1155O547BA Places a pag...

Page 97: ...not No Useful Tips Blocking out the background The background image is erased and the date is printed on the erased area Not blocking out The date is printed over the image Touch Enter Useful Tip User...

Page 98: ...99 Select whether to block out the background Yes or not No Useful Tips Blocking out the background The background image is erased and the page number is printed on the erased area Not blocking out Th...

Page 99: ...number from the 10 Key Pad Useful Tip The starting number can range from 1 to 999 Select the page on which to print the distribution number either First Page Only or All Pages Touch Enter Useful Tip T...

Page 100: ...not possible to check the preprogrammed image if a job has been reserved Useful Tips A preprogrammed image can be stored in memory using Utility Image Memory Input p 5 6 A preprogrammed image can also...

Page 101: ...desired image Select the image stamping position Touch Enter Touch Enter NOTES If two or more images are used each has to be different from the other and should be placed in a unique position No two i...

Page 102: ...Mixed Orig Detection Auto Paper and Staple are combined together to make copies ex For originals consisting of 11 17L Letter C and Letter L copies can be made if Letter L is aligned with Letter C When...

Page 103: ...to make a copy do that in ascending order of page Load the next set of originals and press the Start key Repeat step 3 according to the number of pages of the document Useful Tip The number of origina...

Page 104: ...mode The preceding image data and copy settings are cleared to disable Memory Recall when any of the following operations is performed The machine is turned OFF The machine scans a new original or th...

Page 105: ...f operation from original loading to the end of the copy cycle NOTE Reserve is disabled if the machine is equipped with the optional Plug In Counter Touch Reserve on the Touch Panel Load the originals...

Page 106: ...b Touch Mode Check and then touch the job no key whose settings are to be checked Check the specific details of the settings made and then touch Exit Change allows you to change the settings made for...

Page 107: ...to be deleted Touch Yes Touch Exit To delete a job being scanned or printed Press the Stop key while the job in queue is being scanned or printed Touch Delete Printing Job or Delete Scanning Job Usefu...

Page 108: ...print queue Touch Next Touch Unlock Enter a 4 digit password from the 10 Key Pad NOTE All jobs are unlocked if the previously programmed password matches the password entered The status of that partic...

Page 109: ...4 1 Typical Function Combinations Chapter 4 Chapter 4 Typical Function Combinations...

Page 110: ...ther Corner Staple 2 Point Staple or Hole Punch for the finishing function p 3 20 6 Shows the margin position to be set for your original p 3 39 7 Shows the file margin function to be set as an auxili...

Page 111: ...n Select Position 1 Sided Single Sided Corner Staple Single Sided Corner Staple Single Sided Hole Punch 2 Point Staple Single Sided Hole Punch 2 Point Staple Single Sided Corner Staple Single Sided Co...

Page 112: ...n1 Corner Staple Single 2in1 Corner Staple Single 2in1 Hole Punch 2 Point Staple Single 2in1 Hole Punch 2 Point Staple Single 2in1 Corner Staple Single 2in1 Corner Staple Single 2in1 Hole Punch 2 Poin...

Page 113: ...ner Staple Single 4in1 Hole Punch 2 Point Staple Single 4in1 Hole Punch 2 Point Staple Single 4in1 Corner Staple Single 4in1 Corner Staple Single 4in1 Hole Punch 2 Point Staple Single 4in1 Hole Punch...

Page 114: ...Position 2 Sided Double Sided Corner Staple Double Sided Corner Staple Double Sided Hole Punch 2 Point Staple Double Sided Hole Punch 2 Point Staple Double Sided Corner Staple Double Sided Corner Sta...

Page 115: ...Double 2in1 Corner Staple Double 2in1 Hole Punch 2 Point Staple Double 2in1 Hole Punch 2 Point Staple Double 2in1 Corner Staple Double 2in1 Corner Staple Double 2in1 Hole Punch 2 Point Staple Double...

Page 116: ...aple Double 4in1 Hole Punch 2 Point Staple Double 4in1 Corner Staple Double 4in1 Corner Staple Double 4in1 Hole Punch 2 Point Staple Double 4in1 Hole Punch 2 Point Staple 1 2 3 4 5 9 6 10 7 11 8 12 Tu...

Page 117: ...inishing Functions Margin File Margin Select Position 1 Sided Single Sided Corner Staple Single Sided Corner Staple Single Sided Hole Punch 2 Point Staple Single Sided Hole Punch 2 Point Staple Single...

Page 118: ...n 1 Sided Single 2in1 Corner Staple Single 2in1 Corner Staple Single 2in1 Hole Punch 2 Point Staple Single 2in1 Hole Punch 2 Point Staple Single 2in1 Corner Staple Single 2in1 Corner Staple Single 2in...

Page 119: ...ple Single 4in1 Corner Staple Single 4in1 Hole Punch 2 Point Staple Single 4in1 Hole Punch 2 Point Staple Single 4in1 Corner Staple Single 4in1 Corner Staple Single 4in1 Hole Punch 2 Point Staple Sing...

Page 120: ...Functions Margin File Margin Select Position 2 Sided Double Sided Corner Staple Double Sided Corner Staple Double Sided Hole Punch 2 Point Staple Double Sided Hole Punch 2 Point Staple Double Sided C...

Page 121: ...2in1 Corner Staple Double 2in1 Corner Staple Double 2in1 Hole Punch 2 Point Staple Double 2in1 Hole Punch 2 Point Staple Double 2in1 Corner Staple Double 2in1 Corner Staple Double 2in1 Hole Punch 2 P...

Page 122: ...le Punch 2 Point Staple Double 4in1 Hole Punch 2 Point Staple Double 4in1 Corner Staple Double 4in1 Corner Staple Double 4in1 Hole Punch 2 Point Staple Double 4in1 Hole Punch 2 Point Staple 1 2 3 4 5...

Page 123: ...nishing Functions Margin File Margin Select Position 1 Sided Single Sided Corner Staple Single Sided Corner Staple Single Sided Hole Punch 2 Point Staple Single Sided Hole Punch 2 Point Staple Single...

Page 124: ...1 Sided Single 2in1 Corner Staple Single 2in1 Corner Staple Single 2in1 Hole Punch 2 Point Staple Single 2in1 Hole Punch 2 Point Staple Single 2in1 Corner Staple Single 2in1 Corner Staple Single 2in1...

Page 125: ...le Single 4in1 Corner Staple Single 4in1 Hole Punch 2 Point Staple Single 4in1 Hole Punch 2 Point Staple Single 4in1 Corner Staple Single 4in1 Corner Staple Single 4in1 Hole Punch 2 Point Staple Singl...

Page 126: ...Functions Margin File Margin Select Position 2 Sided Double Sided Corner Staple Double Sided Corner Staple Double Sided Hole Punch 2 Point Staple Double Sided Hole Punch 2 Point Staple Double Sided C...

Page 127: ...2in1 Corner Staple Double 2in1 Corner Staple Double 2in1 Hole Punch 2 Point Staple Double 2in1 Hole Punch 2 Point Staple Double 2in1 Corner Staple Double 2in1 Corner Staple Double 2in1 Hole Punch 2 Po...

Page 128: ...e Punch 2 Point Staple Double 4in1 Hole Punch 2 Point Staple Double 4in1 Corner Staple Double 4in1 Corner Staple Double 4in1 Hole Punch 2 Point Staple Double 4in1 Hole Punch 2 Point Staple 1 2 3 4 5 9...

Page 129: ...as shown below sel ectas part of your steps to specify the Direction of Original P 3 38 When making copies on 11 17L or LegalL 2 point staple or hole punch cannot be made in any of the following posi...

Page 130: ...is mounted NOTE Specify the direction of the original if the original is to be placed in any direction other than those shown above p 3 38 4002O352AA 4002O353AA 4002O270AA Paper sizes LetterC Paper s...

Page 131: ...ion other than those shown above p 3 38 4002O358AA 4002O353AA 4002O270AA Paper sizes LetterC Paper sizes LetterL Original sizes LetterC 4002O359AA 4002O355AA 4002O271AA Paper sizes LetterC Paper sizes...

Page 132: ...irection of the original if the original is to be placed in any direction other than those shown above p 3 38 4002O358AA 4002O270AA Paper sizes LetterC Original sizes LetterC 4002O355AA 4002O271AA Pap...

Page 133: ...direction of the original if the original is to be placed in any direction other than those shown above p 3 38 4002O358AA 4002O270AA Paper sizes LetterC Original sizes LetterC 4002O359AA 4002O271AA Pa...

Page 134: ...4 26 6 Stapled Position Typical Function Combinations Chapter 4...

Page 135: ...5 1 Using the Utility Mode Chapter 5 Chapter 5 Using the Utility Mode...

Page 136: ...bs can be stored in memory for each account Set up the job you want to store in memory Press the Utility key Touch Job Image Scan Input Touch Job Memory Input Touch Input and then select any one of th...

Page 137: ...5 3 1 Job Memory Input and Job Recall Using the Utility Mode Chapter 5 The job settings appear on the Touch Panel After you have checked the settings touch Exit Touch Enter 7 4003P146CA 8 9 4003P147CB...

Page 138: ...Image Scan Input Touch Job Memory Input Touch Delete then touch the job number key from which you want to delete a job program When appears in that key it indicates that the job program has been delet...

Page 139: ...Touch the job number key in which the desired job has been stored Check the settings made and then touch Exit The machine is now set up for these settings and the Basic screen reappears If the job rec...

Page 140: ...Copy Start setting has been made Press the Utility key Touch Job Image Scan Input Touch Image Memory Input Touch Input then touch the desired image number key in which you want to store the image NOT...

Page 141: ...en fixed Do the same for Y then touch Enter If you want to erase the image on the left top or along the frame of the original touch Erase You have a choice of the following three types of erase 4003P4...

Page 142: ...ip The erase width can range between 1 4 to 3 4 variable in 1 16 increments Touch Enter Touch Enter As illustrated on the Touch Panel place the original directly on the Original Glass Select an image...

Page 143: ...hecked Select the type of paper on which to print the programmed image Press the Start key and the programmed image is printed on the copy Useful Tip Programmed images may be checked by using the scre...

Page 144: ...ity Mode Chapter 5 Press the Utility key Touch Job Image Scan Input Touch Image Memory Input Touch Delete then touch the number key to be deleted Touch Enter Deleting a Programmed Image 1 4002O282CA 2...

Page 145: ...by the machine configured as a printer on paper of a size preset for Size Counter This counter counts the number of prints made on paper of the same size as that set for the Size Counter Toner Repleni...

Page 146: ...own when the Printer Controller is mounted 6 6 p 5 16 A listing of User s Choice functions is given in six pages of menu from 1 6 to 6 6 To show the listing of each page touch the desired page number...

Page 147: ...ically selected when power is turned ON or panel reset The initial setting is 1 Sided 1 Sided Select the language of theTouch Panel messages The initial setting is English Select whether to default to...

Page 148: ...the number becomes smaller and it will become higher as the number becomes greater Select the default combination of the finishing type when the machine is equipped with a Finisher from among the foll...

Page 149: ...itial setting is Select the format for date printing i e punctuation year and date format Punctuation can be either XX XX XX or XX XX XX The initial setting is XX XX XX Year can be either yy or yyyy T...

Page 150: ...also possible to disable Auto Shut Off Only when the Printer Controller is mounted Select the time it takes the machine to automatically enter the Sleep mode from 15 to 90 min in 1 min increments The...

Page 151: ...desired User s Choice function is listed For example to change Output Priority from Non Sort to Sort touch 2 6 Touch the key of the desired User s Choice function For example touch Output Priority To...

Page 152: ...number is entered NOTES The administrator number is to be programmed by your Tech Rep Ask him her for more details The administrator of this machine should remember the administrator number Selecting...

Page 153: ...otal Counter You can also clear the counter Size Count Displays the count of the Size Counter You can also clear the counter When 1000 Accounts is selected Total Count Displays the count of theTotal C...

Page 154: ...o show Copy Track on the Touch Panel follow the steps given in Selecting the Administrator Mode p 5 18 Touch Copy Track Touch ON or OFF of the desired configuration Copier or Printer then select the a...

Page 155: ...unts is set program the access code for each account Programming the Access Code p 5 22 Useful Tips You can have the copy track data printed on paper Touch Copy Track Data Place Letter L paper on the...

Page 156: ...hould be a 4 digit number To correct a number entry press the Clear key and then enter the new number If you want to program an access code for another account repeat steps 3 through 5 If a new access...

Page 157: ...5 18 Touch Copy Track Data Select the page number on which the target account is shown Touch the Copy Limit key of the target account Enter a number for the Copy Limit from the 10 Key Pad Then touch E...

Page 158: ...r Mode p 5 18 Touch Copy Track Data Select the page number on which the target account is shown Useful Tip To clear the counters of all accounts at once touch All Counter Reset Touch the counter key o...

Page 159: ...in the range between 1 to 99 To show Copy Track on the Touch Panel follow the steps given in Selecting the Administrator Mode p 5 18 Touch Max Copy Sets Enter the Copy Limit value from the 10 Key Pad...

Page 160: ...sable Auto Shut OFF is shown when the optional Printer Controller is not mounted and Disable Sleep is shown when the Printer Controller is mounted To show Copy Track on the Touch Panel follow the step...

Page 161: ...6 1 When a Message Appears Chapter 6 Chapter 6 When a Message Appears...

Page 162: ...wn NOTE The paper should be loaded no higher than the Max Level Indicator Slide the drawer back in 1st Drawer 2nd Drawer 4003P438EA When the drawer currently selected for use runs out of paper the mes...

Page 163: ...e paper should be loaded no higher than the Max Level Indicator Slide the drawer back in For United States and Canada Users Only Moving the Paper Stack If the paper stack on the right hand side runs o...

Page 164: ...de out the 3rd or 4th Drawer Load the paper stack into the drawer so that its front side faces down NOTE The paper should be loaded no higher than the Max Level Indicator Slide the drawer back in 3rd...

Page 165: ...ly up against the Guide Plate on the take up side of the cassette The paper should be loaded no higher than the Max Level Indicator Close the Cassette Door This causes the Paper Plate to rise automati...

Page 166: ...Shake the new Toner Bottle well and turn it over lengthwise five times 4003P185CA The message shown on the left appears when toner is soon running out It is recommended therefore that you replace the...

Page 167: ...ult in trouble Do not throw away but keep the used Toner Bottle which will be collected by your Tech Rep Be careful not to drop the Toner Bottle from a 40 or more height It may cause damage to the Ton...

Page 168: ...ressing down the Staple Cartridge Lever pull the Staple Cartridge out its port Pull the staple sheet about 1 1 4 inches out of the new Staple Cartridge and break off that portion Finisher 9708 The mes...

Page 169: ...and the machine automatically feeds a sheet of paper to test the stapling Remove the sheet of paper to check that it has been properly stapled If no staples are evident clear the staple misfed Cleari...

Page 170: ...her 9710 NOTE Two Staple Cartridges are mounted in Finisher 9710 Be sure to remove the specific Staple Cartridge that is indicated in the message on the Touch Panel Finisher 9711 Finisher 9710 Pinch t...

Page 171: ...back against the machine Touch Staple shown on the Touch Panel and the machine automatically feeds a sheet of paper to test the stapling Remove the sheet of paper to check that it has been properly st...

Page 172: ...Remove the empty staple clip from the Staple Cartridge Load a new staple clip into the Staple Cartridge and carefully peel off the Seal Insert the Staple Cartridge into the Staple Unit until it click...

Page 173: ...been properly stapled If no staples are evident clear the staple misfed Clearing the Staple Misfeed p 6 42 NOTES Reload the Staple Cartridge only after you are prompted to do so by the message Removi...

Page 174: ...g at that particular location A blinking dot indicates that there is a misfeed at that location A lit dot indicates that there might be a sheet of paper stopped at that location 4003P189CA If a paper...

Page 175: ...ronic Document Handler p 6 22 Finisher 9710 p 6 32 Mailbin Finisher p 6 34 4002P191AC 4002P192AB 4002P194AB 4002P196AC 4002P197AB Paper Feed Cabinet p 6 18 Intelligent Multi Bypass Tray p 6 21 Finishe...

Page 176: ...sheet of paper Opening Misfeed Clearing Guide M2 remove the sheet of paper Close Upper Left Door L1 and reinstall the Exit Tray Open Middle Left Door L2 Pull out the sheet of paper Then close Middle...

Page 177: ...er Right Door R1 Pull out the sheet of paper from the Paper Take up Section Then close the Upper Right Door R1 Slide out the drawer being used and take out the paper stack left in it Reload the paper...

Page 178: ...Then close Lower Right Door R2 Slide out the drawer being used and take out the paper stack left in it Reload the paper stack in the drawer and slide the drawer back into the machine To reset the pap...

Page 179: ...ht Door R2 Press the Paper Descent key and then slide the drawer out Take out the paper stack left in the drawer Reload the paper stack in the drawer and slide the drawer back into the machine To rese...

Page 180: ...sheet of paper from the Paper Take up Section Then close Lower Right Door R2 Slide out Duplex Unit Open Misfeed Clearing Guide D and remove the sheet of paper Close Misfeed Clearing Guide D and slide...

Page 181: ...Tray and open Upper Right Door R1 Pull out the sheet of paper from the Paper Take Up Section Then close Upper Right Door R1 Reload the paper stack back on the tray To reset the paper misfeed indicatio...

Page 182: ...dling Tray F3 until a click is heard and then gently pull out the original Open Misfeed Clearing Tray F4 and then gently pull out the original Pinching the lever on Document Handling Tray F3 bring the...

Page 183: ...e Appears Chapter 6 Opening F6 Lever gently pull out the original Lower the Electronic Document Handler Close Misfeed Clearing Guides F1 and F2 Reload the originals as instructed on the Touch Panel 9...

Page 184: ...er Close Misfeed Clearing Guide H2 Open the Front Door Holding the Lever open the Transport Unit and pull out the sheet of paper Raising Misfeed Clearing Guide FN3 pull out the sheet of paper Turn Kno...

Page 185: ...ide FN5 open FN5 Pull out the sheet of paper and close Misfeed Clearing Guide FN5 Opening Misfeed Clearing Guide FN1 pull out the sheet of paper Loosen two screws open the Misfeed Clearing Guide and p...

Page 186: ...ver of Misfeed Clearing Guide FN8 open FN8 Pull out the sheet of paper and close Misfeed Clearing Guide FN8 Turn Knobs FN7 and FN6 to feed the sheet of paper Pinching the lever of Misfeed Clearing Gui...

Page 187: ...Finisher back against the machine When the following dots are lit Open Top Offset Tray FN9 and pull out the sheet of paper Close Top Offset Tray FN9 Open Staple Tray Cover FN10 and pull out the sheet...

Page 188: ...of paper Close Misfeed Clearing Guide H2 Open the Front Door Holding the Lever open the Transport Unit and pull out the sheet of paper Raising Misfeed Clearing Guide FN3 pull out the sheet of paper T...

Page 189: ...N5 Pull out the sheet of paper and close Misfeed Clearing Guide FN5 Turn Knobs FN2 and PF1 together five turns to feed the sheet of paper Check to see if a sheet of paper is left in the Finisher If an...

Page 190: ...Knobs FN7 and FN6 to feed the sheet of paper Pinching the lever of Misfeed Clearing Guide FN5 open FN5 Pull out the sheet of paper and close Misfeed Clearing Guide FN5 Slide out Paper Folding Unit PF...

Page 191: ...Clearing Guide PF4 Opening Misfeed Clearing Guide PF5 pull out the sheet of paper Opening Misfeed Clearing Guide PF6 pull out the sheet of paper Slide Paper Folding Unit PF2 back into the machine Clos...

Page 192: ...ing Misfeed Clearing Guide FN8 pull out the sheet of paper Close Right Door FN7 When the Finisher 9711 is mounted Opening Misfeed Clearing Guide FN7 pull out the sheet of paper Open Front Door FN4 Tur...

Page 193: ...uide FN3 pull out the sheet of paper Close Misfeed Clearing Guide FN1 Opening Misfeed Clearing Guide FN6 pull out the sheet of paper Slide the Finisher back against the machine CAUTION Metallic parts...

Page 194: ...aper Open Misfeed Clearing Guide FN3 and pull out the sheet of paper Close Misfeed Clearing Guides FN3 and FN2 Open Top Offset Tray Cover FN1 Pull out the sheet of paper and close Top Offset Tray Cove...

Page 195: ...ears Chapter 6 Open Right Door FN4 Pull out the sheet of paper Opening Misfeed Clearing Guide FN5 pull out the sheet of paper Close Right Door FN4 Slide the Finisher back against the machine 8 4002O23...

Page 196: ...Lever open the Cassette Door and pull out the sheet of paper Close the Cassette Door Press the Lock Release Lever and slide the cassette away from the machine Pull out the sheet of paper Slide the ca...

Page 197: ...6 37 4 When the Message Misfeed detected Appears When a Message Appears Chapter 6...

Page 198: ...While pressing down the Staple Cartridge Lever pull the Staple Cartridge out its port Pull the staple sheet about 1 1 4 inches out of the Staple Cartridge and break off that portion Finisher 9708 400...

Page 199: ...off any portion of the sheet that hangs out of the cartridge Insert the Staple Cartridge until a click is heard Push the Staple Unit back in and close the Front Door Slide the Finisher back against th...

Page 200: ...er Pull the Staple Cartridge out to the front Finisher 9710 NOTE Two Staple Cartridges are mounted in Finisher 9710 Finisher 9711 Push up the guide of the Staple Cartridge and pull out one staple shee...

Page 201: ...Chapter 6 Finisher 9711 Only when the Finisher 9710 is mounted Close Right Door FN7 Slide the Finisher back against the machine NOTE If the Finisher does not staple after clearing the staple misfeed c...

Page 202: ...the Finisher Slide out the Staple Unit While pressing down the green lever pull out the Staple Cartridge Push up the guide of the Staple Cartridge and pull out one staple sheet Return the guide back t...

Page 203: ...o lock the cover NOTES A maximum of about ten stapling sequences may run idly without driving staples in paper immediately after clearing the staple misfeed During this time the Staple Unit advances t...

Page 204: ...l reset the minor malfunction IMPORTANT If this does not reset the minor malfunction call your Technical Representative and give him or her the malfunction code being shown on the Touch Panel 4003P201...

Page 205: ...has come when the machine needs service Call your Technical Representative Your account has reached its maximum copy allowance Please call your administrator The max number of copies that can be made...

Page 206: ...he machine needs more toner Replenish toner by using Toner Replenisher of Utility Mode p 5 11 The message Replenish Toner is shown on the Touch Panel Replace the Toner Bottle p 6 6 The paper is damp C...

Page 207: ...t the same paper size as the original p 3 9 Or use Auto Size to enlarge the copy to the appropriate size p 3 14 The original is not placed in the correct position when the zoom ratio is set at full si...

Page 208: ...light up green Is your Access Number or Account Number entered Enter your Access Number or Account Number by following the procedure given in Entering the Access Number p 2 20 No copies are fed out w...

Page 209: ...7 1 Chapter 7 Miscellaneous Chapter 7 Miscellaneous...

Page 210: ...7 Paper Feeding System 1st Drawer 2nd Drawer 550 sheets 20 lb Intelligent Multi Bypass Tray 50 sheets 20 lb 20 sheets recycled paper or exclusive paper Warm up Time 240 seconds or less First Copy Lett...

Page 211: ...inet 9716 Kinds of Paper Plain paper 16 lb to 24 lb recycled paper Paper Size Duplex Unit 11 17L to 5 1 2 8 1 2L Power Source Supplied from copier Dimensions Width 26 1 4 Depth 28 3 4 Height 15 1 4 We...

Page 212: ...8 1 2 Bottom Offset Tray 11 17L to Letter Capacity Top Offset Tray Plain paper 20 lb recycled paper Max paper size 11 17L to 5 1 2 8 1 2 250 sheets Exclusive paper Thick paper translucent paper OHP tr...

Page 213: ...r Paper Size Top Offset Tray 11 17L to 5 1 2 8 1 2 Bottom Offset Tray 11 17L to Letter Capacity Top Offset Tray Plain paper 20 lb recycled paper Max paper size 11 17L to 5 1 2 8 1 2 250 sheets Exclusi...

Page 214: ...taples cartridge 1 piece Paper Size Top Offset Tray Bottom Offset Tray Sheets Copy Set Corner Staple 2 Point Staple Non Sort Sort Group LetterC 100 sheets 2500 sheets no staple LetterL 100 sheets 2000...

Page 215: ...17L to Letter 100 sets or 1000 sheets 2 to 50 sheets Side LetterC 200 sets or 2000 sheets 2 to 50 sheets 11 17L LegalL LetterL 200 sets or 1000 sheets 2 to 50 sheets Center 11 17L to LetterL 100 sets...

Page 216: ...Tray 11 17L to Letter Mailbin 11 17L to 5 1 2 8 1 2L Capacity Top Offset Tray Plain paper 20 lb recycled paper Max paper size 5 1 2 8 1 2 250 sheets Max paper size 11 17L to Letter 500 sheets Exclusiv...

Page 217: ...ty Cassette 9717 Kinds of Paper Plain paper 16 lb to 24 lb recycled paper Paper Size Letter C A4C Capacity 3 400 sheets 20 lb Power Source Supplied from copier Power Consumption 30W or less Dimensions...

Page 218: ...clean with a soft dry cloth NOTE NEVER use a glass cleaner or any detergent to avoid damage to the control panel keys and Touch Panel Raise the Original Cover Wipe the surface of the Original Glass cl...

Page 219: ...ragile Swing down the Front Door Wipe the surface of the Front Door clean with a soft dry cloth Gently slide out the Upper Corona Unit Cleaning Lever as far as it goes Gently slide the Cleaning Lever...

Page 220: ...Vellum A R H Small Size H Zoom Auto Size A A A A A H Full Size B Change Fixed Zoom B Zoom Ratio in Memory B 10 Key Input B X Y Zoom B B Finishing Non Sort J J J Sort Group Corner Staple S T Side Stap...

Page 221: ...Card Vellum Small Size Zoom Auto Size F Full Size Change Fixed Zoom F Zoom Ratio in Memory F 10 Key Input F X Y Zoom B B F Finishing Non Sort J Sort I Group I J Corner Staple P N Side Staple P M Cente...

Page 222: ...unctions only when Separation and Double Sided Copy are set with a Book original being used L The functions cannot be combined only for Separation The function set first takes precedence M The combina...

Page 223: ...ize Paper Size Zoom Ratio A3 297 420mm 11 3 4 16 1 2 A4 0 707 11 17 279 4 431 8mm 11 14 0 823 A5 0 500 Legal 0 772 B4 0 866 Foolscap 0 764 B5 0 610 Letter 0 647 A4 210 297mm 8 1 4 11 3 4 A5 0 707 Invo...

Page 224: ...8 Copy Key 2 14 Copy Track 5 19 Copy Track Data 5 19 Cover 3 46 Crease 3 28 Criss Cross Mode 5 14 Crisscross Grouping 3 22 Crisscross Sorting 3 22 D Date Printing Format 5 15 Date Printing Position 5...

Page 225: ...s for Stapling 4 22 Print Exposure 5 16 Priority Device 5 16 Priority Offset Tray 5 16 Programming the Access Code 5 22 R Replacing the Staple Cartridge 6 8 Replacing the Toner Bottle 6 6 Reserve 3 69...

Page 226: ...Choice Functions 5 12 Using Date 3 61 Using Distribution 3 63 Using Page 3 62 Using Zoom Up Down Keys 3 15 Utility Key 2 15 Utility Mode 5 1 W What does each message mean 6 45 When this type of copy...

Page 227: ...without notice to incorporate improvements made to the products listed in this manual Imagistics International Inc 2002 Printed in USA Part Number DL4600060 www imagistics com Imagistics International...

Reviews: