


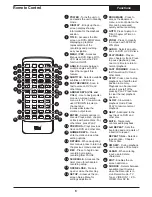


POWER
- Turns the unit on
and sends the unit to Standby
mode.
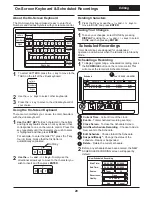
DISPLAY
- Brings up the on-
screen display showing
information for the playback
session.
TITLE
- Accesses the title
screen on DVD+R/RW discs,
displaying a graphical
representation of the
recordings and providing
easy navigation.
MENU / PBC
- Accesses
Menus on DVD Discs. With
VCD discs, turns the PBC
function On/Off.
ANGLE
- Selects between
multiple angles with DVD
Discs that support this
feature.
SUBTITLE
- Selects available
subtitles on DVD discs.
FAST REVERSE
- Scan in
fast reverse on DVD and
other discs.
ARROW KEYS (VOL and
CH+/-)
- Use to navigate disc
menus, on-screen setup
menu, etc. In TV tuner mode,
use UP/DOWN to select a
channel and
increase/decrease the
volume output level.
ENTER
- Selects options in
menus. Plays a disc, chapter
or track with some discs. For
other discs, press PLAY.
PREVIOUS
- Plays previous
track on DVD and other disc.
NUMBER KEYS
- Use to
enter numeric values while
setting options.
RETURN
- When navigating
disc menus, press to return to
the previous menu accessed.
REC
- Press to begin a live
recording or resume
recording from PAUSE.
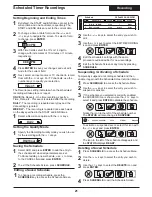
SCHEDULE
- Accesses the
timer menu for scheduled
recording setup.
OPEN/CLOSE
- Press to
open or close the disc tray.
SETUP
- Accesses the on-
screen Setup Menu for
settings adjustment.
7
8
12
10
11
14
16
3
4
5
1
2
6
9
13
15
17
18
Remote Control
Functions
BOOKMARK
- Press to
access the Bookmark
menu, a current point on the
disc can be accessed
quickly without searching.
GOTO
Press to jump to a
Title, Chapter or Time on
the disc.
ZOOM
- Press to magnify
the screen with DVD and
JPG discs.
AUDIO
- Selects an audio
track on DVD or VCD discs.
PLAY/PAUSE
- Plays a
disc, chapter or track. Press
to pause playback, press
one more time to return to
normal playback.
FAST FORWARD
- Scan in
fast forward on DVD and
other discs.
STOP
- Press once to stop
playback and hold the last
position in memory.
Playback can be resumed
where it was left off by
pressing PLAY. Press twice
to clear the last playback
position.
SLOW
- Slow motion
playback mode. Press
PLAY to resume normal
playback.
NEXT
- Advanced to the
next track on DVD and
other disc.
MUTE
- Temporarily
cancels audio playback.
A-B REPEAT
- Sets the
beginning and end points of
a section to repeat.
REPEAT 1/ALL
- Selects a
repeat option - Chapter,
Title or Disc.
CM SKIP
- During playback,
use to advance 30 seconds.
CLEAR
- When entering
input, use to delete
characters.
EDIT
- Enables the on-
screen edit menu.
SOURCE
- Selects between
available Input Sources
when the Recorder is in
Live Record mode - TV
Tuner, VIDEO IN 1 / 2, S-
VIDEO IN or DV IN.
19
21
20
22
24
27
25
28
26
29
30
31
23
6
4
2
POWER
0
C
9
6
5
4
3
ENTER
PBC
DISPLAY
8
7
GOTO
2
1
A-B
1/ALL
REPEAT
RETURN
REC
SCHEDULE
ZOOM
SLOW
CM SKIP
EDIT
CH
STOP
PLAY/PAUSE
MUTE
AUDIO
SUBTITLE
ANGLE
VOL
VOL
BOOKMARK
MENU
OPEN/CLOSE
SETUP
15
16
SOURCE
CH
1
TITLE
8
3
5
6
7
12
9
10
13
14
11
20
19
18
17
21
22
23
24
25
26
27
30
28
31
30
30
29