


TM
TM
TM
TM
TM
TM
TM
TM
1
1
ALL
ALL
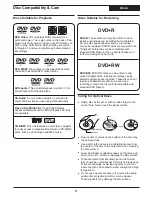
DVD Video:
This unit plays DVDs recorded for a
particular region. The region mark on the back of the
player must correspond to that on any DVD discs you
wish to play. Units sold in North America are coded
for Region 1, and are compatible with discs marked
accordingly.
DVD-R/RW:
These discs can be played back when
recorded in standard DVD Video format.
DVD-Audio:
This unit will playback only the 5.1CH
sound track on DVD-Audio discs.
Video CD (VCD/SVCD):
On VCD/SVCD discs,
advanced features such as PBC (Playback Control)
are available.
CD-R/RW:
This unit features an on-screen navigator
for easy access to playable files stored on CD-R/RW
discs, such as JPG images and MP3 music.
CD-Audio:
An on-screen navigator is provided to
select and play tracks when using CD-Audio discs.
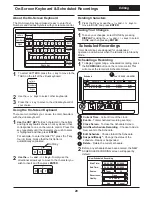
JPG
!
Finger prints or stains on the surface of the disc may
cause signal loss.
!
Use a soft cloth and wipe in a radiating manner from
the center of the disc to the outer rims when cleaning
the disc surface.
!
Never add labels or adhesive tapes on the discs and
be careful not to scratch or damage the disc surface.
!
To prevent discs from becoming bent or deformed,
they should be vertically kept in the disc storage case.
To prevent damage, avoid leaving discs in your car,
where they may be subject to direct sunlight and high
temperature.
!
Do not use any disc accessory to improve the audio
quality, disc protective solutions or lens cleaner.
These products may damage the disc surface.
!
Hold a disc by the rim or with an index finger in the
central hole. Never touch the signal surface.
Labels
Tapes
Labeling Side
Surface
Disc Compatibility & Care
Discs
Discs Suitable for Playback
Caring for Optical Discs
5
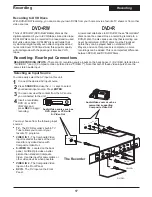
DVD+R:
These discs can only be written to once.
Existing recordings can be hidden but not deleted.
So, any disc space already used by a recording
cannot be regained. DVD+R discs are required to be
"Finalized" before they will be compatible with
standard DVD Players. Once a disc is finalized, no
further recordings can be made.
DVD+RW:
DVD+RW discs can be written to and
erased multiple times. Existing recordings can be
deleted and disc space regained. These discs do not
require a finalization procedure. As soon as a
recording is made, the disc will be compatible with
standard DVD Players.
Discs Suitable for Recording
DVD+RW
DVD+R