


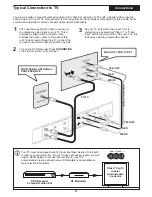


4
1
The file format.
2
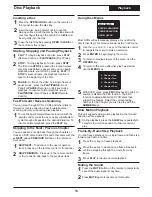
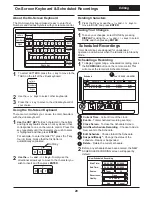
The display bar for the file list.
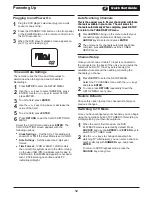
3
Displays up to 10 music files at one time. Use the
5
/
6
keys to navigate this list.
Use the
3
/
4
keys to navigate the Action Menu.
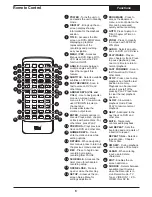
PLAY
- Begin playback of a file.
Mode
PLAY MODE
- Select from available
playback modes including Shuffle, Repeat,
Normal and more.
8
7
6
5
Displays current and Action Menu functions.
Displays the currently playing file selected play
mode.
Displays Total number of music tracks, Percentage
of files played and Current Playback Function icon.
Progress bar and total time of the file.
Action Menu Icons
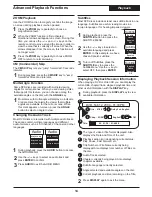
Viewing JPG / Play Mp3
On-screen Player
Press
ENTER
on any file to start the ACTION MENU.
THUMBNAIL PLAY
- Begin thumbnail
display playback mode.
TYPE
- Select the desired file type to be
listed on-screen. Choose from picture,
music or all.
Type
All
1
3
Mode
Type
All
MP3 / WMA disc
SONG_ONE.MP3
Total:
Play mode:
00:56 / 04:28
SONG_ONE.MP3
SONG_TWO.MP3
SONG_THREE.MP3
SONG_FOUR.MP3
SONG_FIVE.MP3
5 tracks
Normal
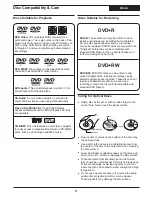
This unit can play an audio CD, JPG and Mp3 file on a disc. A handy on-screen player will appear automatically.
JPG Images & Slideshows
To display a JPG file, use the
5
/
6
keys to select a
file then press
ENTER
or
PLAY
to display a file.
1
The above screen displaying the files on the disc
will automatically begin. Please see above.
2
Inserting a JPG Disc
2
5
4
FOLDER MODE
- Switches the FILE
DISPLAY MODE to display the folders on a
disc. (This option appears only in SPLIT
MODE.
To begin a JPG SLIDE SHOW with the image you
have selected, use the
4
key and select the MODE
icon and press ENTER. From the available menu
options, select a playback mode. SLIDE SHOW
play mode options include, shuffle, play all, etc.
Press the MENU or STOP key to exit the
slideshow and return to the on-screen player.
4
3
MP3 file playback
Inserting a MP3 Disc
Use the
5
/
6
keys to select tracks you wish to
playback, then press
PLAY
to begin playback. Use
the
3
/
4
keys to navigate the Action menu items to
select other playback features as listed above.
1
The disc will automatically begin playback of tracks
beginning with the first one.
2
This unit supports CD-R/RW discs recorded with JPG
and Mp3 files.
!
JPG files must be named with the extension “.JPG”
!
MP3 files must be named with the extension “.Mp3”
!
JPG images must be saved with “standard”
encoding, rather than “progressive” encoding.
!
Discs created with personal computers may have
problems playing due to differences in recording
techniques. Compatibility with all recordable
formats is not guaranteed.
Notes
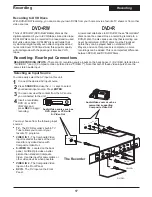
16
During playback of JPG files, you can use the
5
/
6
and
3
/
4
keys to rotate either clockwise or
counterclockwise.
5
Play
6
7
8