

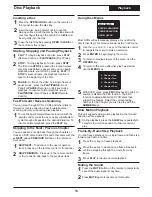
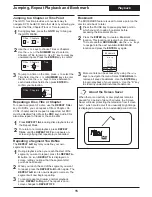


When you insert a DVD+RW or DVD+R disc, the Title
Screen will appear. The Title Screen displays thumbnail
and information for each Title (recording) on the disc. In
the Title Screen, you can perform the following functions
with your Recordings:
!
Play Titles or Chapters.
!
Delete a Title of your recordings.
!
Rename Titles and Disc Label.
!
Erase a DVD+RW disc.
Playing and Editing Your Recordings
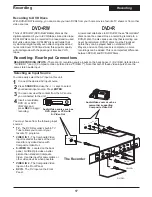
Recording
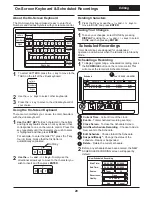
The Title Screen
19
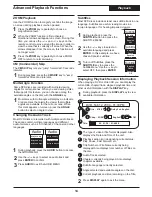
4
To return to the Title Screen, press
MENU
.
10
1
DVD disc [My Party]
4 titles
34 minutes left
1
2
00:10:24
/ 00:20:33
2
3
4
9
9
3
4
6
7
8
5
9
Re
name
T01-Thu 03/11
T01-Fri 03/12
T01-Fri 03/12
T01-Sat 03/13
1
If the Title Screen is not displayed on screen, press
MENU
to bring it back.
2
Use the
5
/
6
keys to select the title you wish to play
and press
PLAY
.
Playing a Title
Thumbnail Images
- Displays an image of the title.
Disc Information
- Shows the Disc Label name,
total number of titles on the disc and recording time
remaining.
Progress Bar
- Shows the current playback point
and total length of the current title.
Title Preview
- The current title is played in this
window.
Play Title
- Begins playback of selected title.
Chapter Viewer
- See Chapter Previews and Play
Chapters.
Rename Title
- Rename the Title with the On-
Screen Keyboard.
Delete Title
- Delete the current title.
Erase Disc
- Erase a DVD+RW disc.
Rename Disc Label
- Rename the Disc Label.
4
1
2
3
6
5
8
7
9
3
The Action Menu also can be used to playback a
title. Use the
3
/
4
keys to select the
PLAY
icon and
then press
ENTER
.
Re
name
10
1
2
Enter the Title Menu. Use the
5
/
6
keys to select
the title you wish to erase.
1
2
Enter the Title Menu. Use the
5
/
6
keys to select
the title that contains the chapter you wish to play.
4
Use the
5
/
6
keys to select the chapter you wish to
play and press
PLAY.
3
Use the
3
/
4
keys to select the CHAPTER VIEWER
icon and then press
ENTER
.
5
Or use the
3
/
4
keys to select the
PLAY
icon and
then press
ENTER
.
To return to the Title Screen, press
MENU
.
Playing a Chapter
Delete a Title
Use the
3
/
4
keys to select the DELETE TITLE icon
and then press
ENTER
.
1
2
Enter the Title Menu. Use the
5
/
6
keys to select
the Title you wish to rename.
Use the
3
/
4
keys to select the RENAME TITLE
icon and then press
ENTER
. Use the on-screen
keyboard to rename the title.
Renaming a Title
Re
name
Re
name
Re
name
Re
name
1
Erase a Disc
Enter the Title Menu. Use the
3
/
4
keys to select
the ERASE DISC icon and then press
ENTER
.
1
Rename Disc Label
Enter the Title Menu. Use the
3
/
4
keys to select
the RENAME DISC LABEL icon and then press
ENTER
. Use the on-screen keyboard to rename the
title.
Re
name
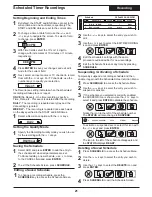
Title: 01 Total Time: 20m
Mode: SP Source: CVBS