


1
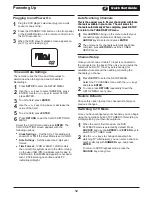
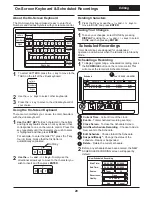
By default, the START and END times are set to the
current time and one hour later, respectively. The
START and END dates are set to the current date.
2
To change a time or date field, use the
5
/
6
and
3
/
4
keys to navigate the screen. To select a field
to change, press
ENTER
.
3
With Time fields, select the 10's or 1's digit to
change, with increments of 10 minutes or 1 minute,
respectively.
4
Press
ENTER
to save your changes and exit edit
mode for the current field.
5
Next, select an input source or TV channel to record
from with the
3
/
4
keys. For TV channels, use the
number keys to specify your selection.
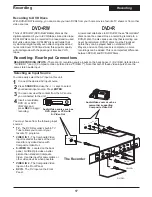
Scheduled Timer Recordings
Recording
Setting Beginning and Ending Times
21
08
:00 PM
08:0 PM
5
Video 1
Specify the Recording Quality mode you wish to use
for the recording with the
3
/
4
keys.
Setting the Quality Mode
The Recurrence setting indicates when the scheduled
recording will take place or repeat.
ONCE
(No Repeat) - One time recording, specify a
Time, Date, etc. This event is deleted after the recording
DAILY
- The recording is repeated every day and the
date setting is ignored.
WEEKLY
- The recording is repeated once each week
on the day specified in the START and END times.
Daily
1
Select a Recurrence option with the
3
/
4
keys.
HQ(1hour)
1
Select ADD and press
ENTER
to add the entry to
the schedule list when all parameters are set.
To Cancel adding a new schedule, use
4
to move
to the CANCEL field and press
ENTER
.
To exit the Schedule Screen, press
SCHEDULE
.
Saving the Schedule
1
2
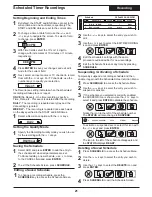
1
To change a recording schedule, press the
SCHEDULE
key to access the Schedule Screen.
Editing a Saved Schedule
Schedule
No.
Starting time
Length
Source
Status
28 Feb 2006 - 08:00PM
1 03/05/05 - 08:30AM 01:30 1 Ready
2 Wed - 10:30AM 01:00 Svideo Ready
2
Use the
5
/
6
keys to select the entry you wish to
edit.
3
Use the
3
/
4
keys to select the EDIT RECORDING
icon and press
ENTER
.
4
Edit the schedule's settings with the same
procedure outlined earlier for new recordings.
5
Exit the Schedule Screen at any time by pressing
SCHEDULE
.
1
Press
SCHEDULE
to access the Schedule Menu.
2
Use the
5
/
6
keys to select the entry you wish to
suspend or activate.
3
If the schedule you selected is currently enabled,
the SUSPEND icon is shown. Use the
3
/
4
keys to
select it and press
ENTER
to disable the schedule.
Temporarily suspend a recording schedule and then
enable it again with the Schedule Screen's Action Menu.
Suspending / Activating a Schedule
Notice the icon to the left of the schedule number.
The
STATUS
will also change to
SUSPEND
.
To activate a suspended event, select this icon with
the
3
/
4
keys and press
ENTER.
The icon to the left of the schedule disappears and
the
STATUS
displays
READY
.
2 03.06.05 - 08:30PM 01:30 VIDEO 1 Suspend
1
Press
SCHEDULE
to access the Schedule Menu.
2
Use the
5
/
6
keys to select the entry you wish to
delete.
Deleting a Saved Schedule
3
Use the
3
/
4
keys to select the
DELETE
icon and
press
ENTER
.
4
Press
SCHEDULE
to exit the Schedule Screen.