


1
Use the
5
/
6
and
3
/
4
keys to select a time or
date field to change.
2
To edit a field, press
ENTER
.
3
Use the
5
/
6
keys to increase or decrease the
value of the field.
4
To exit a field, press
ENTER
.
5
Press
SETUP
to exit the CLOCK SETTINGS
MENU.
1
Use the
5
/
6
to select the Hour Mode field.
2
To edit a field, press
ENTER
.
3
Use the
3
/
4
keys to select an option.
4
Press
SETUP
to exit the CLOCK SETTINGS
MENU.
Select either 12HR (normal civilian time) or 24HR
(military time) time mode.
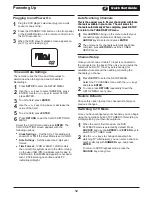
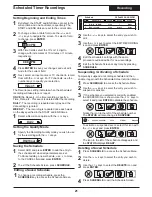
Setup Menu
Time and Date Settings
Time Format
24
Quality
SP(2 Hours)
Recording
Auto CH mark
Recording Volume
100
5 min
Press RETURN to exit
1
2
Use the
3
/
4
keys to select the QUALITY setting
you wish to use.
Default setting:
HQ (High Quality)
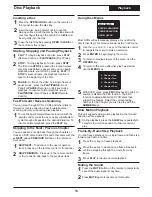
The Quality setting determines the quality of your
recordings as well as the maximum amount of video you
can record on a disc. Not surprisingly, the higher the
quality, the less video can be recorded.
Press
SETUP
to exit the RECORDING MENU.
Recording Quality Mode
HQ
(High Quality)
Highest
1 HR
SP
(Standard Play)
Excellent
2 HRs
LP
(Long Play)
Very Good
3 HRs
EP
(Extended Play)
Better than VHS
4 HRs
EP+
(Extended Play+)
Equal to VHS
7 HRs
SLP
(Super-Long Play) Lower than VHS
8 Hrs
Mode
Quality
Max Time
1
2
Use the
3
/
4
keys to select an option.
Default setting:
5 min
Control whether or not Chapter Markers are
automatically inserted during your recordings. You can
select the interval from
5
,
10
or
15
minutes, or turn this
feature
OFF
.
Press
SETUP
to exit the RECORDING MENU.
1
2
Use the
3
/
4
keys to decrease/increase the audio
volume.
Default setting:
100
Use this setting to adjust the volume of the audio for
your recordings. The default setting of 100 sends 100%
of the signal from your input to the recording. You can
decrease this value if you wish, all the way to
0
which
will result in no sound on the recording.
Press
SETUP
to exit the RECORDING MENU.
Chapter Mark
Recording Audio Volume
General - Recording
Displays various versions of the unit.
This action will restore
the factory defaults.
Are you sure you want
to continue ?
Press RETURN to exit
Restore
!
Yes
No
General - Version
General - Restore
Selecting Yes will restore factory defaults to your unit.
A/V Output - Video
NTSC
TV Shape
Press RETURN to exit
Video
Standard Output
4:3 Pan Scan
Interlace
Scan Mode
Output
S-Video