iLO DVDR05 Operation Manual Download Page 6

Legal Notices Regarding

Macrovision’s Property Rights

“U.S. Patent Nos. 4,631,603; 4,577,216; 4,819,098; 
4,907,093; and 6,516,132.”

“ This product incorporates copyright protection 
technology that is protected by U.S. Patents and 
other intellectual property rights. Use of this 
copyright protection technology must be authorized 
by Macrovision, and is intended for home and other 
limited viewing uses only unless otherwise 
authorized by Macrovision. Reverse engineering or 
disassembly is prohibited.”

Consumers should note that not all high definition 
television sets are fully compatible with this product 
and may cause artifacts to be displayed in the 
picture.  In case of 525 progressive scan picture 
problems, it is recommended that the user switch 
the connection to the 'Standard Definition' output.  If 
there are questions regarding our TV set 
compatibility with this model 525p DVD player, 
please contact our customer service center.

!

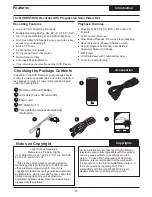
Live and Timer Recording Functions.

!

Multiple Recording Modes, HQ, SP, LP, EP, EP+, SLP.

!

Up to 8 Hours Recording on one DVD+R/RW Disc.

!

On-Screen Disc Title Navigator gives you quick, easy 
access to your Recordings.

!

Built-In TV Tuner.

!

Front and Rear A/V Inputs.

!

DV Input and Camcorder control.

!

Delete/Rename Titles.

!

Auto-Insert Chapter Markers.

!

Your recordings are playable on most DVD Players.

!

Plays DVD, SVCD/VCD, MPG, JPG, Audio CD 
Formats.

!

Fast Forward / Reverse.

!

Slow Motion Playback, Frame-by-Frame Stepping.

!

Repeat Playback (Chapter/Title/Disc & A-B).

!

Restrict playback by Ratings, User Defined 
Password, Password Change.

!

MP3 Player. 

!

JPG Slideshows with Thumbnail preview.

!

Zoom to x4 with Panning.

Features

Introduction

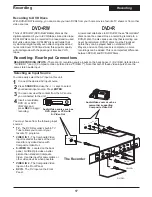
The DVDR05 DVD Recorder with Progressive Scan Video Out

Recording Features

Playback Features

3

Checking the Package Contents

In addition to the DVD Recorder, your package should 
contain the following accessories. Check the contents of 
the package carefully, as some items may be located 
under the packing foam.

3

4

5

1

2

Remote control with battery

A/V cable (Video, Stereo Audio)

Power cord

RF Cable for TV

This operation manual and warranty 
information

Accessories

1

4

5

3

2

Notes on Copyright

Copyrights

Operation Guide

Operation Guide

TM

TM

JPG

JPG

Progressive Scan Video Playback

DVD Recorder & Player

W


t

i h

DVDR 05 

technologies

TM

TM

Summary of Contents for DVDR05

Page 1: ...Operation Guide Operation Guide Progressive Scan Video Playback DVD Recorder Player t Wi h DVDR05 technologies TM TM JPG JPG JPG...

Page 2: ......

Page 3: ...an act of God such as flood are not covered This warranty does not permit recovery of consequential or incidental damages Some states do not allow the exclusion or limitation of incidental or consequ...

Page 4: ......

Page 5: ...tus during lightning storms or when unused for long periods of time Refer all servicing to qualified service personnel Servicing is required when the apparatus has been damaged in any way such as when...

Page 6: ...on one DVD R RW Disc On Screen Disc Title Navigator gives you quick easy access to your Recordings Built In TV Tuner Front and Rear A V Inputs DV Input and Camcorder control Delete Rename Titles Auto...

Page 7: ...4 Changing the Audio Track 14 Subtitles 14 Displaying Playback Session Information 14 Jumping to a Chapter or Time Point 15 Repeat Playback 15 Repeat Playback user defined segment 15 Bookmark 15 Scree...

Page 8: ...careful not to scratch or damage the disc surface To prevent discs from becoming bent or deformed they should be vertically kept in the disc storage case To prevent damage avoid leaving discs in your...

Page 9: ...BOOKMARK Press to access the Bookmark menu a current point on the disc can be accessed quickly without searching GOTO Press to jump to a Title Chapter or Time on the disc ZOOM Press to magnify the scr...

Page 10: ...Plastic Tab Pull 6 Remote Control Battery Holder Handle Release Clip Battery Replace the battery check for the correct polarity of the battery in the battery holder Slide the battery holder back into...

Page 11: ...IN of the power cord into the unit before connecting 1 or VIDEO IN 1 for recording the other end to the wall socket COAXIAL DIGITAL AUDIO OUTPUT Use a ANTENNA IN OUT For Antenna or Cable TV special Co...

Page 12: ...s STANDBY ON on the remote control or front panel 2 Your TV must be equipped with AV inputs like those pictured to the right in order to connect this unit If your TV does not have AV inputs you will n...

Page 13: ...commended that you use this type of connection for better picture quality First obtain a special S Video cable Connect the S Video output from the unit to the corresponding input on your TV 1 On your...

Page 14: ...lby or DTS decoding capability These outputs require special cables not included Audio Output Connections 11 The Recorder Stereo audio amplifier or receiver AUDIO CABLE NOT INCLUDED 1 You can connect...

Page 15: ...setup the recorder s built in TV Tuner by auto scanning for available channels and then adding or deleting the channels you choose 2 You can press RETURN repeatedly to exit the SETUP MENU at any time...

Page 16: ...ack Control to enable or disable the PBC function The PBC function enables a MENU on SVCD discs that support this feature Select the corresponding number for the Chapter you wish to play with the NUMB...

Page 17: ...ple audio tracks These can contain multiple languages and different audio formats such as 5 1Channel 2 Channel and other languages 3 Press AUDIO to exit the AUDIO MENU Changing the Audio Track During...

Page 18: ...y is cancelled Repeating a Disc Title or Chapter During playback when you reach the start of the segment you want to repeat press the REPEAT A B button An icon REPEAT A is displayed on screen letting...

Page 19: ...he above screen displaying the files on the disc will automatically begin Please see above 2 Inserting a JPG Disc 2 5 4 FOLDER MODE Switches the FILE DISPLAY MODE to display the folders on a disc This...

Page 20: ...l 1 S VIDEO referred to as S VIDEO 1 and 1 Composite Video referred to as VIDEO 1 Note that both of these video inputs share the same stereo audio input Audio Video source such as DVD player or VCR wi...

Page 21: ...me so you ll have to press the STOP key to manually end the recording Alternatively you can specify the length of the recording in 30 minute intervals by pressing the REC key repeatedly Specifying the...

Page 22: ...Title with the On Screen Keyboard Delete Title Delete the current title Erase Disc Erase a DVD RW disc Rename Disc Label Rename the Disc Label 4 1 2 3 6 5 8 7 9 3 The Action Menu also can be used to...

Page 23: ...Return Exit Clear all Back Done Done Letters Numbers Signs Space bar Caps CM Skip 0 1 To select LETTERS press the 3 key to move to the TABS on the left of the virtual keyboard 2 Use the 5 6 keys to se...

Page 24: ...4 to move to the CANCEL field and press ENTER To exit the Schedule Screen press SCHEDULE Saving the Schedule 1 2 1 To change a recording schedule press the SCHEDULE key to access the Schedule Screen...

Page 25: ...titles Default DVD Audio Default DVD Subtitle Off Version Restore Recording Language Rating Clock Default setting ENGLISH Sets the language used by the SETUP MENU and ON SCREEN DISPLAY ENGLISH Default...

Page 26: ...After you have defined a user password you would enter that value in this field If you forget the value of your user password later you can always use the factory password to change the value 2 Move...

Page 27: ...LP Long Play Very Good 3 HRs EP Extended Play Better than VHS 4 HRs EP Extended Play Equal to VHS 7 HRs SLP Super Long Play Lower than VHS 8 Hrs Mode Quality Max Time 1 2 Use the 3 4 keys to select an...

Page 28: ...o exit the VIDEO MENU Default setting S Video Your DVD Player will work with televisions supporting various video inputs including composite S Video component and Progressive Scan Output 2 If you plan...

Page 29: ...he AUTO SCAN 1 Channel 34 Channel 35 Channel 36 Channel 37 Channel 38 Channel 34 Channel 35 Channel 36 Channel 37 Channel 38 Channel 34 Channel 35 Channel 36 Channel 37 Channel 38 Press SETUP to exit...

Page 30: ...e set wrong for your Television type Enter the SETUP MENU and select the A V OUTPUT 4 VIDEO menu Try changing the TV SHAPE setting to 4 3 PanScan Pan Scan if you are using a standard TV or 16 9 Wide i...

Page 31: ...Signal to Noise Ratio 90dB Audio Dynamic Range 90dB Harmonic Distortion 0 001 W PEAK Audio Performance Component Video Y 1 0Vp p 75 Ohm Negative Sync Pb Pr 7Vp p 75 Ohm Mini DIN 4 Pin 75 Ohm S Video...

Reviews: