background image

6 Search, Playback & Backup

The Search function gives you the ability to search for and play previously recorded videos as well as 
snapshots that are stored on your NVR’s hard drive. You have the choice of playing video that matches 
your recording schedule, manual recordings or motion events only. The Backup function gives you the 
ability to save important events (both video and snapshots) to a USB flash drive.

6.1 Using Search Function

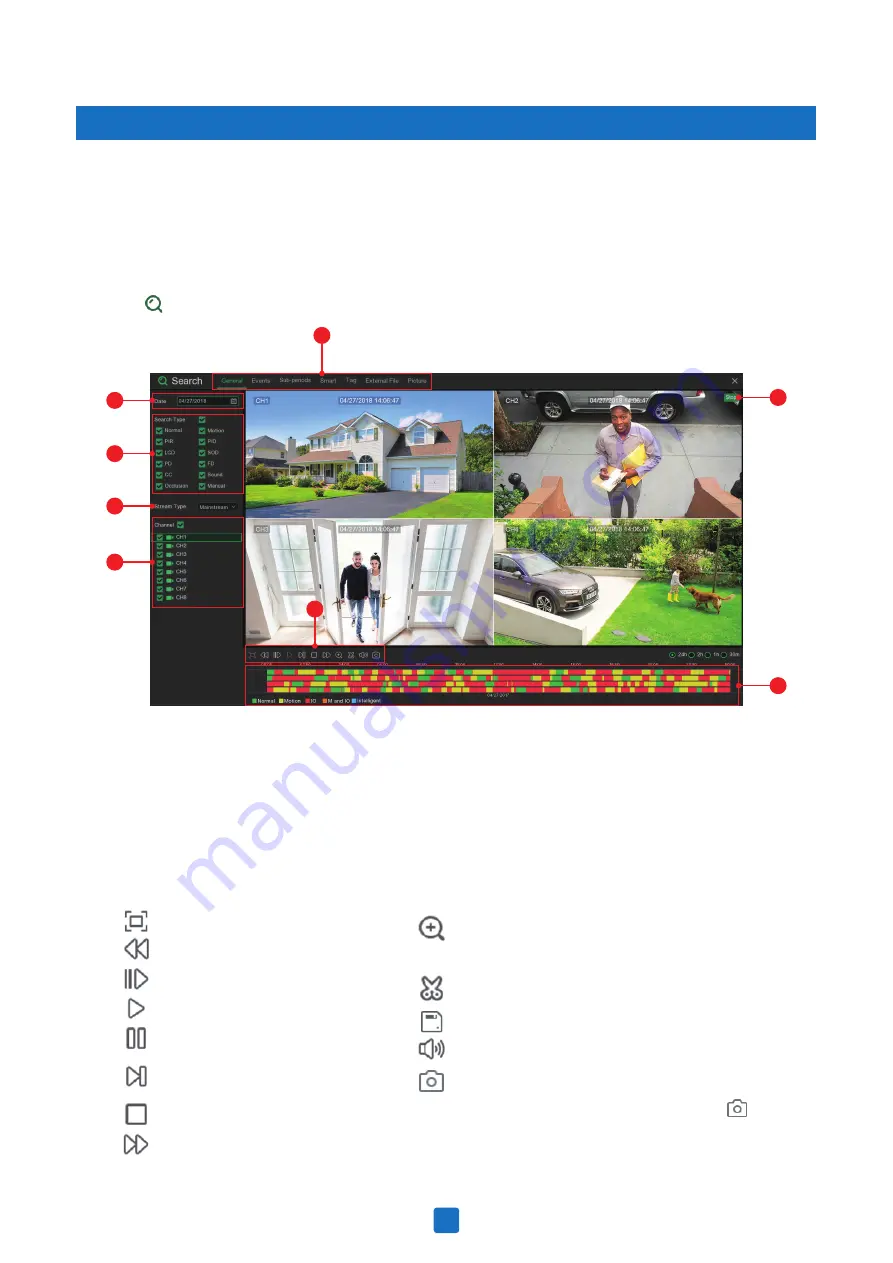
Click       

Search

 button in the Start Menu to enter search section.

1. 

Search Options:

 the system provides various search & playback methods: General, Events, 

Sub-periods, Smart, Tag, External File & Picture.

2. 

Search Date:

 search by a date to play back.

3. 

Search Type:

 the system provides different search types to narrow your search.

4. 

Stream Type:

 To choose the stream type you want to search & play.

5. 

Channel Selection:

 to choose the channels you want to search & play.

6. 

Video Playback Controls:

 to control the video playback.

Enlarge the video playback to full screen

Rewind, x2, x4, x8 and x16

Slow Play, 1/2, 1/4 and 1/8, 1/16 speed

Play

Pause

Play frame by frame. Click once to play a 
frame of the video

Stop

Fast Forward, x2, x4, x8 and x16

Digital Zoom: Click to zoom in then click-and-drag on a camera 
image during playback to zoom in on the selected area. Right-click to 
return to regular playback.

Video Clip. Quickly save a section of video to a USB flash drive. View 
more on6.1.1.1 Video Clip Backup

Save Video Clip.

Volume Control: scroll the slider bar to increase or decrease volume. 

Snapshots: to capture a snapshot image to your USB flash drive. If 
the video playback is in split-screen view, move the mouse cursor to 
the channel you want to capture, and then click the icon        to save 
the snapshot.

2

3

5

4

8

7

6

1

46

Summary of Contents for A75020547

Page 1: ...For the latest up to date manual please visit www iget eu DETECTION SMART MOTION HEAT TRIGGER ACCURATE ALERTS Professional HD Security Kit Instruction Manual ...

Page 2: ...on 4 1 3 Date Time 4 1 4 IP Camera 4 1 5 Disk 4 1 6 Resolution 4 1 7 Mobile 4 1 8 Summary 4 2 Live View Screen Overview 4 2 1 Camera Quick Toolbar 4 2 2 Task bar 4 2 3 Start Menu 4 2 3 1 Unlock and Lock Screen 4 2 3 2 Shutdown 5 NVR System Setup 5 1 Channel 5 1 1 Channel 5 1 1 1 IP Channels 5 1 1 3 Protocol Manage 5 1 2 Live 5 1 3 Image Control 5 1 4 Video Cover 5 1 5 Motion 5 1 6 PIR 5 1 7 Intell...

Page 3: ...1 Disk 5 5 1 1 S M A R T 5 6 System 5 6 1 General 5 6 1 1 Date and Time 5 6 1 2 NTP Settings 5 6 1 3 DST Settings 5 6 2 Output Configuration 5 6 2 1 LIVE OUT 5 6 3 Multi user 5 6 3 1 Changing Password 5 6 3 2 Add New Users 5 6 3 3 Setting User Permissions 5 6 4 Maintenance 5 6 4 1 Log 5 6 4 2 Load Default 5 6 4 3 Upgrade 5 6 4 4 Parameter Management 5 6 4 4 Auto Reboot 5 6 5 IP Camera Maintain 5 6...

Page 4: ...ack 6 1 4 1 Smart Search Area 6 1 5 Picture Search View 6 1 5 1 Picture Preview Control 7 Remote Access via Web Client 7 1 Basic System Environment Requirements 7 2 Web Plugin Download and Installation 7 3 Web Client Manager 7 3 1 Live Interface 7 3 2 Playback 7 3 2 1 Playback Control Buttons 7 3 3 Remote Setting 7 3 4 Local Setting 8 Viewing Backed Up Video on PC Mac 9 Remote Access via Mobiel De...

Page 5: ...horized dealer or service center 7 Do not try to remove the upper cover Warning Do not remove the cap of NVR so as to avoid electric shock 8 Handle with care If NVR does not work normally because of hitting on the hard object please contact the authorized dealer for repair or replacement 9 Use standard lithium battery Note Use the batteries attached or specified by the manufacturer After cutting o...

Page 6: ...AUTION RISK OF ELECTRIC SHOCK DO NOT OPEN CAUTION TO REDUCE THE RISK OF ELECTRICAL SHOCK DO NOT OPEN COVERS NO USER SERVICEABLE PARTS INSIDE REFER SERVICING TO QUALIFIED SERVICE PERSONNEL WARNING TO PREVENT FIRE OR SHOCK HAZARD DO NOT EXPOSE UNITS NOT SPECIFICALLY DESIGNED FOR OUTDOOR USE TO RAIN OR MOISTURE AUDIO OUT 1 2 3 4 5 7 8 6 Functions LAN network interface support PoE can supply power to ...

Page 7: ...eter value of control bar Down arrow key Volume decrease Press to rewind during video playback Press to fast forward during video playback Press to play recorded video or enter the recording search menu Press to start manual recording Press to stop manual recording or stop the video playback Press to pause the video playback or enter frame playback mode Functions Flashes when the HDD is in use Fla...

Page 8: ...e rear board and then remove top cover of NVR Connect data and power ports of hard drive to motherboard Holding the hard drive and the NVR gently turn it over and line up the holes on the hard drive with the holes on the NVR Using a screwdriver screw the provided screws into the holes Two groups of screw mounting holes are provided in the base frame of the NVR respectively for installation of 3 5 ...

Page 9: ...DMI or VGA cable from your monitor to the HDMI or VGA Port on the rear panel Use the included power adapter to connect the recorder to a nearby outlet Turn the recorder on using the power switch on the back panel Connect one end of the Ethernet cable into your router s LAN port and the other end of the cable to the Ethernet port on the rear panel Note Each Homeguard camera is supplied with a mount...

Page 10: ...ar on the Live Viewing screen View Task bar on 4 2 2 Task bar In menus click to go back close menus 3 Scroll Wheel In menus scroll to move up down through the menu content While hovering over the volume control wheel scroll to turn system volume up down You will see the virtual keyboard automatically on the screen when you need to enter data 3 1 Using the Supplied Mouse 3 2 Using the Virtual Keybo...

Page 11: ...ses Default ID is 000000 View more about Device ID on 5 6 1 General New Admin name To set your own administrator name New Admin Password To set your own password The password must be a combination of 8 characters Confirm Password Enter your own password again Click Apply to confirm your settings and goes to the login interface Enter your user name password to Login the NVR system Note If you forge...

Page 12: ... of four groups of numbers between 0 to 255 separated by periods For example 192 168 001 100 Subnet Mask Subnet mask is a network parameter which defines a range of IP addresses that can be used in a network If IP address is like a street where you live then subnet mask is like a neighborhood The subnet address also consists of four groups of numbers separated by periods For example 255 255 000 00...

Page 13: ...r Enable this option if your router supports the UPnP In this case you do not need to configure manually port forwarding on your router If your router does not support UPnP make sure the port forwarding is completed manually in your router 4 1 3 Date Time Date and Time Click on the calendar icon to set the current system date This menu allows you to configure the Date Time Date Format Time Format ...

Page 14: ...eks or in days Start Time End Time Set the start time and end time for daylight saving 4 1 4 IP Camera This menu allows you to add IP cameras to the NVR Click Search to search IP cameras in the same network Choose the IP camera s you want to add and then click icon to add to the NVR Enter the camera s user name password to add the camera s You can also click button to add individual IP camera to a...

Page 15: ...he IP camera Alias Name of the IP camera Position Position to display the camera name on the screen Port Port of the IP camera Protocol Choose the protocol of the IP camera from the drop down menu User Name User Name of the IP camera Password Password of the IP camera Bind channel Choose a channel of the NVR you want to attach to 4 1 5 Disk 14 ...

Page 16: ...cord On ESATA If your NVR comes with an e SATA port on the rear panel you can enable to record the video to e SATA HDD 4 1 6 Resolution Choose an output resolution matches to your monitor The NVR supports to adjust the output resolution automatically to match the best resolution of your monitor when the system is starting up 4 1 7 Mobile If your NVR come with a P2P ID you can scan the QR code with...

Page 17: ...ates that the NVR is currently recording This icon appears when the camera has detected motion The icon indicates that the external I O alarm device is triggered This icon indicates that the HDD is in error to work This icon indicates the HDD is unformatted This icon indicates the HDD is full This icon indicates the HDD is read only VIDEO LOSS The analog camera is disconnected No Camera IP camera ...

Page 18: ...AST SATURATION of the image Click to switch the channel between main stream and sub stream Click it to add the name for the recording Click to open the Start Menu Click to choose different layout for live view Click to choose more layouts for live view Click to start viewing channels in a sequence Quick playback You can choose to play the latest recording for all channels from the beginning of the...

Page 19: ... locked you can click the Unlock icon to unlock the system for further operation Click the Shutdown button from Star Menu and the check the further action you want to move Click OK button system will require to input the Admin password to authenticate If you choose Logout the system the live viewing screen will be disappeared You will need to login the system for further operations To switch user ...

Page 20: ...lay manage IP cameras adjust IP camera s image PTZ setup motion setup convert mode and more 5 NVR System Setup 5 1 Channel 5 1 1 1 IP Channels If you enable the XVR mode for the NVR it supports to add IP cameras modify IP channels Click Search to search IP cameras from local network click Add to add individual IP camera click Add All to add all IP cameras 5 1 1 Channel 19 ...

Page 21: ...amera s The added IP camera would be not able to connect if its IP address is not in the same network segment with NVR With this function to reassign an IP address to all added IP cameras Channel Delete Choose one or more added IP cameras and click this button to delete With the Protocol Manage you can edit your own RTSP protocol for IP camera connection 5 1 1 2 Protocol Manage Custom Protocol The...

Page 22: ...Q Enhanced Quality level depends on your camera video cable Check the box If you want to hide the live image of this channel To show the camera name in live view screen To show the system time in live view screen Adjust the Hue value for the image color Adjust the Bright value for the image color Adjust the Contrast value for the image color Adjust the Saturation value for the image color Click De...

Page 23: ...rast of the video when shooting in the darkness with bright light sources Set the WDR level Automatic Gain Control Configure white balance Set the shutter mode Choose the exposure time of the camera Use in foggy environments to improve the video quality 5 1 4 Video Cover This menu allows you to create privacy zone s if you want to partially cover some certain part of the image You can create up to...

Page 24: ... area into transparent blocks After setting is completed click the right button of your mouse to return and click Save to make the area setup effective Switch Enable or disable motion detection Sensitivity Set the sensitivity level Level 1 the lowest sensitivity level while level 8 is the highest sensitivity level Click Alarm button to configure the motion detectionalarm function Channel Channel n...

Page 25: ...enable FTP please view 5 4 4 FTP 5 1 6 PIR This is an optional function If your camera has PIR function you can configure the PIR recording here Switch Enable or disable PIR recording Sensitivity Set the sensitivity level Level 1 the lowest sensitivity level while level 8 is the highest sensitivity level Setup Click icon into the setup page PIR Detection Area Click Select All to set the whole scre...

Page 26: ...set higher up to 5 minutes Show Message Check the box to displayPIR on the live view screen when the PIR alarm is detected Send Email You can let the NVR to send you an auto email when PIR detection is triggered Full Screen If this function is enabled and PIR is detected in a channel you will see that channel in full screen 5 2 Record This menu allows you to configure the recording parameters This...

Page 27: ... video and have a microphone connected to the NVR or using a camera with audio capability This menu allows you to configure the channel recording parameters 5 2 2 2 Record Schedule Record Switch Check to enable the recording in this channel Stream Mode Choose the recording quality If you choose Dualstream the system will record in both Mainstream Substream PreRecord If this option is enabled the N...

Page 28: ...slot is marked yellow this indicates the channel records only when a motion is detected during that time slot PIR When the time slot is marked purple this indicates the channel records only when the PIR is triggered during that time slot No Record A time slot marked black means that there is no recording scheduled for the time slot This menu allows to configure the image capture function 5 2 3 1 C...

Page 29: ...forms normal capture for that time slot Motion When the time slot is marked yellow this indicates the channel capture images only when a motion is detected during that time slot PIR When the time slot is marked purple this indicates the channel capture images only when the PIR is triggered during that time slot No Capture A time slot marked black means that it won t capture any images for the time...

Page 30: ...ent Type Select the event type from below options No Space on Disk When an HDD is full Disk Error If the HDD is not detected properly Video Loss If a camera is not connected properly Switch Check the box to enable the monitoring of the event Buzzer Set the buzzer duration when the event occurs Off 10s 20s 40s 60s To disable buzzer select OFF Latch Time This is an optional function Determine how lo...

Page 31: ...01 100 Subnet Mask Subnet mask is a network parameter which defines a range of IP addresses that can be used in a network If IP address is like a street where you live then subnet mask is like a neighborhood The subnet address also consists of four groups of numbers separated by periods For example 255 255 000 000 Gateway This address allows the NVR to access the Internet The format of the Gateway...

Page 32: ... if your router supports the UPnP You need to enable UPnP both on NVR and router In this case you do not need to configure manually port forwarding on your router If your router does not support UPnP make sure the port forwarding is completed manually 5 4 2 DDNS This menu allows you to configure DDNS settings The DDNS provides a static address to simplify remote connection to your NVR To use the D...

Page 33: ...eceive the event notifications from the NVR Interval Configure the length of the time interval between the notification emails from the NVR To make sure all settings are correct click Test Email The system sends an automated email message to your inbox If you received the test email it means the configuration parameters are correct 5 4 3 1 Email Configuration User Password Enter the user name and ...

Page 34: ...from NVR to your storage device over FTP FTP Enable Click to enable FTP function Server IP Enter your FTP server IP address or domain name Test FTP Click to test the FTP settings Port Enter the FTP port for file exchanges Name Password Enter your FTP server user name and password Directory Name Enter the default directory name for the FTP file exchanges The color codes on email schedule have the f...

Page 35: ...only displayed when your NVR is coming with an e SATA port on the rear panel It will allow to record the video to external e SATA HDD to enhance your HDD capacity If the e SATA recording function is enabled e SATA backup function will be disabled If your NVR supports to install multiple HDDs the edit icon appears in your system you can click it to edit the HDD as below Disk Type Read write read on...

Page 36: ...place a new HDD 5 6 1 General Device Name Enter the desired name for your NVR The name can include both letters and numbers Device ID Enter the desired ID for your NVR The device ID is used to identify the NVR and can only be composed of numbers For example 2pcs NVRs are installed in the same place the Device ID is 000000 for one of the NVRs and 111111 for another NVR When you want to operate the ...

Page 37: ... with a time server This gives it the ability to constantly have an accurate time setting your NVR will periodically sync automatically Check to enable the NTP and select a Server Address click Update Now to manually sync the date time Click Apply to save your settings When NTP function is enabled system will update the system time at 00 07 50 per day or every time when the system is starting up 5...

Page 38: ...particular day and time when Daylight Saving starts and ends For example 2 a m on the first Sunday of a particular month Date Select the start date click the calendar icon end date and time when Daylight Saving starts and ends Start Time End Time Set the start time and end time for Daylight Saving 5 6 2 Output Configuration This menu allows you to configure video output parameters Video Output To ...

Page 39: ...p button to adjust Scale To adjust the size of the displayed screen by scale X Offset To move the displayed screen to left or right Y Offset To move the displayed screen to up or down Click once or long press the left button of your mouse on the arrow to adjust the size and position or you can scroll the wheel of the mouse to adjust Click the right button of your mouse to exit and click Apply to s...

Page 40: ...word again to confirm and then click Save to save your new password You will be required to input your old password to authenticate Password Enable It s strongly recommended to enable the password to protect your privacy If you want to disable the password protection please ensure your NVR is placed in a secure place 5 6 3 2 Add New Users 1 Select one of the user accounts that is currently disable...

Page 41: ...u can enable or disable access to certain menus and functions of each user account 1 Click the edit icon under Permission tab 2 Check the boxes next to any system menus or capabilities you would like the user to access Click All to check all boxes Click Clear to check none of the boxes 3 Click Save to save your modifications 40 ...

Page 42: ...ntire system log for the selected time period 4 Click Search 5 Browse system log events from your search period Video events can be played back instantly by clicking in the Playback column Right click to return to your search results Use the buttons in the bottom right corner of the menu to move between pages of system log events 6 Click Backup to create a backup of the system log for your search ...

Page 43: ... file from USB flash drive to the NVR 5 6 4 5 Auto Reboot This menu allows the system to auto reboot the NVR regularly It is recommended to leave this function enabled as it maintains the operational integrity of your NVR Save Settings Click to save the NVR current system settings to the USB device You will be required to input the Admin password to authenticate Load Settings Once you have created...

Page 44: ...pdate file from your USB flash drive then click OK 3 Click IPC Upgrade button to start upgrading You will be required to input the Admin password to authenticate Please do NOT power off the NVR and IP camera or remove the USB during the upgrading 1 Choose the IP cameras you want to restore 2 Click Load Default to restore settings You will be required to input the Admin password to authenticate 5 6...

Page 45: ...you will find the P2P ID P2P QR code in the information page You can scan this QR cord with mobile app to remote view the NVR View recording information for each connected camera such as bitrate stream type recording resolution and frame rate FPS 5 6 6 1 Information View channel information for each connected camera such as alias mainstream and substream recording specifications motion detection s...

Page 46: ...5 6 6 4 Network State View network information Total Band Width It shows the NVR s total input band width for IP cameras Used Band Width It shows the used band width of IP cameras 45 ...

Page 47: ...pe To choose the stream type you want to search play 5 Channel Selection to choose the channels you want to search play 6 Video Playback Controls to control the video playback Enlarge the video playback to full screen Rewind x2 x4 x8 and x16 Slow Play 1 2 1 4 and 1 8 1 16 speed Play Pause Play frame by frame Click once to play a frame of the video Stop Fast Forward x2 x4 x8 and x16 Digital Zoom Cl...

Page 48: ...lue color Alarm Recording in Orange color Continuous Recording in Manual color This menu gives an option to search play recording for a selected date 1 Select a date to search for video recording from the calendar 2 Choose a search type 3 Check channels you would like to search or check Channel to search all connected channels 4 The search result will display on the timeline from 00 00 to 24 00 5 ...

Page 49: ...ick icon 4 Check the channel s you want to make a video clip backup 5 Move the mouse cursor to the timeline where you want to start the video clip 6 Press and hold the left button of your mouse and drag the drag the cursor to the timeline where you want to end the video clip 7 The icon has been changed to icon click to save the video clip 8 Select a file type for your backup files click Save butto...

Page 50: ...he channels you want to search or check Channel to choose all channels 5 Click icon to start search 6 Events fitting your search criteria are displayed in list form You can double click the left button of your mouse upon one of the events to play the video immediately 7 Click icons in the bottom right corner of the menu to browse between pages of events or input the page you want to browse 8 You c...

Page 51: ...will show the event information on the left bottom corner of the screen 10 Check the box next the number of the event to select files or check the box next Select to select all events in the page 11 The number of selected files total size information will be displayed at the right bottom of the screen 12 After selecting file you can click icon to save the video to USB flash drive Or click icon int...

Page 52: ...s on Video Playback Controls 6 Videos are being played in split screens 7 Click the left button of your mouse upon a particular split screen the time period of the video split screen will be displayed on the timeline The color bar on the top of the timeline indicates the time span of the video split screen you have clicked The color bar on the bottom of the timeline indicates the time span for the...

Page 53: ...back with buttons on Video Playback Controls 5 Videos are being played in the screen 6 The color bar on the top of the timeline indicates the time span of the motion recordings you have searched The color bar on the bottom of the timeline indicates the complete time span for the whole recordings you have specified 6 1 4 1 Smart Search Area The smart search function searches the motion recordings i...

Page 54: ... to the playback interface Segments matching your search criteria will be shown on the timeline in blue color 6 1 5 Picture Search View This function can be used to search play and copy snapshots to a USB flash drive 1 2 3 4 8 6 5 11 9 10 7 To search play back up pictures 1 Choose the date time you want to search 2 Check the picture capture types you want to search or check Search Type to choose a...

Page 55: ...nformation will be displayed at the right bottom of the screen 11 After selecting file you can click button to save the pictures to USB flash drive Or click button to go into picture preview control window 1 Picture List you can select the pictures here 2 Click button to save your selected pictures to a USB flash drive Click button to view the pictures in slideshow 3 Press button to exit preview c...

Page 56: ...gher 8G or more 1000G or more 4G or more 1920 1080 Windows 7 or above Mac OS X 10 9 or above DirectX 11 Acceleration Function 10 100 1000M Ethernet Adapter Microsoft Internet Explorer Ver 11 10 9 8 It doesn t support Edge V51 or below It doesn t support V52 or above version V44 or below It doesn t support V45 or above version 5 1 or above Item Minimum Recommended 7 2 Web Plug in Download and Insta...

Page 57: ...If you use Google Chrome please use Version V41 or below If you use V42 to V44 you need to enable NPAPI plugins Please enter chrome flags enable npapi on URL bar to find and enable NPAPI It doesn t support V45 or above so far For Mac Safari 1 Launch the Safari in your Mac and enter the NVR IP address or DDNS domain name Host Name you have set on NVR in the URL box 56 ...

Page 58: ...tep 1 to open the Web Client login page 7 3 Web Client Manager The web client supports to fully control the NVR with administrator account Please make sure to protect your user name password for preventing illegal login This is the first screen that opens after you have logged in to the Web Client Here you can open or close live preview record video to local computer manually take snapshots of the...

Page 59: ... is available for IP channels only 2 Live Video Stream Options Mainstream View all live videos using high quality mainstream video settings Substream View all live videos using middle quality substream video settings Mobile Stream View all live video using lower quality mobile stream video settings to conserve bandwidth Available for IP channels only 3 Main Menus Live View live video from cameras ...

Page 60: ...o full screen Manual Recording Click to start manually recording for all displayed channels Click again to stop recording Manual recordings are saved to your computer Snapshot Click to save snapshots of all current displayed channels to your computer Digital Zoom Click upon on a live image then click and drag over an area of the live image to enlarge Right click to return to the normal display Vol...

Page 61: ...rdings from Check Synchronous playback to play all channels at once 6 Click Search 7 Recordings that fit your search will be displayed in the timeline Click a section of video where you would like to begin playback and click the play button Play the recordings Pause Stop Go Forward One Frame Move frame by frame through playback Only available when the Synchronous playback option is not checked Cli...

Page 62: ... the playing video to fit the full area for each channel on screen To enlarge the web client to full screen 7 3 3 Remote Setting 7 3 4 Local Setting Here you can remotely configure the settings of the NVR Please see 5 NVR System Setup for more details on the NVR settings Set download locations for recordings and snapshots taken using Web Client and choose file type for video files Record Path Clic...

Page 63: ...6 dmg For PC users please install the software VideoPlayer_x x xx_xxxx_xx_xx exe for example VideoPlayer_1 0 15_2017_01_06 exe 1 Install the VideoPlayer software in the CD and run 2 Copy the backup files to your computer 3 Click Open File button or click button on the Play List to load single or multiple video files It supports to add play rf avi mp4 264 and 265 files Click button to load a folder...

Page 64: ... x4 x8 and x16 4 Volume control Multi screen play It allows to play multiple videos at a time When you choose multi screen you can drag the video in Play List to the play screen 5 Take snapshot To save a video clip to your computer Press once to start press again to end the video clip Keep the video player on top Enlarge the video play screen to full screen 6 Advanced Setup Menu allows to choose t...

Page 65: ... the live view screen 3 After start app tap to open the menu tap to open device list page 4 Tap to scan QR code then enter the password of NVR 6 Touch icon to open the Menu list where you can check configure the Remote Setting Local Config File List Device List Smart Detection Help About IP Address ID Input the P2P ID or IP address Domain name Media Port Input the media port in NVR network setting...

Page 66: ...is OK and panel keys are functional Why A Operate again by aiming the remote controller at the IR receiver on front panel If it still doesn t work please check if the batteries in the remote controller are dying If not check if the remote controller is broken 6 Q I want to take out HDD from my PC and install it in NVR Can it work A All HDDs supported by the system can be used But remember once NVR...

Page 67: ...tronic devices and prevent the HDD from being damaged by static electricity and induced voltage If the network cable is frequently plugged it is suggested to replace connecting line regularly or the input signal may be unstable 7 This is a class A product It maybe bring wireless interference in life Under this situation it need user to make measures 13 Q Why can t I stop recording by pressing STOP...

Page 68: ...https helpdesk intelek cz HGNVK5300 4M 210619 2019 HOMEGUARD Helpdesk Technical Support ...

Reviews: