background image

Part 3 - Operations

20

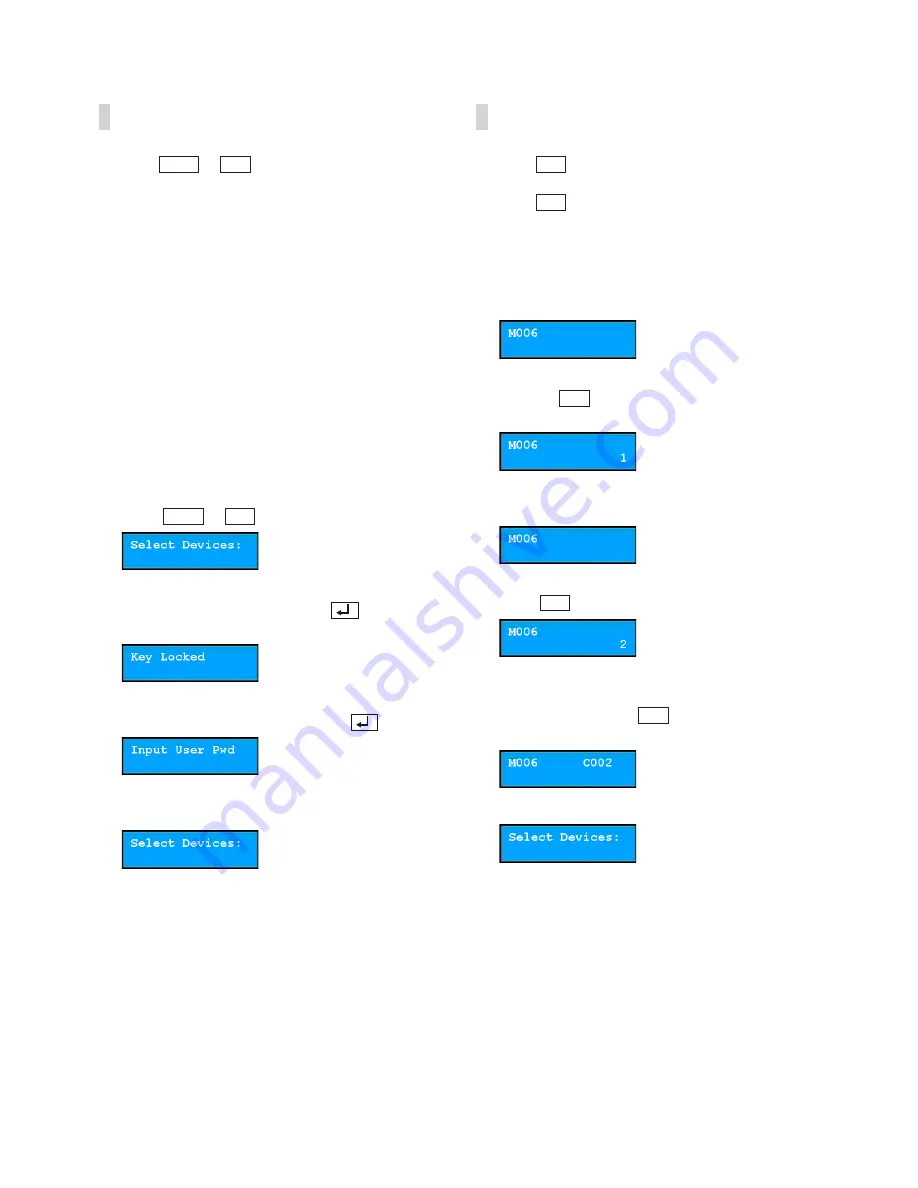
Locking Buttons

Pressing 

1

0

SHIFT

ESC

DEV

PANE

MON

F1

MON

DEV

ESC F3 F4

PANE

SHIFT


+


1

0

SHIFT

ESC

DEV

PANE

MON

F1

MON

DEV

ESC F3 F4

PANE

SHIFT

 locks all buttons on the 

network keyboard. You can make the buttons on 
the network keyboard locked after a preset time of 
inactivity. This can be done by using the LCD menu 
or the IDIS Discovery program. This function does not 
work if a User password has not been set or if the 
button lock time is set to 

Never

. For more information 

about the setup for User password and button lock 
function, see 

Part 4 - LCD Menu Configuration > 

Setup Menu > System 

or

 Part 5 - Remote Setup > 

System

.

When all buttons are locked, the network keyboard 
does not receive any commands and any given 
commands are cancelled. To unlock the buttons, the 
User password must be entered.

 Press 

1

0

SHIFT

ESC

DEV

PANE

MON

F1

MON

DEV

ESC F3 F4

PANE

SHIFT


+


1

0

SHIFT

ESC

DEV

PANE

MON

F1

MON

DEV

ESC F3 F4

PANE

SHIFT

.

The buttons are locked so press 

1

0

SHIFT

ESC

DEV

PANE

MON

F1

MON

DEV

ESC F3 F4

PANE

SHIFT


to unlock 

them.

 Enter the User password and press 

1

0

SHIFT

ESC

DEV

PANE

MON

F1

MON

DEV

ESC F3 F4

PANE

SHIFT

.

The buttons are now unlocked.

Cancelling a Command

Pressing 

1

0

SHIFT

ESC

DEV

PANE

MON

F1

MON

DEV

ESC F3 F4

PANE

SHIFT

 after entering an ID or number cancels 

the entry and returns to the previous command. 
Pressing 

1

0

SHIFT

ESC

DEV

PANE

MON

F1

MON

DEV

ESC F3 F4

PANE

SHIFT

 after pressing a command button 

cancels the command and returns to the default 
screen.

Press a camera ID after selecting a monitor.

 Pressing 

1

0

SHIFT

ESC

DEV

PANE

MON

F1

MON

DEV

ESC F3 F4

PANE

SHIFT

 cancels the entry and returns to the 

previous command.

Press the camera ID.

Press 

1

0

SHIFT

ESC

DEV

MACRO

PANE

MON

F1

MON

DEV

ESC CAM

F3 F4

PANE

SHIFT

MACRO

Auto

Pan

Light

ON

Aux

ON

Alarm

 Reset

Tour

Home Menu

Pattern

CAM

.

The video for the selected camera is displayed on 
the monitor. Pressing 

1

0

SHIFT

ESC

DEV

PANE

MON

F1

MON

DEV

ESC F3 F4

PANE

SHIFT

 cancels the command 

and returns to the default screen.

Now you can press a new command.

Summary of Contents for NK-1100

Page 1: ...Powered by Network Keyboard Operation Manual NK 1100...

Page 2: ...e seek technical assistance from their retailer regarding product installation and use If you need to disassemble the product for functionality expansion or repair purposes you must contact your retai...

Page 3: ...o lightning and power line surges 10 Overloading Do not overload wall outlets and extension cords as this can result in the risk of fire or electric shock 11 Objects and Liquids Never push objects of...

Page 4: ...t responsibly to promote the sustainable reuse of material resources Household users should contact either the retailer where they purchased this product or their local government office for details o...

Page 5: ...Panel 12 Top Panel 13 Part 2 Installation 14 PTZ Camera Registration 14 Basic Mode 14 Advanced Mode 15 NVR System Registration 16 Video Management System Registration 18 Part 3 Operations 19 Overview...

Page 6: ...27 Button 28 LCD 28 Audio 29 Network 29 IP Address 29 FEN 30 Devices 30 General 30 Setup 30 Functions 33 Macro 34 Button 34 Part 6 Appendix 35 Troubleshooting 35 Buttons 35 Operation Commands 36 Contr...

Page 7: ...a network connection Controls for various models of PTZ cameras via RS485 connection Two way audio communication Convenient firmware upgrades via either the USB port or Ethernet Firmware duplication a...

Page 8: ...ore information see Part 2 Installation PTZ Camera Registration Controls for NVR Systems Network Cameras Network Cameras Monitor Network Keyboard NVR NVR NETWORK Monitor You can control NVRs and PTZ c...

Page 9: ...keyboard Recording Update Administration Monitoring Streaming Video Analytics Network Cameras Client You can control Video Management System via a network For more information see Part 2 Installation...

Page 10: ...s on The network keyboard must be off before connecting or disconnecting the joystick cable otherwise it may affect the network keyboard or cause it to malfunction ROUTE POWER CORDS SO THAT THEY MAY N...

Page 11: ...ion refer to the PTZ camera manufacturer s manual RS485 PTZ Connector Pin Outs Master Unit Slave Unit To TX RX To TX RX 6 RS485 DVR Port RS485 DVR port is not supported 7 Power In Connect the power ad...

Page 12: ...is not normal and the connection is not made while controlling a PTZ camera via RS485 connection Do NOT connect or disconnect the joystick cable while the network keyboard is on The network keyboard...

Page 13: ...and Part 4 LCD Menu Configuration 4 Device Control Buttons Controls remote devices including NVRs For more information see Part 6 Appendix Buttons Device Controls 5 Arrow Buttons Allows you to navigat...

Page 14: ...5 connection PTZ cameras with different ports can be controlled only in Advanced mode Basic Mode PTZ cameras can be directly registered using the network keyboard with the LCD menus or remotely using...

Page 15: ...RS485 communication The RS485 ID is used to distinguish it from other cameras during control with the network keyboard so each camera must have a unique RS485 ID For more information about the model n...

Page 16: ...NVR to the network 2 Run the IDIS Discovery program and connect the network keyboard for NVR registration For more information about the IDIS Discovery program refer to IDIS Discovery Operation Manua...

Page 17: ...r user is logged on to the NVR the current user must be logged off from the NVR 5 3 Click Network Video Recorder for the device list then click a registered NVR A list of monitors and cameras for the...

Page 18: ...ogram 3 Select Setup Remote Setup Network IP Address Configure the network connection information 4 Select Setup Remote Setup Device General Select Advanced in Setup Type 5 Select Setup Remote Setup D...

Page 19: ...me Menu Pattern CAM commands displays the video from the camera 1 on the monitor 1 and entering the 2 1 0 SHIFT ESC DEV MACRO PANE MON F1 MON DEV ESC CAM F3 F4 PANE SHIFT MACRO Auto Pan Light ON Aux O...

Page 20: ...SHIFT 2 The buttons are locked so press 1 0 SHIFT ESC DEV PANE MON F1 MON DEV ESC F3 F4 PANE SHIFT to unlock them 3 Enter the User password and press 1 0 SHIFT ESC DEV PANE MON F1 MON DEV ESC F3 F4 P...

Page 21: ...nnected to the NVRs via network connection You must log on as a user with permission to perform functions while controlling a NVR or PTZ camera If another user is logged on to the NVR the current user...

Page 22: ...e device control buttons you can control the NVR that the monitor is connected to 3 Press the camera ID 4 Press 1 0 SHIFT ESC DEV MACRO PANE MON F1 MON DEV ESC CAM F3 F4 PANE SHIFT MACRO Auto Pan Ligh...

Page 23: ...o management system Network Keyboard Buttons Playing Recorded Video 1 Press Play or NVR Search tab ID on the network keyboard 2 Press 1 0 SHIFT ESC DEV PANE MON F1 MON DEV ESC F3 F4 PANE SHIFT 3 Press...

Page 24: ...E SHIFT MACRO Auto Pan Light ON Aux ON Alarm Reset Tour Home Menu Pattern CAM 1 0 SHIFT ESC DEV MACRO PANE MON F1 MON DEV ESC CAM F3 F4 PANE SHIFT MACRO Auto Pan Light ON Aux ON Alarm Reset Tour Home...

Page 25: ...s the MAC address Button Beep If it is set to ON the network keyboard beeps when any button is pressed Lock Locks the buttons The buttons will be locked after a preset time of inactivity on the networ...

Page 26: ...onfigure the port information for PTZ cameras in Advanced mode you must run the IDIS Discovery program If the port information for PTZ cameras is different from each other the cameras can only be cont...

Page 27: ...settings To apply any changes and close the screen click OK System You can change system information import or export all settings change the password set up beep and lock functions for the network ke...

Page 28: ...save the settings for the network keyboard in dat file format A setup screen appears to allow you to name the setup file Do NOT check the Include Network Setup box while the network settings are used...

Page 29: ...r the network keyboard Manual Select when the network keyboard is using a static IP address for network connection and set the LAN parameters manually DHCP Select when the network keyboards are networ...

Page 30: ...c or Advanced when controlling devices via RS485 connection only or select Advanced when controlling devices via network and RS485 connection Port Select the device to control via RS485 connection fro...

Page 31: ...ick to find and list the devices connected to the network in case of network cameras only If the device connects to the network using the mDNS Multicast DNS protocol the device may not be scanned Auto...

Page 32: ...Camera Channels Select the number of camera channels supported by the device Main Monitors Select the number of main monitor outputs supported by the device If the device does not support the seconda...

Page 33: ...have a unique ID Click OK Then a message box appears to confirm the existing ID Click OK to complete the changes Name Set the camera name for your reference Type Set the type of the camera Select Fixe...

Page 34: ...nd the network keyboard performs the actions registered on the macro Name Enter the macro name No Displays the sequences of the operations in the macro The network keyboard takes actions based on the...

Page 35: ...ected to the network keyboard Check the camera settings The type of the camera must have been set to PTZ Camera On the IDIS Discovery program Setup Remote Setup Device Setup Type of camera PTZ Camera...

Page 36: ...els of all devices 1 0 SHIFT ESC DEV PANE MON F1 ON DEV ESC F3 F4 PANE SHIFT Shift 1 0 SHIFT ESC DEV PANE MON F1 MON DEV ESC F3 F4 PANE SHIFT Button Performs the secondary function for the buttons tha...

Page 37: ...to Pan 1 0 SHIFT ESC DEV MACRO PANE MON F1 MON DEV ESC CAM F3 F4 PANE SHIFT MACRO Auto Pan Light ON Aux ON Alarm Reset Tour Home Menu Pattern CAM Performs the auto pan set for number 1 Auto Pan No 1 0...

Page 38: ...ESC F3 F4 PANE SHIFT 1 0 SHIFT ESC DEV MACRO PANE MON F1 MON DEV ESC CAM F3 F4 PANE SHIFT MACRO Auto Pan Light ON Aux ON Alarm Reset Tour Home Menu Pattern CAM 1 0 SHIFT ESC DEV PANE MON F1 MON DEV E...

Page 39: ...1 0 SHIFT ESC DEV MACRO PANE MON F1 MON DEV ESC CAM F3 F4 PANE SHIFT MACRO Auto Pan Light ON Aux ON Alarm Reset Tour Home Menu Pattern CAM Displays the video of the selected screen layout No 1 full No...

Page 40: ...the function press the button again Receiving and sending audio is available only when controlling a device that supports two way audio communication via network connection This feature may not work p...

Page 41: ...ell 12 Orbiter Microsphere Ademco video 40 Pacom 2036 Pacom 13 Delta Dome II Ultra IV Sensormatic 41 CDC 2500 Costar 14 Spectra Dome Pelco 42 VRX 2201 Inter M 15 KD6 Ultrak 43 DY 255RXC Dongyang 16 SP...

Page 42: ...tion No Description 0 Unknown error 302 Remote upgrade is not authorized 1 File version error 303 Saving remote package failed 3 Software version error 304 Remote upgrade was cancelled by the user 4 K...

Page 43: ...ort Terminal block USB Port 2 on rear panel 2 0 GENERAL External Dimensions W x H x D 14 8 x 3 7 x 7 0 376 9 x 95 x 177 6 mm Packaging Dimensions W x H x D 17 9 x 6 3 x 10 0 455 x 160 x 255 mm Weight...

Page 44: ...Part 6 Appendix 44 Remote Setup System Network Function Button IP Address General Macro FEN Button LCD Audio Device General Setup Map of Screens Remote Setup Ver 1 5...

Page 45: ...IDIS Co Ltd For more information please visit at www idisglobal com...

Reviews: