7
USING AN SD CARD
7-1
7-1
About the SD card
Saving data onto the SD card
The SD and SDHC cards are not supplied by Icom. User supplied.
You can use an SD card of up to 2 GB, or an SDHC of
up to 32 GB. Icom has checked the compatibility with the
following SD and SDHC cards.
(As of March 2017)
•Brand: SanDisk
®
•Type: SD (2 GB) and SDHC (4, 8, 16 and 32 GB)
L
The above list does not guarantee the card’s performance.
L
Throughout the rest of this document, the SD card and an
SDHC card are simply called the SD card or the card.
TIP:
Icom recommends that you save the receiver’s
factory default data for backup.
NOTE:
Format all SD cards to be used with the
receiver with the built-in Format function. Format, even
preformatted cards for PCs or other uses. (p. 7-2)
NOTE:
• Before using the SD card, thoroughly read the card’s instructions.
• If you do any of the following, the card data may be
corrupted or deleted.
- You remove the card from the receiver while the card
is being accessed.
- A power failure occurs or the power cable is
disconnected while the card is being accessed.
- You drop, impact or vibrate the card.
•Do not touch the contacts of the card.
• The receiver takes a longer time to recognize a large
capacity card.
• The card will get warm if continuously used for a long
period of time.
• The card has a certain lifetime, so data reading or writing
may not be possible after using it for a long period.
When reading or writing data is impossible, the card’s
lifetime has ended. In that case, use a new one.
We recommend you make a separate backup file of the
important data onto your PC.
• Icom will not be responsible for any damage caused by
data corruption of a card.
You can save the following data onto the card:
• Data settings of the receiver
Memory channel contents saved in the receiver.
• Communication contents
The recorded audio.
• Communication log
The receive history log.
• FSK (RTTY) decode log
The received FSK decode history log.
• Captured screens
Inserting or removing the SD card
D
Inserting
Insert the card into the slot until it locks in place, and
makes a ‘click’ sound.
• Displays the SD card icon when the SD card is inserted.
L
Be sure of the card orientation.
D
Removing (While the receiver is OFF)
Push in the SD card until a click sounds.
•The card is unlocked, and you can pull it out.
L
If you remove the SD card while the receiver’s power is
ON, be sure to unmount it.
Inserting
Removing
Lights blue
Turns OFF
1. Push
2. Pull
Cutout
LOCK
SD
LOCK
SD
D
Removing (While the receiver is ON)
Proceed the unmount as shown below, otherwise the
data may be corrupted or deleted.
1. Open the SD CARD screen.
2. Touch [Unmount].
•
Unmount confirmation dialogue appears.
3. Touch [YES].
•"Unmount is completed." is displayed.
4. Push the SD card, then pull it out.
D
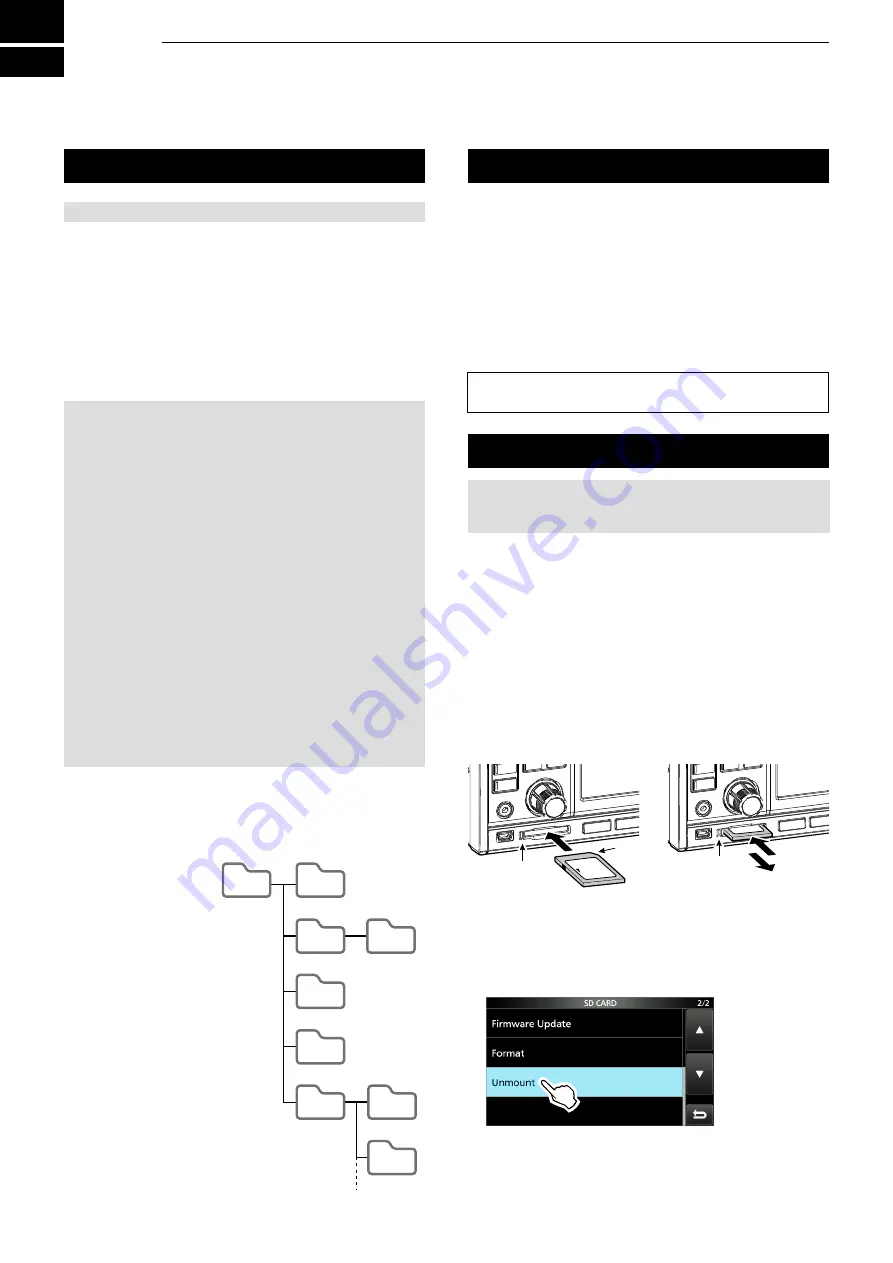
SD card’s folder contents
The following folders are created in the SD card.
q
All folders are
contained in this folder.
w
The captured screen
data (‘.png’ or ‘.bmp’).
e
The FSK decode log
folder is created.
r
The received FSK
decode log data (‘.txt’
or ‘.html’).
t
The receive history
log data (‘.csv’).
y
The receiver’s setting
data (‘.icf’).
u
The recorded audio
data folders are created.
i
Recorded audio files
(‘.wav’).
IC-R8600
q
w
e
r
t
y
u
i
i
Capture
Decode
Fsk
yyyymmdd
yyyymmdd
RxLog
Setting
Voice
The folder name is automatically
created in the following format:
yyyymmdd (yyyy:Year, mm:month, dd:day)
Hierarchy1 Hierarchy2 Hierarchy3


