


Attention
To ensure rack stability, plan the installation of servers
in the rack starting from the bottom.
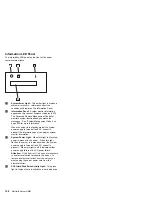
To attach the mounting hardware to the rack:
1. Remove the rack front door. Refer to the rack
documentation for instructions.
2. Mark the positions of the slide-bracket assemblies,
bezel brackets, and the cable-management arm on
the rack:
a. Position the installation template on the front
mounting rails on the rack, aligning the holes.
b. Mark the holes for the slide-bracket assemblies
and bezel brackets.
c. Move the template to the same U level at the
rear of the server and mark the locations for the
slide-bracket assemblies and cable-management
arm.
d. Install the six cage nuts at the locations marked
on the mounting rails for the cable-management
arm and bezel brackets.
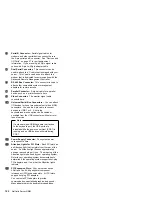
3. Attach a slide-bracket assembly to the front of the
rack:
a. Position the slide-bracket assembly behind the
mounting rail so that the slides will extend out
from the front of the rack.
Netfinity 7000-M10 - Type 8680
125
Summary of Contents for 86803RU - Netfinity 7000 M10
Page 2: ......
Page 8: ...vi Netfinity Server HMM...
Page 110: ...1 5 6 9 102 Netfinity Server HMM...
Page 232: ...224 Netfinity Server HMM...
Page 249: ...Related Service Information 241...
Page 250: ...242 Netfinity Server HMM...
Page 251: ...Related Service Information 243...
Page 252: ...244 Netfinity Server HMM...
Page 253: ...Related Service Information 245...
Page 266: ...258 Netfinity Server HMM...
Page 267: ...Related Service Information 259...
Page 268: ...260 Netfinity Server HMM...
Page 278: ...IBM Part Number 09N1052 Printed in U S A S 1K 4643 2...


